| SJ23 Tech Tip A11, (Updated 2022-07-17) Bob Schimmel, Doug Murray & Jim Dalessandro | |
|
Winter Storage on a Trailer - Protection Against the Elements. |
|
| On
the Canadian prairies, and where ever else it freezes, a wise sailor will pull their boat out of the water
in the middle of October, about a month before hard freeze up to let the interior dry out. The greatest
risk for a working stiff is
not having good weather to haul out on a November weekend.
Even if you are retired, whatever that is, you will have to haul out on a weekend if
you get
help from a younger guy who still works. In near freezing weather there is also an increased risk of
injury as you
stumble about the wet, slippery launching ramp in your cold weather gear. A launching ramp can be a miserable place in November. Water at this temperature seems to take on the property of very
light oil. Add some character building snow and you have a combination that
separates the men from the boys and filters the wise ones out to
a pub to discuss politics over hot libations! Freezing weather and
near freezing water can be a deadly combination! But it can also be
extremely invigorating! Ah the challenges of life. The weird properties of water make it one of the most unique fluids on Earth. Weird may surprise many people since it is the fluid we are most familiar with, yet many don't understand its properties all that well. For instance;
One thing is for sure; you can't stop water, you can only redirect it, and I'm not sure for how long. OK, enough of physics! NEAR FREEZING CLIMATE - A near freezing climate is probably the hardest on a boat. Provide lots of ventilation during storage to prevent rain and condensation damage. This is particularly important during a very moist southern US winter. An incredible amount of rot can occur in this weather. You must take every effort to prevent mould from taking a foot hold on a boat. Wood rot occurs only with fresh water. For this reason it is important to use a water proof tarpaulin that is held off the hull using a framework similar to one shown below. Better yet, park the boat in a breezeway, in a barn or in a machine shed with open exposure to the sun. FREEZING CLIMATE - If you live in a freezing climate you know that freezing water can do a lot of damage to a boat as the ice expands inside a crack. This is the reason why some prairie owners in Canada store their boat in a heated warehouse where they can also work on it in comfort, with electrical power near by. I'm jealous. The rest of us 'peons' work on our boats outside, under a tarp with ends open to promote ventilation while we patiently wait for a warmer day. Failing that, we take a project home. If you are one of those 'peons' then you should dry the hull before freeze up. Drying is particularly important to evaporate water that may have collected against the "mush" that binds the hull to the liner. It's not difficult to imagine the damage what freeze/thaw cycles can do, spreading the laminates apart where you can't see them. Then you have to consider water absorbed into the fibreglass over the course of the summer. This is why the hull too must be air dried. Best to park the boat at least a month prior to freeze up so it will be bone dry going into winter. WINTER BOARDING ACCESS - It is not advisable to board the boat while stored on the trailer when the hull is at -5C (25F) or colder. Leave boarding till the hull has warmed to about freezing temperature. The reason for this is to protect the gel coat from cracking under your body weight. This is also why you should shore up the trailer frame so the boat can't rock in the wind. For this reason, take your projects home in the Fall. Don't worry, she'll be OK during the winter! WATER IN HULL - It's a deep
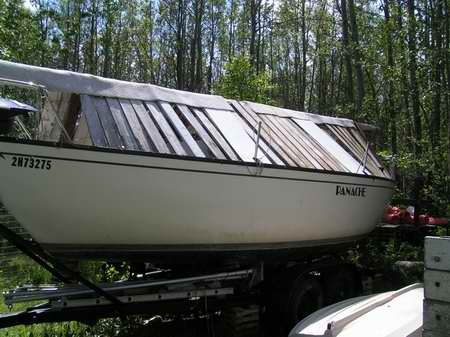
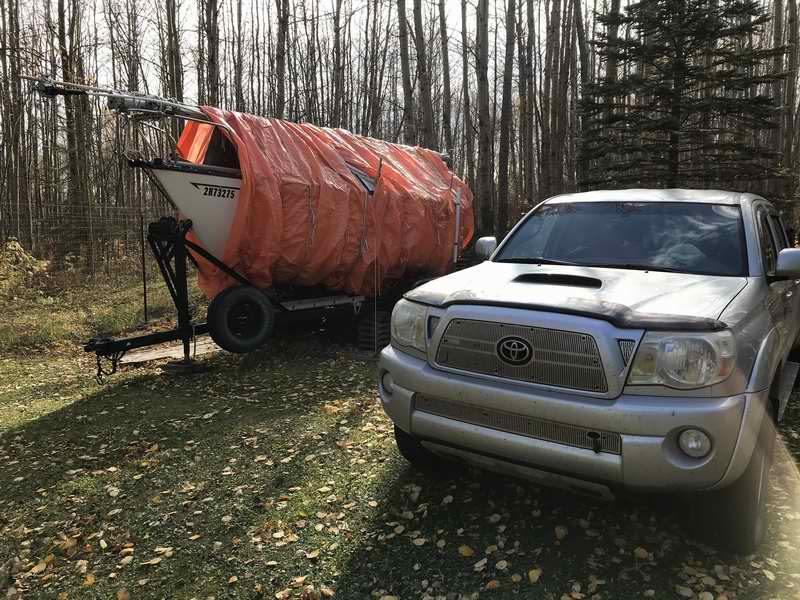
freeze on the Canadian prairies in winter, so: FOOD - Removed from boat to deter critters from entering. Mice are actually attracted to matches so remove them as well. THRU HULL - Set the thru hull ball valves to half open so the void between the ball and the socket can dry. This simple precaution ensures that a valve body can't crack and sink the boat next summer. HATCHES AND DOORS - The cockpit lockers are left closed. The forward hatch is left 1/2" open. The bottom board of the companionway is left in place. The top board is swapped for one equipped with a squirrel proof screen. All this to promote ventilation and keep critters out. CUSHIONS - Some people remove their cushions which is probably a good idea in a humid climate. I leave them on board, propped on edge away from the hull. It is bone dry here in winter and they survive just fine. DEHUMIDIFIER in NEAR FREEZING WEATHER - A friend of mine, who stores his boat "on the hard" at the west coast of Canada, recently described the benefits of using a dehumidifier versus a small heater to keep the boat dry and fresh. Both devices use the same amount of electricity. He used to keep the cabin above the dew point with a small heater placed on the cabin floor It didn't do much good since the musty smell was there each time they returned to the boat. It was a chore to clean the cabin. Now he runs a dehumidifier resting over the sink so the water drains out the hull. It keeps cabin temperature at 5C and the cabin smells fresh when they return to the boat. The bonus is no mould and no clean up. If you don't have access to shore power for your floating boat, the best alternative is to store the boat under a roof with plenty of natural ventilation to keep it dry. Some occasional warmth so you can work on it is also a good idea! Warmth, what a pleasant thought. Shown below are several winter covers for storing a boat in the Canadian "bush", probably the most difficult of all situations. These two boats are stored only 20 KMs from each other in central Alberta, yet each has diversely different cover requirements due to microclimate from sheltering trees. Lots of snow can settle in the shelter of trees that does not accumulate in an open area. It is not uncommon to have 1M deep snow around Panache's trailer and nothing around Siesta's trailer. TARP - There are several schools of thought for the tarp;
I've tried all 3 for Panache and have settled on #3; quickest to deploy with no damage to the gel coat. I wrap the tarps tight to Panache's hull
using lots of lines around the hull to keep the tarps still in the wind. The ends are kept open for ventilation. Once the
snow settles on the tarps all movement stops and I no longer concern myself about
them moving or coming loose. |
|
SOLUTION
- I go through a well rehearsed ritual to prepare
Panache
for the ravages of old man winter.
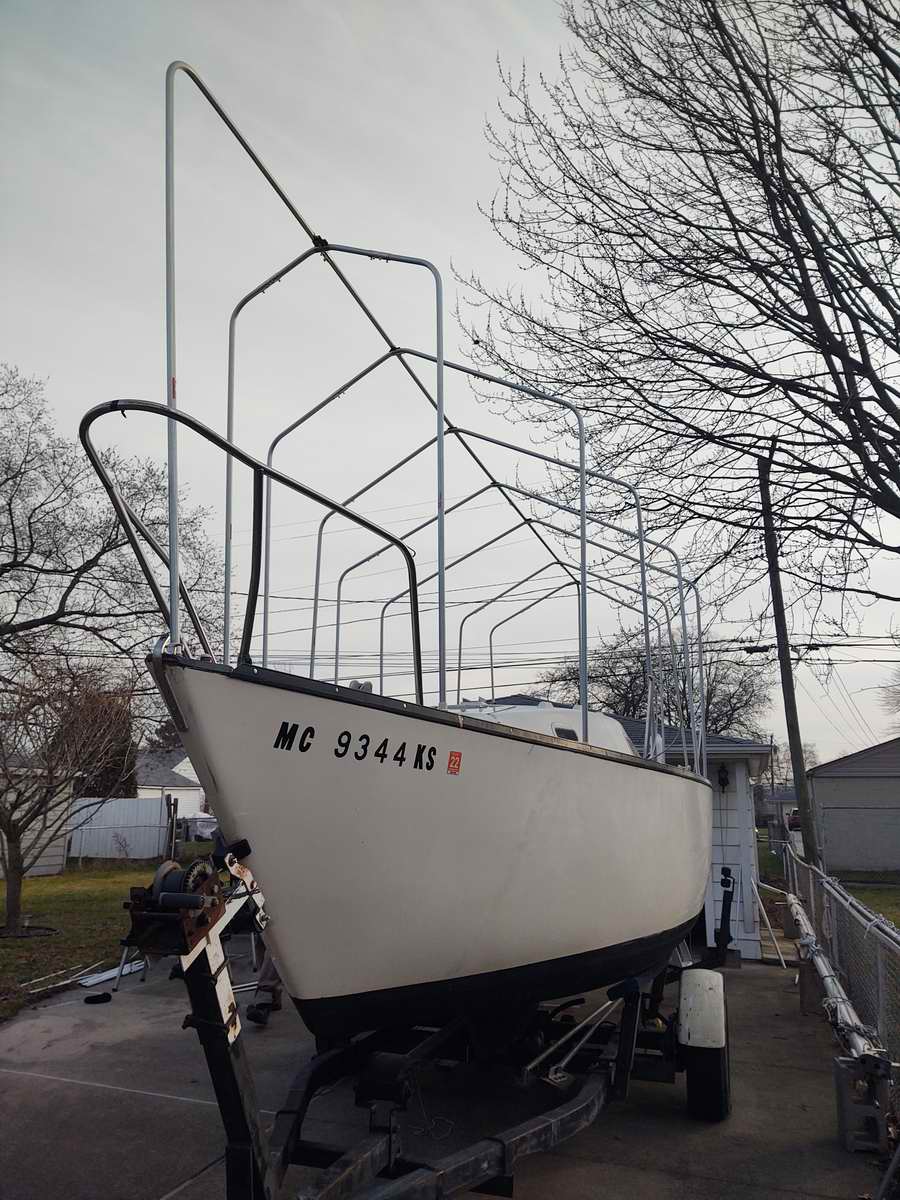
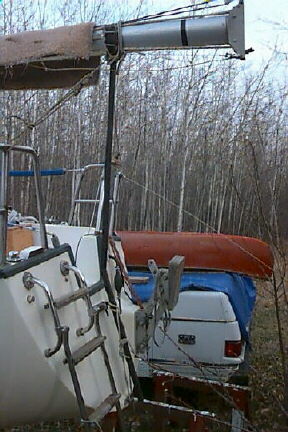
Shown below is Panache's transom mast support post standing on the gudgeons. It's welded from 1" square steel tubing with pintles that fit on the gudgeons. The top pintle is tied to the gudgeons to prevent the post from popping up. The top of the post is also tied laterally to the pushpit to stabilize it sideways for towing. The yoke at the top is lined with rug to protect the mast. The mast is tied to the post with 1/4" line at the yoke. I doubt it could pop out of the yoke on its own but the line also prevents movement and chafe. As an alternative you could build a wood A frame to stand in the back of the cockpit. Remember to leave the drain holes open. Rug on the bottom should keep in from sliding around.
These
photos were taken on Dec 20, 1997 during a very warm El Nino. The
00C temperature is definitely NOT typical of a
Canadian prairie winter as it is usually around -100C in late
December, making
delicate outside work somewhat difficult! I took advantage of this mild
weather to remove and repair my centerboard. Two days later a cold front
blew in
and we received our promised winter when the temperature plummeted to
-300C, in just two hours. Now you know why preparation up
here is everything.
TOP
|
|
|
TARP SUPPORTED with a PVC FRAME (Doug Murray - Ver 1, 2001). |
|
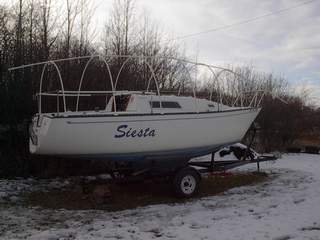
| In the winter of 2001 I pulled a tarp over Siesta's mast and
tied it down, similar to the technique shown above but without the
support planks. Because the foot of my mast is supported under the rail of the
pulpit, the tarp sat quite low. Besides not being able to comfortably do
my pre-season work under there (due to low head clearance and many
lines in the way), the tarp trapped snow in the hollows between the
lifelines, mast and spreaders. They ultimately became blocks of ice
despite the light snow fall over the winter.
I was concerned that the unsupported spreaders might be
damaged by the heavy weight. Obviously the heavy snow and ice doesn't do the hull any
good!
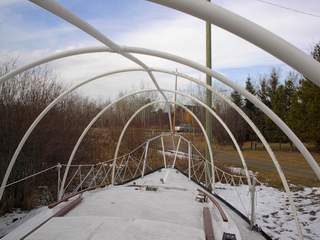
BACKBONE, VERTEBRAE & RIBS - The six ribs attach to the backbone with a vertebrae or PVC cross connector. All the ribs are installed on the outside of the lifelines to minimize wear on the tarp from the stanchions. Don't tie the frame to a stanchion. With the wind blowing against the tarp it will likely loosen the base in the deck leading to a leak and wood rot of the core. When the cross connectors and short straight sections are assembled fore and aft, they form the backbone. The two front ribs are cut from two sections of tubing and the remaining ribs are single sections pushed through each cross connector. Cut each pair of front ribs the same length to ensure that the backbone is straight. I had difficulty keeping the two front ribs attached to the inside of each vertebrae because the radius of the bend was too tight. They just popped out. I happened to have a 10" dowel which just fit inside the tube and that was enough to keep each rib inside a vertebrae. The other ribs are continuous with glued joints and posed few problems. The tubes I bought came with a flared end to allow for continuous tubing. When glued together, the joints seem to be strong enough to withstand the radius of the bend. However, I did use them over the cockpit where the radius is large. If you can't find tubing with flared ends, then use a dowel or 10" length of 1/2" PVC tubing slipped inside the 3/4" tube. You will have to cut a lengthwise slot in the 1/2" PVC to do so.
I eye-balled the alignment of the backbone and it seems pretty good. The cross connectors can be adjusted from side to side by the length of each rib, which also determines the height of the backbone. Build the tallest ribs first in case you make one too short. I built the center section taller than the ends. So measure twice, trial fit and then glue all the joints. FEET - There is lots of strain on these ribs so I installed a T fitting at the end of each rib to strengthen them where they straddle the toe rail. The T fittings make excellent feet and distribute the forces to prevent the rib ends from splitting. To secure the T connector to the toe rail cut a slot across the "top" of it with a carbide tipped blade in a table saw. This makes a nice tight fitting groove that slips over the top of the toe rail. It also to keep it in place. The T connector feet are glued onto each rib end with PVC solvent and tied to the toe rail. It's not shown in these photos but the frame were secured with diagonally tied opposing lines. This is the only way they can stand up to the wind. This was one nice tarp to work under. Surprisingly warm when the sun shone. TOP
|
|
|
The T connectors and joints are glued. All other joints are held together with a #10 by 1/4" screw. Pre-drill the screw holes. The whole project took me about three hours and I didn't work particularly fast. After all it was Saturday and no one was paying me! Total cost of PVC material was about $41.00 (CAN) at Home Depot, not including the tarp, rope and bungee cords. I don't remember how much I paid for the tarp but they vary in price depending on quality. You might want to buy one or two extra fitting in case of a mistake. Most retailers will accept returns on this type of material. I have one section of pipe left over for repairs and the bow and stern ends could be shortened a bit to create more slope and add rigidity. Frame PVC material list:
|
|
|
FLOATING BOAT - If you want to cover a floating boat you need to figure out a way of
tying the tarp down. One suggestion would be to make the slot in the
bottom for the T connectors a little wider and simply "pin" the
tarp to the toe rail under each frame end. You could also cut lengthwise
slots in short lengths of PVC pipe and use them to pin the tarp along
the toe rail between the T connectors much in the same fashion as a
clothes pin. This will create a very tight cover and perhaps allow too
little ventilation. Mine was quite tight as described and I opened the
ends during spring thaw to minimize condensation. If you did
pin the tarp over the toe rail you should also tie the frame down to
prevent the wind from moving the whole assembly onto the Commodore's
Porsche parked in the driveway. Some of my frames are lashed to adjacent
stanchions. |
|
|
TARP SUPPORTED with a PVC FRAME (Doug Murray - Ver II, 2002). |
|
|
Version II uses 2" ABS. The vertebrae have been eliminated by drilling 1" holes in the 2" ABS to insert the rib ends into. T fittings are not available in this size combination. Shown at left is the backbone with the holes drilled about 600 from each other to receive the ribs. (This angle is entirely dependant on how high you want the backbone to be off the deck). Keep at least 1" of material between each pair of rib holes in the backbone to retain as much strength as possible. Drill the holes slightly oversize to give the ribs ends some play. Each set of ribs were lashed for security and overall strength.
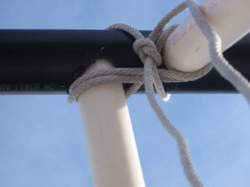
Since the backbone of this design is one piece, it is automatically stronger and straighter than a sectional backbone. The frame was erected by installing the two middle ribs first, then the end ones. Cutting the remaining ribs to length was easy. I suggest labeling the ribs by their station number, bow to stern. After the frame work was assembled, we steadied the sideways movement with a support line tied from the toe rail, over the backbone to the toe rail on the other side, at each set of ribs. Use a clove hitch knot over the backbone and a truckers rolling hitch at the toe rail. By tightening the lines a bit we pulled the backbone down to bend the ribs outward. This added form stability. It takes a considerable amount of pull to induce the bend, hence using a truckers rolling hitch knot. We also tied a line fore and aft to steady the frame in that direction. MATERIALS LIST
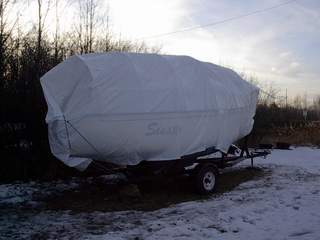
Despite the fact that the backbone of this temporary redesign
was too high, being just beyond our arms, the frame is
extremely strong. It was rock
solid when we pulled the tarp over it. The following year Doug lowered the
backbone so the ribs are approximately 5' long and closed the open tarp ends
some to
scoop less wind. The tarp now hangs lower down the hull which protects the gel coat. After
three months of winter the frame was still intact and the snow did not stick to
the tarp, evident by the neat piles of snow along the drip line of the tarp.
Bob S TOP
|
|
|
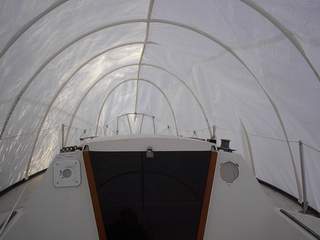
CONCLUSION - The tarp pulls easily over the Version I frame. If you want the framework to stand up to strong winds, add internal guy lines from the backbone to the toe rail. The frame has lots of height in the cockpit and adequate room to move around on deck. It is possible to work sitting on the bow. With a heater you would be quite comfortable working on the boat in winter. That was the purpose of this design. Version II frame is much easier to erect, stronger and sheds
the snow completely. Unfortunately it has more wind resistance
than I like but Siesta is well protected from wind where she sits so it
wasn't an issue. The framework can be made lower if you don't require
sitting clearance on the deck. After all
you can't possibly work on the boat every winter, can you? Remember to include the stanchions under the cover.
Otherwise you loose the advantage of this frame. TOP
|
|
|
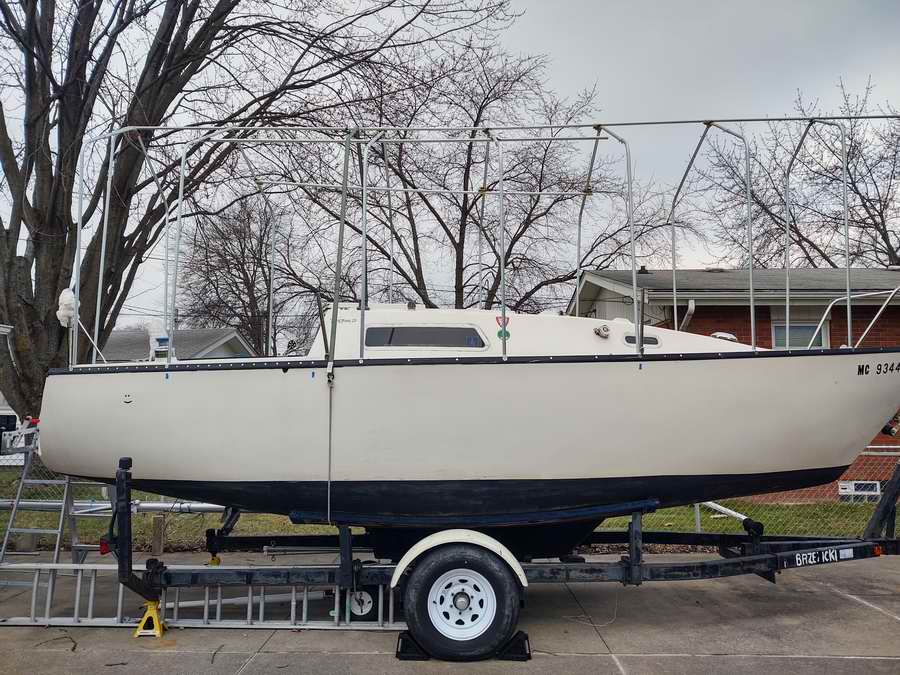
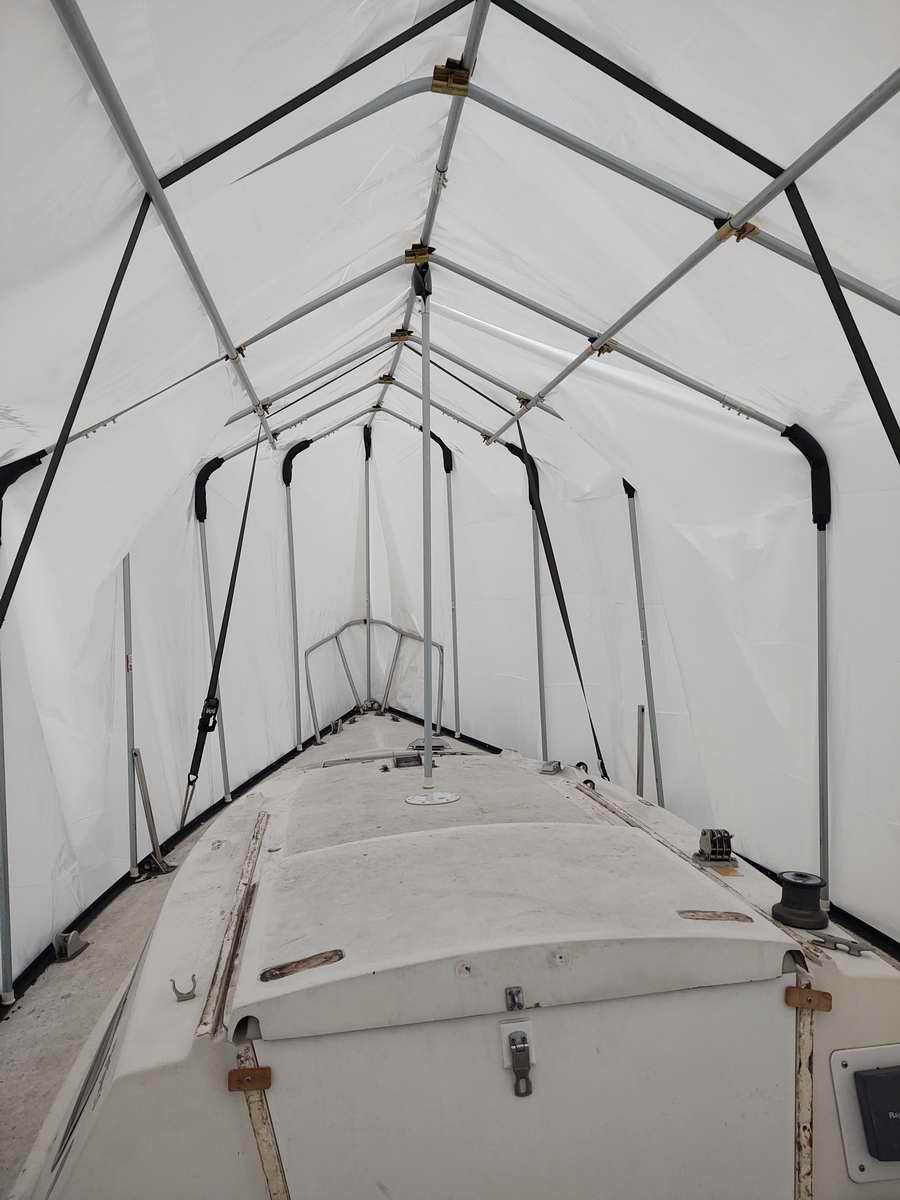
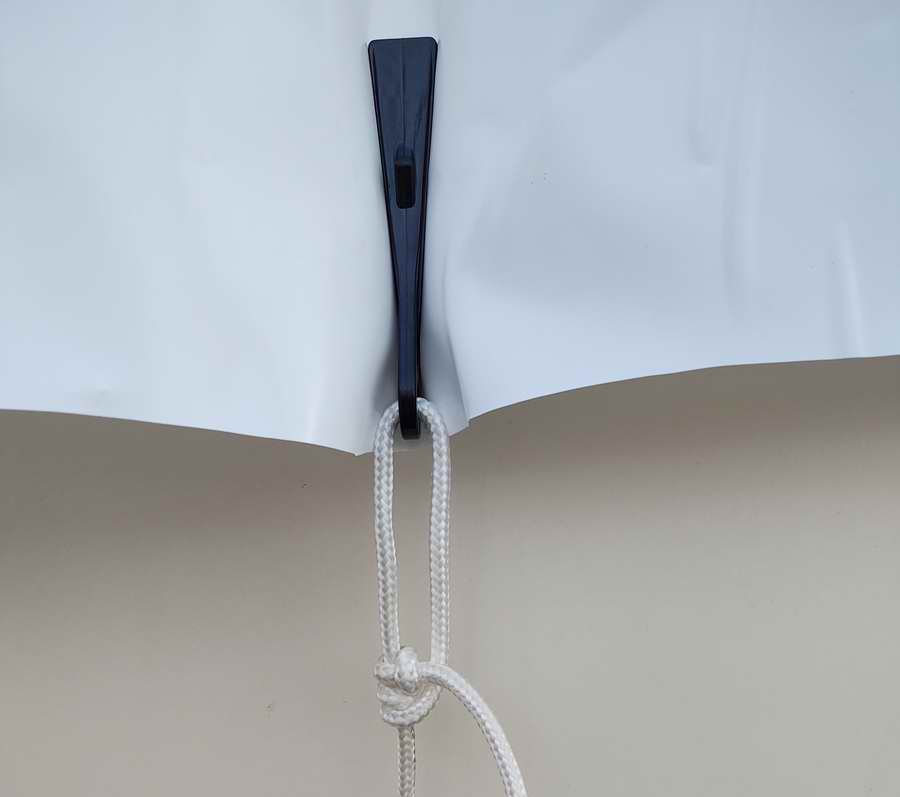
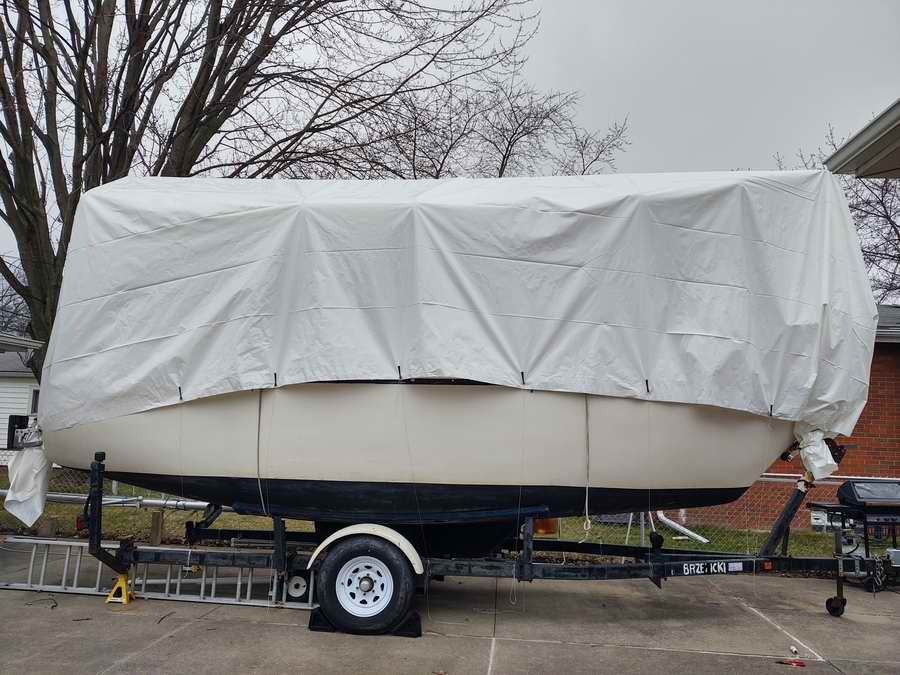
I've done a tremendous amount of work on my boat. It was basically a basket-case when I bought it. I've cut out and re-cored the balsa in the forward deck using new foam core and fibreglass, stripped and re-mounted all the deck hardware using butyl tape and much, much more. The deck is now 100% water tight and the cabin is bone dry. But one of the best things I did was to build a winter enclosure with 6' headroom over the deck. It makes working on the boat a pleasure. Being in Michigan, it needs to hold up to high snow load and occasionally 60 mph winds. The system I used is from a company called Kover Klamps. Using their Klamps and electrical conduit, which you can buy anywhere, it's an affordable way to build a super strong framework. Then I did something different. I bought a remnant of shrink wrap ($30) that was big enough to cover my boat but I didn't shrink it. Kover Klamps also makes something called Kover Klips which can lock on to any type of covering material without making a damaging hole. Each Klip can hold up to 150 lbs tension. So far I've used this system for 2 winters and the shrink wrap shows no signs of wear. I think I can get many years of use out of it. The inventor has thought of everything. He even includes color coded labels so you can reassemble the frame year after year. Its the Kover Klamp connectors that make the difference in this system.
|
|
|
Return to Tech Tip Index. . . . . . . . . . . . . . . Have a Question? |
|

 To
attach the cross connectors to the straight sections, I reamed out the inside of the connector
(backbone direction) so it would slide over the pipe. Use a Dremel tool with a sanding
drum. Then I cut suitable lengths of tubing so each cross connector was
positioned over a set of ribs.
To
attach the cross connectors to the straight sections, I reamed out the inside of the connector
(backbone direction) so it would slide over the pipe. Use a Dremel tool with a sanding
drum. Then I cut suitable lengths of tubing so each cross connector was
positioned over a set of ribs.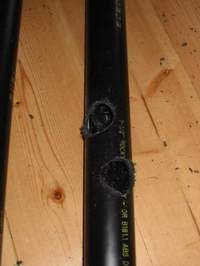
 I
was surprised at how much snow was on the tarp when I found it collapsed at
the end of winter last year. Although I don’t know if it accumulated
before or after the collapse. So the frame was redesigned to use
larger diameter components (shown left and right) for additional strength.
I also wanted to make a steeper roof to shed snow easier. My sense of
the weakness in version I was that too much flex contributed to the failure,
especially in the ribs. Stronger and stiffer ribs will stand up to the
wind loads better and shed the snow off the tarp. There is a trade off
between low profile (aerodynamics) and the slope (snow shedding).
I
was surprised at how much snow was on the tarp when I found it collapsed at
the end of winter last year. Although I don’t know if it accumulated
before or after the collapse. So the frame was redesigned to use
larger diameter components (shown left and right) for additional strength.
I also wanted to make a steeper roof to shed snow easier. My sense of
the weakness in version I was that too much flex contributed to the failure,
especially in the ribs. Stronger and stiffer ribs will stand up to the
wind loads better and shed the snow off the tarp. There is a trade off
between low profile (aerodynamics) and the slope (snow shedding). 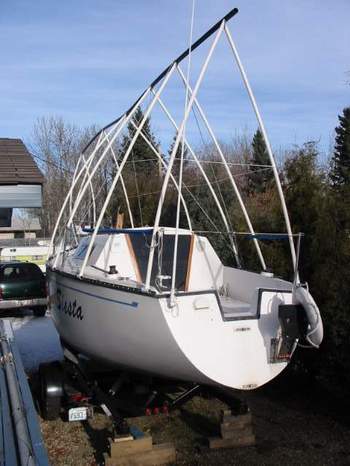
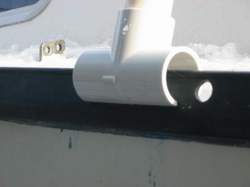 At
left
is the foot of a rib showing a 1" PVC T-fitting straddling the toe
rail. The T-fitting is glued to the foot of each rib for
strength and stability. Bob and I also considered just
setting each foot against the inside of the toe rail and lashing them in place
but this idea was abandoned after seeing how
much rigidity the diagonal support lines added, so we opted for the adjustability of
sliding feet along the toe rail. This made it easy to square a rib to
the backbone.
At
left
is the foot of a rib showing a 1" PVC T-fitting straddling the toe
rail. The T-fitting is glued to the foot of each rib for
strength and stability. Bob and I also considered just
setting each foot against the inside of the toe rail and lashing them in place
but this idea was abandoned after seeing how
much rigidity the diagonal support lines added, so we opted for the adjustability of
sliding feet along the toe rail. This made it easy to square a rib to
the backbone.