| SJ23 Tech Tip F28, (Updated 2017-05-26) Alan Weld, Glen & Bob Schimmel | ||
|
Mainsail Traveller & Mainsheet. |
||
|
When Panache's mast was pinned down to near horizontal (the cockpit sole almost vertical) I found myself struggling to stay on the high side of the cockpit with my feet against the slippery side of the cockpit foot well. The slightest movement would cause me to loose my footing, slipping into the water. I can't remember what I clung to as I crawled to the high side where my weight could afford the most righting force.
Once I was braced in the cockpit I couldn't reach the traveller control line (factory design) or release the mainsheet since both were at the low side, well out of my reach. Releasing the jib sheet was totally out of the question because it required moving to the low side of the hull. By moving out of the bottom of the cockpit I could actually feel the hull rolling over further. By shifting my body weight back to the bottom of the cockpit I managed to keep the mast just above horizontal. At the time of the knockdown I was having a conversation with an adjacent SJ23 and not paying much attention to the weather coming at us. We were sailing in a circle, opposite each other and Panache was upwind of the other boat, blocking their view of the incoming wall of the wind behind me. It was one of the few times I did not have the mainsheet in hand in threatening weather. What a mistake that was. Read Glen's explanation of a knockdown below. In addition, the cam cleats on my traveller car were worn so bad that the wind force simply pulled the control line backwards through the locked cam, sending the car to the leeward side. Panache survived the knockdown intact. But enough of this nonsense. I was not about to repeat this fiasco. FACTORY TRAVELLER - While paying attention to the weather is very important, having hardware that works at any angle of heel is also important, unless you always sail in mill pond weather. The problem with the factory traveller configuration is that when the car slides to leeward it takes the end of the control line with it, leaving the end of the control line hanging out of the cam cleat. While a ball on the end of the line is a good idea, you must go to leeward to pull the car back to windward. Not many crew feel comfortable leaving the high side (a somewhat desirable position to sit when the boat is heeled at 300 or more!) with the hull heeled well over. The dead end of each control line is tied through a hole at the end of the track. Not elegant but it works. Another problem is that two loose control lines exiting so close to each other at the car means they will eventually snarl, making it difficult to move the car.
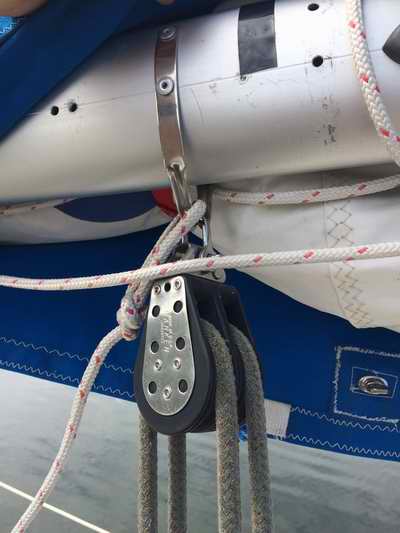
MAINSHEET BLOCKS
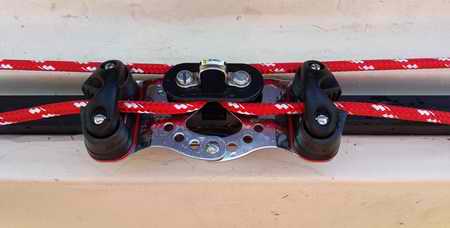
- Shown here is Panache's mainsheet hardware. It has 5 blocks
with 38' of 1/2" line. The top double block is a Harken and
the bottom is an Easyblock with dual cams. Both are ball bearing from the
late 1990s. The angle of the dual cams on the
bottom block are adjustable so a crew can easily release the sheets with a
downward pull. If both sheets are pulled simultaneously it is very quick to pull in or
release the boom. In heavy weather I only operate one sheet since the
ratio goes from 2:1 to 4:1.
The line could be spliced at the ends to create an endless sheet but I have never done that. By the time I acquired Panache the line was too old to splice. The bottom block is supported by two Harken springs to
keep it standing upright in light air.
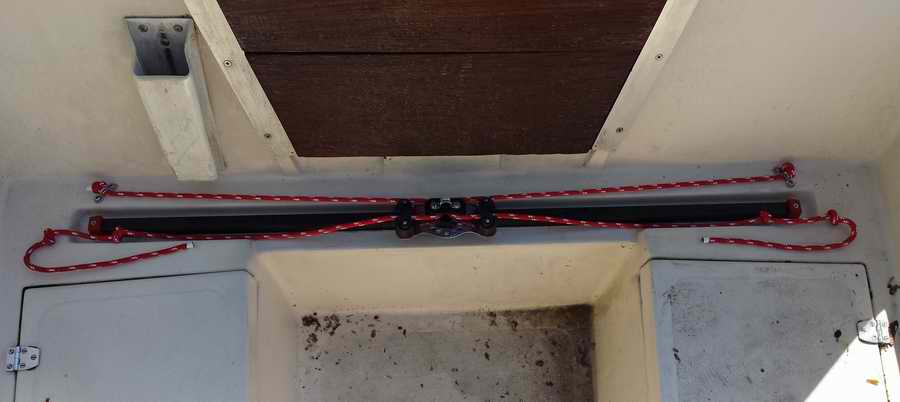
TOP NEW TRAVELLER CONTROL LINE - After judging the pros and cons of several traveller control line systems on various boats around here I chose the endless 5/16" control line as it offers complete control of the car from either side of the cockpit. An endless line can't snarl and is always within reach regardless of the heel of the hull or which side of the cockpit the crew is at. In addition, many sailors on our lake use an endless line which is an advantage when crew moves from boat to boat. However, I didn't want the position of the new sheave box and cam cleat on the cockpit wall to interfere with the creature comfort of wedging my back against the cabin, my favourite cruising position. So I installed low profile hardware that doesn't jab into my butt.
The 5/16" control line is spliced to the starboard eye strap. It then goes around the mainsail car turning block, back to the starboard cam cleat, up through the cam cleat, across the cockpit to the port side, down through the cam cleat, around the port block on the mainsail car, and finally back to the port eye strap where it is terminated with a splice. Leave about 1' of slack to operate the control line. This shouldn't foul the car. But if it does, then hang the slack in the cockpit foot well. The amount of slack you feel comfortable with is probably determined more by your agility and the requirements of your sailing than anything else. The tensioned portion of the control line running along the track is low enough in the track recess that it isn't a tripping hazard. The loose portion of the control that is between the two cam cleats is shown forward of the traveller (cabin side) to separate it from the mainsheet. This helps to minimize tangles. You can always reverse this to meet your needs. The control line is 15' long, 3 times the beam of the cockpit.
To position the car to weather, the control line is pulled
through the cam cleat
on the high side of the boat till the car is in the desired position.
To position the car to leeward, just release the line and the mainsail
will pull it across. Once the car is at the desired position,
set the line in the cam
cleat to lock the car. This applies to either side of the cockpit as the control line
is symmetrical. However, if you release the control line from the cam
cleat while on the low side, you will have to crawl across the cockpit
to reset it. But at least you can release it from the low side should a gust come along.
If you are short handed and want to lock the car in the centre of the
traveller
then lock the line in both cleats. If you are racing or have a
second crew, that person can stand in
the companionway and easily operate the mainsail track & sheet, the boom
vang & topping lift, the halyards,
and the jib downhaul. Wouldn't want to see them get bored now,
would we!
TOP SEAL THE TRACK TO THE DECK - While I changed the control line I also resealed the leaky track mounting screws. It was a difficult job in so far that it is awkward to access the nuts under the track. There are always other "things" in the way like the galley and the wiring under the companionway. I discovered that many screws were a different length due to the varying thickness of fibreglass under the track. Some were so poorly installed that they were at 300 off vertical. Others were bent inside the hole and difficult to remove.
TRAVELLER SPECIFICATIONS - "The factory equipped ~5' long I beam track is 3/4" (19MM) wide by 1" high. There are no manufacturer markings on it but I suspect it is made by Ronstan. The car travels on four wheels located on opposite sides of the I beam. If the wheels or axle pins are worn then it might be possible to rivet new ones in." Gene Adams. The Ronstan Series 19 I-Beam Traveller System cars fit the San Juan track perfectly. Check out their catalogue. All Ronstan cars are equipped with roller bearing wheels so they roll much easier than the original factory car.
INSTALL A HARKEN TRAVELLER - Alan installed a new traveller since the factory original was worn out.
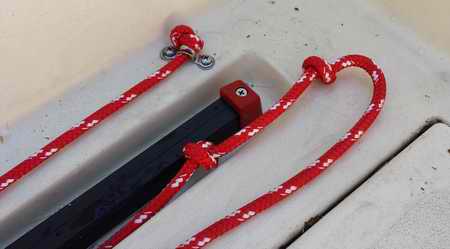
INSTALLATION - The first task was to remove the old track. The counter top prevents access to the nuts on the inside of the hull. Removing the counter is easy with the removal of 4 screws on the lower inside edge. I then disconnected the sink drain hose so I could move the counter out of the way. All the screws holding the old track were removed. I found that on my hull, the screw holes were not in the center of the track recess. The new track and car need to be perfectly centered as it is a very close fit. So, I drilled new holes for the new track. I ended up ordering 5mm bolts and locking nuts online as my local hardware store did not carry anything close. Since the bolts were thicker/longer than the original, I removed the teak edge at the back of the counter as it was not visible anyway. I then cut a couple notches in the edge to accommodate the new longer screws. I used butyl rubber tape under the track. I used ¾" sheet metal screws to attach the eye straps as the hull that is about 2" thick at that point. I used 5/16” line for the traveler. Notice the stopper knots to create a tail for grabbing line.
Alan Weld ANATOMY OF A KNOCKDOWN - Alan reported broaching his SJ23. What follows is Glen's analysis of the broach. An excellent explanation. SITUATION - "We had four crew aboard, two in the cockpit and two on the windward side deck. The main was reefed, the roller furling jib was reefed down to 100% and the centerboard was down. Winds were 15-20 MPH. We were close hauled and a strong (30 MPH?) gust came up. The boat headed upwind and we ended up with an uncontrolled tack. I tried to release the jib but the sheet got caught on the cleat. We laid fully 900 horizontal. I released the main and then the jib. The guys on the side deck managed to stay on board by holding on to the lifelines and the wood handrail. The boat righted itself immediately. I told my crew that this could not happen due to the keel. It happened. No one was hurt and we now have a great story to tell. I shared this story for your information and I welcome any constructive comments. Please be kind". Thanks, Alan. ANALYSIS - "I believe I understand the chain of events from your description and can walk you through what probably happened. This comes from experience, for I believe I have made every mistake possible on a sail boat. Some more than a few times! Your choice of sail plan was a good combination for the conditions, particularly if the air temperature was warm, which reduces the density of the air. The puff that hit you may have been associated with a strong lifting wind shift, i.e.: striking the boat more on your beam. This often occurs in areas with cliffs, tall buildings, or where micro-bursts are associated with a storm cell. With a wind increase of any kind or an increase in boat heel, the boat will begin to head up. If it is due to wind only, the boat heads up because the center of effort on the sail plan moves aft in relation to the underwater foils (keel and rudder). This relationship is what allows a sailboard to be steered without the use of a rudder. In the case of increasing heel, the asymmetry of the immersed shape of the hull drives the boat up wind. You can easily demonstrate this in calm water, with or without sails, by purposely heeling the boat and observing the course change away from the direction of heel. You can steer your boat without a rudder with a bit of practice. Shifting your weight around a hull with a locked tiller will also steer the boat. In the event of a knockdown puff, there are three things the crew can do:
There were clearly helmsman errors that led to your knockdown; round-up into a tack and second knockdown. What occurred first was a failure to see the puff coming. Usually the water to windward gives some warning. Learn to watch the water on your weather forward quadrant when sailing upwind which tells you what is coming. A hand on either the mainsheet or traveller control will allow a quick release of rig power if the gust is severe. "Puff coming!" is the courteous warning to give crew in anticipation of a change. With "Puff coming", the helmsman can pre-feather the boat by heading up a few degrees before the boat gets knocked down. Steering is much easier and efficient with less heel. This also serves to de-power the rig, which averts the downward spiral of events that will follow. In your case, the helmsman missed the opportunity to pre-feather the boat, as well as ease the main or traveller and fretted about the jib: you're not getting me to go down there NOW to ease that jib! Sequence: Boat heels strongly, rudder perhaps stalls, or also the helmsman may have instinctively fought against the added helm pressure to prevent the boat from heading up. Either way, with the boat self-tacking, it is clear that ultimately the rudder stalled and the main remained cleated. If the boat had forward motion when it came head-to-wind, the helmsman should still be able to steer onto either tack. The boat moving through the water dead upwind will not have a rudder in a stall and there are no side forces to create a stalled condition. I suspect the driver slipped at this point or was confused and/or panicked. After the unintended tack, with the jib backed, the boat got pinned down on the new tack. The main cause for being pinned was actually having the main cleated, with no means to release wind pressure. The amount of sail area in the 100% jib would not keep the boat pinned for long. You could tell your crew to look on the bright side. If your the genoa had been the sail in place, you would have been blown through the tack, and then taken all the way around in a 3600 turn, which throws in a jibe at the bottom of the loop! That's when people can get hurt, and usually occurs when the genoa winch has an overriding turn that prevents releasing the sail. Have you made that mistake yet? Most people do it several times. As for a full 900 knockdown, unless you could photograph the keel, rudder and centerboard and harvest jellyfish sushi from the spreader tips, recognize the probability of adding to a good story. Granted, after a crash tack, any crew that did not cross to the new high side are probably going to be sitting in the water to leeward. I hear it can get pretty wet down there! Alan, make no mistake, we all appreciate a good story. For preventing a repeat of these events in the future, there are a few easy fixes available that should be on your boat as it was built.
Your event brings up another idea that I keep hammering about with these boats, and that is to not sail these boats too high on a beat, particularly when using the working jib. By sailing a little lower and freer, a lot of good things happen. First, the boat is moving through the water faster, which gives more lift from the keel and rudder. The SJ23 hull has relatively little rocker, which makes them stop dead in the water if they hit big waves head-on. A lower course gives a better angle to the oncoming seas. With more speed, you can also steer more effectively, which allows you to head up or fall off more quickly when needed to steer around waves or respond to a puff. Also, by sailing a bit lower, there is a bigger region between your current course and "head-to-wind", which gives more degrees to find a way out of a disaster. And remember, having speed means you can steer your way out quicker. Feathering up into a brief luff does no harm to anything. For a sheeting reference, if your jib lead is from the toe rail and sheet tension is not excessive, and you sail with the jib full and not luffing, you are pretty close to optimum. That way, you have power and speed. If the main is luffing, a second reef doesn't hurt. Sailing high and slow is just asking to be blown over. Did I mention how important speed through the water is? For crew placement, with four on the boat, the best arrangement is to have one person aft of the driver, who serves as tactician/trimmer/lookout for boats crossing below, with the driver next and the remaining two on the side decks, which sounds like the way you sail now. During tacks, the forward crew passes under the boom, or one can cross forward of the mast to make sure the jib clears the fore triangle.
So Alan... you're fine. Boat
is fine, the crew is fine. Everyone blows a tack now and then, as observed
by the Kiwis on Emirates in the 2013 America's Cup. They almost
capsized 15 million bucks worth of flotsam by screwing up the procedural
sequence. The important thing is to keep at it and listen to the
boat talking to you, which it is doing at all times under sail. Believe in
your boat: it will bring you home."
Good sailing,
Glen TOP |
||
|
Return to Tech Tip Index. . . . . . . . . . . . . . . Have a Question? |
||

 There are so many good traveller designs today and
many of them are ergonomically designed to fit their cockpit layout for
cruising comfort or race performance that it behoves me to stay with
the original design. The
problem is to pick a design that suits the SJ23 and the style of sailing
you do! An important consideration is the nature of the winds in
your cruising area. If you usually have steady breezes, quick
response is not required. If you have gusty winds or
occasional micro-bursts, then quick response is very desirable. If
you race or sail solo you need every convenience with speed that you can get. I
chose to upgrade the original Ronstan traveller and car. Both were in good condition except for the worn cleats that I cut off, replacing them with new cam cleats and turning blocks
on the cockpit walls. The upgrade was simple to
install and quite cost effective.
There are so many good traveller designs today and
many of them are ergonomically designed to fit their cockpit layout for
cruising comfort or race performance that it behoves me to stay with
the original design. The
problem is to pick a design that suits the SJ23 and the style of sailing
you do! An important consideration is the nature of the winds in
your cruising area. If you usually have steady breezes, quick
response is not required. If you have gusty winds or
occasional micro-bursts, then quick response is very desirable. If
you race or sail solo you need every convenience with speed that you can get. I
chose to upgrade the original Ronstan traveller and car. Both were in good condition except for the worn cleats that I cut off, replacing them with new cam cleats and turning blocks
on the cockpit walls. The upgrade was simple to
install and quite cost effective.
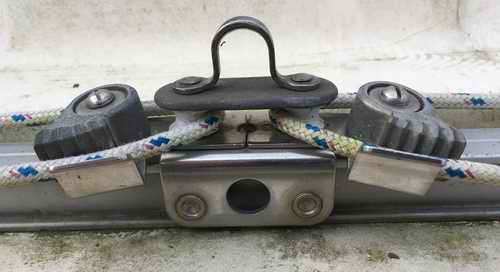
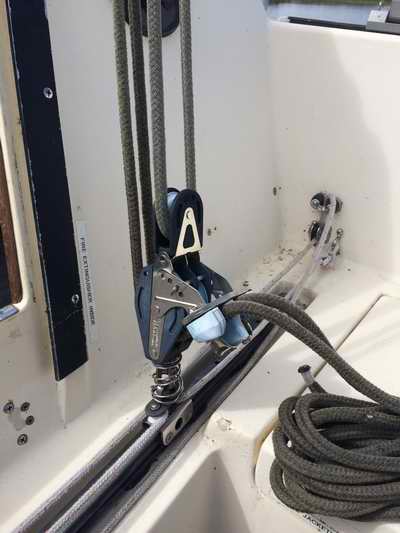 A Ronstan sheave box is mounted against
the cockpit wall, forward of the traveller. Here it is far enough into the corner so it doesn't jam into my butt.
Form
and function working together! Wonderful.
A Ronstan sheave box is mounted against
the cockpit wall, forward of the traveller. Here it is far enough into the corner so it doesn't jam into my butt.
Form
and function working together! Wonderful. 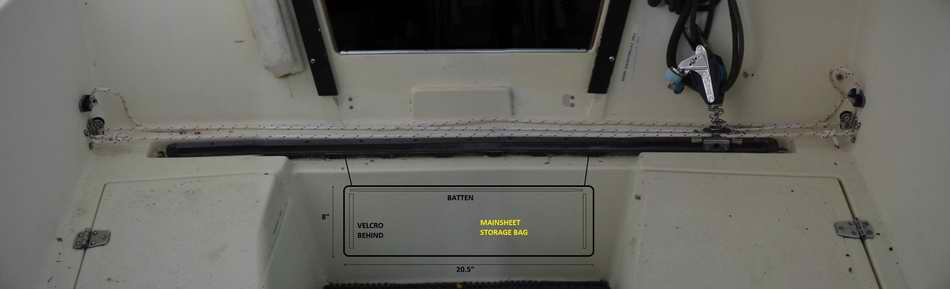
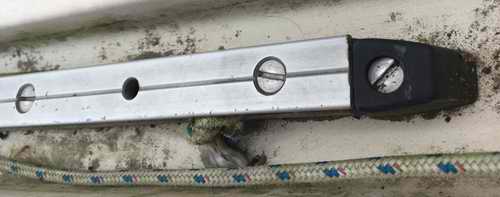
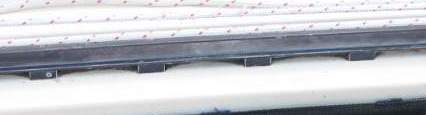 To deal with the water and dirt that accumulates
in the track recess I once contemplated filling the recess flush with the deck. Problem is, it would hurt to sit on a
surface mounted track so I stayed with the recess design. An
upgrade was in order to deal with the dirt.
To deal with the water and dirt that accumulates
in the track recess I once contemplated filling the recess flush with the deck. Problem is, it would hurt to sit on a
surface mounted track so I stayed with the recess design. An
upgrade was in order to deal with the dirt.  Unfortunately the track recess still traps some dirt but not nearly as much. However, it is now easier to wash
the dirt away with
a 3/4" bottle brush under the track and a bucket of water. Much to my surprise the underside of the aluminum track has a
groove across through which water can travel. This makes it difficult to seal and pin
point a leak. The smooth surface of the spacers make a good surface for an excellent water tight seal to the deck.
Unfortunately the track recess still traps some dirt but not nearly as much. However, it is now easier to wash
the dirt away with
a 3/4" bottle brush under the track and a bucket of water. Much to my surprise the underside of the aluminum track has a
groove across through which water can travel. This makes it difficult to seal and pin
point a leak. The smooth surface of the spacers make a good surface for an excellent water tight seal to the deck.