| SJ23 Tech Tip G08, (Updated 2025-07-03) Bob Schimmel | |||||||||||||||||||
|
Install a Deck Fitting. |
|||||||||||||||||||
| Generally the first sign of a badly installed deck
fitting is a leak. The leak may be difficult to locate, but can you
usually trace it to a rusty through bolt fitting. The problem arises from
the original installation where, if the installer didn't accurately
drill the holes, the bolts don't share equal loading. The overloaded
bolt hole elongates, starting a leak. When you read further on you will
discover that bedding the fitting
with a marine sealant is not always a solution as the fitting may move
under load and may leak again. The problem is compounded with a cored
deck (SJ23 is cored) that can absorb moisture, becomes soft and
delaminates. This is generally the start of a major repair! Plywood was used to reinforce the deck
of the SJ23 where a factory fitting would be mounted. You will find it under the aft part of the
deck as well. The cabin top is mostly balsa core except under the mast step.
This is why you should epoxy the inside of a fitting hole on an SJ23.
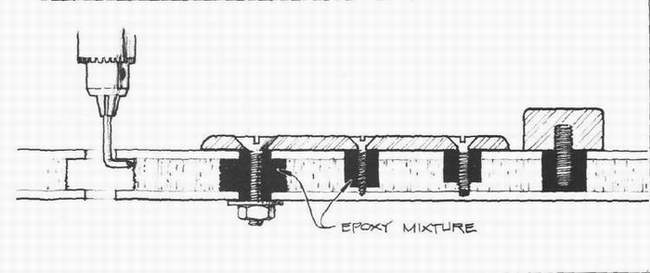
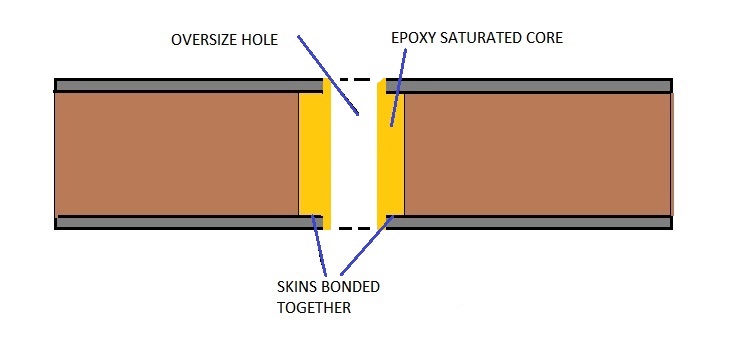
THE WEST BONDING METHOD (Original) - A technique developed by WEST involves bonding the hardware with epoxy to distribute the load over a cored deck. By using maximum contact surface area, stress is distributed & minimized, and leak-causing movement is gone. The core must be sealed around every penetration. Skip this step and water will eventually seep between the skins. It requires more time to bond a fitting, but WEST claims it performs better without leaking. In the illustration below are four typical examples of bonding to a deck. The technique is the same with all of them. First drill an over size hole. Then clean out the sides of the hole as shown on the left. Paint the core inside the hole with unthickened epoxy to seal the soft wood/foam. Thicken the remainder of the batch (peanut butter consistency) and fill the hole. Insert the screw and let the epoxy cure. If you wish to remove the screw in the future, coat it with a release agent before inserting it in the epoxy. This will not reduce the hold on the fitting. If there is no backing plate to distribute the stress, take this opportunity to add one. Make sure it is rounded at the corners and tapered at the edges. Be creative and hide the nut to improve the looks of the cabin ceiling.
NOTE - A suggested alternative to the "Allen wrench" in the drill chuck above it to bend the head a long nail 900 and use the head to gouge out material. It can remove debris quicker and smoother. However, Dremel now makes a bit specific to this task, making this job easier with more control. This is an excellent technique for installing a fitting on an SJ23 balsa cored deck. The epoxy will strengthen the deck by bonding the upper and lower layers together plus add compression strength for the fastener bolts. If you also add a backing block and seal the fitting with butyl rubber, all the better. While there are times when you don't want to penetrate the bottom skin, the following method is quicker to implement for through bolting. WEST BONDING METHOD (Updated) - WEST no longer mentions the previous method as taking too long but it is a strong bond. The following procedure works for wood, solid polyester, balsa cored polyester. It also creates a tube of rigid epoxy that joins the top skin to the bottom skin to prevent crushing the deck with the fastener. The bond of the tube to the skin is extremely strong.
This technique is stronger than the original polyester resin from which the hull was made. TOP
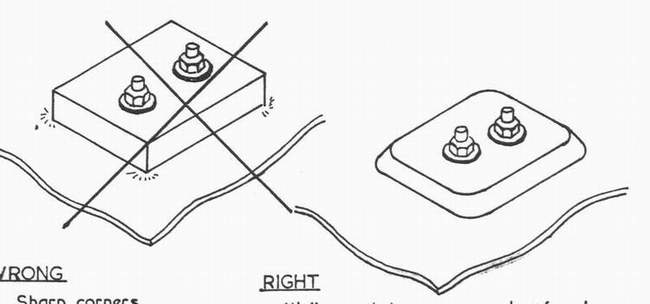
UPDATED BACKING PLATE - A fitting that is fastened with nuts and washers may be ripped out of the deck when it is subjected to a high load. A proper backing plate will distribute the forces and hold the fitting in place. Sharp corners on a square block create high stress areas and are to be avoided. The round corners with tapered edges distributes the forces evenly. If the plate is made of wood, seal the wood with tung oil, varnish or resin to stabilize the wood (prevent warping, cracking, rot, etc).
NOTE - Never apply a sealant to the back side of backing block unless water can drain out of the bolt hole. Hardwood backing blocks I installed in the 1990s are still in perfect condition.
There is a lot to consider when tightening the nuts on a backing block. The compression force must never exceed the strength of the underlying material as per the following table. However, the resistance to compression can be increased by using the WEST Bonding Method (Updated) around the mounting bolt.
In terms of the area of a washer or wood backing plate it should be rigid and have an area large enough to properly distribute the load so the compressive strength of the core material is not exceeded by the compressive force of a torqued bolt. If the backing block is not round, the corners should have a radius equal to at least 5 bolt diameters. For aluminum, stainless or fibreglass backing plates, a thickness of 1/2 to 2/3 the diameter of the mounting bolt should create adequate stiffness. TOP
BUTYL RUBBER TO SEAL A FITTING - While Sikkens Sikaflex or 3M 4200 are excellent to seal a fitting to a deck, you should also consider using butyl rubber. It can be applied to a fitting and tightened immediately because it flows out quite slowly to fill every nook and cranny. Then it solidifies to uniformly support the fitting. After 24 hours you can cut or rub off the excess that oozed out. If Sikaflex or 4200 is applied to a fitting, you have to snug up the fitting loosely then tighten it 24 hours later when the sealant has hardened. If you squeeze it too thin, it creates insufficient support. During the cure time you cannot load up the fitting. Butyl rubber is the same adhesive that holds a car windshield in place. Consider the following advantages of butyl rubber:
Prepare the hole drilled through the fibreglass by bevelling the top slightly.
This prevents the gel coat from cracking and creates a small void where the butyl
rubber can ooze in to create a
very tight seal. To seal the bottom of a screw head, wrap a
cone of butyl around the underside of the head and sink the screw in to
full depth. DO NOT twist the screw. Instead, hold it still
with a screw driver and tighten the nut from the bottom. The rubber will flow to fill the bevel. Tighten
it ONCE ONLY and forget it.
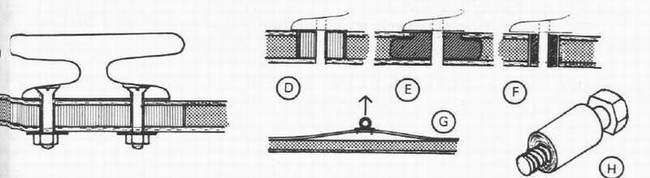
__________ DON'T USE THE FOLLOWING OLD TECHNIQUES ___________ THE ORIGINAL METHOD for F.R.P. (1960) - Drill a slightly over sized hole. Coat the inside of the hole using an epoxy or polyester resin saturated pipe cleaner. This seals the surface. Insert a rigid tube (H below) that is liberally coated with resin. (The tube is a guide for the screw and takes the compression load of holding the fitting to the deck). Let cure. Use marine sealant on the bolt and base of the fitting to create a water tight seal.
This technique works, since some of my fittings from the 1990s are still water tight. However, it is cumbersome and not as strong as the technique from WEST shown above. THE DRILL & SEAL METHOD - The 'quickie' technique of attaching a fitting is:
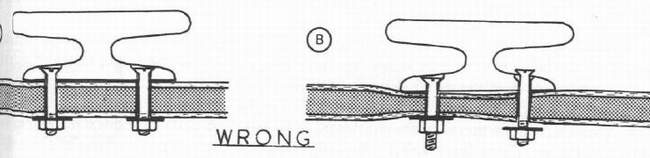
The problem with this technique is that it is structurally weak. If you over tighten the nuts as shown below, you compress the core as in diagram B, causing damage. Bad idea!
It is very easy to over tighten the nuts that result in compressing a balsa cored deck. I tried this technique once but it leaked in a few years. Very annoying and quite honestly, a waste of time. TOP
|
|||||||||||||||||||
REFERENCE - Installing a
complicated deck fitting is such a diverse subject that it is beyond the
scope of a tech tip to adequately describe all the details required for
your specific installation.
Regardless of which
technique you use, installing a fitting on a cored deck must be done
correctly. Therefore, I suggest you visit the WEST
SYSTEM web sit to learn more on the subject. Or browse their
other web site dedicated to
Epoxy
Products for Building and Repair. Download their Product Guide or User
Manuals. All excellent stuff. If you intend to perform this job, order one of their
publications
for reference. I own "Wooden Boat Restoration and Repair" and
"Fiberglas Boat Repair and Maintenance." Very excellent
publications and where I get a lot of my ideas from. |
|||||||||||||||||||
|
Return to Tech Tip Index. . . . . . . . . . . . . . . Have a Question? |
|||||||||||||||||||
 Drill a pilot hole to locate the bolt or screw hole accurately.