| SJ23 Tech Tip A04, (Updated 2006-07-13) Bob Schimmel | |
|
SJ23 Tandem Axle Conversion - Bob Schimmel INDEX - Overall weight, Tongue weight, Brakes. |
|
| Like Betsy and Dave, I also disliked towing my boat with a
single axle trailer. I haul my boat four times a year, about 300 KM (200
miles) in total. Not a big deal, but I have to contend with heavy
oil field truck traffic and I dread the thought of a tire blow-out at highway speed.
My single 3500 lb. axle equipped with light truck tires was loaded to 100% capacity.
The axle bent slightly with the wheels bowed out under the weight of the hull.
No reserve is NOT a
good thing! If you need a justification for
converting your trailer, look at the repair costs associated with a
blow-out on the highway. The second axle is inexpensive in comparison!
Despite the
fact that my Jeep Cherokee has ample pulling power (4L 6Cyl, 170HP &
220 ft lb torque engine with 5000 Lb. towing capacity), the
trailer always swayed a bit and hobby horsed too much for my liking.
This is probably due to
the short wheel base of the Jeep. Even more disconcerting
were the jerks on the draw bar when going over the slightest dip in the road. In
short, I never felt comfortable pulling the trailer at highway speed so in
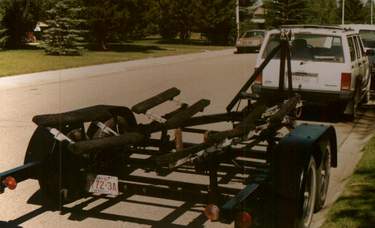
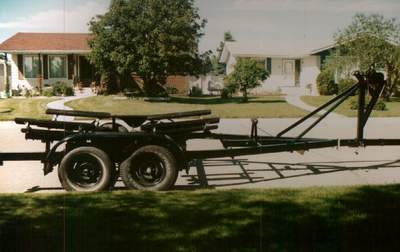
the summer of 1998 I converted my EZ Loader trailer from a single axle to a tandem
axle and have never regretted it. I started off by doing some investigative work, talking to several local axle manufacturers and finally settled on McCoy Brothers in Edmonton. The staff in the Axle Division (unfortunately no longer in business) were very helpful. We discussed the pros and cons of a spring axle versus the new rubber torsion axle, comparing them with assembly diagrams and they explained the installation process fully. Either style of axle was good for my application but I opted to add a spring axle for a smoother ride. Factors that convinced me were; deterioration of rubber over time, the wider temperature operating range of a metal spring, repair possibility of a spring while on the road, and the lower cost. I also learned the benefits of using a center rim for the wheels as this design is the strongest and therefore less likely to fail from stress fatigue. (The bolt plate of a center rim is located equidistant between the inside and outside beads of the rim. This results in minimal flex on the bolt plate, the studs and the rim). The net result is a wheel and studs that operate cooler. I also had a friend who was very familiar with welding horse trailers. Since a horse trailer is very demanding construction, I felt pretty confident with him. Without a good retailer and a welder, I wouldn't have tackled this upgrade. When I bought my tandem axle conversion kit it included a "walking bar." This triangular bracket is bolted to the middle spring hanger and connects the front and back springs to each other. The walking bar makes the two axles perform in tandem, transferring the weight smoothly from one axle to the other. Consequently the ride is smoother than two independent axles. So when you order your axle kit, take a close look at your existing trailer to match the kit to your axle and hangers. The absolute best way to accomplish this is to haul the trailer to the axle shop so they can confirm the parts requirements. For example, the axle guy may advise you that it is less expensive to trade your old axle in for two new ones, just to create a matching set. While this is good I was able to add the new axle to the existing one by buying springs and hangers for both axles so they rode at the same height with equal spring rates all around. I have never regretted this decision. ONLY
3000 POUNDS YOU SAY! - "The design weight of a San Juan 23 is just under
3000 pounds. The cabin liner and the interior pan (floor) were made with a chopper gun
that sprays resin and fibreglass, similar to a paint sprayer. It is very
difficult to maintain a uniform
thickness with a chopper gun unless you have the touch of a Rembrandt.
If
you have this touch you don't need to build boats for a living! The result is that
SJ23s varied widely in weight. An extreme example of this was the last boat I
handled,
that weighed 4000 pounds, empty. This was 1000 pounds over weight, which
is an example of why the people who built it did not stay in business long. As a dealer,
who was the last 10' of the assembly line, I got to install the second axle on the occasional trailer. The 3000 pound design
weight is right at the upper limit of how much weight a single axle trailer
can
support. If your boat happens to be on the heavy side, you need two
axles." Gene Gardener. TOP
CONSTRUCTION - Armed with the installation instructions and diagrams we chose to weld the spring hangers to (3x1/4)" flat iron (mounting rails) and then U-bolt the assembly to the bottom of the trailer frame. (It is much easier and stronger to fasten spring hangers to the mounting rails by welding downwards than to weld permanent hangers to the bottom of the trailer frame by welding upwards. This also eliminates any chance of accidentally "blowing" a hole in the frame with the torch. It is also much easier to fabricate accurate symmetrical left and right mounting rails for the springs. I am a firm believer in, "If it's easier to do, you are apt to do it correct, the first time"). The advantage of this design is that the axle assembly can be slid forward or backward under the trailer without affecting the axle to axle alignment. (The position of the spring hangers is determined by the length of the springs, the mounting requirements of the axles and the desired hitch weight. Use the instructions that come with your tandem axle kit).
Finally the U-bolts were slipped over the trailer frame and tightened to lock the tandem assembly in place. To verify the wheel alignment we took the empty trailer for a road test on a dry dirt. Dry dirt or sand is very effective at revealing axle misalignment or dog tracking. If the loose sand or dry dirt on either side of the track drops in an equal amount then the tires are aligned to the direction of travel. If more drops on one side than the other, the wheel is not aligned to the direction of travel. You require bone dry fine dirt or dry sand to see this effect. In addition, if the tread marks leave equal left/right track patterns in the sand, the alignment is also OK. These are the patterns you are looking for. If the tires "dog track," then the track on the ground will be wider than the tread on the tires (1 tire width plus a bit from the other tire). The pattern of the track may also be unsymmetrical. One final point, I replaced my old springs on the original axle with new ones to have four matching springs. The axle manufacturer, McCoy Bros, recommended this for proper tandem operation. TONGUE WEIGHT - I positioned the center hanger of the tandem axle directly where the old single axle was. In this way the trailer tongue weight remains about the same as with the single axle. The tongue weight should be about 10% to 15% of the trailer weight. As such the front of the window will be about 2" ahead of center of the tandem axle assembly. You can use this guideline to position the hull pads. See Tech Tip A10. After 25 years of towing the trailer with the boat over various terrains, I have never experienced a problem with too little or too much tongue weight. The coupler never lifts off the ball. TOP BRAKES - In Canada, brakes are mandatory on trailers exceeding 2000 lbs carrying capacity. I equipped all four wheels with electric brakes for the extra safety factor for emergency stopping or traveling down long mountain hills. Panache's trailer brakes are controlled by a Tekonsha Voyager 9030 inertia activated brake controller. The unit is equipped with level control (brake timing) and gain control (braking power) so the inertia sensor (pendulum) can be adjusted for very smooth breaking action, down to almost crawling speed. It is far superior than my previous direct coupled hydraulic controller that was popular in the 1960/70s. A nice safety feature is the LED that monitors circuit continuity to the brakes; green light on = brakes OK, The green changes to red to indicate increase of power to the brakes. If the green light is off = NO BRAKES. Very handy if you are about to go down a long grade or enter a congested roadway! A properly adjusted braking sensor applies trailer brakes at the same rate of deceleration as the tow vehicle. If you launch your boat in salt water it's an excellent idea to add a flushing kit to the brakes and brake drums. This consists of a garden hose fitting on the front of the trailer interconnected to water lines connected to the backing plate on each wheel. Immediately after the trailer comes out of the water you run fresh water through the lines to flush the salt water off the drums and actuating coils. This prevents corrosion to ensure continued operation of the brakes. Bearing Buddy is one such example of this product. Remember to drain these hoses dry for winter. Also see Tech Tip A09, Tow Vehicle Considerations On the other hand there are many people who have good success with hydraulic brakes. I have been told they operate well on flat land with minor hills. If you choose this system consider the following advice from the folks at Road King trailers in Texas. They said the reason most hydraulic brake systems fail are as follows:
|
|
|
Return to Tech Tip Index. . . . . . . . . . . . . . . Have a Question? |
|

