| SJ23 Tech Tip B08, (Updated 2018-08-12) Bob Schimmel, Brian King, Tim Woods | ||||||||||||||||
|
FORWARD
HATCH
- Reseal. |
||||||||||||||||
|
REPLACE the SEAL - The
seal on Panache's forward hatch has never leaked which is a testament to the
simple but effective design. The factory incorporated a hollow 1/2" high "D" shaped
sponge foam rubber seal with adhesive backing. This type of seal has
been used in automobiles
for years to keep out air, water, road dust and noise on compound curves and surfaces. Use a razor blade to cut off the old seal and clean the gel coat with acetone prior to applying the new seal. Place the new seal in the same location as the old seal so it clears the hinges. The hatch should compress the seal to only 1/3 so the seal can retain its resiliency over its expected life. Unfortunately, the factory bolted the hatch strap hinges directly on the bottom of the deck depressions which compresses the seal adjacent to the hinges almost flat. This also strains the acrylic and the deck around the screw holes. To alleviate this problem either use a 3/8" high seal or use a 1/4" thick spacer under the deck side of the hinge strap. Make the spacer from any material that can withstand water and UV. I used white UHMW shaped to match the hinge strap so it is barely visible. With the spacer in place and the screw knobs tightened a couple of turns, the hatch compresses the foam seal uniformly for a stress free water tight seal. There is no point in tightening them any further as it will simply strain the acrylic and the seal without improving the water tightness. If you install a 1/2" thick acrylic hatch then use a 3/8" thick spacer to achieve the same water tight seal. By the way, tighten both screw knobs the same amount after they make contact with the underside of the deck. Don't strain the acrylic by pulling one corner down lower than the other. TOP |
||||||||||||||||
|
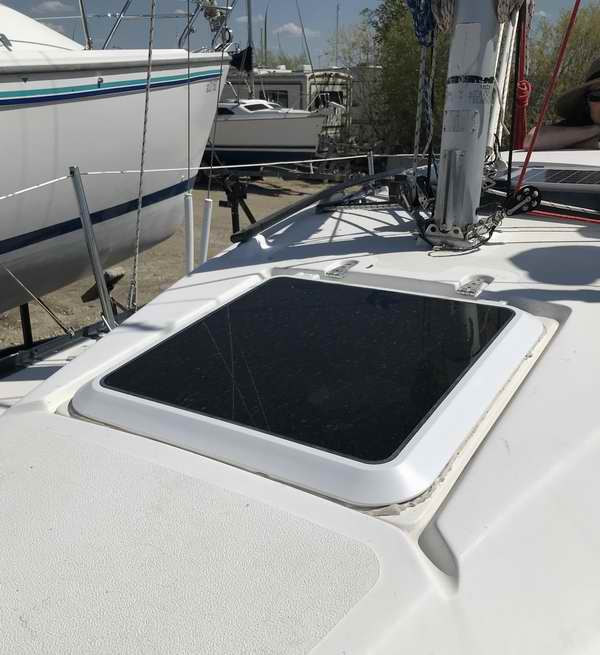
REPLACE the FORWARD HATCH - The factory forward hatch of the SJ23 is made from smoke tinted acrylic, 3/8" thick by (23 5/8)" square and 1/2" radius corners, (10mm thick by 60cm square). It is installed flush to the deck, inside a deck recess. The SJ26 and the original SJ28 use the same design. Its unfortunate there is no metal frame to strengthen it. The aluminum strap hinges are through bolted to the acrylic with a flat washer behind each nut. It is OK to use this technique for a single mounting bolt, but if two or more bolts go through the same piece of acrylic, as is the case with the SJ23 strap hinge, then the hardware must allow for thermal expansion of the acrylic and the stress associated with operation, to distribute the forces uniformly around the hinge bolts. Drill the bolt holes 1/32" oversized and replace the individual washers with a single aluminum plate, the same size as the hinge plate. The larger holes allow movement and the two plates will sandwich the acrylic, thereby distributing the stresses evenly and greatly extending the life. You can expect an acrylic hatch to last about ten years, but some last beyond fifteen years. It all depends on how it was machined during the installation, used/abused during its life and the amount of UV light it was exposed to. While a new 3/8" thick acrylic hatch (without a vent hole in the center) is strong enough to support a person, in a fatigued or stressed state it takes far less force to break it. You could increase the strength by replacing it with a 1/2" thick acrylic combined with a 1/4" thick spacer under the deck strap of the hinge. In Panache's case the original hatch was 26 years old when it cracked from the central vent hole to one of the latch bolt holes. This crack was likely due to a combination of factors: age, stress cracks created by the crude hole saw I used in 1996 to install the 3" Nicro solar vent, the very tight holes the factory drilled for the latch bolts, or the occasional time I stepped on the hatch when it was not reinforced with a wood ring around the vent hole. Combine these factors with the 750C seasonal temperature range we undergo on the Canadian prairies and it is inevitable the hatch will crack. I temporarily sealed the crack with electrical tape for a couple of years, which kept out most of the water, but I also had to place a towel on the cushions to absorb the drips. Problem is, a large broken hatch can lead to a dangerous situation in a storm, so it was time to do something about it. But this was also a good opportunity to rethink the original design. Choice of Material & Fatigue - One might think that Lexan
(polycarbonate) is
a better material for a hatch than Plexiglas (acrylic), since it can stop a
small bullet and withstand a whole range of impact without
breaking. This property makes it excellent for security
purposes. While Lexan is much stronger than acrylic when
new, after about five years of exposure to UV light the properties cross and the Lexan becomes
weaker.
This is because standard polycarbonate absorbs UV and therefore doesn't stand up to UV light
while acrylic filters UV. This is the reason why polycarbonate yellows
with time and acrylic stays clear. There
is a some controversy over this subject. GE Polymer,
the company that manufactures Plexiglas and Lexan, advised me this is rubbish. They
said, "Lexan is stronger than acrylic, if it is coated
with MR-10". My guess is that this
When buying Lexan be sure to specify MR-10 coating that makes it resistant to scratching and UV). If you more strength than 3/8" acrylic, use 1/2" Lexan and install a couple of 1/4" thick spacers under the deck side of the hinges so the Lexan lies flat on the hatch seal. Despite the controversy around the choice of materials, I would choose Lexan with MR10 coating to replace the forward hatch. This would be my current choice if I have to replace the hatch. Good luck finding the smoke tinted stuff. It was very popular back in the 70s when most plastics shops carried it in their inventory. Today (2006) you will have to buy a whole (4x8)' sheet for $600 CA just for your (2x2)' hatch. Share the cost with somebody on the skipper list or consider tinting the clear stuff at an automotive shop. 2018-08-12 - I
found a piece of 3/8" clear acrylic in my garage so cut it to size
and gave it the standard treatment for
fabricating a replacement hatch.
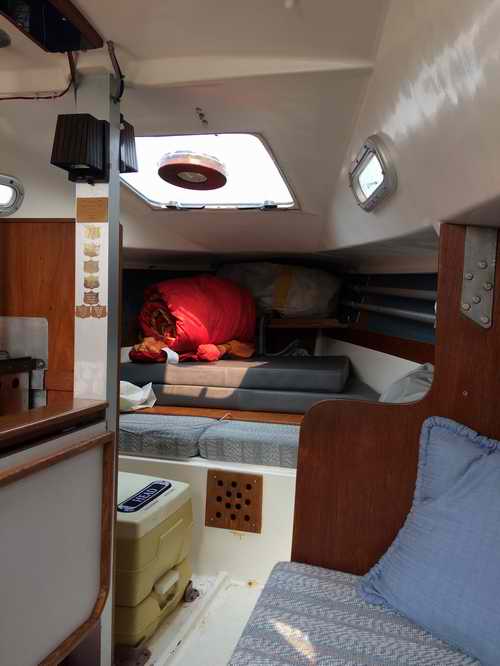
The wood support ring for the vent was eventually permanently installed. So far all is OK.
At right is the forward cabin with the new clear hatch. Notice how bright
it is. Watching stars and satellites is a real treat. |
||||||||||||||||
|
LEVER
HANDLES for the FORWARD HATCH
- All SJ23s, 24s, 7.7s & early 28s hatches
are equipped with an acrylic hatch that pivots on two aluminum strap hinges.
The other models are likely the same. The hatch is locked from inside the cabin with two screw knobs.
I really dislike these
screw knobs in that
it takes way too many turns to open or close them. It should be noted
they are difficult to operate when the
seal is compressed flat to the deck.
With a new uncompressed seal the
screw
TAYLOR LEVER HANDLE - Well time, patience and friendship has paid off. While I was building a prototype lever handle, my sailing buddy Doug found some very suitable handles on the web at a reasonable price; Taylor stock # 1731. The advantage of people working together to solve a common problem. The handles fit on an SJ23 acrylic hatch with very little modification to the existing hardware. The best part is that they can be operated from the outside if the handles are purchased with the exterior thumb levers.
INSTALLATION - If your seal is no longer pliable it is recommended to install a new one first. Once I discovered how high the new gasket holds the acrylic I decided to add shims under the strap hinges so the acrylic lays flat on the seal with minimal compression next to the strap hinges. Then I installed the striker plate on the under side of the deck. Next, cut the length of the PVC spacer so the handle will fit to the striker plate. The PVC tubes should be approximately 5/8" long, depending on how tight you want the hatch to seal (and how much strain you want the handle to hold). Finally determine the location of the hole to install the handle so it fits to the striker plate while turning freely.
PROP UP HATCH - I use a short stick to prop up the hatch. A 6" stick at the mooring or anchor and a 2" stick while sailing in very calm weather. Although it is usually closed while sailing. The advantage of a stick is that if something should snag the lid, then the stick drops and the lid closes, undamaged. If I used one of those springs the lid might get damaged. If I loose a stick overboard, its no big deal. I just go to the bush and grab another one. NOTE: Because it may not be obvious to some
people which direction the handle must be operated,
it is useful to add a 1/4 circle arc glued to the bottom of the acrylic to
indicate the operating sweep of the handle. You may be in that
same frame of mind when panic sets in and your are inverted under the
hatch! TOP
|
||||||||||||||||
|
INSTALL
an ALUMINUM FRAMED HATCH - If you really want to improve
the hatch then install a commercial
submarine style framed hatch. They seal so much better, operate quicker
and are much stronger than the factory hatch that you will wonder why you didn’t
install one years ago. Price may have something to do with it
though! On the other hand 3/8" smoked acrylic is scarce today,
making it expensive. Besides the
LEWMAR OCEAN 60 HATCH - This Lewmar hatch is a very neat installation. It requires a 20" by 20" hole, only slightly larger than the factory acrylic hatch requires. After
removing the old hatch and hardware, scrape off the old gasket, then clean
all around the hatch perimeter with a Scotchbrite pad. Make a
plywood template of the new hatch by drawing a pencil line on the plywood
around the perimeter of the new hatch. Cut out the template with a jig saw.
Center the plywood template over the deck opening and draw a pencil
line around the template to draw a cut line. Before cutting,
mask off the bottom side with plastic sheet and masking tape to keep the
fibreglass dust out of the cabin. Then use a jig saw to enlarge the
hole to fit the slightly larger hatch. Mine needed only a 1/4" trimmed off each side. The hole should only be
cut large enough for the new hatch coaming to fit into the hole with a
very slight gap all the way around. When satisfied with the fit,
use a sander (with vacuum hose attached) to smooth the edge. Then
use
the hatch as a template to make a pencil mark at each drill hole
around the perimeter of the hatch where the bolts will be
installed. Remove the hatch then drill the holes, being careful not
to punch through too hard to prevent chipping the back side (I think I
An alternative to a costly aluminum framed hatch might be to build a similar frame from wood. Fasten the corners with epoxy, float the acrylic inside the wood frame and seal it with Sikaflex. The hardware can be thru-bolted to the wood frame without concern for expansion or contraction stress on the acrylic. The biggest advantage is that it can be sized to exactly fit the existing SJ23 hatch opening. Levers can be attached to the wood frame. I know of several people who have built a hatch just like this and have no problem with it. Just food for thought! Below is a summary of the critical dimensions for selecting a commercial hatch.
|
||||||||||||||||
 BOWMAR HATCH - Another owner who was tired of the factory latching hardware. This Bowmar hatch is a very neat installation requiring little modification to the hull opening. It provides total privacy inside with full view to outside. BOWMAR HATCH - Another owner who was tired of the factory latching hardware. This Bowmar hatch is a very neat installation requiring little modification to the hull opening. It provides total privacy inside with full view to outside. It requires a hole that is only slightly larger than the factory hole. Tim Woods |
||||||||||||||||
|
DRILL & CUT ACRYLIC TECHNIQUES (VENT HOLE) - When installing an acrylic pane inside an aluminum frame there must be at least 1/4" space around the edge for thermal expansion and sealant. Similarly, there must be a space around a bolt installed through acrylic. Regardless of how the acrylic is installed, observe the following procedures to prevent stressing it; CUT
DRILL
BOND
I would venture that if these precautions are taken, the hatch should be
free of cracks for your grandchildren. But
if you have to make a whole new hatch from acrylic it is likely
cheaper to buy a framed made marine hatch as
shown above. 3/8" smoked acrylic is not readily available today like
it was in the 1970s, making it scarce and expensive. You can bet
that a glass company or plastic supplier will charge for a whole sheet.
You also require all the tools to machine acrylic. TOP
|
||||||||||||||||
|
Return to Tech Tip Index. . . . . . . . . . . . . . . Have a Question? |
||||||||||||||||
 opinion
still stands with those people who are unaware of MR-10 coating. Regardless of which situation it is, Lexan has
a few other properties that you should consider;
opinion
still stands with those people who are unaware of MR-10 coating. Regardless of which situation it is, Lexan has
a few other properties that you should consider; 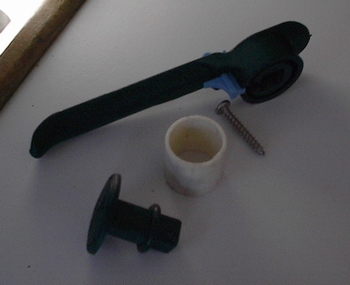 knobs release with only a few turns.
I discovered this after I replaced the seal.
Then there is
the odd crewman who has a difficult time figuring out which
direction to twist the knobs, counter clockwise to open and clockwise to lock!
Something to do with never having been taught how to read
an analogue clock!
Personally, I hate being exposed to the solar heat under the hatch as I
twist the knobs. If the boat is bouncing in a seaway, the motion
while you are looking up at the knobs can be nauseating. Definitely
not a fun part of the job! Then there is the fact that the factory
latches can't be opened from the outside. After all, doors have a handle on BOTH sides, so why not a
hatch? I
know of many San Juan owners who are equally fed up with the factory
screw knobs.
On the other hand, there are
sailors who like them for the tight seal they create since the
closing pressure is fully adjustable. I guess it all depends on your
preference. While a latched hatch may be excellent for
theft prevention,
I wonder if you can get out fast enough in an emergency. The lack of an outside knob
is a safety issue during heavy weather sail changes when it would be much
quicker and safer to stuff
a bagged jib through the hatch than to walk it back to the cockpit.
This
is exactly the weather condition in which latches
should operate quickly and be operable from both sides. The quicker
you can close and latch the hatch, the safer it is, especially if you sail solo or the other crew is
busy.
knobs release with only a few turns.
I discovered this after I replaced the seal.
Then there is
the odd crewman who has a difficult time figuring out which
direction to twist the knobs, counter clockwise to open and clockwise to lock!
Something to do with never having been taught how to read
an analogue clock!
Personally, I hate being exposed to the solar heat under the hatch as I
twist the knobs. If the boat is bouncing in a seaway, the motion
while you are looking up at the knobs can be nauseating. Definitely
not a fun part of the job! Then there is the fact that the factory
latches can't be opened from the outside. After all, doors have a handle on BOTH sides, so why not a
hatch? I
know of many San Juan owners who are equally fed up with the factory
screw knobs.
On the other hand, there are
sailors who like them for the tight seal they create since the
closing pressure is fully adjustable. I guess it all depends on your
preference. While a latched hatch may be excellent for
theft prevention,
I wonder if you can get out fast enough in an emergency. The lack of an outside knob
is a safety issue during heavy weather sail changes when it would be much
quicker and safer to stuff
a bagged jib through the hatch than to walk it back to the cockpit.
This
is exactly the weather condition in which latches
should operate quickly and be operable from both sides. The quicker
you can close and latch the hatch, the safer it is, especially if you sail solo or the other crew is
busy. 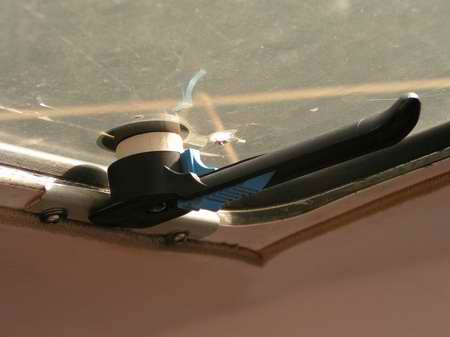 Doug installed
a set on his new 1/2" thick hatch and they aligned to the existing striker plates
at the front of the opening which is obviously critical. I have since installed
two sets of handles: one on
Panache's original
3/8" thick smoked hatch as shown at right and the second on Panache's
replacement clear hatch. It is a bit more
challenging to install it on the original acrylic since I had to seal the old holes before drilling new
holes, to
ensure the acrylic is not weakened. Regardless of the
thickness of the acrylic, this Taylor handle requires an additional
cylindrical (white PVC tube) spacer to
make it fit on an acrylic hatch. The PVC spacer in visible at right
and in the parts photo above. The wall thickness and diameter of 1 3/8"
OD white PVC tubing (plumbing section of home renovation store) fits exactly into the circular groove around the bottom edge of the
handle. The groove ensures that the spacer is held captive and stays
centered for secure support and smooth operation. Both are crucial to maintain a tight
seal and minimize strain on the acrylic.
Doug installed
a set on his new 1/2" thick hatch and they aligned to the existing striker plates
at the front of the opening which is obviously critical. I have since installed
two sets of handles: one on
Panache's original
3/8" thick smoked hatch as shown at right and the second on Panache's
replacement clear hatch. It is a bit more
challenging to install it on the original acrylic since I had to seal the old holes before drilling new
holes, to
ensure the acrylic is not weakened. Regardless of the
thickness of the acrylic, this Taylor handle requires an additional
cylindrical (white PVC tube) spacer to
make it fit on an acrylic hatch. The PVC spacer in visible at right
and in the parts photo above. The wall thickness and diameter of 1 3/8"
OD white PVC tubing (plumbing section of home renovation store) fits exactly into the circular groove around the bottom edge of the
handle. The groove ensures that the spacer is held captive and stays
centered for secure support and smooth operation. Both are crucial to maintain a tight
seal and minimize strain on the acrylic.
 fact that they are totally water tight, the acrylic floats
stress free inside the frame
and is therefore not prone to crack like an unframed piece of acrylic. This is
the main reason why a solid acrylic hatch is weaker than an aluminum framed hatch. Most
framed hatches are equipped with two dogs (levers) to latch it and a riser to support it open
in any position. Some hatches can fold back to lie flat on the deck. The more expensive
ones have low profile exterior knobs to open/latch the hatch from on
deck, a bug screen to keep mosquitoes out, and a double acting hinge to scoop
air in or suck it out. Some even have a second notch for the dogs to
latch to the deck frame so it can vent some air while keeping loose fingered people
out. I have used this feature on a rainy day and it really does
prevent stuffiness in the cabin while retaining some cabin heat.
The
only redeeming feature of a San Juan factory hatch is that it is flush with
the deck and doesn't cost a lot.
fact that they are totally water tight, the acrylic floats
stress free inside the frame
and is therefore not prone to crack like an unframed piece of acrylic. This is
the main reason why a solid acrylic hatch is weaker than an aluminum framed hatch. Most
framed hatches are equipped with two dogs (levers) to latch it and a riser to support it open
in any position. Some hatches can fold back to lie flat on the deck. The more expensive
ones have low profile exterior knobs to open/latch the hatch from on
deck, a bug screen to keep mosquitoes out, and a double acting hinge to scoop
air in or suck it out. Some even have a second notch for the dogs to
latch to the deck frame so it can vent some air while keeping loose fingered people
out. I have used this feature on a rainy day and it really does
prevent stuffiness in the cabin while retaining some cabin heat.
The
only redeeming feature of a San Juan factory hatch is that it is flush with
the deck and doesn't cost a lot.
 Since
no commercial aluminum framed hatch fits the 20” square opening
of an SJ23 you will have to buy a slightly undersized hatch and fabricate or buy a transition spacer to mate
the hatch to the deck hole as shown at left. (the diagram is not
drawn to scale, but it demonstrates the concept). Making a spacer
isn't as difficult as it looks. It consists of a square wood frame that mounts
on the
top perimeter of the deck opening, raising
the hatch flange about ¾” above the deck. Teak
is an excellent choice but if you are good with any other material, well
fill your boots. Make the outside dimensions of the spacer NO
bigger then 22 ¼”
square to retain the drainage function of the trough around the
hole. Round off and slope the top outside corners of the frame to prevent
toe injury or snagging things. Fit
the inside of the spacer snug against the frame of the hatch as shown
above. Raising
the hatch slightly with a transition spacer adds an additional feature of
blocking some solid water out of the cabin
when the hatch is open. This is
helpful when rinsing the deck with a bucket. You should also add a wood filler frame to the bottom
of the hole (cabin ceiling) to add form
strength and appearance; strength being the more desirable of the
two! The top transition spacer seals the hatch to the deck, the
bottom spacer adds the strength to the sandwich. For ultimate strength the hatch frame must be through bolted to
the deck to sandwich the mating frames and deck. Countersink the screw heads and
seal the holes with tapered wood plugs to prevent corrosion. Seal all joints with Sikaflex and
coat the wood frame with Sikkens Cetol Marine. Some hatches also have a cosmetic trim
that installs
inside the hatch opening, creating a smooth lining to prevent
snags on clothing or sails. Remember to allow space for this. The inside trim
may also
incorporate a bug screen or sliding shutter for shade. Be creative.
Since
no commercial aluminum framed hatch fits the 20” square opening
of an SJ23 you will have to buy a slightly undersized hatch and fabricate or buy a transition spacer to mate
the hatch to the deck hole as shown at left. (the diagram is not
drawn to scale, but it demonstrates the concept). Making a spacer
isn't as difficult as it looks. It consists of a square wood frame that mounts
on the
top perimeter of the deck opening, raising
the hatch flange about ¾” above the deck. Teak
is an excellent choice but if you are good with any other material, well
fill your boots. Make the outside dimensions of the spacer NO
bigger then 22 ¼”
square to retain the drainage function of the trough around the
hole. Round off and slope the top outside corners of the frame to prevent
toe injury or snagging things. Fit
the inside of the spacer snug against the frame of the hatch as shown
above. Raising
the hatch slightly with a transition spacer adds an additional feature of
blocking some solid water out of the cabin
when the hatch is open. This is
helpful when rinsing the deck with a bucket. You should also add a wood filler frame to the bottom
of the hole (cabin ceiling) to add form
strength and appearance; strength being the more desirable of the
two! The top transition spacer seals the hatch to the deck, the
bottom spacer adds the strength to the sandwich. For ultimate strength the hatch frame must be through bolted to
the deck to sandwich the mating frames and deck. Countersink the screw heads and
seal the holes with tapered wood plugs to prevent corrosion. Seal all joints with Sikaflex and
coat the wood frame with Sikkens Cetol Marine. Some hatches also have a cosmetic trim
that installs
inside the hatch opening, creating a smooth lining to prevent
snags on clothing or sails. Remember to allow space for this. The inside trim
may also
incorporate a bug screen or sliding shutter for shade. Be creative.  At
right is a Lewmar 60 Ocean Series hatch that was installed on Opus. The original hatch opening
had to be enlarged a bit to make it fit. "Since the deck at that location is
only about 3/8" inch thick, the hatch was through bolted for strength
and a teak trim was added underneath to cover the nuts and bolt ends.
This
also made a good location to fit a bug screen. The
hatch is self supporting. It can be opened from the outside and locked
from the inside. The hatch is kind of pricey but
definitely worth it."
At
right is a Lewmar 60 Ocean Series hatch that was installed on Opus. The original hatch opening
had to be enlarged a bit to make it fit. "Since the deck at that location is
only about 3/8" inch thick, the hatch was through bolted for strength
and a teak trim was added underneath to cover the nuts and bolt ends.
This
also made a good location to fit a bug screen. The
hatch is self supporting. It can be opened from the outside and locked
from the inside. The hatch is kind of pricey but
definitely worth it."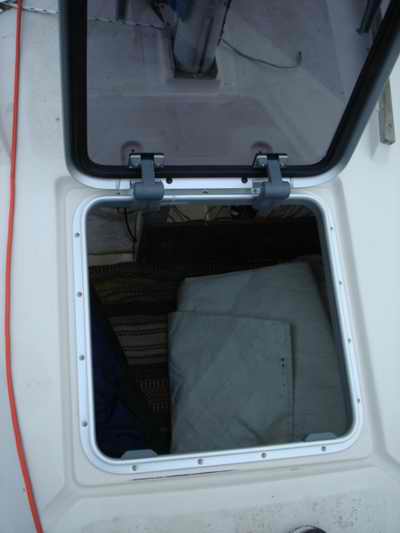 used
a 7/32" drill bit). A wood backing block will prevent
chipping. With the area around the hatch and holes vacuumed and
cleaned, use a penetrating epoxy to seal the deck core along the cut edge
and butter each drill hole with a little brush. Penetrating
epoxy will wick into the core and not fill up the drill holes.
After the epoxy has cured the hatch can be installed. I used
closed cell foam weather stripping applied to the underside of the
hatch flange to create a seal. No.10 pan head SS bolts
with a washer and crown nut on the cabin side worked well. On my
boat the deck thickness varied greatly along the perimeter of the hatch so
the No. 10 bolts varied from 3/4" to 1 1/4" in length.
If the weather stripping is squished evenly all the way around, then the
bolts are tightened evenly. Brian King, SV "Partez!"
used
a 7/32" drill bit). A wood backing block will prevent
chipping. With the area around the hatch and holes vacuumed and
cleaned, use a penetrating epoxy to seal the deck core along the cut edge
and butter each drill hole with a little brush. Penetrating
epoxy will wick into the core and not fill up the drill holes.
After the epoxy has cured the hatch can be installed. I used
closed cell foam weather stripping applied to the underside of the
hatch flange to create a seal. No.10 pan head SS bolts
with a washer and crown nut on the cabin side worked well. On my
boat the deck thickness varied greatly along the perimeter of the hatch so
the No. 10 bolts varied from 3/4" to 1 1/4" in length.
If the weather stripping is squished evenly all the way around, then the
bolts are tightened evenly. Brian King, SV "Partez!"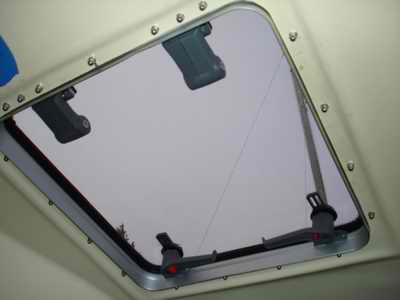
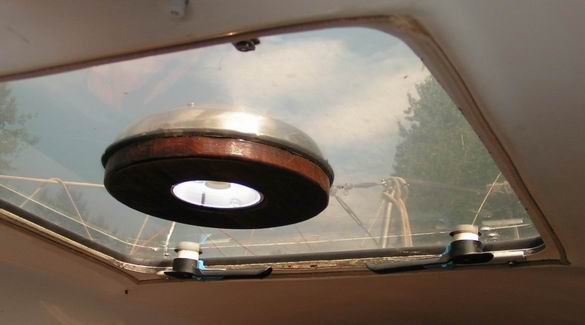 MANDATORY
SUPPORT RING - If a 3" or 4" diameter hole is cut through the acrylic for a
(Nicro)
vent,
then the strength of the acrylic MUST be restored with the addition of a wood
support ring, shaped like a flat doughnut. Make the thickness of
the doughnut equal to or greater than the white protruding plastic
liner of the air hole, (white on inside of ring). Cut the ID of the
hole in the wood ring so it fits snug around the plastic liner.
Cut the OD of the
doughnut equal to the diameter of the vent hood so you
don't see the dust collected on the underside of
the vent. This is not a problem if you
fall asleep quickly on the V berth! Instead, you see a nice finished wood
ring! Glue the ring with Sikaflex or silicone sealant to the bottom of the acrylic.
Clamp it there with C clamps for 24 hours.
MANDATORY
SUPPORT RING - If a 3" or 4" diameter hole is cut through the acrylic for a
(Nicro)
vent,
then the strength of the acrylic MUST be restored with the addition of a wood
support ring, shaped like a flat doughnut. Make the thickness of
the doughnut equal to or greater than the white protruding plastic
liner of the air hole, (white on inside of ring). Cut the ID of the
hole in the wood ring so it fits snug around the plastic liner.
Cut the OD of the
doughnut equal to the diameter of the vent hood so you
don't see the dust collected on the underside of
the vent. This is not a problem if you
fall asleep quickly on the V berth! Instead, you see a nice finished wood
ring! Glue the ring with Sikaflex or silicone sealant to the bottom of the acrylic.
Clamp it there with C clamps for 24 hours.