| SJ23 Tech Tip B15, (Updated 2019-09-03) Bob Schimmel, Randy Cook. | ||||||||||
|
Repair and Seal a Delaminated Cockpit Locker Lid. |
||||||||||
|
The cockpit seats (or locker lids) will take a beating over the years
because they are built relatively light to save weight. Its amazing they are strong enough, considering the foot
traffic they have to endure. The cockpit floor, by comparison, is built very strong
as it's probably the most used surface on the boat. A seat has to support
the most weight when a person steps on the middle while boarding the
boat. Plus, they're likely carrying a box of beer which adds more weight, but
who's complaining. Then there are those 'mad dives' from the top of the
cabin into the cockpit during rough weather. You solo sailors may be aware
of this technique. Well it's no wonder the seat fatigues. As with most problems there are complicating factors. In this case there are four parts:
SOLUTION 1 - An easy way to stiffen the hinge side of a locker lid is to attach a reinforcing strip of wood to the bottom as shown above. It's a lot easier than widening the fibreglass lip at the back that the factory cut too narrow. It also adds strength, preventing future delamination. A strip of wood, formed like a handhold, is stiffer, lighter and stronger than a solid piece of wood. If it fancies you, the holes in the handhold can do double duty by hanging a rag, lines, etc. Fasten the stiffener to the lid with Sikaflex or 3M5200. Epoxy breaks free due to the flexing. However, a stiffener is not a solution for a delaminated lid! PARTS:
"I drilled the 1/4" holes into the bottom of the lid, through the balsa core and stopped on the inside of the glass/gel coat surface, thereby protecting the outside finish. The lid is about 3/8" thick overall so I used a stopper on the drill bit to limit the depth to 1/4". In practice I found it quite easy to stop against the inside of the top laminate because the glass was so much harder than the balsa core, making it easy to feel. Operate the variable speed drill on low speed. After all the holes were drilled (I lost count of how many) I scraped the chipped gel coat off the surface because they can cause real nasty splinters and I didn't want them imbedded in the final finish or in my hands. I also picked the debris out of the holes and vacuumed them clean so the core could dry out completely. The balsa core was so wet that I dried the lid by suspending it over a furnace hot air register for a month.
I kept the whole works under pressure for 24 hours while it cured and discovered that most of the holes required further filling. This is to be expected as the epoxy soaks into the core wood so I topped them off with thickened epoxy. Later I applied a layer of glass cloth. When the epoxy hardened the inside surface was ground smooth with a hand grinder (do this outside). A coat of white enamel spray paint restored the surface to an acceptable finish! I also reinforced the lid with a wood hand hold strip as described in solution 1. If done correctly the lid will no longer be mushy and it will probably last through WWW III, or at least the next dive into the cockpit!" SOLUTION 3 - It may seem like a major job but replacing the wood core may be the easiest and best solution. It all depends on the degree of damage to the balsa core and how you feel about doing the work. Use a hand grinder to cut through the inside surface along the perimeter of the balsa core. Once the cut is complete, remove the inside laminate and
pick the balsa core out. Discard the mess since the wood
fiber is broken down. Besides, you now have the opportunity to
install marine plywood or rigid foam both with tapered edges and rounded corners.
(Keep in mind that you MUST MAINTAIN the
original thickness at the perimeter of the lid). So if you
want to add additional thickness do so in the open area of the locker. Cut a new piece
of filler to completely fill the old
hole. Dry fit to ensure it fits snug, making sure that it does not warp
the lid. Pre-soak the filler, especially at the edges, and the inside of
the lid with unthickened epoxy. Set the filler inside the lid and
squeeze the laminates as in solution 2 above. Once cured, fill any
voids with thickened epoxy. Smooth the edges to
create a nice taper. Cover the inside of the filler with
fibreglass cloth to complete the sandwich construction. Paint the
inside surface white and you have a professional finish. I would
still add the reinforcing strip to the bottom as described in SOLUTION 1
above. Regardless of which solution you choose, consider the job done, as you now have a lid strong enough to support a Flamenco dancer! ______________________________________________________ NOTE 1: I used a Wagner L609 portable moisture meter to measure the % humidity in the wood core. This meter uses electro-magnetic force (EMF), that passes through the fibreglass surface inductively, to measure water mass. With it you can measure precisely where the water is located, the % humidity and hence the extent of the problem. While the meter is calibrated for Douglas Fir the absolute accuracy of the reading is irrelevant. Simply find a spot that you know it to be dry and compare the wet area to the dry area. My dry wood measured 5-7% humidity and the saturated wood measured >20%. NOTE 2: The following factory warning label was
affixed to the inside of the port lid.
|
||||||||||
|
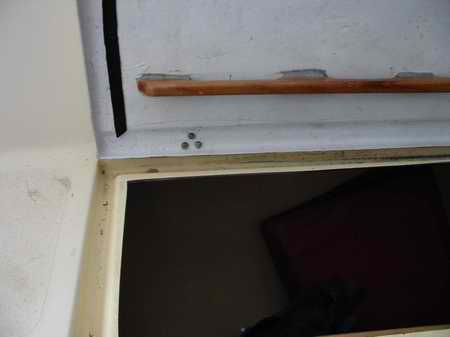
SEAL the SJ23 LOCKER LIDS - Now that you've repaired the lid it's time to prevent the water from collecting in the cockpit lockers. A bucket of water dumped on the cockpit seat or a heavy dump of rain can flow away very quickly. Most of it flows off the seat to the cockpit sole with some flowing down the drain channel that surrounds the locker lid. But if the boat is heeled or listing in the slip, the water can accumulate only so deep in the channel, after which it flows through the gap on the hinge side of the lid, nicely filling the locker. If the hull is level, the channel can drain most water. The drain channel was never designed for high volume water flow and the lid wasn't sealed to the locker at the factory. A trickle of rain or a heavy dew is a different kind of problem. It can, stay attached to the lid, curling around to the bottom and dripping into the locker. Typically the channel has dirt in it, slowing the flow, but that can easily be cleaned with a sponge. The starboard locker is usually not a problem unless you removed the bottom of this locker as described in (Tech Tip B02). As a side note, you can save the crew from sitting in a downhill or leeward puddle by adding a drainage tube from the drain channel to the bottom of the cockpit foot well. A wet bum (gawd I hate that) is generally what holds people back from sailing in the rain.
The solution for both locker lids is to seal the lid hinges & screws to the cockpit
with butyl rubber and to seal the
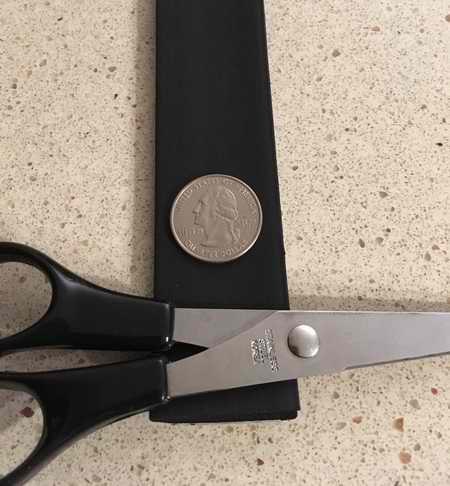
cockpit lid to the locker with an ethylene-propylene-diene-monomer (EDPM) closed cell, foam rubber. EPDM rubber has excellent resistance to ozone, sunlight, oxygen, acids, alkalis, ketones, and aging due to severe weather, making it ideal for a boat application. It is used extensively in cars. Metro Weather adhesive backed Camper Top Seal is one such foam. It was designed as an adhesive backed cushion (1-1/4 x 3/16)" to protect the painted surface of a truck box from the weight of a camper. There are lots of other styles of foam sold for this application but EPDM
excels in all categories.
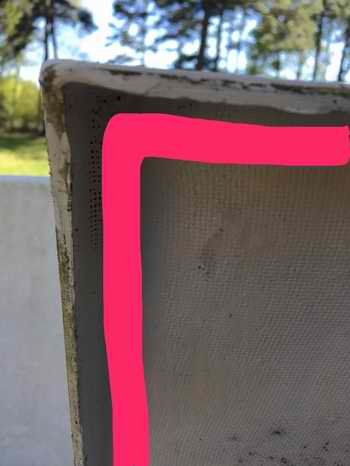
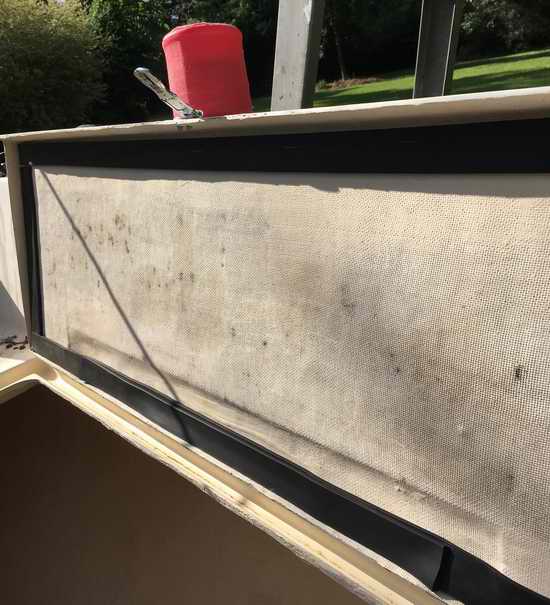
NOTE - While the automotive industry has used hollow EDPM gaskets for years, the marine industry seems to stick with solid neoprene foam that stays compressed for a long time after the load is released. It generally leaks after a season of use because it doesn't have the resiliency to spring back to the original size. This is due to the extremely small pores of the foam. While EPDM foam may also not spring back as quickly when compressed, the fact that the foam forms around the cockpit lip means that it developed a seal. The best place to install the foam seal is on the bottom of the locker lid, pointing down. The lid offers a flat surface area for best adhesion. The top of the locker lip is usually very irregular and too narrow in places as shown below due to the freehand cutting of the opening at the factory. Besides, if it is installed on the lip, it will get beat up with every trip into the locker.
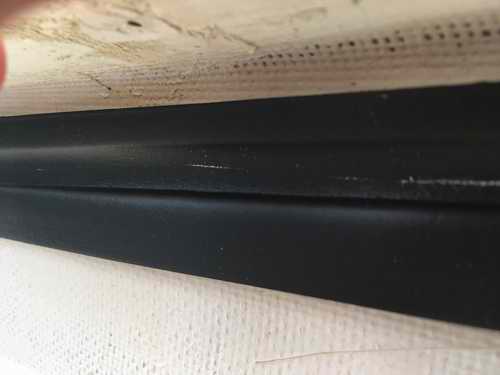
- To determine where to apply the seal on the underside of the lid, crawl inside the locker and draw a pencil line outlining the perimeter of the opening on the inside of the lid. Alternatively, use a ruler to draw lines that extend the lip to the lid. Stick the gasket on the lid, in a straight line 1/3" inside the pencil line. This centers the foam gasket over the locker lip ensuring a water tight seal. - If you don't like crawling in the locker, stick some narrow strips of foam to the underside of the lid, placing them across where you expect the foam to contact the locker lip. Then close the lid and sit on it for for an hour or so. Have a rum and take in the scenery. Once your rum is finished draw a pencil line marking each depression, and link them together to outline the placement of the foam on the inside of the lid. - Randy (Emunah) and I (Panache) each installed a 3/16" thick truck camper cushion seal around our respective lockers. This is the correct thickness to just fill the gap to seal it. It will push the lid up slightly but not totally crush it when first closed, a position in which it will spend the majority of it's life. The gasket can also provide some support for the lid. If the gasket is thicker it can strain the hinges and screws, preventing the lid from closing. However, the gasket will develop an indentation with time, resolving both problems, so be patient. However, the 3/16" gasket is too thin at the hinge side of the lid to effect a seal, so install a half width foam strip in the deeper portion, then double the thickness by applying a full width layer of foam on top of the first. The position and thickness of the gasket is critical so take your time fitting it. Also, don't stretch it as you apply it but do jam the edges together at a joint.
Below is one of Panache's hinges sealed with butyl rubber. It was left untrimmed for this demonstration. The excess was later trimmed with a razor knife. In hind sight, the majority of water that leaked into Panache's locker flowed through the unsealed hinges.
HINT -
If there is water in the
"sugar scoop" aft of and below the cockpit, it came from
the gudgeons, transom chain plate (bolts & deck top) or cockpit drain fittings.
Confirm which side by looking for dribble marks on the bottom of the hull. If
the "sugar scoop" is dry the water came from the
locker lid hinges (include screw heads), gunwale fittings or
scupper.
You can reach the sugar scoop with your right hand by kneeling on the
cockpit sole. The water that flows into the port locker from a leaking scupper
flows down the cabin wall to the settee shelf, through the port bulkhead
and into the locker.
Its amazing how much water can flow through leaking hinges since they
easily work loose due to the unsupported lid. Run your hand under
the hinges to feel the dampness. If you opened the bottom of the starboard locker (Tech
Tip B02) the water drops from the leaking hinges to the bottom of the locker,
then flows to the
settee and accumulates under the cushion on the settee. |
||||||||||
|
Return to Tech Tip Index. . . . . . . . . . . . . . . Have a Question? |
||||||||||
 You can tell if a seat is delaminated by how much it flexes under
weight. If it deflects from the force of your hand so you can
see a definite depression, then the core in your seat is likely
delaminated. Hopefully the wood core is not rotten. Spread a little water on the seat and watch it
flow to your hand in the depression. Under severe delamination, you can hear a gritty
scraping sound if you place your ear to the inside of the lid and flex the
lid. This is evidence that the balsa core and the glass laminates are
rubbing against each other instead of sticking to each other. Not good!
Another
technique is to listen to the lid as you knock on it with your knuckle. "Hello
anyone home?" A good seat
feels hard, firm and has a definite ring to it while a delaminated seat
produces a dead thud. You can
confirm your suspicion with a
You can tell if a seat is delaminated by how much it flexes under
weight. If it deflects from the force of your hand so you can
see a definite depression, then the core in your seat is likely
delaminated. Hopefully the wood core is not rotten. Spread a little water on the seat and watch it
flow to your hand in the depression. Under severe delamination, you can hear a gritty
scraping sound if you place your ear to the inside of the lid and flex the
lid. This is evidence that the balsa core and the glass laminates are
rubbing against each other instead of sticking to each other. Not good!
Another
technique is to listen to the lid as you knock on it with your knuckle. "Hello
anyone home?" A good seat
feels hard, firm and has a definite ring to it while a delaminated seat
produces a dead thud. You can
confirm your suspicion with a 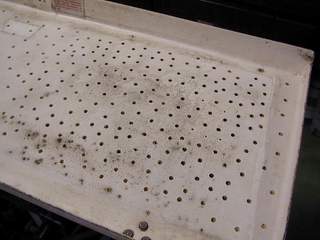
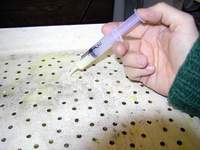 Unthickened
epoxy was injected with a Majestic 412 disposable syringe designed
for this job. They are inexpensive and the "needle" is tapered
so you can cut the end off to match the hole size to accurately meter the epoxy, spilling very little. You'll find
that you have to fill each hole several times as the epoxy soaks into the
core. This is normal and it pays to have patience. The inside laminate of
my lid was warped in several areas so I injected extra epoxy into these areas. As the epoxy welled up in the adjacent holes it was
the sign to stop filling. At this point the hole was about half
full.
Unthickened
epoxy was injected with a Majestic 412 disposable syringe designed
for this job. They are inexpensive and the "needle" is tapered
so you can cut the end off to match the hole size to accurately meter the epoxy, spilling very little. You'll find
that you have to fill each hole several times as the epoxy soaks into the
core. This is normal and it pays to have patience. The inside laminate of
my lid was warped in several areas so I injected extra epoxy into these areas. As the epoxy welled up in the adjacent holes it was
the sign to stop filling. At this point the hole was about half
full. 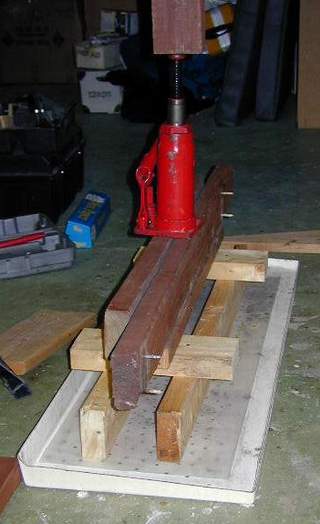 the epoxy uniformly. An unexpected surprise that I'm sure
will preserve the wood." CAUTION: Don't overfill
the holes as the excess epoxy will flow to the surface when the laminates
are squeezed together.
the epoxy uniformly. An unexpected surprise that I'm sure
will preserve the wood." CAUTION: Don't overfill
the holes as the excess epoxy will flow to the surface when the laminates
are squeezed together. 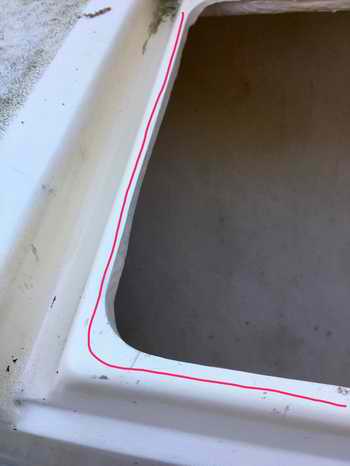
 If you think the
gasket will stick to the top of the locker, spray silicone lubricant on it or apply 1/8" thick nylon
coated neoprene using an adhesive called
If you think the
gasket will stick to the top of the locker, spray silicone lubricant on it or apply 1/8" thick nylon
coated neoprene using an adhesive called 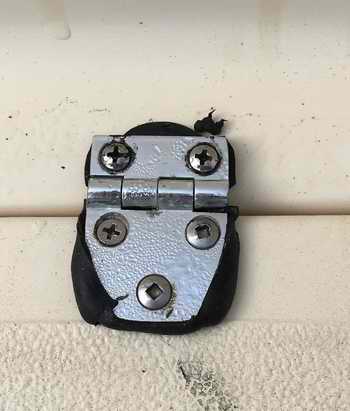