|
I've seen
a few sail boats with center cleats for a spring line but never really had the
opportunity to use one until a recent vacation in Holland. Here
there are locks to traverse, harbours with wharfs to tie to, and pubs that
beckon a weary sailor. The Ijsselmeer is now split in two with a
dike across the middle to reduce wind blown swells to the shallow waters
at the ends.
The shore ends of the dividing dike have locks so boat traffic can pass
between Markermeer in the south and Ijsselmeer to the north.
Both bodies of water are quite shallow and in most places we had only .5M
of water under the keel of the Hallberg-Rassy 42. You get used to it
but to ensure we didn't go aground we used a chart plotter and an iPad 3G equipped with a high resolution chart
to navigate the "deeper channels" between the sandy
 shoals.
This is a technique to keep in mind.
What a different style of
sailing this is from the hinterland lakes of the Canadian prairies where
we have spruce trees, barley sandwiches in the cooler, where locks keep
culprits out, not raise/lower boats and almost
nobody has a spring cleat! shoals.
This is a technique to keep in mind.
What a different style of
sailing this is from the hinterland lakes of the Canadian prairies where
we have spruce trees, barley sandwiches in the cooler, where locks keep
culprits out, not raise/lower boats and almost
nobody has a spring cleat!
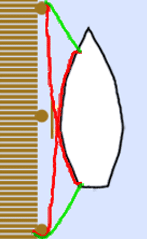
The HR42 was equipped with a spring line cleat mounted on each
side deck that made tying to a lock wall or wharf a snap. As the boat
is slowed to it's resting spot at the side of the lock I grabbed the
spring line,
attached to the spring cleat, and flipped it over whatever was available on
shore. Then I quickly pulled the line
taut
and snubbed it to arrest the forward motion of the 16T
boat. The boat then slowly edged towards the lock wall. In most cases this is all we did to secure the boat in a lock,
since the water was calm. We also left the engine idling in gear with the rudder turned away from the lock wall to keep the hull
straight to the wall. If the water was turbulent we added bow and stern lines. When we tied to a wharf I would similarly secure the boat
using the spring line cleat, then hop ashore with the bow and stern lines to
secure the ends to the wharf. The free ends of
the bow and stern lines then went to the spring line cleat, replacing
the single spring line I initially tied. Sure a lot stronger than tying a spring line to an
SJ23 stanchion! This
is the quickest and most secure I have ever tied a
boat. Mind you I had to be quick or I would have to find my
own way to the pub! Actually not, but friendly ribbing worked to
speed things up since
everybody was anxious to wet their whistle. Suffice it to say that the
spring line cleat came in real handy. This guy gives a good
demonstration of the technique
spring line docking.
 So, how do
you install a cleat on an SJ23 that has a toe rail? Well
it depends on the style of cleat you select. If you have the money for a
folding surface mount cleat then all you have to do is install it on the
side deck.
Seal the holes through the deck with epoxy and use a tapered backing plate.
Problem is, the backing plate shows through the head liner. So, how do
you install a cleat on an SJ23 that has a toe rail? Well
it depends on the style of cleat you select. If you have the money for a
folding surface mount cleat then all you have to do is install it on the
side deck.
Seal the holes through the deck with epoxy and use a tapered backing plate.
Problem is, the backing plate shows through the head liner.
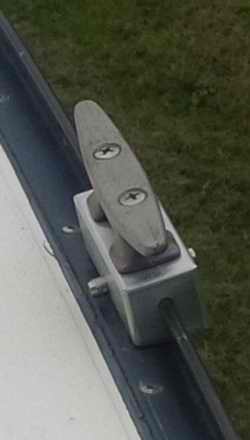
The other style cleat shown below bolts to the top of the toe rail.
It is simple to install and looks strong enough. I have seen one
mounted on a C&C27. It stays up when flipped so it is quick to use
and stores well out of the way.
Then
there is the rigid cleat. More complex to install and strong.

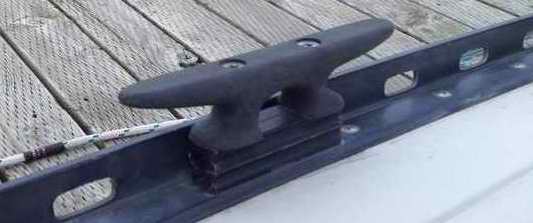 SOLUTION
1 - If you install a rigid cleat then you have to raise it above
the toe rail so the spring lines can wrap around the horns. As an
example, the cleat at right is mounted on my friend's C&C27 and the
one below is installed on Panache. The following
steps describe this installation. SOLUTION
1 - If you install a rigid cleat then you have to raise it above
the toe rail so the spring lines can wrap around the horns. As an
example, the cleat at right is mounted on my friend's C&C27 and the
one below is installed on Panache. The following
steps describe this installation.
-
Cut a 1" square aluminum
tube approx 10'' long. This serves as a secure spacer to raise
the cleat to the top of the toe rail (shown below) and support a possible chock. Water can flow through the hollow tube to keep the deck
clean.
You could use a block of hard wood instead of the aluminum
tube. Your choice.
-
Bend the tube a bit to follow the curve of the toe rail.
A snug fit makes for a secure installation.
If you place a couple of
1/4" thick metal spacers under the ends of the tube and then "tap" the tube in the center using a 10 pound sledge, the tube will bend quite nicely! Just make sure you "tap" it with the flat face of the sledge. You need ~1/8"
deflection in the middle of a 10" long tube.
-
Angle cut the ends of
the tube so your shoe deflects off rather than stubs on the end of a square tube.
I
haven't jammed my foot in the cleat yet but if I do, I'll install a wood plug in each end, incorporating a drain hole in the
bottom of each plug.
-
Grind and polish all metal
surfaces to eliminate meat hooks. Gawd I hate those.
-
Paint
the spacer flat black to match the toe-rail for a finished look.
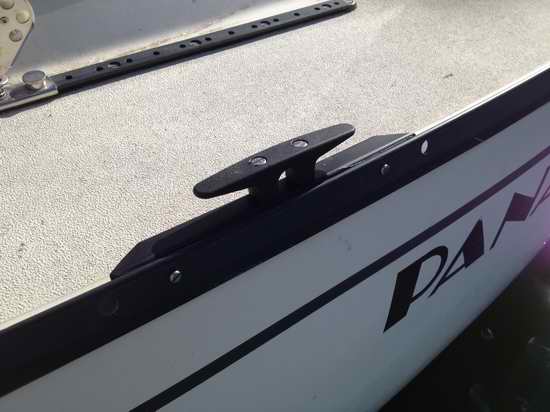
-
Mount a 6" long nylon cleat with a
rectangular style base as shown here. Remember, this cleat must be big
enough to hold 2 spring lines twisted around it. I purposely bought cleats with
straight horns to minimize a chance of snagging a sheet. This
works. Use a metal cleat if you tie
up in a windy
place.
 There are many ways to fasten the spacer to the toe rail. It depends on the strength you need. There are many ways to fasten the spacer to the toe rail. It depends on the strength you need.
- The strongest is through bolting to the deck with
stainless washers or aluminum backing plates. Then bolt horizontally
through the inside of the toe rail. However, you risk leaking through the deck.
- Bolt the spacer horizontally to the inside of the toe rail and add
sealant to prevent movement. You just might be surprised with how much strength the sealant adds.
This technique is OK if you never have an upward pull on the cleat like
when you tie to a high dock or transit a lock. This is how I mounted the cleats on Panache. If bolting to just the toe rail proved to be weak, I could always through bolt them to the toe rail later. This has not proven to be the case.
- Alternatively, you could remove two toe rail screws and insert longer screws to fasten the spacer to the bottom of the toe rail. Good luck lining up the screw holes and keeping the water out though.
Regardless of your technique,
use liberal amounts of adhesive for strength and to keep water out of the
cabin. Use nylock nuts to prevent movement.
-
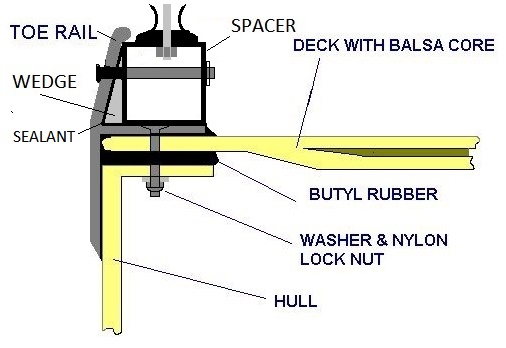 If you
bolt the cleat spacer to the side of the toe rail (in line with the forward end of
the window), you should install 2 aluminum wedges to fill the gaps between
the square spacer and the angled inside of the toe-rail. Without these
wedges the square spacer will get pulled up off the deck, making a weak
installation. The strongest installation is with two wedges in line with the mounting bolts. Each wedge must be 1" tall and tapered about 10 degrees. If you
bolt the cleat spacer to the side of the toe rail (in line with the forward end of
the window), you should install 2 aluminum wedges to fill the gaps between
the square spacer and the angled inside of the toe-rail. Without these
wedges the square spacer will get pulled up off the deck, making a weak
installation. The strongest installation is with two wedges in line with the mounting bolts. Each wedge must be 1" tall and tapered about 10 degrees.
-
I clamped the assembly to the toe rail and drilled horizontally through the toe rail, wedge and both sides of the spacer. Then fastened the assembly
with two long screws. This way a wrench can fit over the nut for tightening as shown at right. A little detail that make this job so much easier.
-
Finally, remember to flush some water through it every now and then. After many years of not having done so, I was amazed at how many dead bugs were flushed out.
SOLUTION
2 - "This Tech Tip about mid-ship cleats last spring got me to
thinking. Always a dangerous thing! After searching around in the basement junk pile I found an old 5 or 6
inch cleat plus a chunk of 1.5" square aluminum bar stock and whipped up
this little project just to see if it would work. It worked really well
over the summer sailing season so now it's time to release the idea into
the wild.
 I
admit I've got a bit of an advantage because I've got a small lathe and
milling machine in the basement, but I see no reason why a person couldn't
do pretty much the same with a hacksaw, power drill, power sander, some
files, a set of taps, and some determination. The trickiest thing was
boring the long hole and cutting the slot. I
admit I've got a bit of an advantage because I've got a small lathe and
milling machine in the basement, but I see no reason why a person couldn't
do pretty much the same with a hacksaw, power drill, power sander, some
files, a set of taps, and some determination. The trickiest thing was
boring the long hole and cutting the slot.
 You could rough it out with a drill press and get your friendly neighbourhood machinist to cut the slot. The curve of the toe rail means that the hole and slot have to be somewhat oversize so the assembly can slide along the rail easily. Why can you only drill a curved hole
when you don't want one? Be prepared to spend some time with
your files and it's good if the boat is close by for trial fittings. You could rough it out with a drill press and get your friendly neighbourhood machinist to cut the slot. The curve of the toe rail means that the hole and slot have to be somewhat oversize so the assembly can slide along the rail easily. Why can you only drill a curved hole
when you don't want one? Be prepared to spend some time with
your files and it's good if the boat is close by for trial fittings.
Because the upright portion of the toe rail leans inboard, the position of
the cleat is such that there is no problem fouling the sheets or anything
else. Voila! No drilling holes in the deck, no wondering exactly
where to put it, no toe stubbing and it's easily adjustable for any dock
you tie up to. My only concern is that strong waves or currents could
possibly bend the toe rail, but if you find yourself in that kind of
situation you should probably be heading away from the dock and out to sea
anyway. The whole business slides onto the toe rail at the stern and
if the pin fell out, it's likely you would notice before the cleat slid
back and fell off the boat completely. The pin is a 3/8" quick pin with
a ball detent."
Dave Doan
S.V. Sybill
CLEAT CHOCKS -
Installing a rigid cleat on the balsa cored deck (away from the toe rail)
would take precious space and become an instant toe masher, unless you use
cleat chocks. Smashing your toes is not a lot of fun!
If your jib sheet gets tangled on the cleat you could wrap your mooring
line around it to fill the horns and coil the remainder of the line,
hanging on the life line. Then it is in a handy place when you have
to use it. I do the same with the bow and stern mooring lines to
save time when sailing solo. If you prefer, fabricate a couple of
form fitting chocks to fill the horns as shown below. There are a
myriad of ways to hold those chocks; bungee cord, line tied around, a
clasp, etc. I'll leave that part to you.
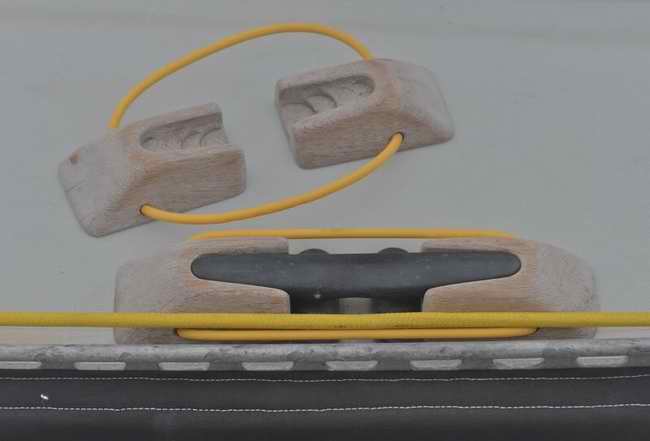 NOTE - It would be clever to cut the
aluminum spacer under the cleat long enough to also support the cleat chocks.
Even if you don't require the chocks, the extra length of the spacer will
strengthen the installation to
support the spring lines. This is what I did as shown in the photo
above. NOTE - It would be clever to cut the
aluminum spacer under the cleat long enough to also support the cleat chocks.
Even if you don't require the chocks, the extra length of the spacer will
strengthen the installation to
support the spring lines. This is what I did as shown in the photo
above.
HINT -
If you are roaming from dock to dock, your dock lines should be tied to your boat. This
way you only have to release the line on the dock and gently pull the
line in to retrieve it. Quick and slick without having to
step on shore. There you go, looking cool again!
Now that you have a spring cleat you can
practice docking with it. Tie the line to the cleat, approach the
dock dead slow, have a crew jump on the dock and quickly cleat the line to
the dock.
As the tight line arrests the forward motion of the boat, the boat will gently slide sideways to the dock. You could keep the engine idling and the rudder
hard over to keep the hull parallel to the dock. This also gives you time
to tie in the bow and stern lines. Looking cool again! What a great
place to tie the boom preventer to!
|