| SJ23 Tech Tip C06, (Issued 2011-07-15) Bob Schimmel | |
|
Cabin Walls - Install New Fabric. |
|
 Does the original fabric on
the cabin walls of your
SJ23 have unsightly stains? Most SJ23s used in a cold climate suffer from this
problem. Moisture will condense on the cool uninsulated fibreglass walls of a poorly ventilated
boat. The condensation dissolves the water based adhesive that holds the fabric to the wall. The dissolved glue then soaks into the porous fabric, creating those
"endearing" stains. In time, the cloth peals off the wall, leaving an
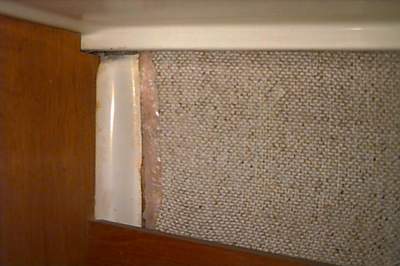
even worse looking mess of old glue on unfinished fibreglass. The fabric
shown at right is not very representative of this problem since the
camera is doing an excellent job of hiding the subtle stain colours! I was
not impressed with the workmanship of the original installation which is
the other reason why I took this photo. Notice
the large gap of cloth adjacent to the bulkhead. Take it
from me that when the fabric was peeled off the wall it left a disgusting
mess of old adhesive on the glass-roving. Does the original fabric on
the cabin walls of your
SJ23 have unsightly stains? Most SJ23s used in a cold climate suffer from this
problem. Moisture will condense on the cool uninsulated fibreglass walls of a poorly ventilated
boat. The condensation dissolves the water based adhesive that holds the fabric to the wall. The dissolved glue then soaks into the porous fabric, creating those
"endearing" stains. In time, the cloth peals off the wall, leaving an
even worse looking mess of old glue on unfinished fibreglass. The fabric
shown at right is not very representative of this problem since the
camera is doing an excellent job of hiding the subtle stain colours! I was
not impressed with the workmanship of the original installation which is
the other reason why I took this photo. Notice
the large gap of cloth adjacent to the bulkhead. Take it
from me that when the fabric was peeled off the wall it left a disgusting
mess of old adhesive on the glass-roving. SAFETY - Wear a mask for the fine particles that become air born. Nasty stuff. If you intend to sleep overnight on the boat with the outside temperature close to freezing, (hopefully not below freezing) it demands a totally different set of solutions to stay warm and dry: insulate the cabin walls meticulously with closed cell foam glued to the wall, including lockers. Lay rug or interlocking foam on the floor, add ventilation under the settee cushions, ventilate the cabin (day/night), and use a heater that vents to the outside. In the explanation that follows I'm assuming that you will have the good sense to stay off the boat when it is below freezing and crawl into a warm pub somewhere. Replacement cloth for the cabin walls must be able to breathe
and not rot. In addition, you must be able to glue it to the
previously attached foam or to the fibreglass hull
using a water proof glue that doesn't soak through the cloth.
Quite a tall order actually. If you select a water proof fabric
(so the glue doesn't soak through), the main issue is the damage that
condensed moisture and possible mould between two vapour barriers (hull and cloth) will do. Two vapour
barriers adjacent to each other is an absolute NO NO. The rule of thumb
for insulation is that the vapour barrier MUST go to the warm side of
the
insulation and the insulation must be able to breathe to vent moisture to the
cold outside. This will
keep the insulation dry and prevent condensation so you can stay
warm. It is OK if the dew point is inside the insulation but never
where the temperature can go below freezing. This is where closed
cell foam has the advantage to keep condensation off the fibreglass. SOLUTION - The first step to cure
this problem is to glue a thin insulating fabric to the walls using a water
proof adhesive. Fortunately, this task is not too difficult and it really
improves the appearance of the cabin. The second step is to add or
improve the cabin ventilation.
If you don't improve the ventilation, it is doubtful the repaired wall
will last.
REMOVE OLD FABRIC - Wear a mask when you remove the old cloth and glue. The tiny cloth and glue particles that become air borne are hard on your lungs & breathing passages. If you still have any original fabric on the walls, it should come off with a gentle pull. "It was very easy to remove the cloth from Panache's walls." Once the old cloth is removed scrape off the big lumps of glue using a putty knife, chisel, wire brush or a curved Stanley Surform scraper. (You owe it to yourself to buy one of these scrapers). Try to create a generally smooth surface without removing hull material. "I left the really solid, stubborn to remove glue in place. I figured that if it didn't dissolve after 30 years it is there to stay. The dried glue resembles PL type adhesive used in home building. If you're a "clean nut" then by all means dissolve and wash off whatever glue you can. However, I could not find a solvent for the glue and hot water made a horrible mess. So I abandoned the cleaning." In the end I let the cabin wall dry and vacuumed all surfaces clean. The rest of the glue is not about to fall off, so it can enjoy the ride!
Spread water proof glue on the wall with a flexible trowel notched with 1/8" holes. The idea is to spread the glue just thick enough to contact and hold the cloth without oozing through the cloth. Experiment on a sample piece. Apply the cloth to the wall by starting at one of your alignment marks and finishing at the other to prevent wrinkles. Spread the cloth evenly, like wall paper. DO NOT twist it. With all the alignment marks lined up, (i.e.: cloth is in the correct place), use a big dry flexible sponge to press the cloth against the wall to work it into the ribs of glue. DO NOT twist or rotate the sponge as this will move the cloth. As the glue dries during the next few days, keep the boat well ventilated. Man does this stuff stink. MATERIAL -
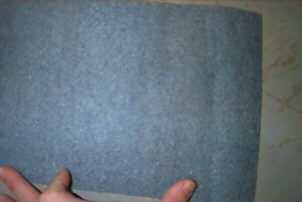
In 1998 I bought Bretlin
Seascape carpet from Eagle Hardware (USA home improvement outlet).
Eagle went out of business in Canada so search
for Bretlin here. They sold it
in Ginger, Blue or Green on a 6' wide
roll at $1.67 per lineal foot. |
|
|
Return to Tech Tip Index. . . . . . . . . . . . . . Have a Question? |
|
 In my search for a
suitable fabric I tried to find Ozite, a rubber backed carpet dating
back to the 1960s. It has properties similar to neoprene.
This solution was suggested by Hal Roth in his book, "After 50,000
Miles," in which he does a good job of explaining this problem.
Unfortunately, this rug is no longer manufactured. Instead, I
found another fabric (thin carpet) that is used extensively on the floor
of bass boats,