| SJ23 Tech Tip C19, (Updated 2024-02-03) Bob Schimmel, Chad Murchison. | |||||||||||||||||||
|
Cabin Ventilation - Nicro Solar Vent. |
|||||||||||||||||||
Good
cabin ventilation is absolutely essential for the continued longevity of
any boat. A dry interior is the best
prevention against musty smelling air, mildew in fabric,
wood rot,
corrosion of electrical/electronic
connections, and to protect the hull against
blisters. Even if the hull is barrier coated
with epoxy below the water line, you should strive to keep the bilge as
dry as possible so spiders will want to call the place home! Here are
some golden rules to follow:
The cabin of an unattended closed boat accumulates humidity because the hull surface temperatures and water & air around it are never identical. They are in constant change with day time heating and night time cooling. You can feel humidity build up on a large scale when a warm and cold air mass meet, converting the atmospheric humidity to rain. The changing air and water temperature is due to the rotation of the earth relative to the sun and the tilt of the planet relative to its orbital plane, but lets not go further than this. While the process is accelerated inside your floating boat, it can also happen when a closed boat is stored on a trailer, especially if there is water in the bilge. The sun can easily heat a light coloured deck to 120F (49C) and a dark coloured deck to 170F (77C). These high temperatures then heat the cabin which is usually not a problem unless water is in the bilge which quickly creates 100% humidity. There are few bone dry boats out there. It's the condensation in the cabin that does the most damage. When you close off a boat's cabin to “protect” it, you actually cause the cabin humidity to rise. Water vapour is a potent gas that can permeate most materials with surprising speed, including fibreglass. Expose it long enough and you have water droplets that drip from the ceiling or run down the wall to be absorbed by wall fabric, cushions or articles stowed against the wall. Over just a few days or weeks, the moist air inside the cabin creates an ideal climate for mould to grow. That smell of musty air is created when the mould attacks your boat's interior; wood, fabric, electrical connections and metal components. Rot stinks, is miserable to remove and is expensive to repair. This damage will quickly age your boat.
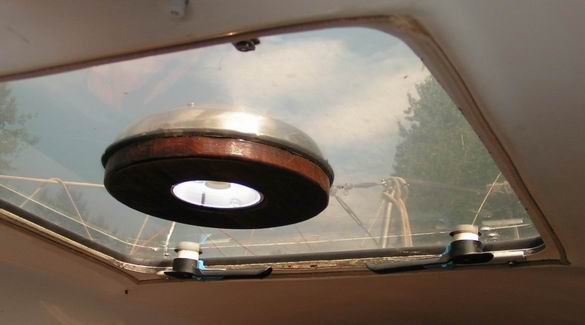
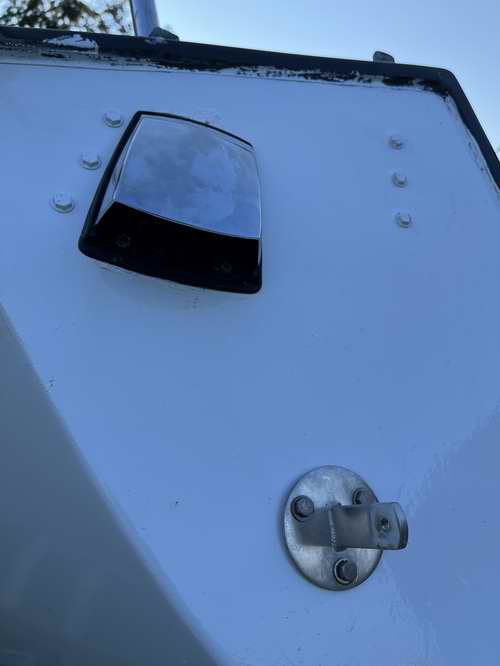
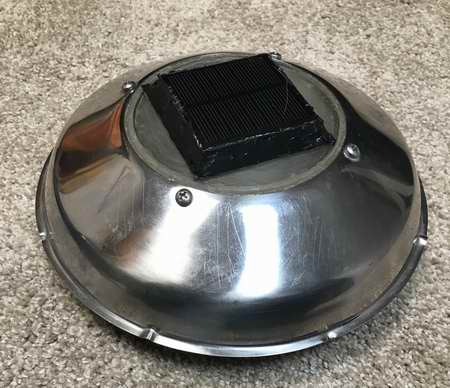
The 3" Nicro day & night 2000 SS ventilator can blow air for ~(24-36) hours from its charged Ni-Cad 2.8 amp hour C cell battery. All Nicro ventilators are equipped with an intake and an exhaust fan blade. You simply push on the appropriate blade for the direction of air flow you want. Look for the coloured dot on the fan. The fan operates very quiet when the bushings are snug and lubricated. But I have a sneaking suspicion that an intake fan lifts the motor off the thrust bearing, making it turn quieter. I installed a ventilator through Panache's forward hatch to retain deck space, precious as it is on an SJ23. Others will say that cutting a hole through the acrylic weakens it and install their ventilator through the forward deck. The hatch of an SJ23 is large enough to leave lots of light shining through around the ventilator. The hatch doesn't have aluminum cross bracing or a reinforcing ring so for that reason I consider it too weak to support a person. Therefore, I tell my crew that it is a NO STEP zone since I also don't want the acrylic scratched. For those reasons it seems logical to have two delicate things in the same place; hatch and ventilator. This way you have only one place to keep away from and leave a clear deck to tramp around on when the boat is rocking and rolling. So far it has worked as nobody has had to walk the plank, yet! See Tech Tip B08 for important instructions about cutting and machining acrylic. The wood ring around the ventilator hole shown above is fastened with silicon sealant to the acrylic. It totally flattened and stiffened the acrylic. This ring was installed several years after I installed the ventilator. The ventilator now looks good from the bottom because I can't see the dust that settles in the ring over summer. It is an essential part of the installation that I forgot to install way back then. I have not seen it necessary to set the two screws through the side of the white ring to secure the ventilator from lifting.
SUMMER
COMFORT - For
the first two years I owned Panache, I struggled to dry the cabin. Every weekend when I returned to the boat I had to wipe up the moisture. I never could find a leak. Food didn't last long and paper wrappers became soggy. It was difficult to sleep in the sauna like atmosphere and I was tired of storing gear away from water dripping off the ceiling and condensation running down the walls. I kept the hatch cracked open at night but I couldn't leave it that way while unattended. I finally solved the problem by installing a Nicro Marine solar powered day ventilator on the forward hatch as shown above. See
Tech Tip
B08 for installation techniques.
This fan blows 750 ft3/hr under full illumination. An SJ23 cabin contains ~600 ft3 of air so this fan is adequate when the sun shines. The ventilator dried the cabin
in about two weeks, ending my humidity and stale air problem. As good as that ventilator is, it was replaced with a day/night ventilator that proved even better. The day ventilator has since been relegated to backup and winter storage use. My next version may see me using dual ventilators.
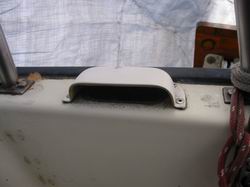
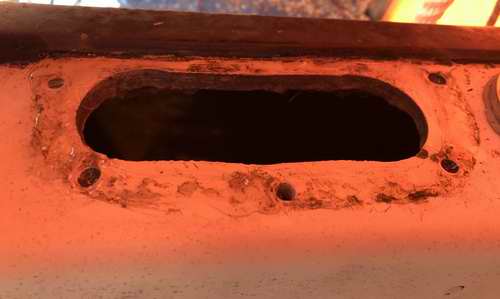
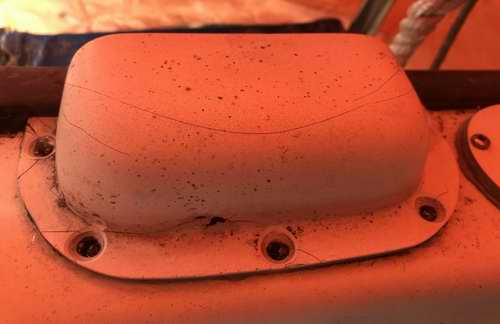
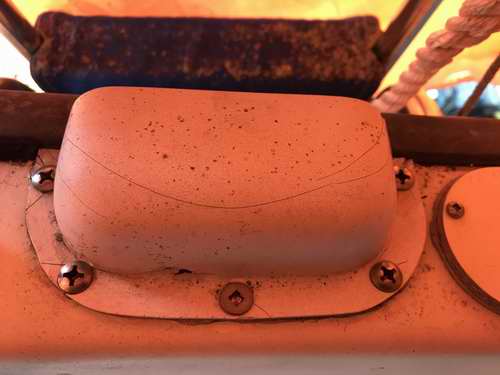
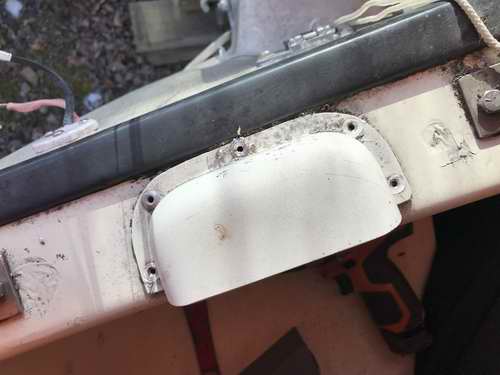
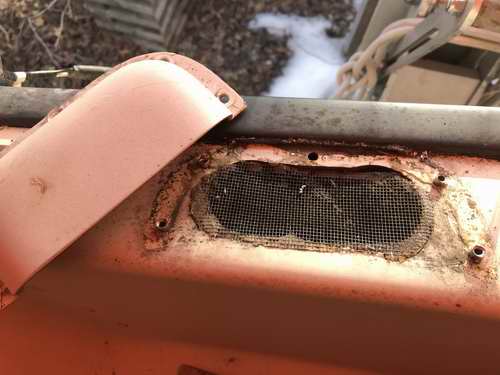
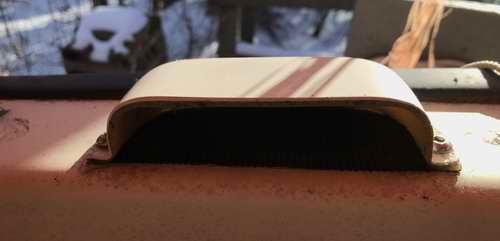
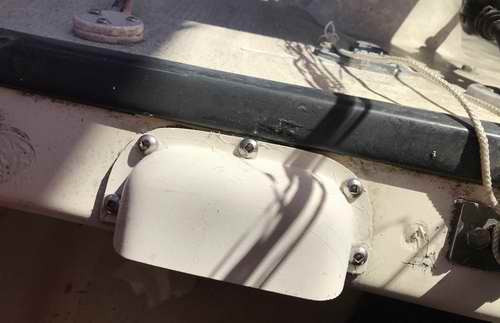
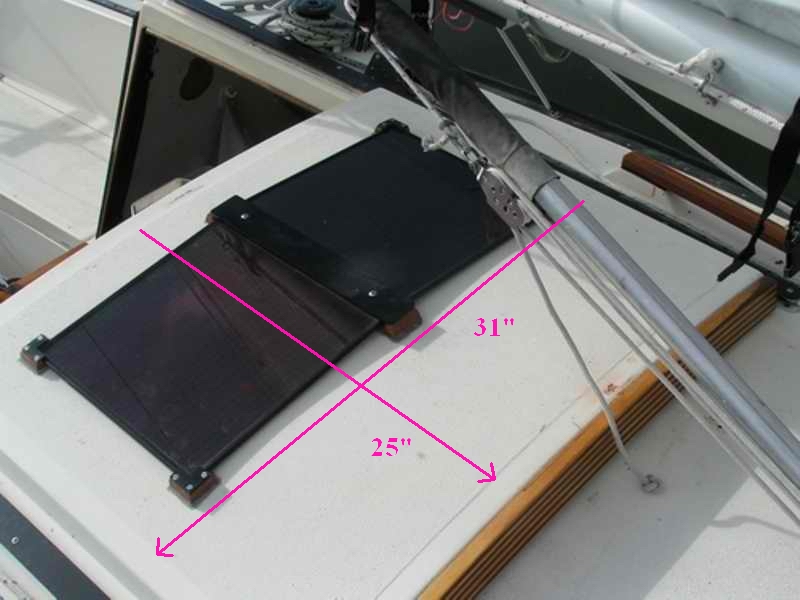
NOTE - These "scoops" are actually the handles from a Tanzer 26 companionway drop board where they double as vents. Rather clever actually. "Sure beats having a board slip out of your wet hands to land on your foot." For original Tanzer "drop board handles," phone Yachting Services at 1-800-618-6748 (Eric Spencer). To install these vents on an SJ23 transom, be prepared to trim the edge of the vent to fit the narrow top. Cut the hole with round corners as shown below. Round equates to strength. Panache's vents were installed by the previous owner using pop rivets. My idea in working on these vents is to make both vents serviceable by mounting them with screws.
WINTER COMFORT - A boat left floating for winter storage (an unheard of concept on the prairies or a mountain lake!) has an entirely different set of ventilation requirements. These owners have the luxury of using the vessel as a weekend getaway with the ability to do some midwinter maintenance. However, the cabin requires heating and active ventilation to offset the additional moisture of occupation. If shore power is available then a small ceramic 1.5KW electric cube heater works well to heat the cabin air and to keep the dampness out of the cushions. Use the low setting while you are away and the high setting while you are aboard. This works OK down to around freezing. Below freezing, two heaters may be required to make it liveable. It's amazing how much heat (5000 BTU) comes out of one of these small ceramic heaters. If the ventilation is inadequate while the boat is unoccupied, you may have to use a sponge to soak up the condensation under the v-berth and in the storage areas under and behind the settees. In the Spring you may see a significant amount of water or ice in those areas to make you think the hull has sprung a deck leak. In actuality, the water came from condensation dripping from the ceiling and flowing into the bilge through any holes. If this is your situation, use an active dehumidifier resting over the sink to drain off the moisture. It will keep the boat dry and fresh smelling so you won't have to clean anything when you step on board. On and SJ23 it is wise to store articles in plastic tubs stowed under the settees. The tubs also help to keep things orderly as it is quite easy to slide them sideways to find your stuff. Leave an empty space between the tubs so you can slide them. NOTE: If you sleep on board without a ventilator and the air temperature will drop below the dew point, then crack the hatch open (install a full hatch bug screen) and open the companionway (with another full bug screen) to keep the cabin dry. It is amazing how much humidity a person can expel at overnight. For most southern U.S. boats the air temperature seldom drops below the dew point and it is therefore irrelevant if the fresh air is blown in or the stale air is sucked out of the cabin. Although fresh air blown in smells better! For a northern latitude boat, especially in the shoulder seasons, the most effective ventilation is better determined by how low the air temperature drops below the dew point and to a lesser extent, what the drying index is during the day. A high drying index almost always relates to a drier boat. If the air temperature drops below the dew point you have to deal with condensation. For a boat floating in an exposed anchorage consider which of the following to choose:
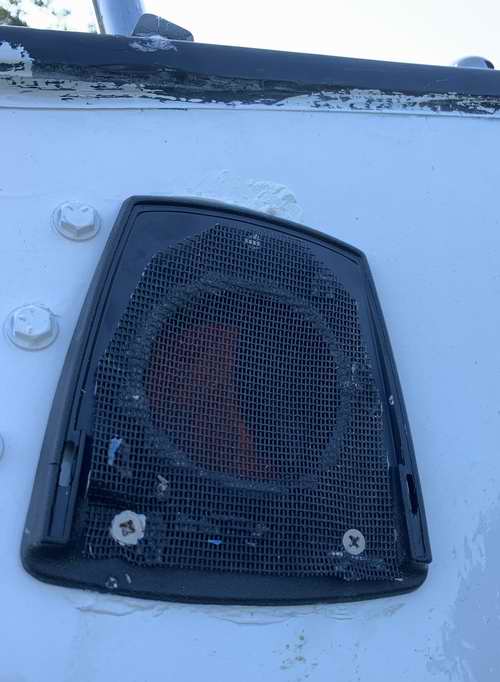
SAFETY - Cooking fumes and humidity aside, if your cabin air is filled with dust particles, glue fumes or is low in oxygen due to a heater consuming air then you definitely need to get outside to breathe fresh air NOW. While you are out there, blow fresh air into the cabin to push out the bad stuff as quick as possible. After all, people need oxygen and clean air to survive. Your nose can smell clean, fresh air very quickly, so follow it! INCREASE THE AIR FLOW - Panache's ventilator shown installed above is a 1993 Nicro Day ventilator. The air flows under the edge, through a narrow 1/8" wide gap. If you do the math, the cross sectional area of this gap is much smaller than the 3" diameter fan hole. A later version of this fan is equipped with long air slots along the bottom edge of the hood to improve the air flow. If you stick a wet finger in front of a slot you can actually feel the wind chill. This is the main reason why I switched to a Nicro Day/Night ventilator. When I discovered that my day ventilator had such poor air flow I added 1/8" thick acrylic spacers under the perimeter of the stainless hood, glued with silicon sealant so they can be removed later. In terms of water shedding ability, the spacers shed water better than Nicro holes drilled around the perimeter. While I have never experienced problems with this installation, about 10 years later discovered the acrylic hatch was bowed downwards, like a shallow dish pan. This was due to the lack of support around the ventilator hole. The pan shape effectively closed the gap under the perimeter of the hood, restricting the air flow. All this because I forgot to install a wood reinforcing ring under the ventilator hole. The ring straightened the acrylic and added phenomenal strength and stiffness. See Tech Tip B08, Reseal the Forward Hatch. I retained the spacers to maintain the higher air flow. DUAL VENTILATORS - If you really want to improve the cabin air flow, install a second ventilator as recommended by Nicro. "Any time an air tight boat is kept in a confined area that has little wind, like a marina with tall power boats, a well protected anchorage or with buildings close by, the boat needs forced ventilation. Usually more than a single ventilator can provide." "DON'T INSTALL A SECOND VENTILATOR TO OFFSET A DECK LEAK".
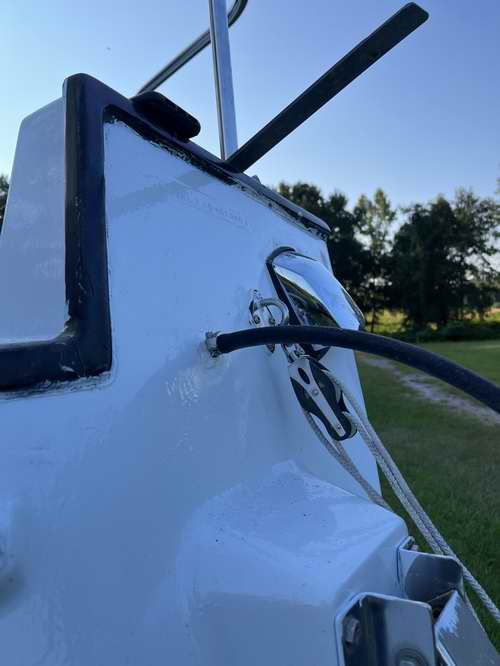
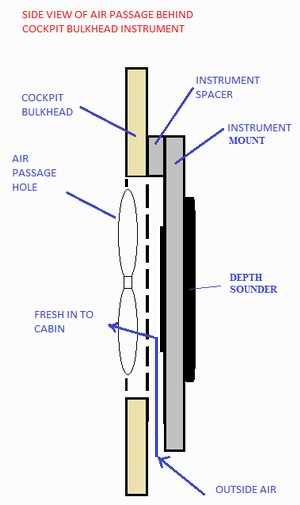
- An alternate location for a second vent might be on the cockpit
bulkhead behind the depth sounder or
other flat, low profile instrument as shown at left. This is my
rendition of an air intake that shouldn't be obstructed while sitting against the bulkhead. This installation
requires a 1/2" thick 12V PC fan installed on the inside and an
appropriate sized solar panel installed outside. You have to get
creative for this. I have not shown the side of the instrument
spacer in order to reveal the air passage.
________________ REPAIRS ____________________
Repair work of this nature requires surgical skills
and precision cutting tools
to separate the components without further damage. This one was no different and it pays
to have patience. I cut a 1/8" thick acrylic disk to fit the hood, just inside the lip
where the old acrylic was mounted. This replaced the damaged backing
panel
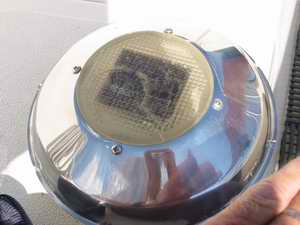
that the solar panel was mounted on. Silicon sealant was 2023 - The repaired solar panel shown above turned opaque with 20 years of UV exposure. I replaced it with an aftermarket panel available from my local electronics wholesaler at $10 Ca. The new 2 1/2" square solar panel has a superior coating to withstand UV light. An aftermarket panel can usually generate lots of power so be careful to pick one that can't overdrive your fan motor. Also one that can charge two AA batteries (>3VDC) so it has sufficient power to start and run the solar motor while charging. A little bit of extra power is OK since the motor can spin faster & run quieter. I like the extra air flow that comes with it. The panel I bought has a 1/8" thick junction box on the back which necessitated a 1/4" thick spacer to fit it to the top. I used some scrap G10 fibreglass board at the perimeter, sealed with Marine Goop underneath. I also applied a fillet of Sikaflex at the outside perimeter to keep the weather out. Its not the prettiest installation but given that this is my backup vent used for emergencies or winter layover, I'm happy with the results and performance. Now that this panel works as well as it does, I may replace the one in my day/night vent shown below because it has difficulty starting in the morning with the marginal light.
Here are some tests you can perform on the motor to determine what is wrong, assuming the panel is illuminated by the sun.
Nicro Solar Motor Specifications.
Solar World
(Now Solaris) Motor
Specifications.
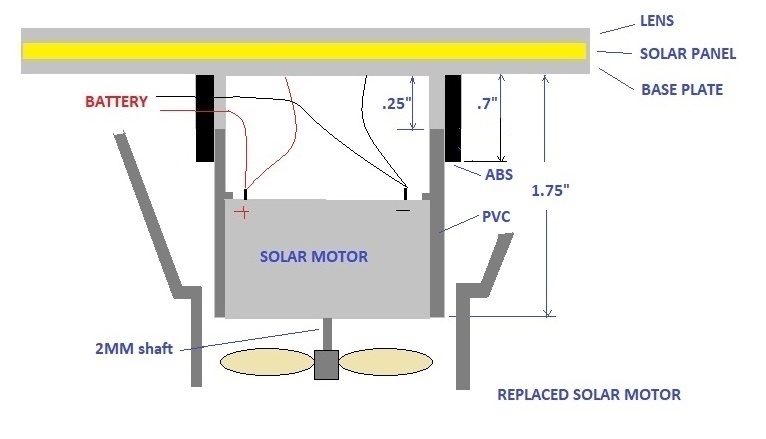
The best part of this technique is that if the replacement motor dies, simply cut the silicone sealant, break free the dead motor, glue in a new one, solder the wires to the motor and screw it back on. So far I have replaced one worn out motor. SWITCH - When I replaced the solar motor in my day/night vent I included a
switch S1 to shut the fan off. There are times when it is annoying to
sleep with the noise above my head. Although, when it is colder
in Spring or Fall, I like to shut it off to keep the
warm air in the cabin. I see little point in heating the
Arctic! |
|||||||||||||||||||
|
Return to Tech Tip Index. . . . . . . . . . . . . . . Have a Question? |
|||||||||||||||||||
 Cabin ventilation, the
simple act of blowing fresh dry air into the cabin and/or stale humid air out of the cabin,
solves the problem. The temperature must be equalized between the inside AND
the outside of the boat to prevent moisture build up.
Cabin ventilation, the
simple act of blowing fresh dry air into the cabin and/or stale humid air out of the cabin,
solves the problem. The temperature must be equalized between the inside AND
the outside of the boat to prevent moisture build up.
 When I moved Panache to a
sheltered mooring the push pull effect of two ventilators seemed like the
best way to remove the occasional, faint musty smell.
The top of the sliding
hatch is one place to install a second ventilator on an
SJ23, there being no free deck space on the aft end of the boat. With the
forward
ventilator
blowing air in
(intake) and the aft ventilator blowing air out
(exhaust), the push pull effect of the two should
dry
and freshen the cabin very quickly. Although it might vent better the other way around.
When I moved Panache to a
sheltered mooring the push pull effect of two ventilators seemed like the
best way to remove the occasional, faint musty smell.
The top of the sliding
hatch is one place to install a second ventilator on an
SJ23, there being no free deck space on the aft end of the boat. With the
forward
ventilator
blowing air in
(intake) and the aft ventilator blowing air out
(exhaust), the push pull effect of the two should
dry
and freshen the cabin very quickly. Although it might vent better the other way around.
 For example, an aft ventilator
like a 3" Nicro day
vent, could
work in concert with hot air rising out of the cabin and the venturi effect of wind over the deck.
For example, an aft ventilator
like a 3" Nicro day
vent, could
work in concert with hot air rising out of the cabin and the venturi effect of wind over the deck. 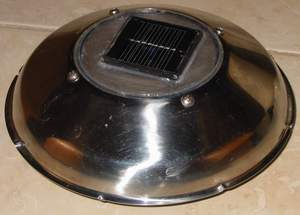
 used to fasten the
replacement solar panel on top of the acrylic disk and to seal the disk to the plastic frame. The SS hood rests on top of the frame. I'm very pleased with the results because the
repair looks good and the fan now
blows more air than with the
original solar panel.
used to fasten the
replacement solar panel on top of the acrylic disk and to seal the disk to the plastic frame. The SS hood rests on top of the frame. I'm very pleased with the results because the
repair looks good and the fan now
blows more air than with the
original solar panel. 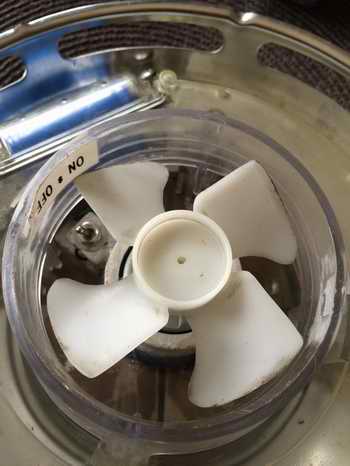
 REPAIR - Around 2009 Nicro
Marine was bought by
REPAIR - Around 2009 Nicro
Marine was bought by
 There are three components to this successful repair; a PVC plumbing fitting
(approx 1 5/8" ID x 3" deep), a short length of 2" ABS pipe and a solar motor. Reconstruction
is a fairly simple process if you have basic cutting tools and soldering skills.
There are three components to this successful repair; a PVC plumbing fitting
(approx 1 5/8" ID x 3" deep), a short length of 2" ABS pipe and a solar motor. Reconstruction
is a fairly simple process if you have basic cutting tools and soldering skills. 