| SJ23 Tech Tip C10, (Updated 2020-02-10) Bob Schimmel, Bill Ward. | ||
|
Ensure the Portable Commode Stays Upright!
|
||
 Panache has been knocked on her side
several times in unexpected gusts. Probably
because the skipper was paying attention to the wrong thing, again! Fortunately
the first two times were on her port side where the back of the head is supported by the wall of the berth behind it. I say fortunate because the head was only secured by the corner brackets at the time. I shouldn't have to describe what a mess a
starboard slam dunk would make! Panache has been knocked on her side
several times in unexpected gusts. Probably
because the skipper was paying attention to the wrong thing, again! Fortunately
the first two times were on her port side where the back of the head is supported by the wall of the berth behind it. I say fortunate because the head was only secured by the corner brackets at the time. I shouldn't have to describe what a mess a
starboard slam dunk would make!
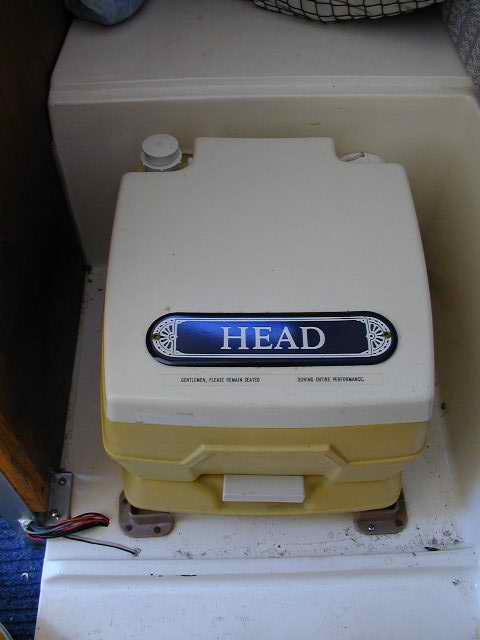
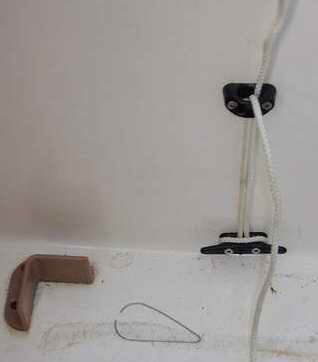
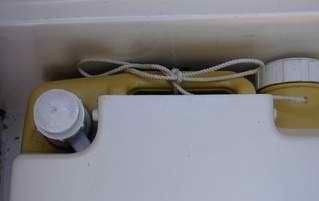
NOTE: As a person goes through various journeys in life, sometimes an event occurs that "wakes you up" to the unexpected. The "enlightening" experience that prompted me to write this Tech Tip doesn't usually happen in a vertical oriented world and my "grey matter" kicked into overdrive for a solution. Sometimes s__t just happens. (Sorry but I just couldn't resist this). CONSTRUCTION - Panache's head, commode, throne, thunder box, porta-potty, John/Betty, privy, loo, can, crapper, pot, toilet, or whatever else you want to call it, is manufactured by VIPi. It is located in the factory designated spot, just forward of the port bulkhead. You'll find it when in need! It can be no taller than 13.5" to allow the filler board to lay across the aft end of the V-berth. If I'm sailing solo when nature calls, I generally set the boat to hove to and on starboard tack so I have right of way and don't have to get off the pot. In hove to, the head is calm and I don't have any accidents. The portable head consists of two sections; the lower section is the holding tank and the upper section houses the waste bowl, flush water tank and pump. There is a very robust seal and valve between the two sections with two over center clamps holding them together on the sides. The clamps are brutally strong. Both sections have a formed carrying handle at the back that make for secure handling. This is pretty standard construction for most porta-potties. INSTALLATION - On Panache the head sits on the cabin floor between four vinyl corner brackets to prevent it from sliding. Oh so important when nature calls while under way. This is a very nice feature installed by the previous owner. I have no idea where he got the brackets from. The steel screws will stay till they corrode free, or I get ambitious. I have not seen a reason to be that ambitious! To keep the head upright and prevent a spill, I installed a small cleat low on the wall, directly behind the head as you can see below. This creates a strong spot to tie the head to. Each fitting is through bolted to a mahogany backing block that can be accessed by going through the forward berth hatch. It helps to be a contortionist. Use a nylock nut so the assembly stays secure and doesn't surprise you by coming apart. Later I added a fairlead above the cleat to hold the line up as it is impossible to reach with the head in place. I use a locking slipknot (shoe knot) for compactness in this tight spot. The location is simply too confined while lifting/placing a heavy fully loaded head.
Variations of the following technique can be applied to the head on your boat as not all porta-potties are designed the same. The trick is to make it very strong and convenient to secure.
PS: The wire ring in the photo has nothing to do with sailing. It was used to attach a lift ticket to my ski jacket. By the end of a ski season it is not uncommon to have 10 tickets glued to the same ring, one over the other. It was bugging me so I ripped it off and ended up in the photo by accident. Now you know.
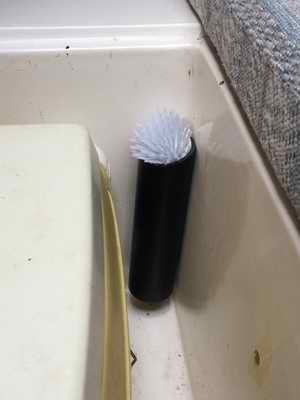
KEEP THE COMMODE FRESH - There is nothing worse than a head that smells. It is better to do something about the problem just after the "paper work" is done, than leave it for later. So I screwed a 2" ABS pipe in the back corner of the head compartment to drop a bowl brush in. The bottom is left open for ventilation and cleaning. Aaagh! Enough said.
A SLICK IDEA:
My wife and I really didn't like the head under the V
berth. It's a hard place to get to, especially when someone is sleeping
in the V berth, and the headroom (no pun intended) is pretty low.
Plus, the floor space under that removable board can provide a LOT of quality
storage without a porta-potty there! ______________________________ CERAMIC MARINE HEAD ___________________________________
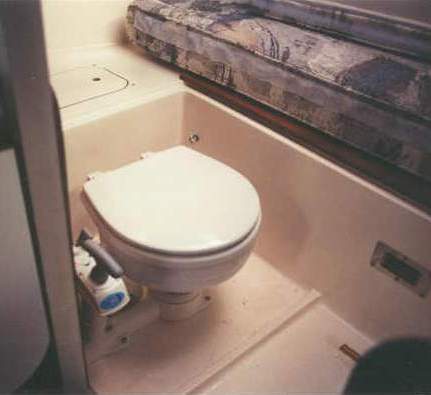
Ceramic marine heads are manufactured with various mounting arrangements. The one shown at right is the only one I know installed on an SJ23 and gives you a good idea of an installation. It is firmly bolted to the floor with about 3" of vertical clearance under the flat floor to accommodate the plumbing. This installation was done many years ago but I recall the owner had a difficult time with it which is why he added the extra access hatch behind the head. Even if this hatch is not required to install the head, it opens access to a huge storage volume and the bulkhead mounting bolts. See Tech Tip B07. This is all I know of this installation.
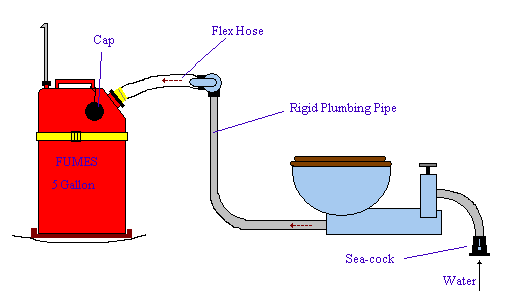
PLUMBING
- A marine head is equipped with a joker valve (the grey handle shown at
right) that pumps and macerates the
solid waste to a consistency resembling a liquid which makes it possible to pump the stuff through a 1.5"
ID hose. It might surprise you but paper is actually the biggest problem, not the human waste. The valve pumps only one way so it is possible to pump
fluid uphill or install the drain hose around obstacles inside
the hull. Does anybody actually install
a plumbing line with free space
around it? Use ABS plumbing pipe and
fittings for the rigid line from the bowl to the valve. Approved ABS pipe and fittings are
available at a local plumbing supply. The ball valve is specific to this task and available
at West Marine. They also sell the 1.5" drain hose in white
vinyl which has an
absolutely smooth bore, for all the obvious reasons. Soak the ends
in hot water to slide it over a barbed nipple and use 2 stainless clamps
to hold it there. The flush water is
drawn from the through hull fitting to the head through a 3/4" suction hose (fiber reinforced clear vinyl). If you
plumb your
holding tank overboard (see note below) then do so through a sea cock
equipped with a ball valve to keep the boat afloat.
Ditto for the flush water line. VENTING - The holding tank must have an external air vent located high outside the hull. Ensure that it stays open at all times. If you can't flush the head or pump out the holding tank then quite likely the vent line is plugged or restricted. If you have the tank pumped out at a shore facility then make double sure the vent line is functioning properly since the shore pump can quite easily collapse the holding tank down to the size of a small jug! This can happen so quick it'll make your head spin. So be careful.
On an SJ23 you could install the jug under the V-berth, standing upright on the center line of the hull, against the inside bulkhead. If it is set in the upright position on a wood shelf equipped with fiddles and strapped to the fibreglass bulkhead it can't accidentally drain. I haven't gone onboard yet to determine where the gas jug could fit. The drain hose also requires a top quality plastic ball valve to shut off the hose while the tank is disconnected. The valve must be positioned high so fluids drain away from it and NO fluid flows out when it is disconnected from the jug. Make the last flush clean water, just in case! Don't say I didn't warn you! The loose cap is tied to the tank handle in the diagram above which saves having to look for it!
SYSTEM OPERATION - Stick your head into the V berth access hole and shine a flashlight against the outside of the jug to see the fluid level. When the tank is almost full, give it one last flush with clean water, let the water drain and close the ball valve, disconnect the hose, cap the jug and switch it out for a replacement jug. DON'T wait till the jug is full to the brim! The risk is too great! Dump a glug or two of "blue stuff" in an empty jug to break down the new waste and control the odour. Use biodegradable toilet paper. NOTES
LINKS Marine Heads - http://seagrant.uaf.edu/bookstore/boatkeeper/heads.pdf
Composting Head -
http://www.marinesurveyor.com/articles/kant06a.html |
||
|
Return to Tech Tip Index. . . . . . . . . . . . . . . Have a Question? |
||
 The majority of SJ23s are equipped with a
portable potty as shown above. However, there are a few SJ23s that can sail beyond the off shore discharge line (3 mile), where
a boat is allowed to empty
a holding tank. For these folks a
ceramic head is definitely the way to go. There is nothing like
using a head that is firmly bolted to the floor. Oh the joy of it
all. On the other hand, words can't describe the
"thrill" of repairing a plugged
head or one with leaky plumbing. A portable unit is far more pleasant to
repair, if I can use that expression. I'm not going further with
this.
The majority of SJ23s are equipped with a
portable potty as shown above. However, there are a few SJ23s that can sail beyond the off shore discharge line (3 mile), where
a boat is allowed to empty
a holding tank. For these folks a
ceramic head is definitely the way to go. There is nothing like
using a head that is firmly bolted to the floor. Oh the joy of it
all. On the other hand, words can't describe the
"thrill" of repairing a plugged
head or one with leaky plumbing. A portable unit is far more pleasant to
repair, if I can use that expression. I'm not going further with
this.