|
Every San Juan 23 that is NOT equipped with a deck plate around
the shroud chain plate, either leaks water
or will soon leak water through the deck.
This seems like a pretty brash statement, but I have seen this
problem on 12 different SJ23s. All of them leaked and the one
with a deck plate
did not. As
the water seeps past the seal at the deck hole it is absorbed into the
balsa core of the deck. Once the balsa is saturated it then weeps down the chain plate
where it is absorbed by the plywood bulkhead. After the water
creates a track through the bulkhead the excess water will likely be absorbed by the cushions,
starting a "healthy" crop of mildew! The alternate soak/dry cycles weakens the bulkhead
and starts wood rot, especially with poor ventilation in the cabin. The wood rot usually appears at the bottom
of the bulkhead by the bolts but may also thrive around the chain plate.
With poor or nonexistent cabin ventilation, the bulkhead stays moist, the wood
softens and the rigging tension will pull the chain plate bolts up through
the soft plywood, elongating the holes. Both places are starved for oxygen. The
classic requirement of crevice corrosion.
The plywood
bulkheads of an SJ23 are an integral component of the hull to support
the standing rigging.
Remember that it should be possible to lift the entire hull from the
shroud and transom chain plates. At advanced rot, the chain plates
WILL LOOSEN and the "big stick" WILL FALL DOWN!
What a way to spoil a nice afternoon! Hopefully you will be
observant enough to recognize the symptoms of wood rot to stop this chain reaction before the
afternoon is spoiled!
Wood rot can be difficult to detect so if you fail to recognize the subtle
symptoms, you should ask yourself, "why have I run out of thread to tighten the
shroud turnbuckles?" What won't be obvious is that the
chain plates have pulled up through the deck over a long time!
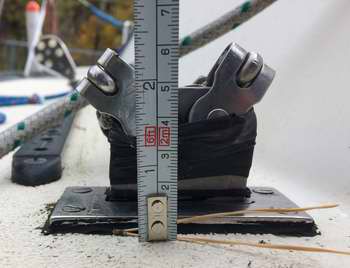
This was my situation on Panache. After my restoration both
chain plates now stick up 1 7/8" above the deck, which I'm assuming is
correct because the rigging is tensioned correctly with the
turnbuckle screws 1" into the barrel. Both chain plates must stick up an equal length.
See Tech Tip F34, Standing
Rigging Maintenance.
A lot of similar vintage
sailboats suffer from this problem since this was the construction
technique of the day. This is a
weakness in the design and most manufactures have redesigned their boat to
solve this problem.
But don't fret, there is a simple fix for your problem.
Q -
Why install the chain plates inboard instead of at the toe rail where
the hull is stronger?
A - They are installed inboard to sheet the jib in
close for pointing high into the wind and to create an easier path
for walking on a side deck.
Here are some important facts about wood: (It never hurts to
have a bit of background info for understanding).
- Dry wood
NEVER rots -
There are stands of trees growing on this planet that are thousands
of years old, some of it clinging to rocks
on Georgian Bay. The cedar looks so dry you'd think it would
make good fire
wood. But the moisture content of this stuff is just above the residual
moisture level and will likely never die if you leave it alone.
- Wet wood takes a very long time to rot especially if is cold. -
There are British battle ships at the bottom of the Great Lakes that
sank during the war of 1812. They were built a few years prior to this fiasco and were still in perfect condition when Jacque Cousteau found
them in the mid 1980s. They survived because the temperature
is just above freezing and the wood is deprived of
oxygen so it cannot rot.
- Wood that is
alternately wet and dry will rot quite quickly, especially in warm air. Faster
once mould takes hold.
Sometimes the wood will crumble in a matter of
only a few
years. - The evidence or this stuff is continually disappearing! (ie:
sailboat bulkheads).
- Only fresh water causes wood rot. - Wood
that is pickled in salt water does not rot. What eats wood in salt
water are the tiny critters that swim in the water and feed on wood.
Not rot, just hungry critters doing their best to stay alive.
SYMPTOMS OF LEAKY CHAIN PLATE DECK HOLE - If the bottom of a bulkhead feels damp
or the bottoms of the
cushions are occasionally damp, then suspect a deck leak
around a chain plate. Water can seep into the cabin through cracked
or nonexistent
deck sealant
around a chain plate. Old sealant that is no longer pliable will usually
separate from the hull by the movement of the chain plate as it is pulled aft while stepping the
mast. This is later followed by the upward pull of the rigging while sailing.
It is easy to understand why a person would miss a leaky deck fitting
based on observations made during good weather. This is when a bulkhead
usually feels dry, even if the cabin has marginal ventilation. The chain plate
may appear to be sealed from the top
side, hiding the fact and catching you off guard. This problem is difficult to detect because
it is such a slow, long term process and people have a way of adjusting
to slow changes! However, there is one tell
tale sign that is visible most of the time; a long black streak
that weaves its way down along the grain of the teak. Don't be
mislead by the fact that it looks like the dark streaks associated
with
teak grain. Another symptom is missing varnish. The best and most accurate tell tale is moisture content in the
wood when it is raining outside. Use a moisture meter for accuracy.
These are the symptoms I saw when I examined several boats to determine if there was a pattern to the
problem. In three out of four boats the bulkhead felt bone dry. I examined
the bulkheads when it wasn't raining and therefore missed
several clues. (After all, better to be in the bar
drinking hot rum when it's raining). Then one night I
was leaning against Panache's bulkhead and "felt" the clue running down
my back. My shirt got wet very quickly, there was that much water!
Not only was standing deck water seeping in but the shrouds directed a
significant stream of rain water directly to the chain plates. The
cumulative effect is quite something to see.
Keep an open mind though, a
window could be leaking and the water can flow down the
cabin wall then across the settee to be absorbed by the bulkhead.
See Tech
Tip B05 for repairing a window leak. You could also have a leaking
toe rail and to just aggravate the problem the water could be flowing along
the toe rail before it exists at the bulkhead. See Tech Tip B16 for repairing a
toe rail leak.
(You can pin point the track of a leak by blowing flour
or talcum powder against the cabin wall or bulkhead where you suspect water to be seeping in.
Use a bulbous blower with a small
nozzle to blast an even pattern of powder against the wall. Any water running down, no matter how slow, will
pull the powder along with it, leaving a tell tale track).
 There
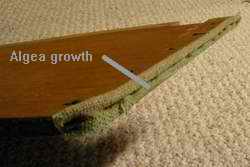
is one more annoying detail to complicate this problem, as the water flows to the edge of the bulkhead it will be absorbed by the cloth
piping and the edge grain of the plywood. This piping is NOT the "best" of
designs as it absorbs and holds a lot of water, preventing it from
evaporating. This ensures that the wood stays wet, uniformly! (The
bulkhead will last longer and function better if veneer is applied over the
edge grain and sealed with epoxy as a moisture barrier). The piping shown at left was removed from
Panache in 2004.
Notice the green algae growing in the cloth. The growth was due
to a combination of cabin condensation, darkness and warm temperature in
the presence of fresh water. The basic requirements for life in a swamp!
I
couldn't smell the mould in the cabin but the stench from the piping was disgusting when I pulled
it off the plywood. Good riddance! Fortunately the plywood was still in good
condition so I killed the mould with some potassium metabisulphite
(chemical used to kill
bacteria in wine making), dried the wood in the furnace room, saturated the edges in epoxy (described later in this Tech
Tip) and then applied teak veneer over the edge. There
is one more annoying detail to complicate this problem, as the water flows to the edge of the bulkhead it will be absorbed by the cloth
piping and the edge grain of the plywood. This piping is NOT the "best" of
designs as it absorbs and holds a lot of water, preventing it from
evaporating. This ensures that the wood stays wet, uniformly! (The
bulkhead will last longer and function better if veneer is applied over the
edge grain and sealed with epoxy as a moisture barrier). The piping shown at left was removed from
Panache in 2004.
Notice the green algae growing in the cloth. The growth was due
to a combination of cabin condensation, darkness and warm temperature in
the presence of fresh water. The basic requirements for life in a swamp!
I
couldn't smell the mould in the cabin but the stench from the piping was disgusting when I pulled
it off the plywood. Good riddance! Fortunately the plywood was still in good
condition so I killed the mould with some potassium metabisulphite
(chemical used to kill
bacteria in wine making), dried the wood in the furnace room, saturated the edges in epoxy (described later in this Tech
Tip) and then applied teak veneer over the edge.
NOTE -
To maintain a water tight seal, metal boat components like the mast base,
chain plates, tracks, winches, pulpit feet, mainsail traveller MUST NOT be installed rigidly against the
hull. Rigid metal doesn't bend with the hull that jiggles and flexes while under
way. The thermal expansion of metal is also greater than fibreglass. To maintain a water tight seal between
the two use 1/8" thick bedding compound or sealant. You could use butyl rubber tape, 3M 4200 or Sikkens Sikaflex. 1/8" is thick enough to allow for surface undulations and for shear movement so it
does not tear the sealant loose.
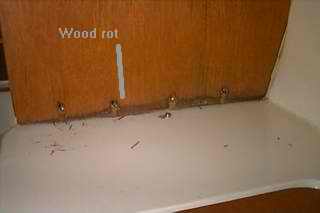
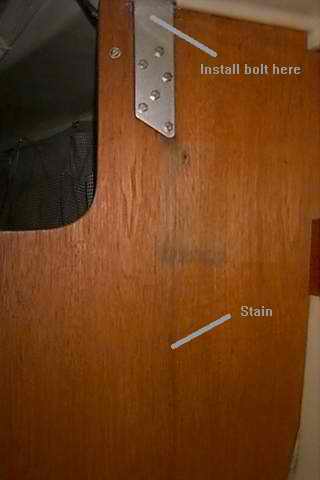 These
two images clearly
demonstrate advanced wood rot on the starboard bulkhead of another SJ23's chain plate that leaked for years.
The
bulkhead was very damp at the bottom with advanced dry rot. Notice the stain line
below the chain
plate. You can follow the stain right to the bottom of the bulkhead where the
cloth piping soaked up the water. The bottom
of the bulkhead was so rotten that it crumbled into little bits and pieces
years ago leaving nothing for the bolts to grip. The nuts
were rolling in the bilge! These were the factory original bulkheads pressed against the underside of the deck. It's
amazing the mast stayed up at all. Unfortunately
the previous owner of this boat never loosened the
shrouds prior to stepping the mast which resulted in a significant leak
past the sealant on the chain plates. These
two images clearly
demonstrate advanced wood rot on the starboard bulkhead of another SJ23's chain plate that leaked for years.
The
bulkhead was very damp at the bottom with advanced dry rot. Notice the stain line
below the chain
plate. You can follow the stain right to the bottom of the bulkhead where the
cloth piping soaked up the water. The bottom
of the bulkhead was so rotten that it crumbled into little bits and pieces
years ago leaving nothing for the bolts to grip. The nuts
were rolling in the bilge! These were the factory original bulkheads pressed against the underside of the deck. It's
amazing the mast stayed up at all. Unfortunately
the previous owner of this boat never loosened the
shrouds prior to stepping the mast which resulted in a significant leak
past the sealant on the chain plates.
However, this raises the question of what
holds the chain plates in place; the bulkhead pressing against the
underside of the deck (which says a lot for the strength of the hull to deck joint), or the bulkhead held being down by its mounting bolts
at the settee? Interesting huh? That should be enough to start
a conversation over a beer, or ten!
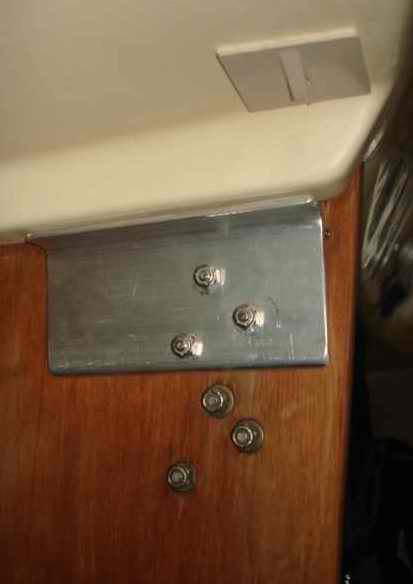
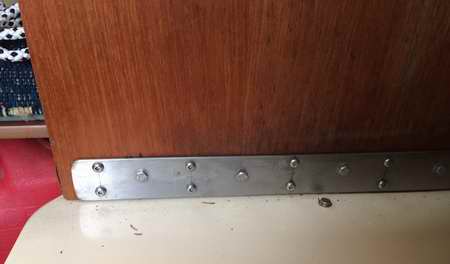 The owner
and I decided his factory original bulkhead was too rotten to repair so replaced
it with new teak plywood; without the cloth piping. Since he had to repair the settee
fibreglass
around the bottom bolts, we added a long 1" wide aluminum flat bar
under the heads of all the bolts, sandwiching the plywood
bulkhead between
it
and the fibreglass. By
replacing the washers with a metal bar the load was distributed and the
ultimate survivability of the bulkhead ensured! Nice upgrade feature.
By
the way
we left a narrow gap between the bottom of the bar and
the top of the fibreglass settee for drip dry drainage and ventilation. TOP The owner
and I decided his factory original bulkhead was too rotten to repair so replaced
it with new teak plywood; without the cloth piping. Since he had to repair the settee
fibreglass
around the bottom bolts, we added a long 1" wide aluminum flat bar
under the heads of all the bolts, sandwiching the plywood
bulkhead between
it
and the fibreglass. By
replacing the washers with a metal bar the load was distributed and the
ultimate survivability of the bulkhead ensured! Nice upgrade feature.
By
the way
we left a narrow gap between the bottom of the bar and
the top of the fibreglass settee for drip dry drainage and ventilation. TOP
SOLUTION
- Removing a chain plate and/or repairing
the bulkhead must be performed with the
mast down. I agree that you could work on one side at a time and tie the
halyards off to that side, but this stunt is bordering on dangerous.
If you insist on doing the repair in this fashion then at least have the courtesy to isolate your boat at the visitor's dock and hang up a sign, "CONSTRUCTION SITE. VISITORS NOT WELCOME. HARD HAT MANDATORY!". You get the idea. Besides, the main reason for lowering the
mast is to remove the load on the deck while the bulkhead is gone. After all, you MUST remove the compression post to remove
the port bulkhead. The purpose of the
compression post is to transfer the weight of the mast to the keel and with all
that weight on the post, you WILL gouge the floor
when you drive the bottom of the compression post aft. Better to do the job safely by
removing
the load, then nudge the post aft with your hand. Remember,
the idea is to fix one problem, not create a bunch of others! Read
on.
-
REMOVE PANACHE CHAIN PLATES AND BULKHEADS (2004) -
I suspect the bulkheads were put in place prior to installing the deck. This would make it easier to fasten the bottom of each bulkhead. All in all, this installation is quite rigid and adequate for this sailboat and its
designed use.
- The bottom of
each
bulkhead is fastened
with 1/4" bolts
to the settee.
- The
side of each bulkhead is fasten
with wood screws to the fibreglass rib along the hull.
- The top of each bulkhead
is fastened with wood screws to the fibreglass rib across
the ceiling.
- The chain plate is bolted
with 1/4" bolts
to the bulkhead.
- The
bottom of the
port bulkhead is fastened
with
wood screws
to the settee and supports the compression post.
REMOVE A CHAIN PLATE
- Unbolt each chain
plate. Extract them. Clean the metal and the deck hole.
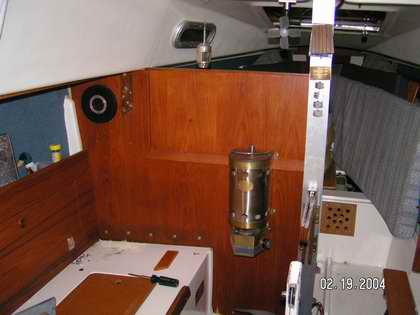
 REMOVE PORT BULKHEAD - To remove the port bulkhead you must
first remove the table. This gives you room to move around and lets you swing out the bottom of the compression post once the mast is down. I found it impossible to move the compression post with the mast pushing the deck down. This shows you the compression post is doing its job within a flexible hull. REMOVE PORT BULKHEAD - To remove the port bulkhead you must
first remove the table. This gives you room to move around and lets you swing out the bottom of the compression post once the mast is down. I found it impossible to move the compression post with the mast pushing the deck down. This shows you the compression post is doing its job within a flexible hull.
Left side - The wood screws set into the compression post
are accessible from the forward side.
Top - The wood screws along the top are accessible from the aft side. I discovered a hidden screw behind the chain plate and had to drive the chain plate up through the deck to access it. Needless to say, that one didn't go back in! It was replaced with two screws, one on either side of the chain plate. I also had to cut through the cloth piping here to release a jamb under the down turned lip of the ceiling liner.
Right side - The wood screws set into the rib along the edge of the hull
are accessible from the forward side.
Bottom - The nuts for the 1/4"
bolts across the bottom of the bulkhead are accessible by
reaching through the access hole in the forward berth. You are going to need a 2' long nut driver or lots of extensions on a ratchet drive. (I have a suspicion the bulkhead was in place prior to fitting the deck).
Compression Post -
Remove just the wood screws through the bottom mounting
flange that secure the post to the raised portion of the cabin floor (where the head resides). Swing the bottom of the compression post
slightly aft, leaving a 3/4" gap between the flange and the raised floor. This is just enough space to slide the bulkhead out. I
had an additional problem with electrical wiring that was installed
through the sub floor and the base
of the compression post. Fortunately I had just enough slack that I
could pull the wires out from under the floor to make room for pulling the
bulkhead out. This one is unique to Panache. See Tech Tip E09,
Supporting Electrical Wiring Inside the Mast.
Bulkhead - Once all the fasteners are removed, the bulkhead should slide out horizontally
towards the center of the hull. However, Panache's bulkhead was jammed between the
settee and the ceiling
and I had to use a slide hammer to "pull" it out,
alternating blows between the top and the bottom of the bulkhead.
This is tricky because you have to strike a balance between driving hard
enough to move the bulkhead and light enough to not damage the
plywood. You must have a good grip around the back edge of the plywood to
protect the wood. NEVER pry
the bulkhead out by levering against the hull. The hull cannot
handle this type of stress and you will likely do serious
damage. Remember, the idea here is to
take one step forward, NOT two back! It's OK to slide soft wood wedges
between the hull and the edge of the bulkhead to prevent the plywood from
rebounding to the hull as you use the slide hammer. This job
really was slow going but I made steady progress which is why you should clear the cabin of clutter.
| PORT BULKHEAD |
|
|
|
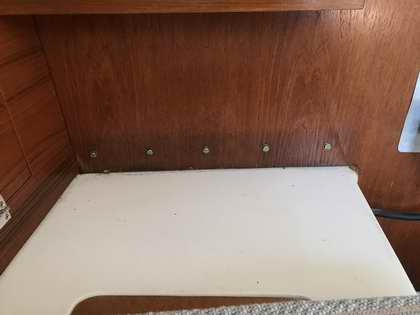
LEFT - The forward side of the port bulkhead looking from the head. It is sealed with lots of silicon sealant to keep moisture trapping debris out. The starboard bulkhead is similarly sealed.
RIGHT - Looking aft at the front of the settee fibreglass bulkhead that is below the port wood bulkhead shown above.
You can just see the nuts that screw on the bolts across the bottom of the bulkhead. 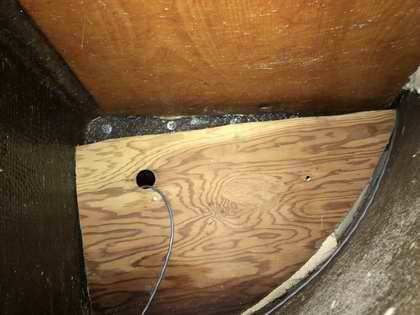
This piece of plywood comes as a complete surprise to me.
It was likely part of the fibreglass bulkhead. It is a recipe for rot and will be removed if it is loose.
An iPhone is very useful to reveal stuff in a cavity that you can't see into.
|
REMOVE STARBOARD BULKHEAD - The
starboard bulkhead may look like it's simpler to remove but it has its own
challenges. It is also fastened to the settee with bolts across the
bottom and screws along the side of the hull and ceiling. The bolts are
easy to remove. The nuts, well!
- You access the bottom nuts by
reaching in through the hatch in the forward berth. This is a bit of a
reach for an adult though. Whomever
built sail boats never heard about the "Child Labour Laws" from the
middle 1800s, because the ideal person to crawl in this hole is a little kid! The factory used 1.5" long
1/4" bolts, the same size as the chain plates, that are too long for this
job.
 To
spin the nuts off use a 1/2" deep socket on a 2' long 3/8"
extension and a small LED flashlight to see while looking inside the bilge. If you don't have an assistant, clamp the head of the bolt
with a vice grip to prevent it from turning. You can use this same technique
for the installation but a second person makes it much easier.
Don't leave nuts or washers lying in the bilge so keep a mechanical pickup tool handy
to retrieve it. Once the fasteners are removed you simply slide the bulkhead out. To
spin the nuts off use a 1/2" deep socket on a 2' long 3/8"
extension and a small LED flashlight to see while looking inside the bilge. If you don't have an assistant, clamp the head of the bolt
with a vice grip to prevent it from turning. You can use this same technique
for the installation but a second person makes it much easier.
Don't leave nuts or washers lying in the bilge so keep a mechanical pickup tool handy
to retrieve it. Once the fasteners are removed you simply slide the bulkhead out.
- To reinstall the nuts and washers on the bolts is a tricky venture
that will challenge anybody who can't fit inside the hole. The
problem is to start a nut on each bolt without dropping it in the
bilge. Oh
you can take the easy way out and bribe the neighbour's kid to crawl
in for you but I wouldn't let his mother know! I cursed
at this job for quite some time till I figured out the solution is to
stick the washer to a nut with silicon sealant and drive
the combination using a shallow socket on a 2' long extension. In addition, I taped the
washer to the socket so I wouldn't loose it. Push the nut very gingerly against the
end of the bolt as you start turning it. Once the thread has started
you can either twist the socket or the bolt. It all
depends if you persuaded the kid to hang around AND his mother is
not looking for him! Finish tightening with a deep socket to full depth. I can't emphasize enough about reducing the risk of dropping a nut as it's next to impossible
to pick it up. You just know this nut is going to wear on the fibreglass.
- If you find the above listed instructions daunting then consider
adding a forward berth storage compartment as shown here and
described in Tech
Tip C5.
-
REPLACE A ROTTEN
BULKHEAD - If a wood bulkhead is
rotten you must replace it to restore the strength. Use 1/2" plywood because this thickness aligns perfectly between the deck
hole for the chain plate
and the interior flanges of the fibreglass hull liner. Marine plywood
is an excellent choice because
the laminates are held together with water proof glue.
This is sort of
important if things get wet in the future! See
thoughts below about selecting wood.
Starboard
may be another good choice, being impervious to water, but it just doesn't
have that wood look. The Europeans make excellent "15
layer" plywood that is very dense, but also expensive. I
chose to saturate the five layer hardwood plywood to harden and preserve it, filling all the bolt holes.
The new bulkhead must fit snug in its place as movement is NOT
allowed. So take note of how the old one fits (scribe marks from hull to bulkhead, on masking tape) before you
remove it. If your old bulkhead fits snug, its OK use it as a template against the new
plywood, taking care to remove high spots and smooth out the low
spots. In Panache's case I had to use a belt sander to shave the outside a bit so it fit snug.
However, you now have a perfect opportunity to change the
shape of the bulkhead to create a new passage to the forward cabin. There is no point in
copying an unwanted shape or a previous mistake! Consider
capping the edge with 1/8" thick veneer to better withstand abuse
or lowering the top
of the port bulkhead.
The top area that I'm referring to is adjacent to the head, under
the raised cabin ceiling. NOT the section to which the chain plate is bolted to.
For
instance, I lowered my port bulkhead 12" below the cabin
ceiling to permit air to pass over it
for better ventilation and natural lighting. Use your imagination and
consider passing your good idea along so I can add it here.
Once dry fitted I used the holes in the fibreglass to drill new ones through the epoxy filled bulkhead holes. The chain plates were clamped in place with the correct height protruding above deck. I then used the chain plate as a template to drill new holes through the bulkhead.
CLOTH PIPING - While the bulkhead was
out, I discard the cloth piping that is stapled (steel staples) along the edge.
This
piping is a 1970's solution to covering a gap or sloppy
fitting along the edge of the plywood. At best it is a shitty
solution to hide poor carpentry skills. The problem with cloth
piping is
that it wicks up spilled water
and holds it against the bulkhead where it will soak into the end
grain of the plywood to
start the rot process. There is almost no chance for the water to
evaporate. Better to have a sloppy looking fit that dries out quickly than to
have a cosmetic looking
joint! I believe that piping was installed only on the early hulls.
NOTE 1 - At one time I was going to
supply a template for the bulkheads. This proved impractical as there
are subtle variances in each hull which I discovered while repairing
another SJ23 using a template from my bulkhead. So much for
that idea.
-
PRESERVE THE
BULKHEAD - If
your cabin bright work is like a lot of others, in that the bulkheads haven't had a coat
of varnish since the boat was manufactured, then the wood
pores are totally open to absorb moisture, spills and food splatters.
Not good. This sets the conditions ripe for wood rot. If the removed
bulkhead has high moisture content and the plywood is still in good condition then dry
it thoroughly. While the sun can do a really good job of drying
wood, that process is too quick and can lead to warped wood. Drying must be done slowly to prevent warping. Use a moisture meter to confirm that the wood is dry down to the residual moisture level, <10%. Once the wood is close to 10% moisture it is OK to place it in direct sunlight to remove the last of it. Panache's bulkheads hung in the warm furnace room for several months in the winter. Rub a coat of stain on the bulkhead to fill
the light scratches and even out the colour. I applied a light
coat of Minwax cherry stain since it closely
matched the patina of the 30 year old teak. Let it dry for a week,
preferably in the sun every now and then. The subtle colour of aged teak is virtually impossible to duplicate which is what makes
it so valuable. Then apply a couple of coats of clear
unthickened epoxy to seal the wood against water
absorption once and for all. Saturate the sides, edges and
especially the bolts holes. If you have the time, drill the bolt holes slightly larger, fill them with epoxy and drill them out to the correct size. The epoxy adds considerable strength. Lightly sand the top coat of epoxy and apply two coats of Sikkens Cetol Marine to create a pleasant smooth finish that withstands
food splatters and the inevitable rubbing that happens on a small
cruiser. It is also easy to recoat. See Tech
Tip G5. I coated both bulkheads to match the
rest of the wood in the cabin and it is impossible to detect the epoxy.
Cetol Marine also creates UV protection for the epoxy and is the only coating that allows moisture to breathe out of the wood while
preventing it from soaking in.
-
 CHAIN PLATE BOLT
HOLES - Check the chain plate bolt holes in the bulkhead for
elongation and/or determine if any of the bolts have tipped slightly, through the
wood bulkhead. (Likely all bolts or none). If either condition exists the wood was/is
wet. The solution is to dry the wood and then stabilize the bulkhead wood
around the holes with thin epoxy. Rebuild the bolt holes with one of the following
technique. CHAIN PLATE BOLT
HOLES - Check the chain plate bolt holes in the bulkhead for
elongation and/or determine if any of the bolts have tipped slightly, through the
wood bulkhead. (Likely all bolts or none). If either condition exists the wood was/is
wet. The solution is to dry the wood and then stabilize the bulkhead wood
around the holes with thin epoxy. Rebuild the bolt holes with one of the following
technique.
4a -
Drill the worn holes out several sizes larger. Wet out the hole to fill the little voids. This seals the insides of a newly drilled hole. It is good
insurance, even if the wood is in good condition, because it adds
compression strength so you can tighten the bolt for no movement. Mix
thickener in the epoxy to the consistency of peanut butter and over fill
the hole.
Once hardened, smooth the
fill bump flush
to the bulkhead and drill out the hole to the correct size.
4b -
Use the chain plate as a template to drill a new bolt hole through the epoxy. Position the
chain plate at factory height, 1 7/8" above deck
level, to maintain mast tuning consistent with the other chain plate and the manual. The factory used small wood blocks to temporarily support each chain plate on deck.
Drill the holes the same size as the bolts. The bolts must fit very snug in the holes to ensure the maximum load carrying capacity
without movement.
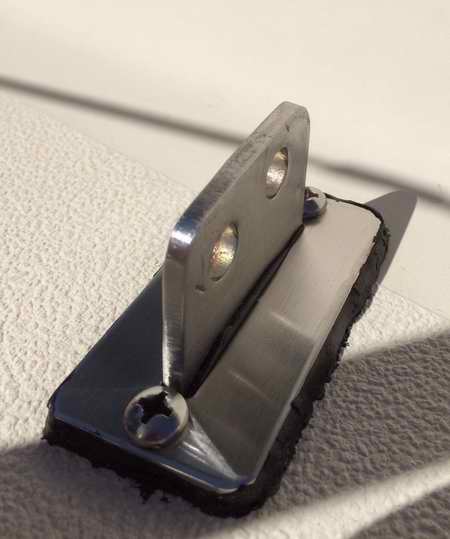
4c - The factory intentionally placed the chain plate bolts deep down the
bulkhead for maximum shear strength of the plywood. However, this
leaves the upper end of the chain plate unsupported in the aft direction.
To stiffen the upper end
install a
5/16" thick (1x3)" aluminum flange on the forward side as show at right. This flange was created by bending a 3" flat bar. You will have to drill holes through the chain plate to connect to the flange. Not an easy task through SS. To
prevent movement, apply sealant between the upper flange the fibreglass deck rib. This flange really helps to keep the deck plate sealed.
Anything to spread the load and stiffen the chain plate.
STAINLESS STEEL CREVICE CORROSION:
The stainless steel chain plate of an SJ23 will corrode
if water gets through the deck seal. A chain plate that is bolted against a wet bulkhead will develop crevice corrosion that occurs in the absence of oxygen. Oxygen is required to make the protective coating of chrome oxide. Chain plates should be inspected for corrosion
at least every five years, especially where there is a sign of
"rust" on the surface. It may be easier to test your chain
plates for cracks rather than fabricate new ones. If you don't find any
cracks then reuse them. Chain plates on
production boats are often made of 304 stainless steel, which
is far more susceptible to corrosion than 316 stainless steel. I
don't know which grade the SJ23 plates are made of. If your
inspection exposes a problem, fabricate the new plates from 316
stainless. To compensate for the lower tensile strength, the
new 316 chain plate must be approximately 20% thicker than 304. Silicon bronze
is another good choice.
-
INSTALL THE BULKHEAD - Install the bulkheads
using nylon lock nuts and large washers or better yet a solid
backing plate along the bottom. A solid backing plate,
regardless of the material, is far stronger than individual flat
washers. If you can't find
lock nuts, smear a dab of silicon sealant between
the nut and the bolt. This will keep the nut on allowing
you to spin it off later.
If you've gone through all the effort of
refurbishing the bulkhead, you should also close the gap on the
forward end of the settee where it rests against the bulkhead. This will keep the water and dust out. Dust is just as effective at trapping moisture as cloth piping is. On Panache's I sealed the gap
with clear silicon sealant. To remove the bulkhead cut it with
a razor knife. While this technique might make it a real bear to remove, it will definitely preserve the wood so I will never have to
be removed again! Alternatively you could jam some 3/8" OD foam backer rod in the
gap which can easily be removed for
inspection. I leave the final decision to
your imagination. Whatever you do, don't create
another water trap that will start wood rot! Leave the bottom
of the bulkhead open for water drainage. You can't be too careful!
When I reinstalled both bulkheads, minus the piping, they still fit
snug. One of my fears in removing the piping was that I would have
to cut a slightly larger bulkhead so it would fit snug to create
support. This proved unnecessary as they installed very snug
and firm, which is what you want.
NOTE 2 - Before you install the bulkhead, apply a generous bead of
flexible sealant to the edge of the bulkhead where it rubs against the hull.
Be careful when fitting the bulkhead so you don't smear the
sealant on the hull. The sealant will cushion the bulkhead against the
hull, removing any hard spots and distributing the load over a larg
area. It makes for a very solid installation.
If done correctly, the fasteners and sealant prevent the hull from flexing out when the hull bottoms out in a trough. To remove the bulkhead, simply slide a razor knife through the cured sealant.
-
CLEAN and SEAL THE
CHAIN PLATE DECK HOLE
- Remove all old deck sealant and clean the chain plate deck holes thoroughly with acetone.
I
like to call this process "sanitizing the surface". DO NOT touch it with your
hands after sanitizing. The body grease from your fingers will affect the
ultimate long term adhesion of the sealant.
BUT, if the 1/2" plywood core is exposed in the deck hole
it must be sealed with
epoxy to prevent future water absorption and to add compression strength to the
deck. If the core wood is wet, it MUST
first be dried to a residual moisture
content of about 10% to 15%. This may be hard to achieve but it's the only
sure guarantee against future wood rot. Don't guess, use a
heat gun or hair drier to dry the wood followed with a moisture meter
to confirm water content. Once the core is dry, saturate
it with epoxy and let it cure. However, if the core is rotten,
gouge out the rotten stuff with a Dremel tool and fill the gap with epoxy
thickened with sawdust or micro balloons to
the consistency of mayonnaise. Epoxy can be injected with a
syringe or jammed in with a
putty knife. If you have to
fill the deck hole to make it fit snug against the chain plate, epoxy a filler section of fairly
dense but porous wood in place.
See Tech Tip
G08,
Installing a Deck Fitting, for the proper technique. Don't leave any
voids.
Machine the final hole smooth with a file or Dremel tool.
This part of the job could be done with the bulkhead in place
so you have a guide for the final position and dimensions of the
hole.
-
INSTALL THE CHAIN PLATE - Bolt the chain plate
using nylon lock nuts against a single solid backing plate with
large washers over.
I discovered later that Clark
recommended using a stainless backing plate
instead of individual washers. This simple upgrade adds huge
strength to support the standing rigging. Download the Clark
SJ28 advisory bulletin. If you can't find
lock nuts, smear a dab of silicon sealant between
the nut and the bolt. This will keep the nut on while allowing
future removal.
Panache had a
3/8" thick plywood spacer behind the port bulkhead chain
plate. It was
installed to align the bulkhead to a poorly placed deck hole. I have not seen it on any other SJ23 so assume it was a "quickie" fix. It
was very compressed so I replaced
it with hard maple that can withstand pressure far
better than soft plywood.
-
SEAL THE DECK HOLE
-
Now that the refurbished or new bulkhead is bolted in place, clean the deck surface
around the chain plate holes and the chain plates with acetone. After cleaning all surfaces, DO NOT
touch them with your hands or you WILL contaminate them and reduce
the ultimate bond of the adhesive. Install the chain
plates with a thin coat of adhesive against the bulkhead to prevent
movement and seal the gap in the deck hole with a good grade of elastic
marine
sealant
like
Sikkens Sikaflex or butyl rubber.
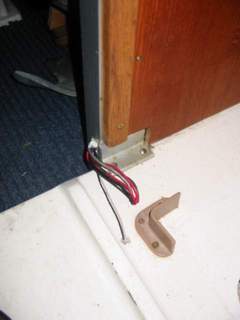
-
 SEAL
THE DECK PLATE - Finally,
install a stainless steel deck plate over each chain plate
and screw it to the deck. Leave about 1/32"
clearance around the chain plate for sealant to ooze through. The purpose of this
plate is to prevent fore/aft movement of the unsupported top end of
the chain plate,
thereby maintaining the deck seal. The only time this chain
plate might flex (about
1/32") is when the mast is stepped without
releasing the turnbuckles (bad thing to do). See
Tech Tip F18. SEAL
THE DECK PLATE - Finally,
install a stainless steel deck plate over each chain plate
and screw it to the deck. Leave about 1/32"
clearance around the chain plate for sealant to ooze through. The purpose of this
plate is to prevent fore/aft movement of the unsupported top end of
the chain plate,
thereby maintaining the deck seal. The only time this chain
plate might flex (about
1/32") is when the mast is stepped without
releasing the turnbuckles (bad thing to do). See
Tech Tip F18.
- Use the deck plate as a template to drill the corner holes.
Seal the holes with epoxy.
- Or you could drill over size holes (3/8")
until they bottom on the interior fibreglass. Careful now.
Don't drill through. Sanitize the holes with acetone. Fill with thin epoxy, flush to the deck.
Coat the screws and chain plate with release agent.
Use the chain plate to position and hold
screws while epoxy is curing. Allow epoxy to set 24 hours.
- Disassemble the hardware and sanitize with acetone.
-
Apply a good grade of
elastic
marine
sealant
like butyl rubber or Sikkens Sikaflex to
the underside of the deck plate and
screws.
Apply sealant to the screws and tighten them.
Don't leave a gap.
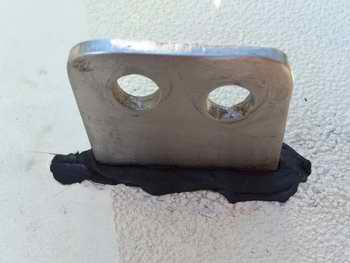
 NOTE
1 - While butyl rubber will flow slowly on its own, there is a limit
to what the heat of the sun can do. If you point a heat gun
at butyl rubber it will flow up through the gap between the chain
plate and deck plate as shown at right on Randy's boat. Exactly what you want. Ouch that's hot! Keep your fingers
off the metal till it cools. NOTE
1 - While butyl rubber will flow slowly on its own, there is a limit
to what the heat of the sun can do. If you point a heat gun
at butyl rubber it will flow up through the gap between the chain
plate and deck plate as shown at right on Randy's boat. Exactly what you want. Ouch that's hot! Keep your fingers
off the metal till it cools.
NOTE 2
- Since this 1970s style through deck configuration is prone to
leaks with thermal expansion and rigging tension, build up a
1/4" tall fillet of sealant between the deck plate and the
chain plate. A fillet of this size has sufficient surface area to stay stuck during
the flex.
For all you picky types, there's one or two in every
crowd, Sikkens has an interesting approach to sealing a demanding deck/chain plate assembly. "Consider sealing the base of the chain plate when the rigging is tensioned at the middle of the application range, 200C (700F). If the deck is sealed with the
rigging under tension, then it prevents the sealant from cracking or breaking free of the
chain plate or deck due to thermal contraction. When the mast is lowered and the
rigging tension is gone, the sealant will compress, sealing itself tighter to the deck, thereby preventing a leak during
winter." In Canada and the northern US you would apply the sealant at around
50C!
While this is at the bottom of the application range, it bonds
perfectly fine. I have tested Sikaflex at -50C and it bonds
well.
ALUMINUM DECK PLATE - This point may be anal but if an aluminum deck plate is
installed
over the stainless chain plate then
a 1/32" clearance
between the two may be too little to insert a space filling
insulator (plastic strip). Without an insulator it is possible
for the
dissimilar
metals to contact each other,
starting galvanic corrosion. I
wouldn't want to hear about your mast falling when the last piece of
chain plate is eaten away. There goes
another good afternoon! Galvanic corrosion is a
huge issue in tropical areas where the hot, humid,
salty air has a way of attacking metal that northern or fresh water
sailors have little experience with.
The problem may be negligible in a northern climate or on fresh water but
it still warrants regular inspection. The
rationale is that you cannot see corrosion happening
if the installation is hidden behind the sealant. You don't need a surprise
here so take the necessary precaution and isolate the two metals. An
aluminum plate may be easier to fabricate but you
can
alleviate the corrosion by anodizing the aluminum. Anodizing creates a high electrical resistance coating on the aluminum surface
which,
in combination with heating the sealant as in NOTE
1 above, should solve the problem quite nicely. The
alternative is to electrically isolate the two metals with a thin,
hard insulating spacer that can stand up to the side forces.
Use an Ohm meter to confirm infinite electrical resistance.
Using similar metal is still the safest method.
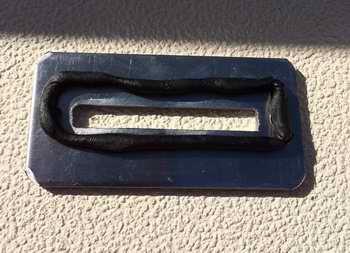
|
NOTE:
I sealed Panache's deck plates in 1995 using Sikaflex and have
never needed to reseal them since. They have never
leaked a drop of water. Upon close examination of Panache's
deck plates I have concluded that the original owner made them.
While the workmanship is very good the machining marks on the
bottom exhibit the telltale signs of being home made, which is OK. You
could fabricate a similar set yourself by cutting a stainless
plate (1.5x3.5)" by 3/16" thick. The slot is (2x7/32)" centered
in the plate. Cutting a slot in 3/16" thick stainless steel
is no picnic so you may want to consider the services of a machine
shop for this. Retail deck plates:
-
Schaefer Marine
part number #84-56 is the closest that fits an SJ23. You
must lengthen the hole 1/4" at either end using a file. It
is a lot easier to modify their plate than to make one from
scratch.
"Deck
plates are used to conceal the deck cut out and to help provide
a proper water tight seal."
-
RIG-RITE. Deck Plate for 2" x 1/4"
Chain plate: CP 84-43M.
-
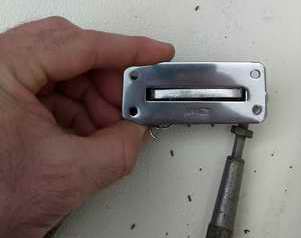 Racelite chain plate cover.
RL-445 are a perfect fit. These 1/8" thick SS plates e/w 4
screw holes are an exact fit for an SJ23 chain plate as shown at right. At
the reasonable price that Duckworks charges there is no
reason not to equip your boat with a set. (S Cook). Racelite chain plate cover.
RL-445 are a perfect fit. These 1/8" thick SS plates e/w 4
screw holes are an exact fit for an SJ23 chain plate as shown at right. At
the reasonable price that Duckworks charges there is no
reason not to equip your boat with a set. (S Cook).
In future, remember to loosen the turnbuckles about 1/3" before stepping the mast!
See Tech
Tip F17. On Feb 28, 1982 the Clark Boat Company
issued an advisory bulletin to all SJ28 owners after two masts dropped. It demonstrates
how important Clark thought the deck plates were. I think they should have
issued this to all SJ23 owners as well. While their concern was
only for the starboard bulkhead of the SJ28, you must release both sides on an SJ23.
Thanks to the guys on the SJ28 web site for this. TOP
|
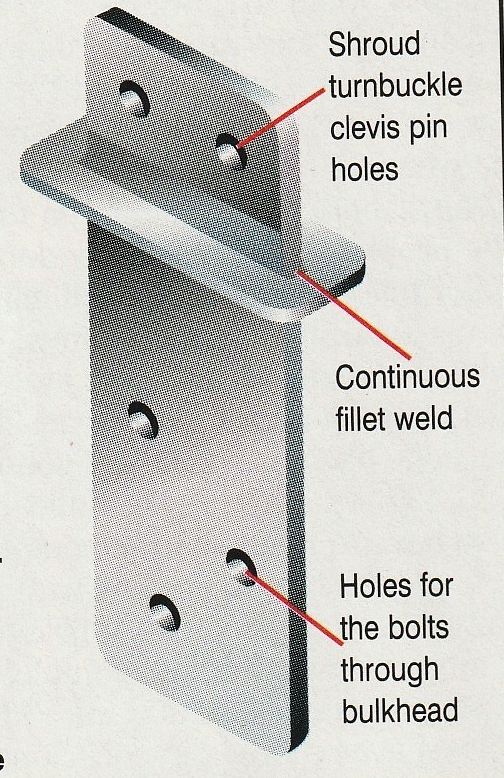 WELDED CHAIN PLATE - If the deck plate is welded to the chain plate the sealant underneath is only subject to a shear load, thereby remaining sealed. This technique eliminates the deck screws to hold plate down and effectively ends future movement with consequent leaking. WELDED CHAIN PLATE - If the deck plate is welded to the chain plate the sealant underneath is only subject to a shear load, thereby remaining sealed. This technique eliminates the deck screws to hold plate down and effectively ends future movement with consequent leaking.
How to assemble it? - Slide the SS deck plate over the chain plate with a 1/8" thick spacer on the deck to create a gap for sealant. Secure the deck plate to the chain plate with a removable sealant. Next, remove the chain plate with deck plate attached. Then have the assembly TIG welded with a fillet around the top of the deck plate.
How to install it? - During installation, apply lots of sealant around the chain plate and under the deck plate. Push the chain plate through the deck hole and insert the bulkhead bolts. Trim off the excess that oozes out. It is a neat effective solution.
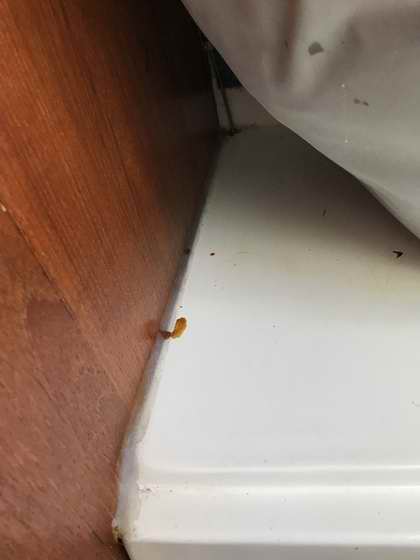
SETTEE BULKHEAD - Following down
at the bottom of the bulkhead,
it is worthwhile to inspect the
fibreglass joint (to the hull) of the fibreglass bulkhead at the front of each settee. This joint likely fails due to the trailer bunk bearing on the tape to flange joint. Every bounce down the road works the tape bond loose. It is a common failure on trailerable boats. If you want to bond this joint, wash it with acetone then slip a layer of fibreglass cloth saturated with epoxy in between or just lather in some thickened epoxy. Then squeeze the whole works between two layers of plywood to ensure a tight bond. A couple of bolts drilled through will squeeze the sandwich. Once that tape joint fails enough to allow a
bit of movement between the outer hull and the interior pan there is no
further deterioration. The manner in which the tape was originally slapped in
there as a resin soaked piece of cloth indicates the factory didn't
consider it to be much of a structural element. The plywood bulkhead
is bolted to the front of the settee which is part of the interior pan of
the hull. The pan actually spreads the load nicely down to the
vacuum bonded cabin sole, ensuring the structural strength of the hull.
All the tape really does is contain stored stuff under the settee. Glenn.
|