| SJ23 Tech Tip C11, (Updated 2008-06-08) Bob Schimmel | |
|
Companionway Ladder. |
|
 Panache is one of the original hulls off the
assembly line and was equipped with a companionway galley and this solid teak companionway ladder.
The original owner discarded the galley in favour of a home made unit and
kept the ladder. I love
the feel of the wood and recently recoated it with Sikkens Cetol Marine because
it was taking a beating from the rain and wet boots, there being no dodger. It's best to recoat the
wood before the old finish wears through, otherwise you will have to
sand, stain and recoat all the wood again. I'm very happy with the
results except that the fresh coat was a wee bit slippery when sprinkled
with rain. The
solution was a light dusting of fine mason sand sprinkled
evenly over
the last coat while it was still wet. Use a salt shaker. It required two
more coats of Cetol Marine to imbed the granules
within
the finish. If this texture is still too rough for your tootsies, then apply more
coats till you reach what you like. With each additional coat the granules are imbedded deeper
to become really tough to loosen. The alternate material
is fine ground walnut shells which I didn't have since it wasn't Christmas. Panache is one of the original hulls off the
assembly line and was equipped with a companionway galley and this solid teak companionway ladder.
The original owner discarded the galley in favour of a home made unit and
kept the ladder. I love
the feel of the wood and recently recoated it with Sikkens Cetol Marine because
it was taking a beating from the rain and wet boots, there being no dodger. It's best to recoat the
wood before the old finish wears through, otherwise you will have to
sand, stain and recoat all the wood again. I'm very happy with the
results except that the fresh coat was a wee bit slippery when sprinkled
with rain. The
solution was a light dusting of fine mason sand sprinkled
evenly over
the last coat while it was still wet. Use a salt shaker. It required two
more coats of Cetol Marine to imbed the granules
within
the finish. If this texture is still too rough for your tootsies, then apply more
coats till you reach what you like. With each additional coat the granules are imbedded deeper
to become really tough to loosen. The alternate material
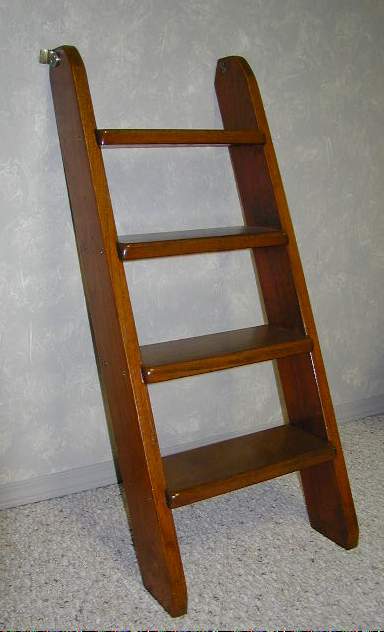
is fine ground walnut shells which I didn't have since it wasn't Christmas. There were several styles of ladders. The early style for the settee galley is shown at right. The style for the athwart ship galley looks like this but leans against the galley and is therefore shorter. The top step is the anti skid plate on the counter top. Later a metal version was introduced but it doesn't have the character of this teak version. CONSTRUCTION
- This ladder is made from solid teak which is somewhat expensive today
and may be difficult to find due to the ongoing struggle for the control
of the last remaining stands of virgin teak in northern Thailand.
Teak is also heavier than many other woods but doesn't rot
due to
the natural oil. You
could substitute teak with walnut, mahogany, ash or other favourite
wood. Choose wood with straight, clear grain for strength and
appearance.
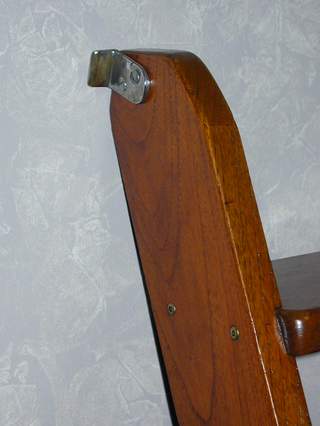
The finished dimensions of the runners are (1x4)" and 37" long. When standing in the boat they are sloped 23 degrees off the vertical as shown above left. To prevent unsightly wood chipping on the bottom of the runners shave the front of the feet off to create a 1" face, vertical to the floor. Round the top of each runner as shown above. The finished dimensions of the treads are (1x5)" by 13" long. The rise of each tread is 7". The back of the tread is cut flush (230) with the runners so you can lay the ladder flat. The front of the tread protrudes about 3/4". The end of the tread is set 1/4" deep into the runners. All joints are glued and screwed with 2" long stainless #8 Roberts wood screws. My ladder is extremely stiff. COATING -
Round all
corners to prevent splinters and to create a smooth shape for the coating to
stick. A sharp corner is the worst thing for a coating to stick to.
If you had to bet money on it, that's where the first
chipping will occur. Lightly sand all
surfaces then wipe with acetone to extract some natural teak oil from
the wood. Now quickly, while the surface is dry, coat it with Sikkens
Marine Cetol Marine or your other favourite stuff. |
|
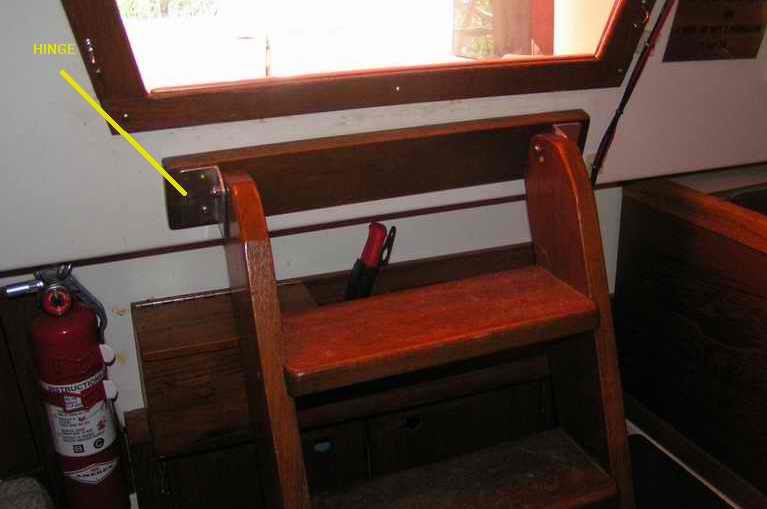
FLIP UP LADDER
(From tight, awkward hanger brackets to very secure, smooth hinges) - If
you have the athwart ship galley,
the biggest threat you might have is to step into a fruit bowl left on the counter!
OK I don't like squashed fruit either but the first step on the empty
counter is pretty secure footing compared to the first step on
the ladder shown below. The second step
off the galley might be a
bit hairy though, as I've seen the short ladder popped out of its
hangers as
well. The biggest problem with the four step ladder is that it has a habit of slipping out of the hanger brackets while the boat is heeled over; making the first step somewhat eventful! The better part of my life flashed before me when I went down on my keester! After I installed a rubber backed rug on the cabin sole I seldom experienced this problem, but I still didn't fully trust the ladder. Without a rug or teak on the cabin sole, a wet fibreglass cabin sole can be very slippery. I've also lifted the ladder up off the hanger brackets with my heel jammed under the bottom step while I'm working on something. I don't even feel the ladder on my heel. The danger in both situations being that I didn't realize the ladder had popped out of the brackets. The second problem I have with this ladder has more to do with me than the ladder. I hate the hassle of lifting it out of the hanger brackets just to get behind it or under the cockpit. I find the heavy ladder difficult to lift up out of the precise fitting hangers without straining the mounting screws. This is especially true when the boat is under way. So I grumbled each time I lifted it, being very careful I didn't damage the screws. CONSTRUCTION - The factory ladder hangers consist of two bracket parts. The male sides are bolted to the top of the ladder. They slip into the female sides bolted to the bulkhead. You can see a good view of them in the photo above. Panache's had Perko, part no. 669 stamped on them, but I have not seen them in any catalogue. There is a lot of really beat up hardware out there that is ready to release under the weight of an unwary crew. You'll hear comments from owners like, "Careful there, the ladder is a bit shaky." So why not fix it? Look after the brackets since replacing them today may be difficult!
Hinges really increase the strength and the security over the original drop hook brackets. If you have no desire to remove the ladder, then simply bolt it to the wall brackets and let it pivot on the bolts. Talk about secure and simple. For ease of fabrication and simplicity of installation, I installed this system. My buddy installed dual wall brackets on both sides of each rail for extra strength. I didn't think it necessary. For once I didn't build something to withstand WWIII! After 10 years it has shown no wear and never required repair. I drilled out the old screw holes in the ladder rails and plugged them with 1/4" teak dowel and glue. This restores the strength and seals the wood. Then I added a support stick fabricated from an old ski pole. Now this is really slick.
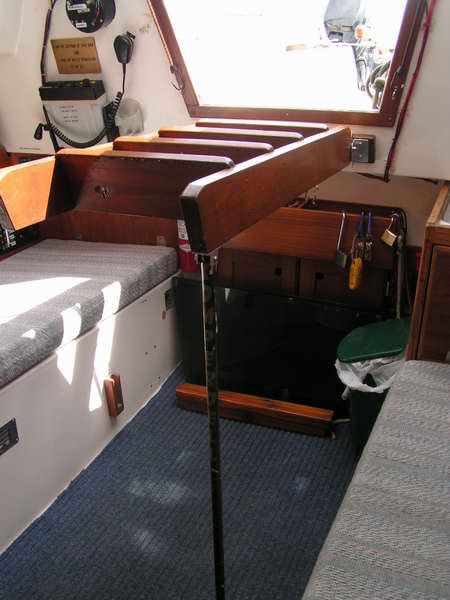
USE - To access the storage area under cockpit, swing the ladder up and pull the support stick down. Alternatively you could tie the ladder to the ceiling or sliding hatch handle. Just make damned sure that the line doesn't let go while you are under there or you will be going home with the impression of a ladder rung across your butt. Failing that, you will definitely see the underside of the cockpit in a hurry! I made my support stick from an old aluminum ski pole (basket removed). Hinge the stick to the back of the ladder rail so it can swing down as you raise the ladder. Lock the stick to the back side of the rail into a bracket similar to a tiller extension. There, now you can forget about the knot! You'll appreciate the convenience. Just don't kick it or you will suffer the same fate as the knot letting go! This ladder hinge is not difficult stuff to make as it can be fabricated with hand tools and a drill. However, you must be very precise in setting the hinges so they turn on a common axis. This makes the ladder swing freely without binding. Take your time and use clamps to hold the hinges in place while you drill the holes. I'm sure you can think of other hinge variations, this is by no means the only one. For instance the ladder could be mounted further away from the companionway (deeper into the cabin) to widen the top step a bit. I like this idea but I ran out of time. NOTE: This may sound ridiculous
but with the ladder raised to the horizontal position it could double as a work surface,
drying rack or to keep kids or dogs in/out of the cabin! Hmmmm. |
|
|
Return to Tech Tip Index. . . . . . . . . . . . . . . Have a Question? |
|
 You will have to experiment with stain to match your
existing teak. For red oak try a blend of cherry and fruit wood.
Mine turned out quite good. With ash you might have to go a little
redder. You'll never match the glow of aged teak but then the oak will age as
well. Give it time. A fresh coat of Cetol Marine over everything
helps to blend colours.
You will have to experiment with stain to match your
existing teak. For red oak try a blend of cherry and fruit wood.
Mine turned out quite good. With ash you might have to go a little
redder. You'll never match the glow of aged teak but then the oak will age as
well. Give it time. A fresh coat of Cetol Marine over everything
helps to blend colours. 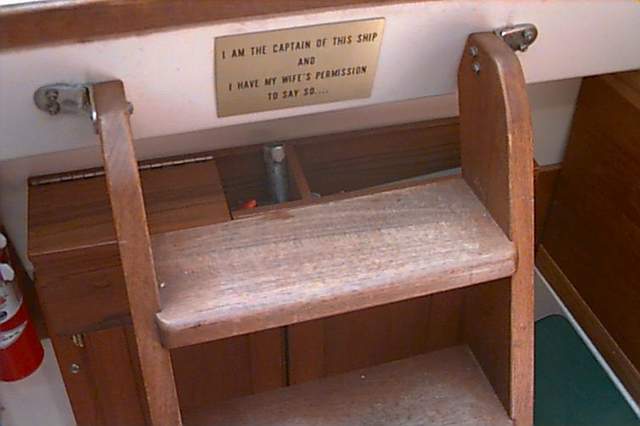 If you don't have a galley or it is installed over the port settee then a four step ladder is required because "one giant step"
into the cabin is
a bit much for most people!
If you don't have a galley or it is installed over the port settee then a four step ladder is required because "one giant step"
into the cabin is
a bit much for most people!  While these brackets
are a popular method of hanging a companionway
ladder I think it is time to improve on this crude system for a design
that would make
this job quick and slick. When a Doug
and I were "wasting time" on his cottage deck, he suggested flipping the ladder up.
This set in motion a brain storming session
that resulted in this design. These diagrams are not drawn to scale but describe
the concept better than words can.
While these brackets
are a popular method of hanging a companionway
ladder I think it is time to improve on this crude system for a design
that would make
this job quick and slick. When a Doug
and I were "wasting time" on his cottage deck, he suggested flipping the ladder up.
This set in motion a brain storming session
that resulted in this design. These diagrams are not drawn to scale but describe
the concept better than words can.  I
installed Panache's ladder with a bolt through the wood directly into each
angle bracket mounted to the wall bracket shown above. To
guarantee smooth operation and to simplify installation the two wall brackets were mounted on a
(20x3x3/4)" backing board. This will ensure perfect alignment of the
hinges to the ladder and later, ease the job of aligning the ladder on the boat so
both feet are on the floor, at the same time! Mount the wall brackets with the flanges facing outwards so the factory bracket mounting holes
in the companionway can be
reused to fasten the
backing board. No sense drilling more holes than necessary.
Use flat head
bolts so they don't snag things. Seal all bolts.
I
installed Panache's ladder with a bolt through the wood directly into each
angle bracket mounted to the wall bracket shown above. To
guarantee smooth operation and to simplify installation the two wall brackets were mounted on a
(20x3x3/4)" backing board. This will ensure perfect alignment of the
hinges to the ladder and later, ease the job of aligning the ladder on the boat so
both feet are on the floor, at the same time! Mount the wall brackets with the flanges facing outwards so the factory bracket mounting holes
in the companionway can be
reused to fasten the
backing board. No sense drilling more holes than necessary.
Use flat head
bolts so they don't snag things. Seal all bolts.