| SJ23 Tech Tip E03, (Updated 2016-10-25) Bob Schimmel | |||||
|
Protection from Lightning - Minimize your Risk of Being Struck by Installing a Protection System. INDEX - Rational, Ground Wiring Guidelines, SJ28 Ground, SJ23 Ground, Panache Installation, Wiring Maintenance, Detector |
|||||
| NOTE: "Please don't get the wrong idea about the information contained in this Tech Tip. There is no guarantee the wiring technique described here creates 100% effective lightning protection for an SJ23. The volatile and sporadic nature of lightning guarantees that it is difficult to develop a perfect cone of protection. In addition, testing an installed system is next to impossible and it may take a lot of trial and error to confirm it is effective. To further complicate things, what may be effective on one boat may be ineffective on another. While effective lightning protection systems on land are mature, on a boat this is still a trial and error process guided by best theory and practices. That is not to say that lightning protection on a boat is a hopeless endeavour, because it is getting better. Having said that, I doubt any "expert" will give you a written guarantee but every one of them
will advocate that you are better protected on the water by having a system installed than by having nothing installed. The description that follows was gleaned from many web sites and tempered with the technical knowledge from several of us 40 year veterans who worked technical support for the telephone company in Alberta. It should get you started in the right direction." BP Schimmel. NOTE: Just because the metal parts of your boat are bonded together with heavy copper conductors, does not mean it is protected against lightning. The bonding system offers lightning protection only when there is a good direct path to earth. |
|||||
The theory behind a
lightning rod (that is bonded to an earth ground) is to create a cone of protection under which there is a
neutral electrical charge, thereby preventing your location from becoming a strike
zone. While there is lots of controversy amongst the
"experts" on this topic, most of them agree on the following guidelines;
|
|||||
| RATIONALE -
Despite the low risk of getting hit by lightning on the water, it does happen and
a storm is definitely a frightening
experience. It can be fatal but fortunately going in the cabin provides substantial protection. Ironically it is the boat that is in
greater peril. The best way to minimize the risk to injury is to install a
properly configured lightning protection system bonded to an earth ground. My work experience with analyzing building
and compound communications earth ground wiring systems is that the
number of lightning strikes are greatly reduced, or almost eliminated,
when installed correctly. After the ground wiring was wired correctly the site never
experienced hair standing on end again and the all electronics survived
subsequent thunder storms.
An adequate lightning protection system may have to carry an ungodly amount of current which is impossible to install on a sail boat. However, it is estimated that a properly installed system can reduce your chances of being hit by up to 80% simply by neutralizing the electrical charge in the area under your mast. The neutralizing system is worth installing as a preventive measure. The lightning rod was conceived by Benjamin Franklin in 1752 to safely conduct a strike to earth, thereby saving the wood buildings in Pennsylvania. It is easier for lightning to follow the ground wire to earth than to go through the air or a wood building. There were very few fire departments around at the time so it was kind of important to keep their wooden abodes standing! A sailboat with an aluminum mast already has a lightning rod and the only thing you have to do is bond it to earth. The concept of electrically grounding a mast scares some sailors who think it will attract lightning, making them reluctant to do so. The logic is basically flawed because grounded or not, an aluminum mast is a better conductor than the air around the boat and thus attractive to lightning. When a strike reaches the bottom of an ungrounded mast, it generally fires (flashes) through the hull into the water, sometimes leaving a hole in the hull big enough to sink the boat. At other times it perforates the hull with numerous tiny holes or fissures just above the water line. They are difficult to find and seal. The lightning may also leap (flash) to other metal parts of the boat and potentially pass through a conductive crew member. Yikes. There is compelling evidence that grounding a mast lowers the incidence of damage or injury from a strike and no evidence that it increases the likelihood of being struck. For example, the standing rigging on my previous 22' pocket cruiser sailboat usually had a blue corona around it during an electrical storm. This is St. Elmo's fire. Many people in the marina remarked on how beautiful this phenomenon looked, though I never saw it myself. So I decided to do something about it and bonded the bottom of the mast to the SS pivot bolt of the steel keel (earth) that hung in the water (earth). After that the rigging no longer glowed. What a show spoiler! The lesson to learn here is that an electrically grounded metal mast can be discharged which minimizes the possibility of it becoming a strike zone. Ideally the electrical path to earth should be directed outside the hull, leaving the crew inside the cabin in relative safety. I didn't know that back then. When I installed the ground wire from the mast to my keel (inside the cabin) it looks like I compromised the safety of the crew by directing the charge through the inside. However, the chain plates also terminate inside the cabin and grounding them and all other metal parts was definitely an improvement over doing nothing. The chain plates of an SJ23 extend into the cabin and there is also an aluminum compression post but it is electrically isolated from the mast. Either will do a nice job of conducting the charge into the cabin from which it can flash to the next most conductive object, likely a crew. However, if the metal is bonded to earth ground the charge will usually follow the path of least resistance to earth, thereby protecting the crew. Now do you understand why doing nothing can be dangerous and bonding to earth is better? The metal hardware configuration in an SJ23 is a good example of why lightning grounding on a sail boat is such a complicated subject and why there is no definitive solution for all boats. If the charge is directed to earth (the water outside the hull) it reduces the risk of being hit and protects the crew seeking protection inside the cabin. That's the theory. However, there is so much energy in a direct strike it is impossible to conduct all of it to ground through the earth bonding wire. The charge is just too big for the size of conductor you can install. But if the ground path is outside the hull, the extra charge will likely conduct through the air (plasma), improving the odds of saving the crew and the boat. Its all about understanding the theory and applying the best solution to improve the odds. If your mast is effectively a "single tree" in a forest of other conductive masts in a marina your chances of being hit are reduced. It is the solitary sailboat out on open water that stands the greatest chance of being hit. NEVER BE THE HIGHEST OBJECT AROUND! However, being in a forest is no reason to avoid installing a lightning ground. I think the reason that boat manufacturers don't install lightning protection is the mistaken belief they would be legally liable if the system should fail to protect. The second reason is that there is no mandatory requirement for it. I'm disappointed in the lack of standards and enforcement in this area but I also understand the complications with the variables involved. I have bonded all metal components on Panache as the first step to install lightning protection to improve her survivability at the mooring and add protection for the crew. I believe that safety can be dramatically improved with some simple additions. All metallic standing rigging and other metal components were bonded together to discharge to a earth just above the water, "earth." For the path to earth I'm considering several options:
Few people talk about using these paths yet I think it might work. Bonding the
components was the easy part. The ground rod is the difficult part.
More later as I explore this. TOP |
|||||
2011-05
BoatUS - "The power and rage of the weather showed itself recently with the
devastating springtime tornados that roared through the southern US.
For recreational boaters, summer thunderstorms bring danger not only
with wind and waves, but also with lightning strikes. BoatUS
Seaworthy Magazine recently took a look at how to protect yourself
from this hazard while boating, sailing or fishing and gave these tips:
|
|||||
|
WIRING GUIDELINES for LIGHTNING PROTECTION
|
|||||
|
LIGHTNING GROUND WIRING SJ28 - The mast of a San Juan 28 is factory equipped with a lightning ground. It consists of a continuous run of large gauge stranded copper wire bonded (large lug) to the base of the deck stepped mast, then through the head and bonded to the keel with another large lug. The deck hole is sealed to water ingress. The bottom two thirds of the SJ28 lead keel is exposed to the water creating an excellent path to earth ground. If copper bottom paint is used, well, that should reduce the resistance to water. While this is seemingly a good installation, I wouldn't sit on the head during a lightning storm. What makes the installation doubly dangerous is that you are sitting directly above a very conductive "fluid" that will virtually guarantee your demise. You just may be in for the most hair raising surprise of your life as you become part of the electrical path to earth. This may sound funny but it isn't. The other problem is that stranded, copper wire is a high resistance conductor at lightning frequencies. This is a perfect example of how a good idea is a problem through an ill thought out installation. However, this ground is better than none. Just don't use the head during a lightning storm. LIGHTNING GROUND WIRING CONSIDERATIONS SJ23 - My initial thoughts about installing a lightning ground on an SJ23 was to copy the SJ28 installation described above. This would require bonding a large gauge copper wire to the compression post, running it under the table bridge to the bolt that supports the center board sheave. The theory being that the steel center board lift cable could conduct the electrical charge to water. The tension of the lift cable over the aluminum sheave should create a good conductive path to the water via the bare steel center board. A nice, neat, clean installation, right? There are two problems with this path;
Hmmmm, what's the point in that? It could easily be argued that the crew would not survive such a strike so sinking the boat won't be a problem! Hmmmm, this idea is getting weirder. Use your discretion to install a lightning ground via this path. While it is a cosmetically clean installation, you run the risk of melting the lift cable like a fuse and then endangering the crew inside the cabin. OK, this is really a dumb idea, so don't use it. I described this to show how easily the wrong solution can be installed. It has been suggested that a safe ground, albeit temporary, is to clip a booster cable to the backstay and drag the free end in the water. The suggested safety advantage of this path is that the charge is carried to water outside the cabin. Temporarily grounding the mast should create the desired cone of protection, but you have to be on board to attach it, well BEFORE the storm arrives. The last thing you should do is clip a grounded cable to the back stay during a lightning storm. Your chances of frying yourself in the process are good. Yikes. Even if you are successful, the problem is the end of a dangling booster cable makes poor contact with water and the charge is delivered right over the helmsman's head. A far better place to ground the rigging would be a
heavy copper cable draped from the mast into the water. This technique is
useful at the mooring and conducts the charge outside the cabin. Are
you beginning to get the idea that you should have a permanent lightning
ground to improve your odds? You will
greatly improve your odds of survival by being in a pub instead of on a
boat! Couldn't resist this last suggestion. TOP |
|||||
|
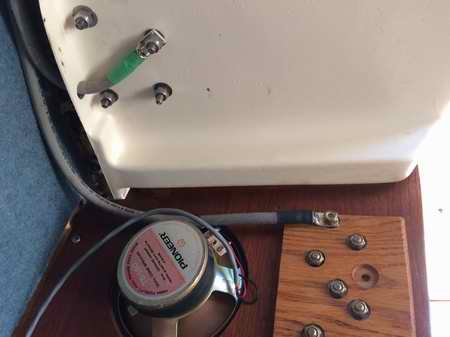
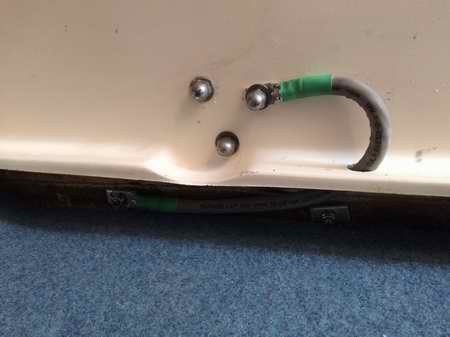
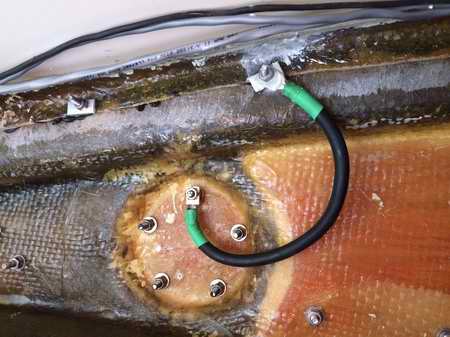
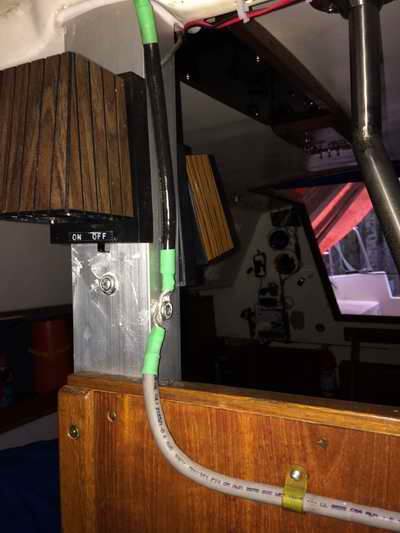
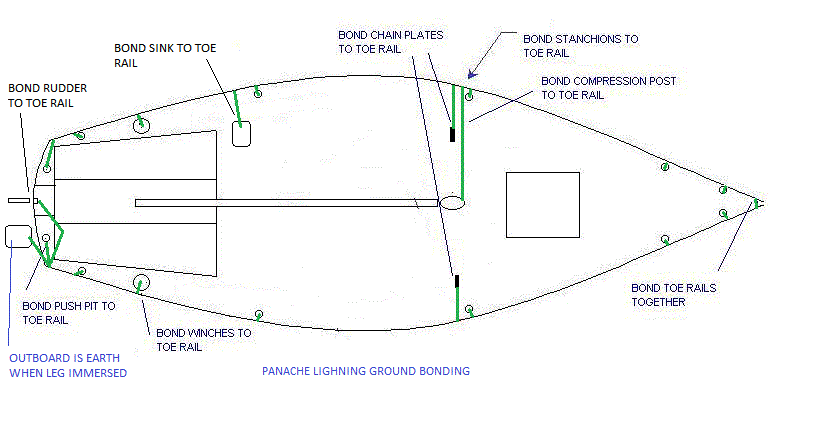
PANACHE BONDING INSTALLATION - As stated previously, it is next to impossible to install a lightning ground that can conduct a direct strike to ground on a sail boat, completely protecting the crew and boat. However, it is possible to install a grounding system that can neutralize the charge in the rigging thereby reducing the chances of the boat becoming a strike zone. A system of this type is estimated to protect you 80% of the time which is obviously safer than installing nothing. Now we're talking. (I bonded the mast to the steel swing keel on my previous Venture 222 and the rigging never glowed with St. Elmo's fire after that, proving that it works). Bonding I installed on Panache:
Since most of the bonding connections described above are less than a foot long, I used #2 weld cable with crimped, soldered and heat shrink sealed lug. With constant radius turns #2 wire can handle ~1000 amps for a short duration. I used a liberal amount of grease at each connection to prevent corrosion. Now I just have to remember the routine inspections of the system to look for corrosion or blackening at an electrical connection. Blackening is a sure sign of a loose, resistive connection that has experienced high current.
A permanent underwater ground plate attached to the hull is high maintenance and is a difficult thing to bond to. You may also experience stray current between a neighbouring boat. Consider that the salt water specs for a permanent ground plate calls for a 4' perimeter plate and for fresh water it calls for a 24' perimeter plate, with sharp or pointy edges to increase the contact area. According to a Florida Sea Grant study only 10% of boats struck in salt water suffered damage (excluding electronics) when the mast was grounded. In fresh water 60% of boats suffered some kind of hull damage. Given the poorer conductivity of fresh water this disparity is almost certainly due to inadequate grounding. To improve the ground, fresh water sailors should always choose a grounding plate that maximizes the edge length. A 12' by 1" plate is 6 times as effective at dissipating a strike as a square plate with the same area, (12" x 12"). Just thought you should be aware of this statistic. As a side note, electronics can usually survive an electrical storm if it is placed inside a Faraday cage. You can achieve this with a steel cookie tin or equivalent steel container. Overall I think this is a functional lightning ground system that can be installed
with little effort. Several of us have given this configuration
considerable thought and believe it to be optimum. Now its just a
matter of putting it in practice. TOP |
|||||
| GROUND
WIRING MAINTENANCE - Connecting the copper lugs to the aluminum parts on
the boat creates a galvanic corrosion problem because copper and aluminum are incompatible. While using a stainless washer between the
lug and the aluminum will slow the problem, the process of corrosion creates
aluminum oxide (white powder). The oxide may progress to the point
where the connection has low conductivity or current cannot flow though it. An annual
disassembly and cleaning of each connection is essential to maintain
conductivity and to ensure a hole isn't corroding through the aluminum mast. Constant attention to all conductor connections is
essential for any grounding system, whether for lightning protection or
electrical system grounding. |
|||||
| ADVANCE WARNING
LIGHTNING DETECTOR - A
SkyScan
lightning detector is a device that uses a patented technology to
accurately detect and determine the distance to lightning strikes. A
computer in the unit analyzes the detected energy and calculates the real
distance in miles between you and the lighting activity, then displays the
information on the front panel.
- You can also tell how far away lightning is by counting the time between seeing the flash of lightning and hearing the thunder. Counting each second (“one thousand one, one thousand two”) will give you a rough idea of the time elapsed. Dividing the number of seconds by five will give the distance to the lightning in miles. The SkyScan display is divided into four range categories: 0-3 miles, 3-8 miles, 8-20 miles and 20-40 miles. These divisions were chosen to make it easy for the user to track the approach of storm activity and know when the danger is overhead. The typical thunderstorm moves at around 15-20 miles per hour, so detecting at maximum range can give two hours or more of advance warning about the approach of dangerous weather. The average strike of lightning is 5-8 miles long, so that when the 3-8's LED is on, the storm has moved close enough to deliver a ground strike right on top of the user. The 3-8 LED is the sign of true danger. When it goes on move yourself to safety! The SkyScan also comes with a SEVERE STORM warning indicator on the front panel. This special warning is turned on by the computer and detects the characteristics of especially strong storms and squall lines. These storms comprise approximately 10% of all storms, and are the ones that bring high winds, hail and tornadoes, along with high probability of dangerous lightning. When the SEVERE STORM indication is on, the danger overhead is EXTREME, and maximum precautions should be taken. I don't smoke but it seems to me that some enterprising individual should be able to figure out how to light a cigarette with lightning! After all, why waste a match!
Lightning Facts! - The National Weather Service indicates there are up to 1,800 thunderstorms in progress somewhere on the earth at any given moment. Each year, the earth hosts over 16 million storms and 3 billion lightning strikes. The United States experiences approximately 100,000 thunderstorms with 20 million lightning strikes annually. Lightning can:
|
|||||
| NOTE - Lightning is
a major concern in some areas of the world, especially Florida and the
Southern USA. Please keep in mind that this
tech tip is NOT the definitive answer or solution to this problem.
I doubt you will find one anywhere in the world. Since lightning protection is
not yet an exact science, there is still lots of "magic" left
for effective ground wiring. Above all, there are NO GUARANTEES.
If
you have technical knowledge on this subject, please submit your
information to Bob Schimmel so I can
update this Tech Tip.
LIGHTNING TERMINOLOGY -
http://www.lightningsafety.com/nlsi_info/glossary.html |
|||||
|
Return to Tech Tip Index. . . . . . . . . . . . . . . Have a Question? |
|||||