| SJ23 Tech Tip E08, (Updated 2015-10-21) Doug Murray & Bob Schimmel | |
|
Battery Tie Down. |
|
|
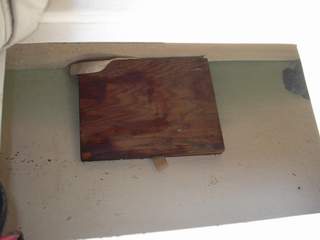
Siesta was equipped with a wood battery support (shown at right) that kept the battery level when the boat was at rest. The rest lay loose in the aft end of the starboard settee and created the ideal ramp across which the battery would slide when heeled on a port tack in search of that elusive 6 knot goal. Rather than slide back across the board when the boat righted, the battery simply tipped over and lay there waiting for me to notice that the 12 V supply was dead! This happened slowly as the acid dribbled out! My solution was to fibreglass a couple of tie down points, one on either end of the battery inside the starboard settee, and use a short length of 1/8” or 3/16” rope around the battery box to keep it tight against the inside of the settee. INSTALLATION CONSIDERATIONS - First, determine where the battery tie downs will be located and mark them with a felt pen. It is important when applying fibreglass over cured material, to prepare the old surface well by sanding with 150 grit or coarser sandpaper and then wiping it clean with acetone. This is akin to sanitizing your skin prior to treatment. Very important to ensure good long term adhesion.
To create the shape of the tunnels, cut a piece of garden hose about 1.5" long and then split it lengthwise. By glassing over these with 1.5" pieces of cloth and resin, it creates a void for threading the rope through; or in my previous world, holding a D ring in place. At left is an image of all the materials. 1/2" PVC pipe works just as well. If you wish to use a tunnel to install a D ring you have to hold it in place under the garden hose while the fibreglass cures. A bit of a tedious job! The tie downs work great and I’ve avoided drilling yet another hole that water can flow through. Doug Murray. _______________________________________________________________________________
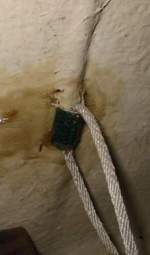
The blue line secures the battery to prevent it tipping. Just above the photo is an eye strap level with the top of the battery. The line goes under the ray through a hole inside the fiddle, up from the back of the tray, through the eye strap and around the battery. The lines are tied to each other to keep the battery snug against the inside wall of the settee. The two black 2.0 gauge positive & negative discharge cables connect to the battery
side terminals, as do the smaller coiled charge wires (black and red) from the
SG-4 solar
controller. Note the ferrites on the wires in front of the tray. These wires
feed power to the electrical distribution panel and the DSC-VHF radio. The ferrites block the
PWM pulses of charging voltage from the solar controller, ensuring "clean" power
to the electrical system. |
|
|
Return to Tech Tip Index. . . . . . . . . . . . . . . Have a Question? |
|
 I had
a bad experience with
Siesta's battery while heeled excessively in the summer of 2009. I failed to realize the battery tipped
over and much of the acid leaked out below the settee. Fortunately battery acid does not react with
fibreglass. The only damage was to the
battery, which was quickly
rectified with an acid refill by the local "Battery Doctor.” The bilge was washed down with water to dilute and clean the acid.
I had
a bad experience with
Siesta's battery while heeled excessively in the summer of 2009. I failed to realize the battery tipped
over and much of the acid leaked out below the settee. Fortunately battery acid does not react with
fibreglass. The only damage was to the
battery, which was quickly
rectified with an acid refill by the local "Battery Doctor.” The bilge was washed down with water to dilute and clean the acid. 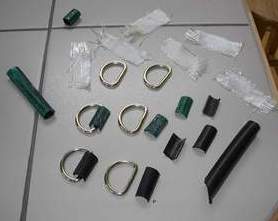
 My original intent was to glass in two “D” rings as I
did when I made fibreglass canoes years ago. Holding the D rings in place while the
fibreglass
cured proved impossible while working upside down. Inhaling resin
fumes in the confined space of the settee is not my cup of tea! I compromised and simply made two
small glass “tunnels” through which to thread the rope
that wrap around the battery box.
My original intent was to glass in two “D” rings as I
did when I made fibreglass canoes years ago. Holding the D rings in place while the
fibreglass
cured proved impossible while working upside down. Inhaling resin
fumes in the confined space of the settee is not my cup of tea! I compromised and simply made two
small glass “tunnels” through which to thread the rope
that wrap around the battery box.  The battery tray for
Panache
is equipped with fiddles to keep the battery from sliding off the tray.
The tray is supported with a wedge shaped piece of wood under it to level
the battery at
anchor.
The battery tray for
Panache
is equipped with fiddles to keep the battery from sliding off the tray.
The tray is supported with a wedge shaped piece of wood under it to level
the battery at
anchor.