| SJ23 Tech Tip E15, (Updated 2022-05-28) Bob Schimmel | ||||
|
Install a Self Powered Knotmeter -
Thru-hull Considerations. |
||||
|
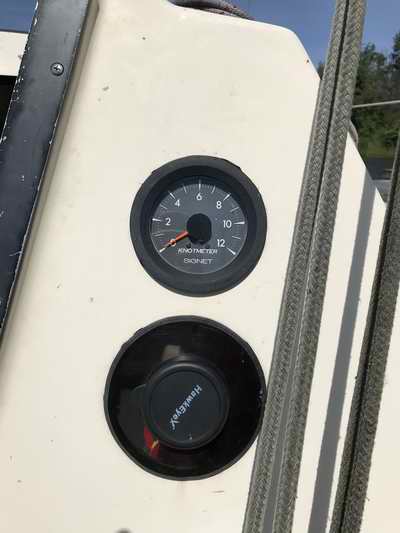
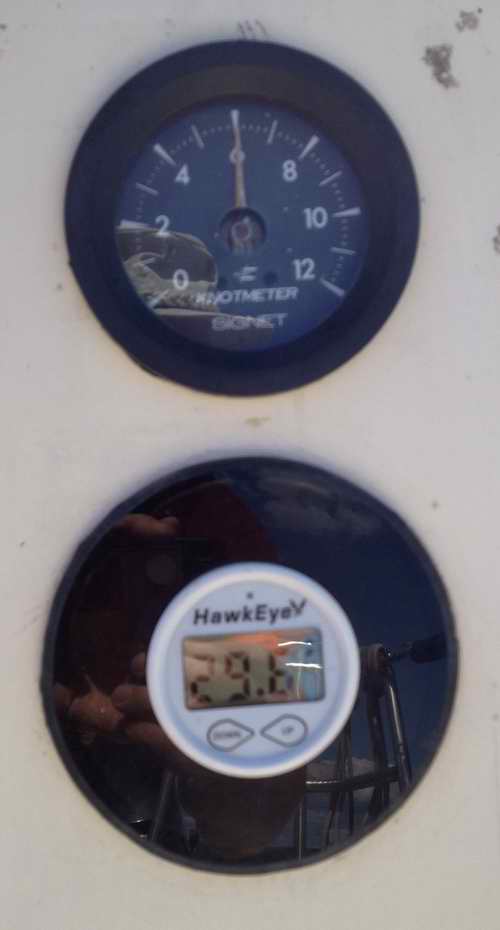
The majority of analogue knotmeters incorporate a paddle wheel transducer equipped with a magnet to measure speed through the water. Panache has an early version of the SignetMarine SL11 self powered analogue knotmeter that is capacitor dampened for a steady indication. It reads accurate to 1% and is easy to calibrate using the tiny screw through the back plate. The optimum place to mount the paddle wheel transducer on an SJ23 is about a foot in front of the keel, dead center on the hull. This spot is free of turbulence for an accurate reading on both tacks and leaves sufficient space for the (6-8)" wide sling of a travel lift or crane.
If the knotmeter is installed on the center line of the hull it becomes an essential tool to determine if your port/starboard sail trim is identical. For example, the transducer on a friend's C&C 27 is mounted slightly off to one side, this being the only spot. The meter shows high when sailing on one tack (deeper water) and slower (shallower water) on the other tack. If the bow becomes airborne while coming off a really steep wave, the wind will peg the meter to full scale. In either case it is really annoying to have to wait for the meter reading to return to normal, which takes about one boat length. The owner has gotten used to it and ignores the false reading. I consider it a "PITA." INSTALL - The photo below shows Panache's installed transducer from above, about a foot ahead of the keel, with the head ("throne") removed. The installation was done by one of the previous owners following the instructions recommended in the manual by SignetMarine. When I acquired Panache I replaced the plywood backing block with a 1" thick hard wood block saturated with WEST epoxy to prevent rot. The block is sealed to the hull with Sikaflex, including a fillet. It's a major pain to access this installation with a heavy porta-pottie in place but the paddle wheel works very well there, so I don't complain. Thankfully that hasn't been an issue yet, as I do all servicing in the off season. The hole through the hull must be drilled true and smooth using a hole saw. Measure both outside and inside the hull to confirm location for service access. Drill a 1/8" pilot hole to confirm location on the other side (It can easily be filled if you screw up). Then drill the final size hole. While you have everything open, cut a large hole through the hull liner big enough to slip your hand through. Round off and smooth the edge since you will have to sponge up water about a foot aft if you ever remove the transducer with the boat floating. Keep the spare plug handy for this! Install a thick, large backing block inside the hull to reinforce the thru-hull housing; 3/4" thick hardwood saturated in epoxy, G10 board or UHMW plastic. Seal the backing block to the inside of the hull with a thickened epoxy or marine sealant (butyl rubber or Sikaflex), aligning the notches (or arrow) in the housing along center line of the hull. Squeeze the block to the hull with a heavy weight or a clamp through the hole, till the sealant cures. Insert the thru-hull housing using lots of marine sealant.
__________________________________________ STUCK PADDLE WHEEL - There are times when the paddle wheel is stuck due to marine growth or tiny fresh water shrimp. The obstruction usually breaks free with speed through the water but occasionally requires a bit of assistance to free it. Use one of the following methods:
NOTE 2: You can see grass through the hull fitting which makes it rather obvious that the boat is not floating! I point this out because I leave the fitting open for winter storage. It's also a good time to inspect the O-rings. Removing the paddle wheel prevents the O-rings from sticking and promotes cabin ventilation without letting critters in. But you do have to leave the head off. NOTE 3: Prior to driving down the road, either pull the paddle wheel up inside the housing or nudge a twig into the gap of a blade. Anything to prevent the paddle wheel from spinning at road speed. Holding the meter pegged to full scale will likely burn out the meter movement. Reverse all this prior to launch! You can thank me later. __________________________________________
Paint Needle - I disassembled the meter and it turns out that loosing the weight of the paint from the needle was enough to offset the balance with respect to the needle counter weights. I didn't want to play with the very delicate weights so I restored the needle balance by coating it with two coats of fluorescent orange paint. Just don't lay a really heavy coat on. That will result in a low 0-4 knot reading and a high 8-12 knot reading as the extra weight pulls the needle down. 4-8 knot should be reasonably accurate though. Enamel model paint is available in a 2 CC bottle at a hobby or craft shop. Enough to paint hundreds of needles. It doesn't often happen but its sweet when you can knock off two birds with one stone. Needle Deflection 1 - If the needle doesn't deflect the correct amount, and rattles when you shake it next to your ear, suspect too much bearing play. Sloppy bearings can also result in sticky movement. Tighten the front and back bearings equally a very small amount till the rattle is almost gone and the needle can still rotate freely. Then STOP. A tiny bit of looseness is perfect. Lots of looseness is not. No looseness is bad. This is a very delicate adjustment so NEVER tighten it too much or the jewel bearings will be crushed, rendering the meter useless. This meter movement is manufacture discontinued so be very careful. Calibrate for accuracy by motoring both ways through a measured mile. Needle Deflection 2 - If the needle doesn't deflect the correct amount and the calibration adjustment is at its limit, the meter has too much internal resistance. The negative electrical connection to the meter coil is through the springs attached to a "washer" under the top bearing at the meter face. The tiny tab on the ring can be rotated to position the needle to zero on the scale. Turning it slightly should crack through the corrosion to restore the electrical path. It can be cleaned with electronic contact cleaner followed by a tiny dab of ATF on the "washer" to prevent corrosion. Calibrate for accuracy by motoring both ways through a measured mile. Needle Deflection 3 - This meter can show speed when backing through the water. The paddle wheel generates an AC signal that is rectified by a diode to generate a DC voltage to drive the meter movement. The polarity generated is the same regardless of boat direction so it doesn't matter if the boat is going forward or backward to show a reading.
NOTE: To confirm that the paddle wheel is generating sufficient voltage at the
connector where plugs into the back of the instrument. (End of the 3 pin paddle wheel cable). All SignetMarine paddle wheels generate
approximately .5 VAC/knot. If you spin the wheel rapidly by hand
you should measure ~5-6 knots on the meter or 2.5-3 VAC at the cable
plug. Night Lighting - I discovered the factory incandescent bulb (an automotive instrument light bulb) draws 250 MA so I replaced it with a Sylvania 194R (red LED) that draws 40 MA. Same type base so the bulb just plugs in the socket. The bulb is polarity sensitive so plug it in correctly. The LED bulb is brighter than the incandescent and comfortable to look at. Winter Storage - While I remove all electronics and the compass from Panache prior to winter storage, the knotmeter stays. Removing the meter risks damaging it and low temperature does not harm it. If you usually remove a bulkhead instrument, I suggest sealing it to the bulkhead with a very thin film of silicon sealant, Goop or butyl rubber that can easily be cut with a razor knife. DO NOT use Boat Life, Sikaflex, 3M5200 or such. Any of these sealants are strong enough to break the case during removal. Meter Mount - The back side of the meter flange that rests against the bulkhead has a groove that is perfect for an O-ring. Not sure if that is the factory intention but I installed one along with a light sealant.
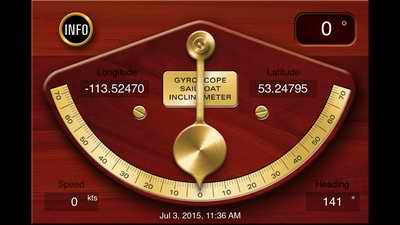
CALIBRATE
- If I had to use an iPhone or iPad application to measure
boat performance or to verify the accuracy of other instruments on the
boat, I would use this one; heel (uses internal inertia sensor), coordinates, bearing and speed
(internal GPS) all without cell service. |
||||
|
Return to Tech Tip Index. . . . . . . . . . . . . . . Have a Question? |
||||
 Knowing your boat speed is a basic requirement of
navigation that can be "somewhat" useful if your weather window is closing! Judging
your speed is a good skill to have but it can be deceptive. A knotmeter equipped with a transducer can show
accurate instantaneous speed, something that a GPS receiver with speed
averaging cannot do. You will never know how fast you surf down
a wave if you use a GPS knotmeter.
Knowing your boat speed is a basic requirement of
navigation that can be "somewhat" useful if your weather window is closing! Judging
your speed is a good skill to have but it can be deceptive. A knotmeter equipped with a transducer can show
accurate instantaneous speed, something that a GPS receiver with speed
averaging cannot do. You will never know how fast you surf down
a wave if you use a GPS knotmeter. 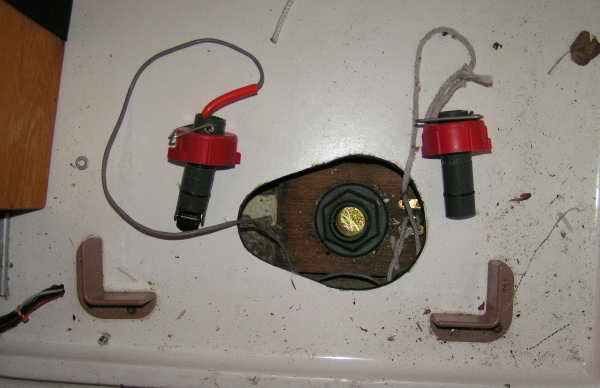 NOTE 1: The paddle wheel transducer is on the left and the plug is on the right. I've tied the plug to the backing block around the thru hull fitting with a 1' line so I can "find it" should it be needed to replace the paddle wheel. I coat the O-rings on both in silicon grease to preserve the rubber. The plug is stored in a sealed plastic bag below the floor to keep it and the O-rings clean.