| Ever have a hankering to upgrade the tiny
SJ23 factory primary winches? If you ask me they look too small on
the winch pedestal. Maybe my attitude comes from seeing small tires
on a pickup truck. Lets face it, some vehicles just look better with
bigger tires. Panache's factory primary winches were
Barlow #15. This is probably the original numbering system that I
think is equivalent to a #6 today.
I sure wish the
manufacturers would adopt one measuring system! It makes it very difficult to
compare products. The small diameter of the Barlow winches can be hard on
wet 1/2" genoa sheets, wearing them out quicker than they should. I realize I use oversize
line on this small winch but I like the feel and grip of the thicker line in
my hand. I value my skin. Anyway, I bought a pair of used single
speed Lewmar #10 winches in excellent condition.
So lets install them.
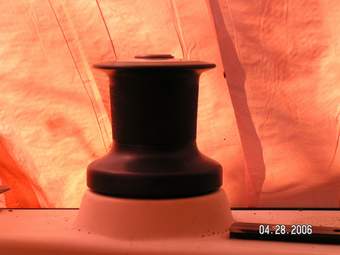
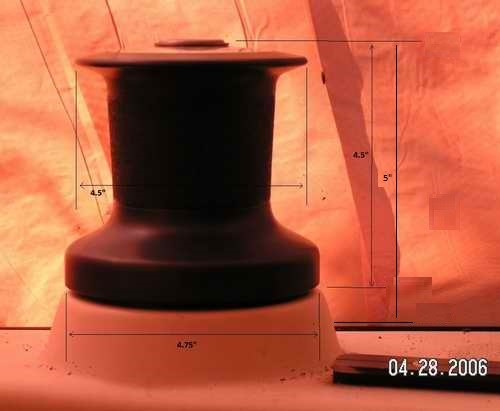 The
foot of the #10 Lewmar has a 4.25"
diameter, the bottom of the barrel is 4.75" in diameter and the winch is 4.5" tall. It
perfectly covers the SJ23 winch pedestal as shown at right. This is the maximum size winch this pedestal can hold without
resorting to an oversize metal plate on top of the pedestal, something I
wouldn't suggest.
The problem is that a slack line around the winch
can drop below the edge of the plate during a tack. With a few
turns around the pedestal, the sheet loads up and jambs against the bottom of the
plate. This will be difficult to release.
If you are going to add a plate, find a way to fill the gap under it to
prevent this problem. The
foot of the #10 Lewmar has a 4.25"
diameter, the bottom of the barrel is 4.75" in diameter and the winch is 4.5" tall. It
perfectly covers the SJ23 winch pedestal as shown at right. This is the maximum size winch this pedestal can hold without
resorting to an oversize metal plate on top of the pedestal, something I
wouldn't suggest.
The problem is that a slack line around the winch
can drop below the edge of the plate during a tack. With a few
turns around the pedestal, the sheet loads up and jambs against the bottom of the
plate. This will be difficult to release.
If you are going to add a plate, find a way to fill the gap under it to
prevent this problem.
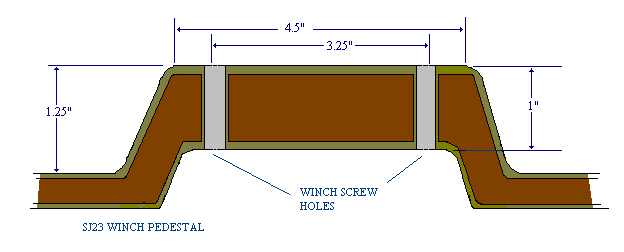
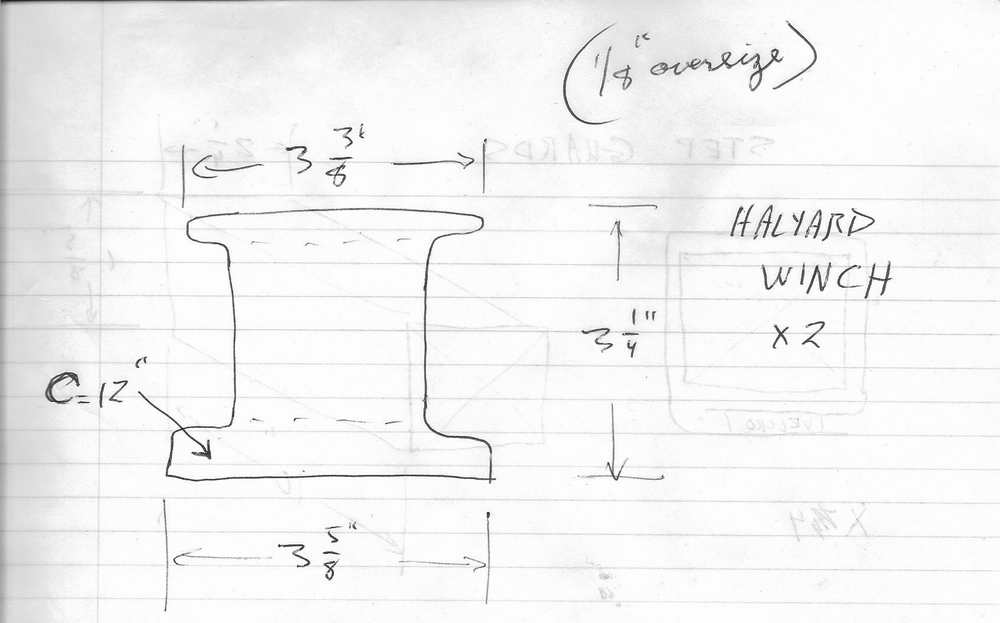
The top of the winch pedestal is 1" thick and the sloped walls
are thicker than the deck, as shown in the drawing below. Wow talk about
strength. This pedestal is definitely up to the task of a
larger winch. Therefore an extra backing block is not required.
Besides, the pull load from a sheet doesn't change with a
different winch. However, the mounting holes of the previous
smaller winch didn't line up, so they
were filled with epoxy to
restore the strength and prevent wood rot in the core.
After assessing the pedestal and having experienced self tailing winches
of late, my preference today would be a self tailing winch. Lewmar
makes a single speed, self tailing winch that fits perfectly on this pedestal. I've learned to slowly ease the
jib sheet without creating an over run, how to pop the sheet off for tacking and how nice it is
to pull the sheet in without having to tail the line, so I wouldn't hesitate to change them out today.
 CONSTRUCTION - Having restored
the top of the pedestal, I outlined the new 1/4" mounting holes using the
Lewmar #10 winch foot as a
template. The winch drain hole was pointed downhill towards
the gunwale to observe the golden rule of plumbing;
s__t runs downhill.
There
is no requirement to orient the base mounting holes relative to the
direction of load for this winch. It's always a good idea to verify
this in the owner's manual as it is mandatory for some winches. I used (1.5 x .25)" stainless steel screws
(pan or bugle head) in combination with the
largest washers and nylock nuts that could fit under the pedestal. CONSTRUCTION - Having restored
the top of the pedestal, I outlined the new 1/4" mounting holes using the
Lewmar #10 winch foot as a
template. The winch drain hole was pointed downhill towards
the gunwale to observe the golden rule of plumbing;
s__t runs downhill.
There
is no requirement to orient the base mounting holes relative to the
direction of load for this winch. It's always a good idea to verify
this in the owner's manual as it is mandatory for some winches. I used (1.5 x .25)" stainless steel screws
(pan or bugle head) in combination with the
largest washers and nylock nuts that could fit under the pedestal.
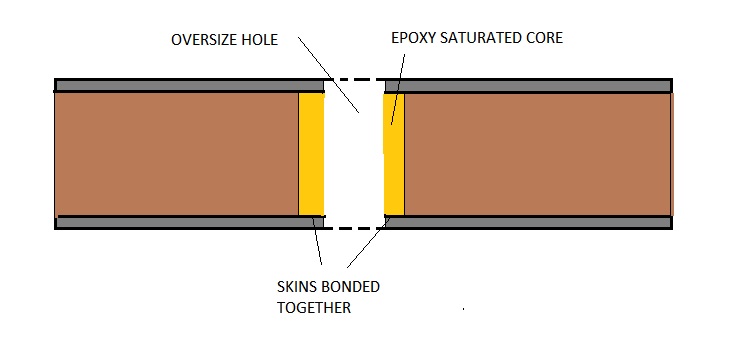
- SEAL THE OLD BOLT HOLES - With the preliminary measuring out of the way you can proceed with the
epoxy repair to restore the strength of the pedestal. Drill out the old holes
two drill sizes larger to clean them of gunk and prepare for sealing a fresh surface. Wash the holes with acetone, tape the bottoms shut and fill the
holes with unthickened epoxy.
Dribble it in slowly letting it drip from a toothpick so it fills the hole from the bottom up. If you just dump it in, you will spend a lot of time with another tooth pick popping air bubbles as they surface. Let the epoxy soak into the
wood core. The wood core on Panache was bone dry (good) and a lot of it soaked into the wood.
Don't be surprised if it takes several applications of epoxy to fill each
hole flush to the top. Each application will soak into the wood core, strengthening it.
Finally fill
the hole with thickened epoxy. I used saw dust as a filler
working it to a ketchup consistency. It's a
good idea to overfill the holes slightly, creating a bump, as there is usually
further settling as uncured epoxy is absorbed. You might be lucky if the overfill shrinks to
level with the surface. If the epoxy cures with a bump then scrape it off
flush using a sharp chisel. If you
have a minor depression, fill it with Sikaflex or butyl rubber when you install the winch. Not
a big deal. By the way, filling the old holes with epoxy
bonds the top layer of fibreglass on the pedestal to the bottom layer which actually makes the pedestal stronger
that original and ads compression strength to offset the bolts. How's that for convenient! This is why it is a none
issue to fill the old holes with epoxy and drill new ones.
- Fig 1 below shows the remains after I removed an old Barlow winch from Panache's cabin top. The 6 holes were filled with G-Flex epoxy to seal the core. The 4 outer holes were drilled out 24 hours later, leaving sealed sides for a new Lewmar winch. Note the bubble of epoxy at each hole to allow for shrinkage.
- SEAL THE NEW BOLT HOLES - Disassemble the new winch as per
Tech Tip F29. Drill the new holes using the winch base as a
template. Position the base so the drain hole points downhill.
Start a counter sink hole by twisting a full size drill bit till
 the
full face just penetrates the surface. Do this for all holes.
Now drill a pilot hole in each through the pedestal. Drill the
final hole 1/8" oversize so you can coat the inside
with epoxy (use a pipe cleaner) to
seal the wood core. No sense taking a
chance with wood rot here. Once cured drill out the
epoxy in each bolt hole with a
1/4" drill bit, matching the bolts. Gently now, you must leave some epoxy to seal the
wood core in the hole. Using a drill is OK if you can keep the speed
real slow. If your battery powered drill turns too fast, then
drill when the battery is almost dead. (applies to Ni-Cad battery only). the
full face just penetrates the surface. Do this for all holes.
Now drill a pilot hole in each through the pedestal. Drill the
final hole 1/8" oversize so you can coat the inside
with epoxy (use a pipe cleaner) to
seal the wood core. No sense taking a
chance with wood rot here. Once cured drill out the
epoxy in each bolt hole with a
1/4" drill bit, matching the bolts. Gently now, you must leave some epoxy to seal the
wood core in the hole. Using a drill is OK if you can keep the speed
real slow. If your battery powered drill turns too fast, then
drill when the battery is almost dead. (applies to Ni-Cad battery only).
- MOUNT THE WINCH - Service the winch (Tech Tip F29)
before you install it. Once the epoxy is cured (24 hrs) you can install the winch use butyl rubber under the base to seal the holes and to provide a uniform bedding
surface. If you like to remove the winch for routine maintenance,
use a sealant to facilitate easy removal. If the winch will be serviced while
mounted on the boat then you
can use an adhesive, as removal is not required. The best tool for tightening the nylock nuts underneath is a
16" long nut
driver. To install the nuts and bolts on your own you must have the arms of an
orangutan
or be extremely dexterous. The reach is incredible. Save your back and
find someone to crawl inside the locker! You handle the screw driver on deck and apply the sealant under the
screw heads. After all, somebody has to do the technical
stuff! Have the helper turn the nut while you hold the screw still to retain the sealant under the head.
Remember to tighten
just a bit beyond snug and no more. If you turn any tighter you are
apt to squeeze the sealant out (jeopardizing the water tight seal) or crush the pedestal. Wipe off the excess sealant that
oozes out, leaving a filet all around the base. Ensure
that the drain hole is free of sealant so water can flow out. This
is real important for a freezing climate. OK,
now is the time to treat the kid for his good work!
TYPICAL STEPS to REPLACE a CABIN TOP HALYARD WINCH (2022). This job is an example of replacing a winch using different mounting holes, going from a rectangle to a square. There is no orientation requirement for the new Lewmar winch so I reused two holes that match. The bores of the four outer holes were sealed with epoxy to protect the wood core and add compression strength for the mounting bolts. The two inner holes were filled to restore strength and left sealed.
|
Fig 1 - Use the winch base as a template to locate the two outer holes. Sanitize all holes with acetone for maximum adhesion of the epoxy. 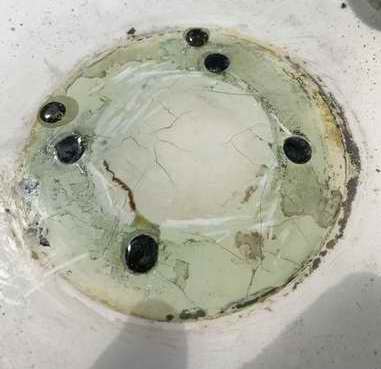 The winch holes were drilled 1/8" larger than the required 1/4" and slightly over filled with epoxy, creating a dome that was later sheared off flush with a sharp chisel.
|
Fig 2 - The bottom of the holes were sealed with duct tape. The bulge shows where epoxy started to creep, alarmingly fast despite its thick viscosity. 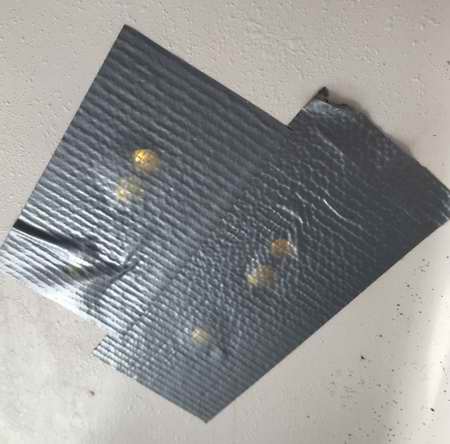
|
Fig 3 - The duct tape leaked and I had to think quick. So I pressed the tape against the ceiling with part of my favourite sponge and the mooring pole. Paper towel was on the settee to catch a drip. 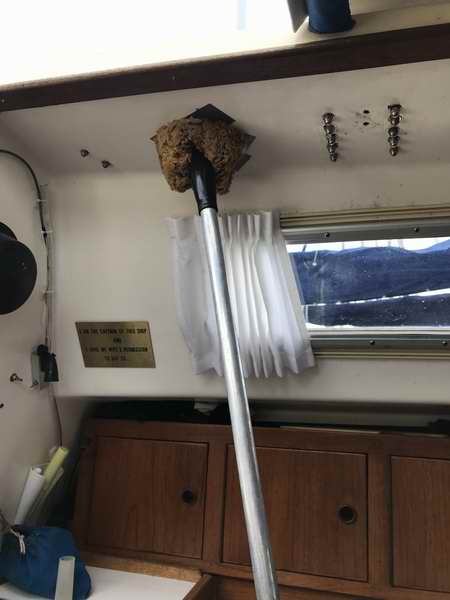
|
Fig 4 - Fortunately the sponge and pole held till the epoxy cured. Below is epoxy cured with the tape removed. Note how far the epoxy crept in only 10 minutes, prior to the tape being pressed against the ceiling. All the excess was picked off while the epoxy was still green, leaving a clean ceiling. 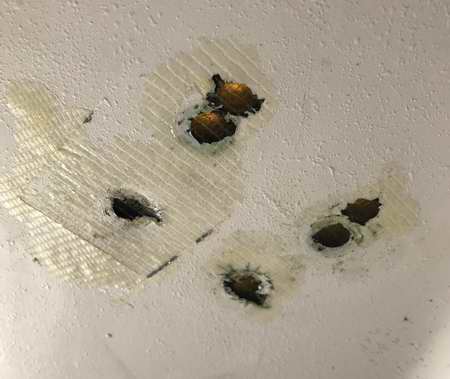
NOTE - I learned a valuable lesson doing this job about testing my technique. On a later epoxy job I used Gorilla Tape and had zero leakage. See Tech Tip F06. As always, testing, practice and preparation is everything. |
Fig 5 - Step drilling epoxy to fit 1/4" screws. Use winch base as template to center the machine screws. 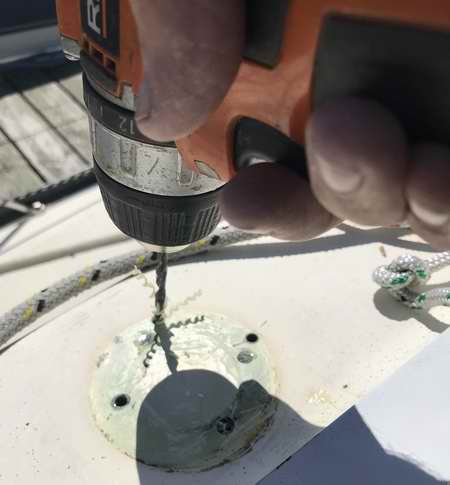
|
Fig 6 - Seal winch base and screws with butyl rubber. 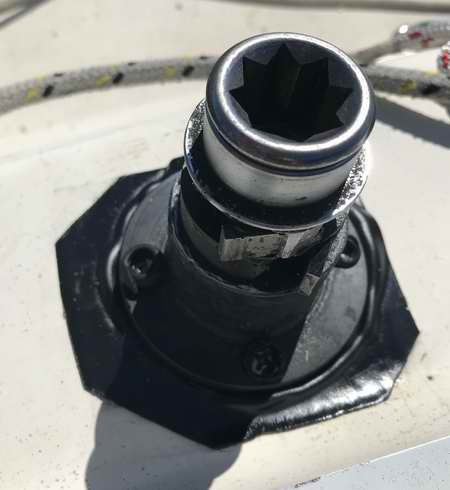
|
Fig 7 - Butyl rubber trimmed off and nuts tightened below. 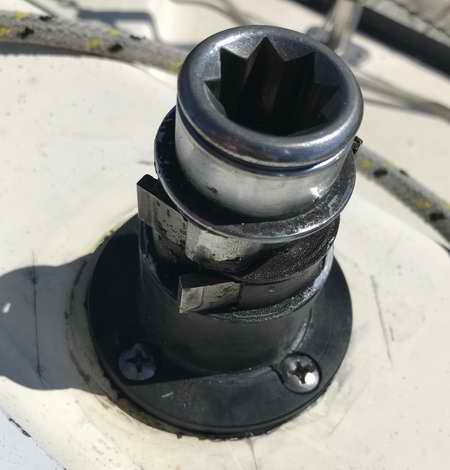
|
Fig 8 - The new winch securely mounted and sealed. It spins nice. All the winches on Panache are now Lewmar. 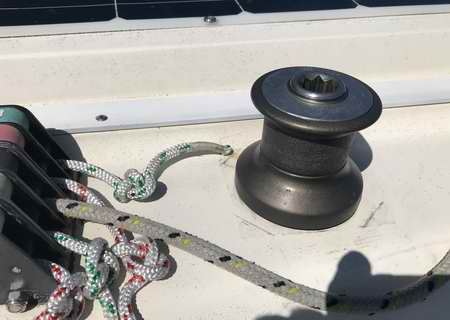
NOTE - The aluminum cap on this Lewmar winch is my fabrication as I couldn't find a factory cap. Use a compass to outline the hole and perimeter of the disk. Drill the hole and cut the disk to machine fit the winch. Accuracy here is everything. Place the disk on top of a pipe with a diameter that matches the OD of the disk. Then center a 1.25" socket over the hole and give it a light "tap". One or two taps is sufficient to create a slight "cone" that sheds water. |
When installing a winch, it must be
mounted on a smooth, flat surface for strength. The sheet should enter the drum up at an angle
of 5-10° below the base angle. This angle can be achieved
by using a low profile turning block (small) on the track or by installing a wedge under the winch
to tip it away from the sheet. An override on a winch is caused by the sheet
lead being too level as it strikes the winch drum. A large genoa car often raises the sheet angle of the deck, making the sheet lead too high as it strikes the winch drum. Too many initial turns on the drum plus an over sized sheet exacerbate the problem. The SJ23 pedestal elevates the winch so the sheet usually strikes at the bottom of the winch drum. It is a perfect match with a Merriman car that has a really wide sheave, sits really low and you can run two sheets through one if you need a quickie place to set up a new jib. When you tack a jib, set one turn on the winch, pull in the majority of the sheet, then add a turn or two after the tack is complete to pull in the last bit of line, and finally wrap it around the cleat. Thick fuzzy yacht braid sheets
are nice on the hands, but they tend to override because they are sticky
around the winch. Click here to view the pattern for a
Sunbrella cover for this winch (not to scale).
|
PRIMARY WINCH (1998)
|
|
Original
Factory Barlow #15 winch
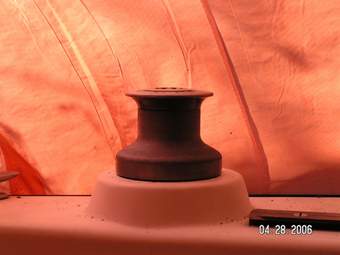
The Barlow #15 has a 3.25"
diameter foot.
|
Lewmar #10 single speed winch
The Lewmar has a 4.25" diameter foot.
|
Note the size difference of the Barlow winch on the left and the Lewmar on
the right. The best part
is, I still get to use my favourite Lewmar locking winch handle. By the way, Lewmar "acquired" Barlow and Barient, quite a few years ago and to the best
of my knowledge have never manufactured spare parts for either brand.
So take care when doing winch maintenance.
CONCLUSION - I find the larger winch
much easier to
use despite the fact that it has a lower mechanical advantage. This
surprised me but I think it has a lot to do with the large
roller bearings (easier to turn than bushings) or the fact that the drum diameter matches the
minimum radius of the 1/2" sheet I use. It could also be the gear ratio, Lewmar Power Ratio = 2 handle lengths X gear
ratio. Regardless, as old and flexible as my
sheets are, they don't slip off the larger winch when I tack. This is a godsend when sailing single handed. The last thing I need when
the action get
dicey
is something as frustrating as a sheet that slips or pops off a winch.
NOTE 1: The factory cabin top winches are Barlow #15 or a
Lewmar #6.
SAFETY - You shouldn't sail with a
handle locked in a winch. I realize it seldom happens, but if the winch ratchet lets go and you are
within the turning radius of the handle, you will receive a nasty whack.
If the line is wrapped around a cleat past the winch, there is
minimal chance it can whack you. This is the main reason why I cleat
a line on a self tailing winch if the boat is trimmed and expected to stay
on the current heading for any length of time. On the race course
the winch is always manned and the free end of the line is held by a
deck ape. On a cruising boat, the winch handle should be stored in
the holder.
|