| SJ23 Tech Tip F33, (Updated 2024-02-07) Clark Sails, Betsy Schultz, Wes Sharp, Ray Bowles & Bob Schimmel | |||||||||||||||||||||||||||||||||
|
SJ23 Standing Rig Tuning and Sail Setting Guide. INDEX - Rig Preparation, Mark Turnbuckles, Rig Tension, Loos Gauge, Sail Trim, |
|||||||||||||||||||||||||||||||||
|
THANKS:
The
text and spinnaker image are from two original Clark Sails Tips I received from
Betsy and Wes. I
combined the info in this Tech Tip which is extremely useful to have
onboard. Read and heed the follow suggestions when you can't figure
out how to make the boat go. |
|||||||||||||||||||||||||||||||||
|
"The sails for the San Juan 23 have been developed using primarily our proven designs from the San Juan 24. Although many San Juan 23 sailors are not interested in racing, most of you would still like to get maximum performance while cruising and the occasional race that many are likely to enter. Here are some ideas (rig preparation) that will help you get the maximum performance from your boat and sails." Don Clark. MAST RAKE - The San Juan 23 is
designed to have up to 12" of rake in the mast when floating level on
her waterline. This is an approximate measurement and you will be in the
ballpark by tightening the factory backstay so 1/2" of thread is
showing on the top
of the turnbuckle barrel. Then adjust the forestay turnbuckle for the proper
head-stay sag, ~(5-6)" when sailing to
weather in a medium breeze. MAST PERPENDICULAR - The most accurate method to ensure the mast is perpendicular
(lateral) to the
hull is to hoist a light steel wire, Dyneema line or measuring tape from a secured main halyard.
Hoist the halyard and extend the wire so it just touches the starboard toe rail, adjacent to the chain plate. Then touch the wire to the port toe rail, adjacent to the chain plate. If the wire just touches either toe rail with the same pull, the mast is perpendicular to the
hull. If you want to get real picky, allow for the main halyard being on port or starboard masthead block. Light wire is superior for this than anything else. To correct a lean, adjust the upper turnbuckles with the lower turnbuckles loosened. SHROUD TENSION - After the mast is perpendicular adjust port and starboard turnbuckles the SAME amount to adjust the tension,
+1/2 turn or -1/2 turn.
Hold the wire from twisting while turning the turnbuckle barrel. Final adjustments can be made while under sail which is most
easily done by adjusting the leeward shrouds, tacking, looking up at the
mast, tacking, etc. The
shrouds should be fairly tight to the point where the leeward shrouds are still snug
when the boat heels 200. (This is approximately 10% of breaking strength or 350-400 lbs as measured with a Loos tension gauge).
Sight up the mast and adjust the lower shrouds to straighten a bowed mast. A slight amount of sideways bend to
leeward at the top is OK while sailing. Keep in mind that 1x19 SS wire or the fittings do not like to be shock loaded which is why
it is so important to tension the shrouds correctly. The leeward shrouds MUST NEVER go completely loose to minimize shock loads or fatigue when they tighten on the next tack.
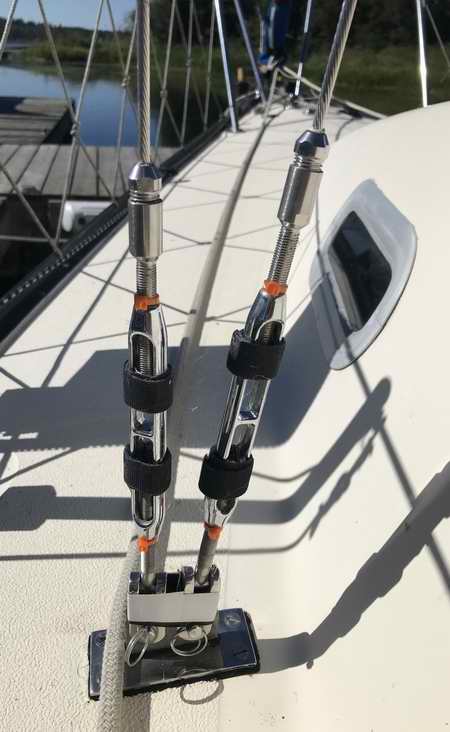
With the rigging tension set correctly the turnbuckle threads should be marked (top & bottom) so you can quickly restore the settings the next time you step the mast. It also a great way to see if you have loosened the barrels 1/4" to lower the mast. Marking the turnbuckles is a real time saver to those of you who trailer launch your boat. For all of you sailors who seasonally launch and retrieve your boat, don't consider yourself done after the initial mast tuning. Since 1x19 SS wire stretches after the first outing you should repeat this procedure in about a week or after a few more outings. Once you have tuned the rigging to perfection, mark the turnbuckles with tape (top & bottom) around the exposed threads to mark the position of the nut against the barrel. The alternative to using electrical or rigging tape is to set a tie wrap around the thread, really tight. I use synthetic grease on Panache's turnbuckles and have discovered it eventually dissolves the tape adhesive. This loosens the tape, rendering it useless.
Ever since I learned how critical rig tension is to sailing performance, I finish setting the tension with a Loos PT-1 gauge on Panache. It really pays in the performance department.
RIG TENSION - The SJ23 is e/w closed barrel turnbuckles from the factory. A closed style turnbuckle
must be loosened initially to confirm how much
thread is screwed into the barrel. Maximum strength is achieved
when all the barrel thread is screwed over the toggle thread.
An equal amount must be screwed over the top and bottom toggles. Set Rig Tension With a Loos Gauge - "I have used a Loos strain gauge for all our sailboats. There are several models so use the gauge that matches the wire size on your boat. All Loos gauges measure strain to +5% accuracy. The PT-1 Professional gauge fits 3/32", 1/8" or 5/32" wire, which is suitable for the 1/8" wire on a MKI SJ23 or 5/32" wire on a MKII. The PT-1 Professional gauge can be used to continually measure the tension as you adjust a turnbuckle, making it much superior to the older A-91 gauge.
Now, all this may seem to be a lot of technical mumbo
jumbo but the boat really responds MUCH better if you take the time
to do this. The first time is a PITA but subsequently it takes less time to keep it in tune.
There are as many methods of setting wire tension as there are sailors. I have found this works very well for me over 6 different boats. Good luck and email me if you have a question or problems." Ray Bowles TOP A Lesson Learned While Setting Rig Tension Under Sail - "Panache in cruising mode has 70 lbs of ground tackle in the anchor locker plus a 5 Kg anchor on the bow roller, 10 gallons of drinking water under the V-berth tank, 2.5 gallons of flush water in the head, some stuff is lying on the V-berth, a 50 lb battery under the starboard settee, 2.5 US gallons of gas in the port cockpit locker and a 70 lb outboard on the transom. She floats level on her lines but heels ever so slightly to starboard in the slip. The turn of the transom is about 2" above the surface. The mast has ~8" of rake, is equipped with roller furling on 5/32" rigging tensioned with a split back stay adjuster, the center board usually hangs just aft of vertical resulting in a light feel at the helm. If the Tiller Tamer is locked she can maintain her heading and follow wind shifts provided I don't move around too much in the cockpit. A sail and tune session with some buddies in 2018 demonstrated something
I could never learn when sailing solo. The three of us purposely went out in a breeze that would heel the hull to 200 to tune the rigging. The boat sailed well but the 1/8" shrouds were a tad loose. After the shroud tension was tightened as per
Clark's
recommendation, Panache could point 50 higher and sailed
livelier when the turnbuckles were tightened only one more turn. This was reported by an experienced sailor on the helm who had never
sailed an SJ23.
It demonstrates how effective correct tension is, which was also reported by Ray. Later I used the Loos gauge to fine tune the tension, equalizing port & starboard. Panache's settings for 5/32" wire are shown in the table above." Bob Schimmel
TOP |
|||||||||||||||||||||||||||||||||
|
Mainsail Trim - Since it is possible to induce only a small amount of mast bend in a mast head rig, the luff is cut fairly flat and shape is produced by broad seaming the Dacron cloth. As the wind increases, pull the Cunningham down to move the max draft forward to 35-40 % back from the mast. You'll find that by removing the horizontal wrinkles in the mainsail luff you'll be very close. The outhaul should be adjusted so the sail has 6" or so of belly in light air while sailing upwind and downwind in most airs, and pulled all the way aft as the wind increases and the boat heel approaches 200. Trim the mainsheet so that the uppermost batten is almost parallel to the boom or slightly falling off to leeward. A tell tale at the leech of the top batten can tell you whether the sail is sheeted too tightly and stalled up there. Jib and Genoa Trim -
The 110% jib should be used in a breeze that produces 200 or
more of
heel. The mainsail may be reefed according to the wind strength, however
the SJ23 should always be sailed with <250 of
heel (when the pulpit inside leg is vertical). The genoa will be happy if the leech is sheeted to 3-4" outside the spreader and the foot is just inside the lifeline on a beat, being careful not to pinch high, which keeps the boat driving hard. Sheet Tension - Sheet tension and the angle of the sheet leads should be adjusted so the sail luffs evenly top to bottom when sheeted in for windward sailing. Generally the genoa should be sheeted so the leech is 2" or 3" off the spreader and the body of the sail should parallel the outer shroud from the spreader to the chain plate. It may be sheeted more tightly for flat water. Spinnaker - The Clark tri-radial spinnaker has been designed for all around off wind performance. We also offer a highly popular cruising spinnaker (without pole) that is attached to the bow fitting and is flown much like a big genoa. It can't be used upwind beyond a close reach.
|
|||||||||||||||||||||||||||||||||
|
Return to Tech Tip Index. . . . . . . . . . . . . . . Have a Question? |
|||||||||||||||||||||||||||||||||
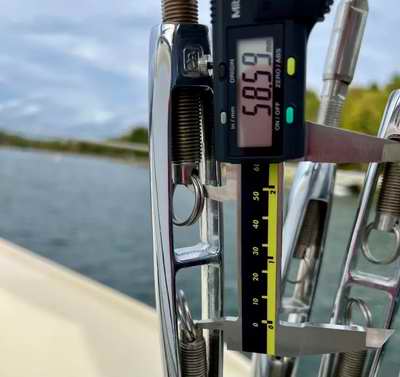 Another technique to quickly restore the rig tension of an open turnbuckle is to use a calliper, dial or digital, to measure the distance between the ends of the threaded studs. This can get the tension in the ball park very quickly and is actually quite accurate. This visual feedback is confirmation to a force that can be fine tuned with a Loos tension gauge.