SJ23 Tech Tip H06, (Issued 1999-03-03) Bob Schimmel

Index

San Juan 23 Operating Manual.
(Text is from the Original Manual, published by Clark Boat Company)

NOTE: This is a copy of the 1977 SJ23 operating manual intended for online use.  I've added many bookmarks to make it easier & quicker to find things. It was created through the collaborated efforts of Art Brown and myself and is reproduced here for your convenience.

There are lots of grammatical and spelling errors in the original manual, there being no word processing in those days and proof reading was expensive.  After all, Clark was interested in manufacturing a fast boat, not printing a manual.  You should be able to work your way through the grammar but the reading is difficult in some places. I've corrected the errors in this html version so don't print it expecting it to be a copy of the original.

The original SJ23 manual was printed on a (5x6)" soft cover booklet.  This html version is formatted for (8.5x11)" paper and the page breaks are automatically generated so don't they don't match the page references listed in the text.

If you would like a copy of the original text, grammar, punctuation and pictures, composed in MS Word, please email Bob Schimmel.         Enjoy.

Art Brown & Bob Schimmel.    

INDEX

Congratulations on your purchase of the San Juan 23. Built by cruising and racing sailors, the San Juan 23 is of the same high quality as all Clark boats. With a minimum of maintenance, your San Juan 23 will provide years of sailing pleasure. This booklet is designed to give the new owner useful information about rigging and maintaining his new boat.

TRAILER HOOK-UP

IMPORTANT: To prevent trailer damage to the hull, trailer boat only with normal gear stowed inside to prevent excessive weight on the trailer bunk supports. When loading your San Juan 23, be sure all gear is stowed properly to avoid damage by shifting.

A.        TRAILER HITCH WEIGHT

The weight at the tongue of the trailer should be 150-200 lbs. for proper balance and steering. Major adjustments should not be necessary.

B.        CHECK LIST BEFORE TRAILING

  1. Hook up to car.
    • Latch securely to ball

    • Safety chains connected

    • Lights connected and working

  2. Now snug in bow chock - winch line tight and locked.
    NOTE: Tie a safety line through bow eye around winch stand in case winch line breaks or slips.
  3. Proper stowage of gear.
  4. Forward hatch and companionway closed.
  5. Mast secured with legal overhang.
  6. All rigging secured, mast and rigging properly padded.
  7. Aft tie down secured.

            NOTE: 

  1. Trailer hitch ball is 2".
  2. Trailer tires inflate to 32 psi.
  3. Keep trailer bearing lubricated.
  4. Surge brakes will activate when backing trailer uphill. Insert a flat bar or tongue brake mechanism to override system.

DRIVE CAREFULLY

A car pulling a boat trailer has its mobility, and its ability to avoid an accident, seriously reduced. The principals of defensive driving, which are always important, become critical when you are pulling a boat trailer. Total weight of boat and trailer, normal gear, is approximately 4000 lbs.

------- INDEX -------

RIGGING AND LAUNCHING

Before launching, park on level spot to rig your San Juan 23. Also, check to see there are no overhanging wires between you and the launch ramp. Clearance required after stepping the mast is approximately 36'. The clearance required in the water is approximately 32'.

Rigging lengths: 

  • FORESTAY                29' 3-1/4"   Marine eye at top end
  • BACKSTAY               30' 3"         Marine eye at top end
  • UPPER SHROUD       25' 10"       Fork at top end
  • LOWER SHROUD     13' 5-5/8"   Fork at top end

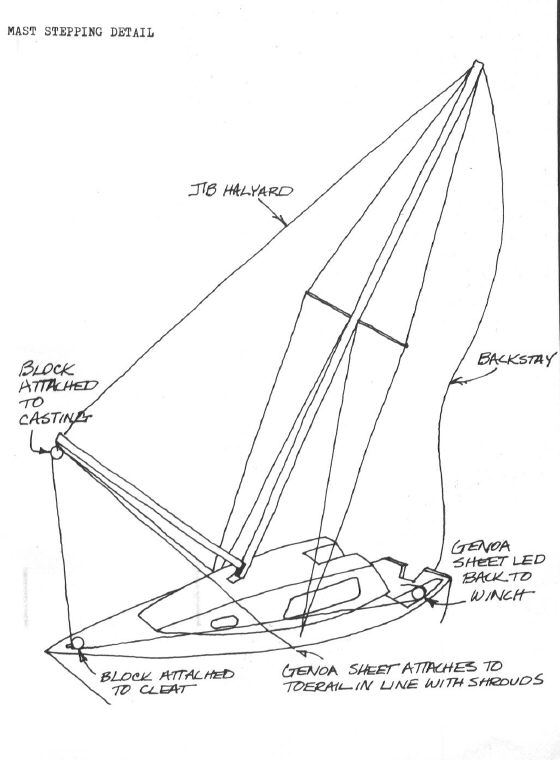
All measurements with turnbuckles 3/4 open, all wire 1x19, 1/8" SS.

------- INDEX -------


STEPPING THE MAST

  1. Block rear end of the trailer up or make sure it is hitched to a vehicle.
  2. Run all halyard shackle ends to butt of mast.
  3. Attach forestay, backstay, and shrouds to mast. Bend cotter pins such that they cannot fall out. Tape any pin ends that could damage sails. Use vinyl electrical tape. Open turnbuckles 3/4 of the travel. Tape bottom of turnbuckles in upright position to prevent them from bending over.
  4. Install spreaders and affix shrouds to outer ends. Tape if necessary. Nico press on wire must go below spreaders.
  5. Prior to attaching the backstay and forestay to the tangs, bend the tangs into line - they are left straight up for loading purposes at the factory. The boat is lifted from these tangs.
  6. Close companionway hatch. Walk the mast aft until you are able to match the mast step hinge to the deck plate. Pin in position with the mast resting on rear support. Make sure mast hinge pin is cottered on both sides.
  7. Slide the gooseneck into the slot on the forward side of the mast and connect a genoa halyard to the end of the boom. Pressure will force the boom to slide towards the bottom of the mast so ensure that the stopper screw is in place at the bottom of the slot.  Attach a genoa sheet to the toe rail, in line with the shrouds. Run the sheet up through a block that is attached to the casting at the end of the boom and then down to through a block attached to a forward cleat. Attach another sheet on the opposite side.  Finally, run the lines aft to a winch.  Sketch illustrates the procedure. 
  8. Ensure that backstay, upper shrouds, lower shrouds are connected to their chain plates.
  9. Hoist mast with genoa sheet and winch. Watch that turnbuckles don't foul.
  10. Hook up the forestay.
  11. Install boom, genoa halyard and sheet to their proper locations.
  12. Make sure you have the centerboard mechanism up all the way and cleated, and a bowline attached before launching.

Note:    Step 7 can be avoided by physically fit adults if one person walks the mast up like a ladder while another person assists by standing on the foredeck and pulling on the forestay. 

------- INDEX -------


PRE-TUNING THE MAST

  1. Loosen the side shrouds, backstay and forestay.

  2. Tighten the forestay so that 1/2" of threads (1" total) show.

  3. Tighten the backstay so it is tight in "mooring" trim.

  4. Adjust upper shrouds so that turnbuckles show an equal amount of threads on each side and the shrouds are fairly tight.

  5. Adjust the lower shrouds so that the lowers end up tighter than the uppers, and the mast is straight.

  6. Check that turnbuckle lock nuts are tight and cotter pins bent. Tape over the pins if you'll be leaving the boat in the water for a while. 

------- INDEX -------

BOOM

  1. Attach boom gooseneck to mast.
  2. Attach boom vang system to boom and mast with shackles to bails provided. Becket block goes on boom at forward boom bail.
  3. Attach fiddle block with cleat to traveler car.
  4. Attach becket block to boom bail.
  5. String main sheet starting at becket block and ending at self cleating block.
  6. Use the main halyard for a topping (boom) lift while at mooring.
  7. A Cunningham cleat is provided as standard equipment and may be used as the "tack" of the reefing gear. 


------- INDEX -------


REEFING GEAR

  1. Measure distance from the cringle near the luff to the cringle on the leach of the mainsail.
  2. Add 3" to this measurement, measure from the gooseneck on the boom and attach the cheek block on the starboard side with sheet metal screws.
  3. Attach the jam cleat 1' back from the gooseneck using sheet metal screws.
  4. Use line provided in Cunningham rig for forward end. 


------- INDEX -------

FITTINGS

All fittings are stainless steel, aluminum or plastic. All good quality stainless has a slight amount of carbon steel in the alloy, therefore, you may notice a slight rust film occasionally. This will clean up with soap and water and occasionally a mild abrasive soap such as Ajax or Comet can be employed. A good boat wash after salt water sailing will help keep your fittings looking like new. Oxalic acid, purchased at a pharmacy and diluted in water will remove a rust stain and makes a good teak stripper, but be careful. Wear gloves and flush very thoroughly with fresh water. 

------- INDEX -------

WINCHES

The winches are of the highest quality but may become stiff with use due to the ingress of dirt and salt. To clean, carefully remove the drum, flush with fresh water and lubricate with white grease.  The pawls can be lubricated with a drop of automatic transmission fluid.

------- INDEX -------

FIBERGLASS SURFACES

Although your San Juan 23 fiberglass surfaces are maintenance free a little care is needed to keep the boat in like new condition. Frequent washings with soap and water will keep abrasive dirt and salt off the hull and deck (which helps also to keep sails clean). A good paste wax applied at least twice a year will preserve the gloss and help prevent oxidation. Remember strong detergents and abrasive cleaners remove wax so be sure to re-wax after their use. Do not use waxes on the non-skid surfaces. 

------- INDEX -------

HOW TO REPAIR A SCRATCH

Follow these step by step instructions to a successful repair of your fiberglass boat. 

DEEP SCRATCH

  1. Scratch must be clean and dry. Scrap with the point of a knife to clean the scratch.
  2. Mix color with 5% catalyst (hardener); for 1 teaspoon of color add 2 drops of catalyst; for temperatures above 70 degrees 1 drop, for temperatures below 60 degrees 3 to 4 drops.
  3. Use a small paint brush, stick or Q-tip to flow color in scratch. If color is too thin, wait until it begins to thicken (work time will then be reduced to about 5 minutes). Fill scratch slightly higher than original color - your mix will shrink.
  4. Wait until patch is hard, not rubbery, to the touch. Then sand with wet or dry sandpaper to level scratch. As course as 360 grit may be used, but must be followed with 400 then 600 grit to remove sanding scratches. 
    IMPORTANT - Then leveling patch make sure to avoid sanding around the fill as it is possible to sand through the original color which is approximately 1/32" thick. In many cases a sanding block helps avoid this.
  5. Rub to a shine with DuPont 202 or other medium grit rubbing compound. 

LIGHT SCRATCH

Merely sand lightly with 600 grit wet and rub with rubbing compound.

HELPFUL HINT

Wax paper over a fresh patch helps level it until set. Shine will improve with waxing.


FUEL STORAGE

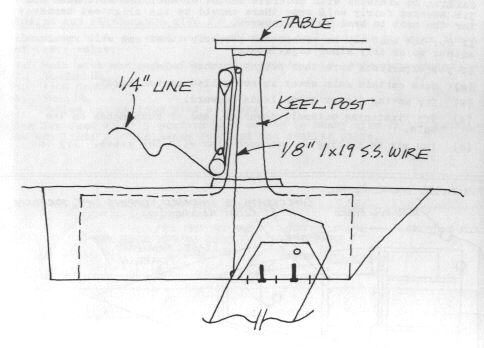
An outboard tank may be used in the port cockpit locker, however, this locker must be vented in accordance with regulations per Motorboat Act of 1940. 

------- INDEX -------

BATTERY

A 40 amp hour 12 volt battery in a plastic case is recommended. Obtain wing nut post connectors if possible and strap the battery securely to the inboard face of the aft settee compartment on the starboard side. 

------- INDEX -------

MAST AND BOOM

The mast and boom of your San Juan 23 are anodized to give the aluminum protection from salt spray and natural elements. It is good to tie all halyards and shrouds away from the mast while trailering and mooring to prevent chafing the anodized finish. Washing with a water hose after sailing in salt water is a good practice. A clean mast and rigging help keep sails clean so wipe road dirt, etc, off before stepping the mast. 

------- INDEX -------

RIGGING

Standing rigging should be inspected periodically for broken strands or loose bolts and clevis. Also check turnbuckle barrel lock nuts for tightness. Keep the spreader tips well taped to prevent damage to the sails.

Running rigging may become stiff with dirt and salt after use. This can be remedied by washing in light detergent or flushing with a garden hose.

Always tie a figure eight knot in the ends of the main and Genoa sheets to prevent them from coming out of the blocks or fairleads. Never tie a knot in the end of the spinnaker sheets. 

------- INDEX -------

CENTERBOARD

The keel centerboard is designed to give maintenance free operation, however, the boat should [be] hoisted yearly and the trunk cleaned of marine growth, and the lifting wire inspected. Replace the wire if any broken strands are found. The pin for the centerboard is movable fore and aft. It is installed in the middle position, however, [it] may be moved [forward] if more weather helm is desired and aft if a more leeward helm is desired. The centerboard pin is on a "stirrup" which is lag bolted to the bottom of the keel. Ensure that the lag bolts are put in with polysulfide (Boat Life) caulking compound. 


------- INDEX -------

TEAKWOOD CARE

Many sailors prefer to leave their teakwood "bleach" and thus do nothing for maintenance. To preserve the oiled finish, however, it is necessary to re-oil the teak with a good teak oil such at Watco or Tung oil whenever it becomes noticeably weathered. 

------- INDEX -------

CUSHIONS

The cushions are fabric Scotchguard and may be cleaned with a damp cloth. Care must be taken to prevent mildew by turning cushions upright when leaving the boat. When boat is out of use for a longer period of time, remove the cushions and store in a dry place. 

------- INDEX -------

SAILS

Always remove the battens, fold carefully, bag and store sails in a dry location. Never fold wet sails, but wait until dry to prevent possible mildew. Dacron sails can be rinsed free of salt with fresh water, then laid on the grass and rinsed with water hose. Never iron sails to remove the wrinkles. 

------- INDEX -------

SAILING ADJUSTMENTS

  1. Take the boat out in a moderate wind with the headsail you will be using most.
  2. Lower the centerboard until it is all the way down, then raise approximately 1" on the hoisting gear.
  3. Sailing to the windward with moderate amount of heel and with main and jib sheeted fairly well snug there should be the slightest tendency for the boat to head up to windward.
  4. If so, the boat may be considered properly tuned and will require either no or only minor adjustments.
  5. If you experience more than slight weather helm:
  • Make certain main sheet is not pulled in too tight.

  • Try moving the jib or genoa leads forward.

  • Try tightening the outhaul, downhaul and or cunningham on the main.

  • You may be sailing in too much wind with the genoa. Try the jib.

  • Crew weight may not be properly distributed. Position the crew weight to keep the boat from heeling will help.

  • Rake the mast forward more.

  • Raise the centerboard slightly.

  • Move the centerboard stirrup to the most aft position.

  1. If you experience slight lee helm or neutral helm: Before you panic: Your San Juan 23 was designed for speed with the jib in light winds with no [or] little heel with NEUTRAL [or] slight lee helm. With the addition of a genoa and a little heel the boat should have a slight weather helm.

If you experience excessive lee helm.

  • Make certain the main is not too loose.

  • Try moving the jib or genoa leads aft.

  • Try slacking - outhaul, downwind and/or cunningham adjustments on the main.

  • Crew weight may not be properly distributed - heel the boat.

  • Rake the mast aft.

  • Lower the centerboard father.

  • Move the centerboard stirrup to most forward position.

  1. When reaching or running, the centerboard may be raised to overcome weather helm and reduce drag. 

------- INDEX -------

TUNING AND PERFORMANCE TIPS FOR THE SAN JUAN 23

About the best, or most used combination sails, seems to be in the order of their value:

  • Main with one set jiffy rigging points. (2 reefs recommended)

  • 115% Genoa.

  • 150 % Genoa.

  • Working jib.

  • Medium cut maximum size spinnaker.

The San Juan 23 will perform much better in heavy airs if she is "sailed on her lines". This means reef and use smaller sails. 

------- INDEX -------

SAN JUAN 23 INVENTORY

MAINSAIL - The mainsail will usually be built out of 5.2 oz. Dacron specially woven for mainsails. All mains will come standard with one row of reefs, shelf foot and Cunningham hole. An additional row of reef points is recommended for areas with winds exceeding 30 knots.

150% GENOA - 199 sq. ft. - The 150% genoa is designed to be the largest headsail carried on the San Juan 23. It is usually built out of 3.8 Dacron and is principally used in winds up to 12 knots.

115% GENOA - 120 sq. ft. - This sail is cut low on the hoist and designed for winds from 10 to 20 knots. It will usually be built out of 5.5 oz. Dacron.

WORKING JIB - 80 sq. ft. - The working jib is a sail that will allow the boat to be driven easily in strong airs with excellent balance and control.

RADIAL HEAD SPINNAKER - This is an all purpose spinnaker with a radial head and horizontal lower panels. It is made of .75 oz. nylon. The spinnaker is cut with an elliptical shape to give it maximum projected area on a run and good reaching capabilities.

Following is a chart for use in sail selection. Try it and let us know your successes and/or failures and we'll try to keep it updated.

SAIL SELECTION CHART

WIND SPEED

BEAT

REACH

RUN

Drifting Conditions

150% genoa, main try to foot

Same as beat

Try the spinnaker

Light Air 4 - 8

150% genoa, main

150% genoa, main, maybe spinnaker

Main, spinnaker

Light-Medium 10 - 15

115% genoa, main

150% genoa, main and spinnaker

Same as above

Medium 15 - 20

115% genoa, main

Main, 115%

Main, spinnaker or wing out genoa

Heavy 20 - up

working jib, main reefed

Same as beat

Reefed main, wing out working jib

------- INDEX -------

SAN JUAN 23 ORIGINAL SPECIFICATIONS FOR RACING

...As printed in Clark Boat Company SJ23 Owners Manual - 1979 Edition


Measurement Rules 

It is the intent of the Measurement Rules of the class to insure that boats race and remain as nearly identical as possible within normal building tolerances and to insure and enforce the One Design nature of the Class. Accordingly, any equipment or modifications to equipment deemed by the class to contravene either the spirit or the letter of these rules shall be outlawed.


Article I - General 

The selection of original fittings, spars, sails and any other equipment furnished with a San Juan 23 sloop at the time of its sale by the manufacturer shall be within the discretion of the Clark Boat Company.


Article II - Hull Construction 

  1. All hulls shall be constructed of fiberglass from molds made from “plugs” or forms furnished by the Clark Boat Co. and in accordance with procedures established by the Clark Boat Co., shall be made by builders licensed by the Clark Boat Co., and approved by the executive committee of the San Juan 23 Class Association, and shall conform to the official specifications.
  2. The mast step position may not be altered from its original manufacture, and adjustable steps are not permitted. If the step is damaged, or if any change is required to accommodate a new mast, the aft edge of the boltrope groove of the mast must be in the same position when stepped as it was prior to the repair or damage. No rotation of the mast which exceeds the usual mast step slope is allowed.


Article III - Mast and Boom 

  1. The mast shall be made of aluminum. 
  2. Halyards must run outside of the mast. 
  3. Tapered masts are not permitted. 
  4. A masthead latch is permitted. 
  5. Wire halyards are permitted. 
  6. No stays on the mast are permitted, other than four shrouds, forestay, and backstay. 
  7. Other than the standard turnbuckle arrangement, devices for adjusting the forestay, changing the tension of the shrouds, or otherwise adjusting position of the mast while underway are not permitted. A backstay choker is permitted. 
  8. Length of the mast is not limited. However, a one-half inch black band is to be maintained on the mast, so that the lower edge of the band is to be no higher than 26’ -0” above the mast step. The sail, when hoisted, shall not extend its topmost portion above the lower edge of the band. Another black band must be maintained on the mast 24’ -0” from the lower edge of the band to the upper edge of the lower band. The sail shall not be down hauled past the upper edge of the lower band. 
  9. If a mast is replaced, the replacement mast must be identical in all essential respects to the mast then being supplied as original equipment on new San Juan 23 sloops. 
  10. Spreaders shall hold shrouds 26 Ύ” from mast (minimum). 
  11. The boom shall be made of aluminum. 
  12. Length of the boom is not limited. However, a black band one-half inch wide shall be maintained on the boom, the inner edge of which band is a distance not greater than 8’ 9” from the aft edge of the mast. The sail must not be outhauled past the inner edge of the band.


Article IV - Rigging and Equipment 

  1. Rudder: The rudder shall be made of wood (which may be fiberglass covered) or fiberglass, shall not be less than 1” and not more than 1 ½” thick, and shall have a 2” length of any shape tolerance. Kick-up rudders are permitted, but must be locked or pinned in the down position while racing. 
  2. Tiller: The tiller shall be of the general shape as provided by Clark Boat Company and may be made of any type of wood. 
  3. Hiking Aids: A hiking stick or tiller extension of any design is permitted, but no other hiking aid above deck level is permitted. Hiking straps of any design are not permitted. 
  4. Keel and Ballast: Internal lead of 900 pounds from the existing or identical mold shall not be altered in either section, profile, weight or placement. Other interior lead ballast or any unusual placement or gear that would provide the effect of inside ballast is not allowed. The centerboard stirrup may be adjusted as desired, however, the centerboard slot may not be gasketed and the centerboard shall remain free to travel up and down while racing. 
  5. Jib Sheet: Other than by holding the jib sheet by hand, no reaching devices are permitted. The blocks may be attached to a sliding track which provides adjustable positions fore and aft. The blocks may be attached by means of metal fittings or wire to extend the blocks but such extenders shall be so designed and rigged as not to be adjustable during a race. 
  6. Jib Halyard Latch: A winch or other similar device for tensioning the jib halyard is permitted. Jib cloth tensioning devices other than rope or wire luffs are not permitted. 
  7. Spinnaker Pole: The spinnaker pole may be made of any material. Its length shall not exceed 9’ 6”, measured from end to end. A lanyard is permitted. The spinnaker pole must be used and connected to the mast when the spinnaker is set, and must be used on the side opposite to that on which the boom is carried. 
  8. Whisker Pole: The whisker pole may be made of any material, length and type. It is to be used only with the jibs, and must be attached to the mast while in use. It must be used only on the side opposite to that on which the boom is carried. 
  9. Anchor: A suitable anchor, chain, paddle, and boarding ladder shall be required. Bunk cushions supplied by the manufacturer or cushions equivalent to them should be on board.


Article V - Sails 

1 General

  1. San Juan 23’s may carry mainsail, working jib, 115% Genoa, and 150% Genoa and spinnaker, as shown in the sail plan and as herein specified.
  2. Use of sails other than main, working jib, 115% Genoa, 150% Genoa and 153% spinnaker shall not be allowed.

 2 Mainsail

  1. The mainsail shall attach to the mast and boom by boltrope groove.
  2. Luff and foot measurements shall be controlled by the black band system.
  3. The leech shall not exceed 24’5”. Batten length maximum: upper, 21”, two middle 23”, and lower 21”.
  4. Battens shall divide the leech diagonally into equal section with 2” tolerances to allow sail maker to avoid seams with batten pockets.
  5. Hollows between battens in leech not to exceed Ύ” in roach.
  6. Headboards shall be triangular, with the upper side of the triangle not exceeding 5” in length.
  7. The mainsail shall be made of 5.0 oz. or heavier Dacron or other synthetic materials.
  8. A cunningham or sail control grommet is permitted to be used while racing.
  9. A reefing zipper on the mainsail is not permitted to be used while racing. Roller reefing or jiffy reefing is permitted.

3. Jib sail (working)

  1. The dimensions of the working jib shall not exceed 85 square feet.
  2. The working jib shall be made of 5.0 oz. or heavier Dacron or other synthetic materials.
  3. Jib foot roach must be a fair, continuous curve.
  4. One small window of clear plastic, 2 sq. ft. maximum area, is permitted.
  5. Jib roller devices are permitted.
  6. No battens in the jib are permitted.

4. 115% Genoa

  1. The 115% Genoa shall be made of 5.0 oz. or heavier Dacron or other synthetic materials.
  2. The dimensions of the Genoa measured with 5 lb. Tension edge of sail to edge of sail shall not exceed the following: Luff 22’6”, LP 11’4”. 

5. 150% Genoa

  1. The 150% Genoa shall be made of 3.5 oz. or heavier Dacron or other synthetic materials.
  2. The dimensions of the 150% Genoa measured with 5 lb. Tension edge of sail to edge of sail shall not exceed the following: Luff 28’6”, leech 26’)”, LP 14’3”. 

6. Spinnaker

  1. The spinnaker shall be made of a .75 oz. or heavier woven nylon material.
  2. The spinnaker halyard sheave shall be attached to the masthead.
  3. Spinnaker sheet fittings may be placed at any position on the deck, but not so as to extend outboard of the deck.
  4. Maximum dimensions of the spinnaker, measured with sufficient tension to just pull wrinkles out, shall not exceed the following: Luff 27’7”, maximum girth 14’6”. 

________________________________________________________________________________________________ 

"It is my intent to suggest to the association just forming that we set up a Rules Committee or act as a committee of the whole to review the above Measurement Rules of the class as originally promulgated with the purpose of approving reasonable deviations in equipment or modifications to equipment for the purpose of maintaining racing competition in the class while at the same time being reasonable in light of the fact the San Juan 23 is no longer in production.  It would seem some handicap could be assessed for modified equipment that provides a clear advantage in racing without “outlawing” that equipment just because it contravenes either the spirit or the letter of these original rules."    Chuck Van de Wetering
 

SAN JUAN 23 ONE DESIGN ASSOCIATION CONSTITUTION

(Since the SJ23 One Design Association no longer exists, this section of the manual is purposely left out for this version of the manual.  It may be added at a later time.)
 

Return to Tech Tip Index. . . . . . . . . . . . . . . Have a Question?