| SJ23 Tech Tip J05, (Updated 2019-07-18) Bob Schimmel | |
|
Mooring Design for a Pocket Cruiser. INDEX - Weight, Chain, Fittings, Ball, Pennant, Deck Fittings, Set a Mooring, Move a Mooring, Winter Storage, Hunting at the Mooring, Mooring corrosion. |
|
It is often said, "There are those
who have run aground and there are those who are gonna run aground!"
I prefer to
belong to the latter group and hope the storm gods will be kind to my
boat should she break loose. I used to moor Panache on the north shore of Wabamun Lake, Alberta, along with a dozen other boats.
A truck brake drum can be converted to a mooring weight by using one of the methods described below. The drum shown in the picture at right uses the first method. The good part of this design is that steel does not corrode in deep fresh water. The metal stays in pristine condition.
NOTE:
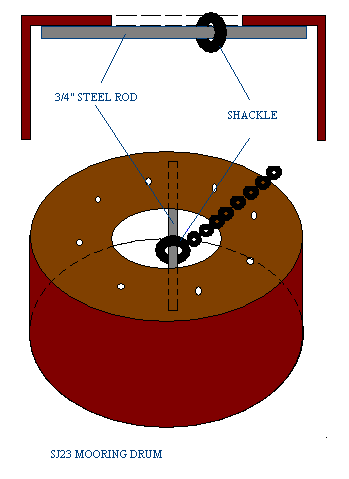
For years I moored my 3000 lb San Juan 23
in 10' deep water using a brake drum,
30' of 5/16" bottom
chain
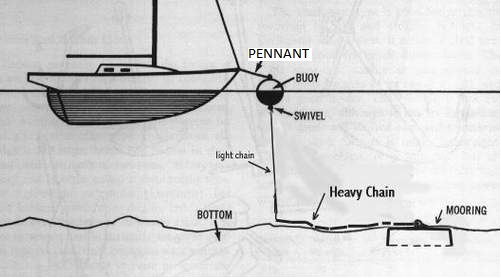
and 8' of 1/4" top chain. See
diagram above. She never
dragged her mooring in winds that reached 70 knots. The reason I used 1/4"
top chain is
that I didn't want to sink the small float at the surface. Now that I have a
large ball with lots of buoyancy the chain has been changed to all
3/8". The heavier chain results in a smoother, steadier ride. The bottom in
our anchorage consists of light goop or mud over sand. (This goop is actually decaying
vegetation but locally known as "Loon
shit," being named after a beautiful bird that doesn't deserve this label! Go figure). The drum works itself into the sand in only a few weeks, thereby increasing the holding
power due to the suction. However,
some sailors are adamant about adding more weight to their mooring and do
so by lowering a second drum over (on top of) the first one. The technique for
doing this is
to stretch the chain up vertical over the drum while dropping the
new drum down over the taught chain. It is quite the experience to feel
a 110 pound drum bumping to the bottom along the chain. It feels like it will snag
the chain and pull you down.
HEAVY BOTTOM
CHAIN
-
The catenary effect of a heavy chain is very effective at holding a bow down. It dampens the pitching forces that result in a boat riding quieter at anchor. The effect is strong enough that it all but eliminates "hunting" on my SJ23. Therefore, use 3/8" or heavier chain, going through a float, terminated in a ring on top of the float. If you use larger chain it will stand up longer to the chemical corrosion and abrasion on the lake bottom. If you use
grade 70 chain, which is 10 times harder than grade 30 chain, it can
withstand abrasion that much better.
In my experience corrosion is the problem, not abrasion. If you want extreme strength and weight, use closed link chain. However, this
is also very costly stuff and difficult to acquire! When you think about
it though, the chain is cheap
compared to the cost of repairing your boat! A 4x1 scope for an all chain
rode is adequate at Wabamun Lake. Considering that the average
mooring depth is 10', then the bottom chain should be about 45' long. (Includes freeboard). See
LIGHT
TOP CHAIN for the remaining portion of the rode. LIGHT
TOP CHAIN - If you use a small 12" mooring ball in 10' deep water then use 8' of 1/4" chain from the
surface down to the heavy bottom chain. Cut
the length of 1/4"
chain 2' shorter than the depth at your mooring. This ensures that the
heavy bottom chain takes the wear and corrosion right on the lake bottom. Attach the light chain to the end of the heavy chain
with a quick link or a double clevis adapter. For security, wire
both pins shut using mild steel wire. Use water proof grease on the thread
of the quick link so you can remove it later.
FITTINGS
-
All chain fittings MUST have a rating of at least 1 ton. Lock all pins with mild steel wire, not stainless steel wire. Dissimilar metal will corrode in one year on the coal-laden bottom of Wabamun Lake.
Don't use a nylon tie-wrap to lock your fasteners. They rot in only one year under water. This surprises me since nylon
line lasts "forever" under water.
MOORING
BALL
-
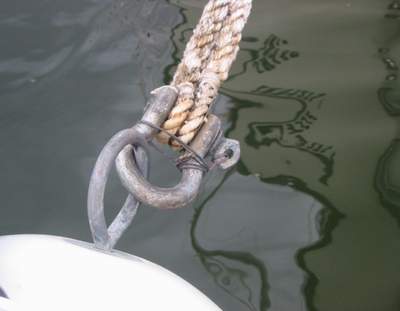
The float MUST be equipped with a swivel, either internal or external, to prevent torque loading (twisting) of the chain and premature wear. Twisted chain wears much faster than strain relieved chain. Most rigid foam filled or inflated mooring balls are equipped with an internal swivel, so attach your light chain directly to the bottom ring using a shackle. Wire all screw pins shut using mild steel wire in such a way that the chain cannot rub against it. See the picture below. OWNERSHIP - Label your mooring ball with the name of your vessel, owner name, address and phone number to designate ownership. This is a mandatory regulation under the Canadian Coast Guard Aids to Navigation and it sure minimizes confusion when a guest arrives in the anchorage. I've been told this rule is seldom enforced by the Canadian Coast Guard but it may be legally advantageous to comply should another vessel founder after striking your mooring ball. Ask a lawyer!
SET A MOORING DRUM FROM A SAILBOAT - Attach the chain to the drum and roll it into waist deep water so you can float the bow over it. Slip a 30' length of 1/2" yacht braid through a chain link, run it up to the bow and tighten the line. This should pull the bow down so when you walk to the stern it should lift the drum off the bottom. Slowly motor to your previously marked mooring spot and let out the line so the drum settles to the bottom in a controlled fashion. This ensures that the drum rests upright on the bottom. In 10' of water you require about 30' of line to have a workable tail end on deck. Keep the line taught to the surface while you retrieve it. A flat barge is another excellent platform for this type of work. In many ways I prefer it due to the extra stability and walking area. SET A MOORING DRUM FROM A DINGHY - Attach the chain to the drum and slide it into knee deep water over a plank laid on the bottom. Lash a 6' long (2x8)" on top of a dinghy so it sticks out 6" past the transom with the rest over the center seat. Lash it securely to the middle seat and sit on the plank. Float the dinghy transom above the drum. Slip a 30' length of 1/2" yacht braid through a chain link (just above the weight) and pull both free ends over the (2x8)". Snug up the line and secure both ends to a cleat on the plank. This will pull the stern down but as you sit in the dinghy your weight should counter balance the drum so it lifts off the bottom. Slowly row to your marked mooring spot and let out one of the lines (wearing gloves) so the drum settles to the bottom in a controlled fashion. This ensures that the drum rests upright on the bottom. Allow the chain to pay out freely, keeping some tension on it so the chain does not get trapped under the weight. In 10' of water you require about 30' of line to have a tail end of workable line in the dinghy. Keep the line taught to the surface while you retrieve it. Remember to attach a float to the end of the chain before you lower the weight to the bottom!
RELOCATE A MOORING DRUM - Relocating a mooring drum can be a heck of a job if it has
settled into the bottom for many years. Our technique is to pull the chain vertical under the bow and clip a chain hook (with block & lift line attached) to the chain,
preferably at or below the water line. Both ends of a 3/8" poly lift line are directed over Panache's bow roller and secured to a strong cleat on the bow. A Venture 23
equipped with the long bow sprit also works very well.
With a couple of guys standing on the bow (the heavier the better) we pull the lift line as tight as we
can, lowering the bow at the same time. Then everyone walks to
the stern which raises the bow and usually loosens the drum from the bottom. If it
doesn't loosen, gun the throttle to break it free from the bottom.
Be patient so you don't break things. MOORING INITIATION - The first time you connect your boat to your new mooring should be done in calm weather. It takes a week or more before the drum settles into the bottom, which is when the holding power really increases. How long it actually takes depends on how soft the bottom is. At Wabamun Lake, where the bottom is mostly sand and thin mud, this process takes a couple of weeks. If you have a gravel bottom it will likely take much longer. I couldn't begin to predict how tidal current affects the settling. That being the case I would suggest adding a second drum. Anyway, I think that slight tugging on the mooring chain during calm weather will hasten the settling process. The tidal current should help sink it as well. DO NOT connect the boat to a new mooring with a storm arriving. You will likely find her against a shore somewhere. WINTER STORAGE and SPRING RETRIEVAL - If the water in your area freezes during winter, you have to remove the ball and lower the chain to the bottom before it turns hard. Trust me, you don't want to attach a sacrificial float and let it freeze in the ice. You will likely find your mooring quite some distance from where you left it. Ice moves in winter! The clever thing to do is stay under the ice. Attach enough 1/2" nylon line to the end of your chain so it clears the surface by a few feet. It helps to splice a loop in the end for Spring pickup. Then attach 1/8" nylon line or light steel cable to the end of your 1/2" nylon line to extend it to shore. When close to shore bury the line or cable in the bottom so the ice can't get at it. Ever hear of ice moving a beach? I didn't think so. Tie the end of the line to a rock or something else you can find in the Spring. I usually do this in 1 foot of water. No sense in getting any wetter than you have to. The beauty of nylon or steel cable is that it sinks to the bottom where it can stay under a fisherman's hook. Occasionally the line sinks just into the bottom all the way to the mooring. You couldn't ask for better protection. One last point with regard to pulling the chain up to the surface in Spring, the 1/2" nylon line attached to the end of the chain is strong enough to really haul up on the heavy chain without fear of breaking. That might be the case if you used 1/8" line. Oops. Chain has a nasty habit of settling into the bottom over a winter and sometimes it can be quite a tug to rip it out of the mud. Once you get the end of the chain to the surface, flip the end over the gunwale, shove a screw driver though it and into the oar lock to keep it there, attach your mooring ball and flip the whole works back into the drink so you are good to go for another season. OK you were supposed to pull the screw driver out before flipping it all into the drink! Geeze. HUNTING OR SAILING AT THE MOORING (or ANCHOR) - Some hull designs continually "hunt" or sail at the mooring. This is really uncomfortable to the crew and hard on the deck fittings and mooring line. If your SJ23 hunts then consider the following hints:
AT ANCHOR - If I have to anchor in rough weather, onset of white caps, I like to set 2 anchors 400 apart with equal scope. While this eliminates the majority of the hunting, allowing you to get some rest, you also have to be vigilant of winds shifts. Any shift greater than 200 and you will have to consider resetting one of the anchors. Not a pleasant task at night!
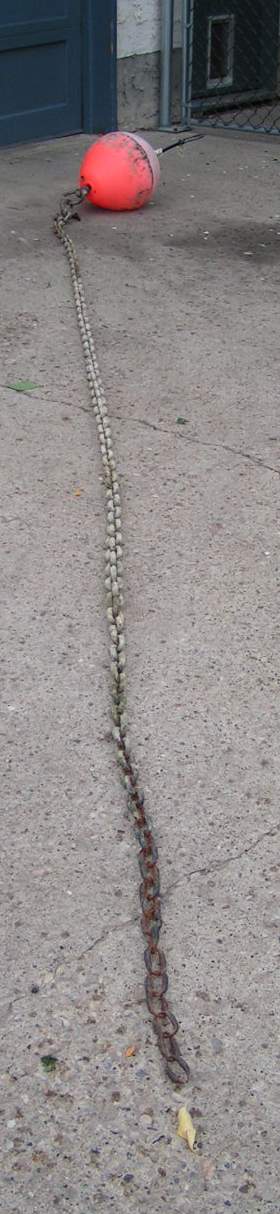
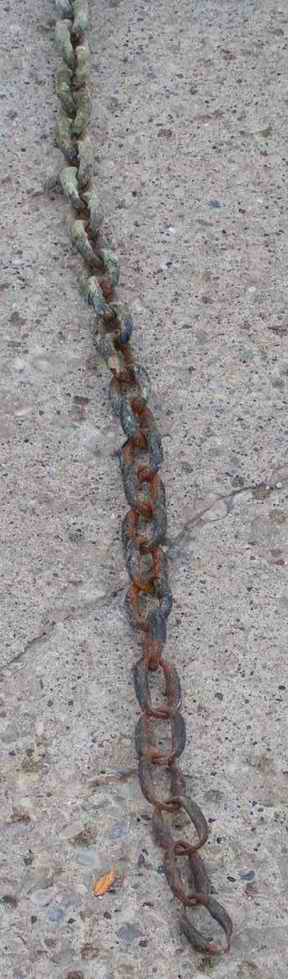
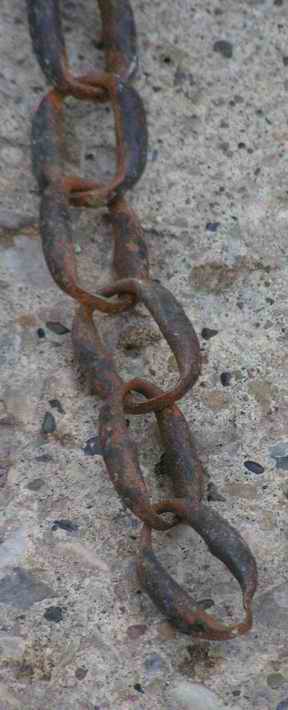
____________________________________________________________ HOW LONG WILL A MOORING LAST? - The consensus by many sailors on Wabamun Lake is that a sail boat mooring will last a person's life time. This is probably true of the mooring weight but the same cannot be said of the mooring chain. In 2004 an old mooring chain broke at Poole Sail Club. For a while we didn't know what the cause was but when the broken mooring chain was compared to several broken dock chains at Sunshine Bay Yacht Club I noticed similarities. The surprising thing about all the chains was that the failure was in the same short section on all chains. This was the 1 meter of chain that rose up from the bottom muck. In all the chains the links above and below the failed section were in excellent condition. But just to add confusion, some PSC moorings have lasted longer than others, so this failure rate is not totally predictable. You have to keep an open mind. These similar failures started me wondering about the source of the problem. In the final outcome it is hoped that if a person can understand the factors then we should be able to guestimate the state of a chain and form an inspection and replacement schedule to prevent breakage. CORROSION - The metal corrosion that occurs in a prairie lake has to do with the chemical cocktail in the Littoral zone at the lake bottom. This is the zone that extends from shore out to the depths of where vegetation growth ends, which is the same zone in which we install our moorings. In most northern prairie lakes the Littoral zone has a bottom consistency of sand, mud, decaying vegetation ("loon shit") and in the case of Wabamun lake, coal dust. The water in this zone is also warm and contains the majority of the oxygen; two other components required for corrosion. This chemical cocktail produces a mild sulphuric acid that will corrode a steel mooring chain laying in the vegetation. Hence the rational of why the 1M of chain that leaves the bottom corrodes, leaving the rest in pristine condition. But the answer is not as simple as this. So why do some moorings last longer than others? This question can be answered by the factors that contribute to the rate of combustion or rot of vegetation; water temperature and oxygen content. Just slightly deeper than the Littoral zone is the thermo cline. If you SCUBA dive you can actually float on this denser cold water, it is that pronounced. It is significantly colder that you can feel if you dip your toes into it. The water below the thermo cline is usually very clean with good visibility. The important factor about this boundary layer of cold water is that it has less oxygen and a lower temperature that make for poor combustion. If a mooring is below the thermo cline, the steel remains virtually pristine and might actually outlast most boat owners. Steel in shallow warm water is usually immersed in mud and will stay relatively pristine due to the absence of oxygen. In addition, this steel cannot abrade because it does not rub against anything. In fact, I have pulled my mooring chain up out of the mud and it literally "rips" out of the bottom to reveal pristine metal. This almost make one consider not installing the drum, but I won't go that far! The pictures below are from a mooring that was below the thermo cline. The chain is 20 years old. Note the excellent condition of the links below the ball. However, at about 12' down the corrosion starts abruptly. This right at the bend to the lake bottom into the Littoral zone. Unfortunately the rest of the chain is still on the lake bottom so I cannot show it to you. I've pulled up pristine chain on other moorings. The corrosion does not occur where the chain is buried in the mud. A recent field of thought is to use a length of Dyneema line in the chain at the turn up from the bottom. The loops at the ends would have to be equipped with metal eyes.
While a lot of corrosion is at play, some abrasion can't be ruled out. There can be little doubt that a chain rolling over a sandy bottom will experience abrasion. Consider it as slow motion grinding. If you have ever seen how quickly wet sand paper can remove material, you will understand the nature of this problem. But if the problem were just abrasion then the sides of the links would be worn smooth, which they aren't. It's only the ends of the links that are worn! Very perplexing. Without doing an in-depth chemical analysis of the processes or wishing to spend ten years underwater to observe the motion, we are left to conclude that both factors affect the chain but at varying degrees, based on local conditions. Regardless of which factors affect your mooring chain, the damage almost always occurs where the horizontal chain meets the vertical rise; just where the acid and sand are located. SOLUTION - To repair your chain just lift the damaged section to the surface, cut it out, and insert a new section using two repair links. Since we now know what to look for and where to find it, inspect your chain annually to avoid a sudden and catastrophic failure during a storm. ______________________________________________________________ CONCLUSION - This mooring design should keep your boat secured so you and everyone else can sleep peacefully at night. It would be sheer hell to hear about the trip that your boat made "slipping" through the anchorage, bouncing off one boat to another, unattended. There is no guarantee in this design and I do not assume liability for damage to your boat. If you have a heavier boat, simply scale up the dimensions to match the requirements of your boat. To date almost everyone at PSC has converted to it with complete success and peace of mind. If you intend to use this design please send me an email as I've been told that many people around the world have copied it and I'm curious to know where this design is used. I'd be interested in hearing about any improvements you have made. Good luck with your mooring and I hope this design works well for you. Bob
P. Schimmel |
|
| NOTE - The rules and regulations stated in this Tech Tip apply to Canadian waters. You should comply with the regulations in your local waters. | |
|
Return to Tech Tip Index. . . . . . . . . . . . . . . Have a Question? |
|
 The anchorage was located just West of Whitewood Point
at 16W, 530
34' 06" N. & 1140 35' 47"
and about 1 KM east of "fabled" Coal Point, the choke point of the lake.
For you land lubbers, that's approximately 70 km west of Edmonton on
Highway 16. The anchorage is
The anchorage was located just West of Whitewood Point
at 16W, 530
34' 06" N. & 1140 35' 47"
and about 1 KM east of "fabled" Coal Point, the choke point of the lake.
For you land lubbers, that's approximately 70 km west of Edmonton on
Highway 16. The anchorage is 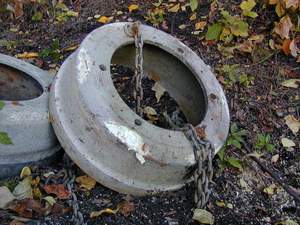
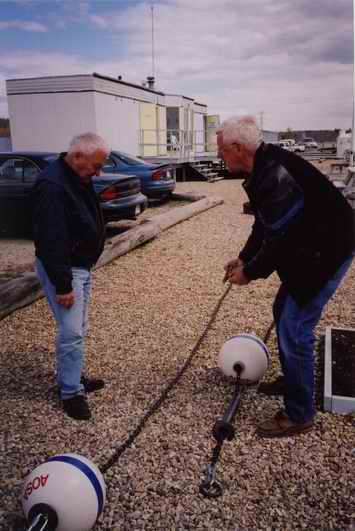
 Shown
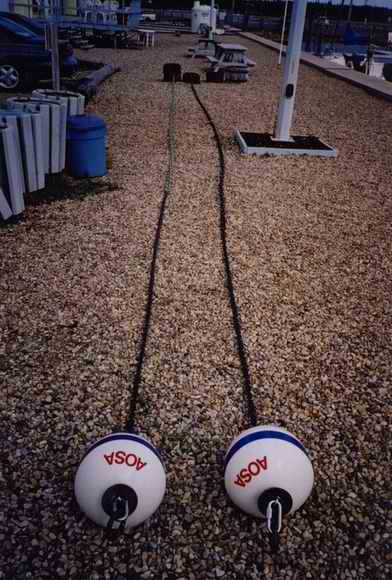
here are two photos of assembled guest moorings, ready to be deployed.
Shown
here are two photos of assembled guest moorings, ready to be deployed.