| Its relatively easy to buy correct fitting off shore rain gear from a brick and mortar store that has a fitting room. Its not so easy to do the same when you buy online. Above all the pants must fit at the waist, over your clothing, with enough slack to squat down on your knees. Similarly for a jacket where you must have full swing range for your arms. Neither of them should be so form fitting that it restricts movement. Sailing is after all, an active sport and a somewhat loose fit is good on a heaving deck.
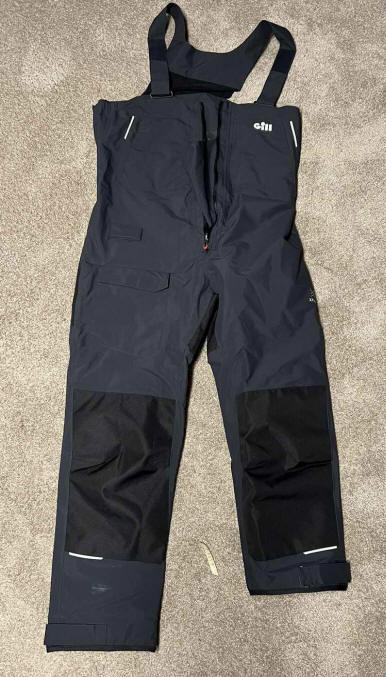
A reputable online store can guide you through the sizing dilemma with advice via a phone call. Thankfully I had that from Binnacle when I bought my Gill Coastal bib pants. While they told me the legs might be too long, they also said it shouldn't cost too much for hemming. Unfortunately my local tailor was out of town for an extended winter vacation. That's when I discovered that hemming performance rain pants is not a simple job if you want to retain the features. I'm speculating that most rain gear is fabricated the same way as these Gill pants. It takes a lot of planning to take the measurements accurately, mark & make the various cuts, then sew it together in the correct sequence.
- If the legs are too long they can usually be shortened. Depending on your body proportions, you can either shorten the pants by moving the cuffs up or remove a section above the knee. The latter is done to keep the padding centered over the knees but raising the cuff is a lot simpler because the shell is straight. Removing a section above the knee is likely best left to a tailor due to the taper; that is if you still want the pants to look good after the alteration! An above the knee conversion is way beyond my skill level!
- LINER - The liner is usually slippery polyester that is difficult to handle while cutting to the exact measurement. This is compounded with the very loose polyester mesh at the cuff. It is there to let solid water drain out so you should retain it. When sewing this thin polyester, keep it stretched tight under the needle to prevent the fabric from bunching.
- SHELL - You should keep the shell looking good with well set, straight stitching. This is not just an issue of vanity! Good stitching maintains the water repelling properties of the breathable fabric. Seams must be tight to shed water.
- THREAD - The thin fabric
of the vinyl backed shell demands strong, thin thread to set even stitches with the knot buried in the fabric. For this reason I used black Gutermann thread. The thread does not need to be UV resistant since there is very little UV light when it is raining! Correct thread tension is everything for which you need a reasonably good sewing machine (not industrial). I used a straight stitch for the most part with a new #16 needle. If you have aging eyes you also need good light at the needle.
- BASTING TAPE - After the shell and liner are shortened, straighten the shell and then the liner to remove any annoying folds that can snag your toes as you slip the pants on. Stretch both out straight so they line up evenly at the hem. My liner was 1/2" longer than the shell to fit slightly loose for comfort, warmth and ventilation. It is also slightly wider than the shell for the same reasons. Its advisable to
use double sided basting tape instead of pins to stick the end of the liner to the shell. This prevents fabric creep while sewing and the tape seals the seam. My roll of 1/4" wide basting tape is shown in Fig 3 below.
- After you shorten the first leg, the next challenge is to shorten the second leg, to the same length! Don't assume both legs were the same length from manufacture. Just say 'in.
- My jacket fits perfect so I haven't considered altering it. But sleeves that are too long could be shortened the same way as hemming the cuffs. Its just more difficult given the smaller diameter of a sleeve.
Follow your alteration in the order shown below. Good luck.
Fig 1, Mark the Length - Stand on a stool and have somebody mark the length to shorten your pants. It's probably a good idea to mark BOTH legs.
|
| Fig 2, Separate the Liner from the Shell - I found that a sharp razor blade worked better than a seam ripper to cut the stitching in the bias tape, as long as you are careful to not cut the shell fabric. With the bias tape removed in one piece, separate the liner from the shell by cutting off the bottom, just above the seam that joins the two. Loosing this bit of fabric is a non issue over the risk of tearing or cutting the mesh with a razor blade. Next I shortened the shell to the marked length, being careful to mark and cut at 900 to the leg. The Velcro strap that tightens the cuff around the ankle was similarly removed by cutting the stitching, then sewn back on 1/2" above the shortened length. This simple technique retains the water tightness by eliminating a new seam. The 1/2" of fabric below the strap is for the bias tape.
|
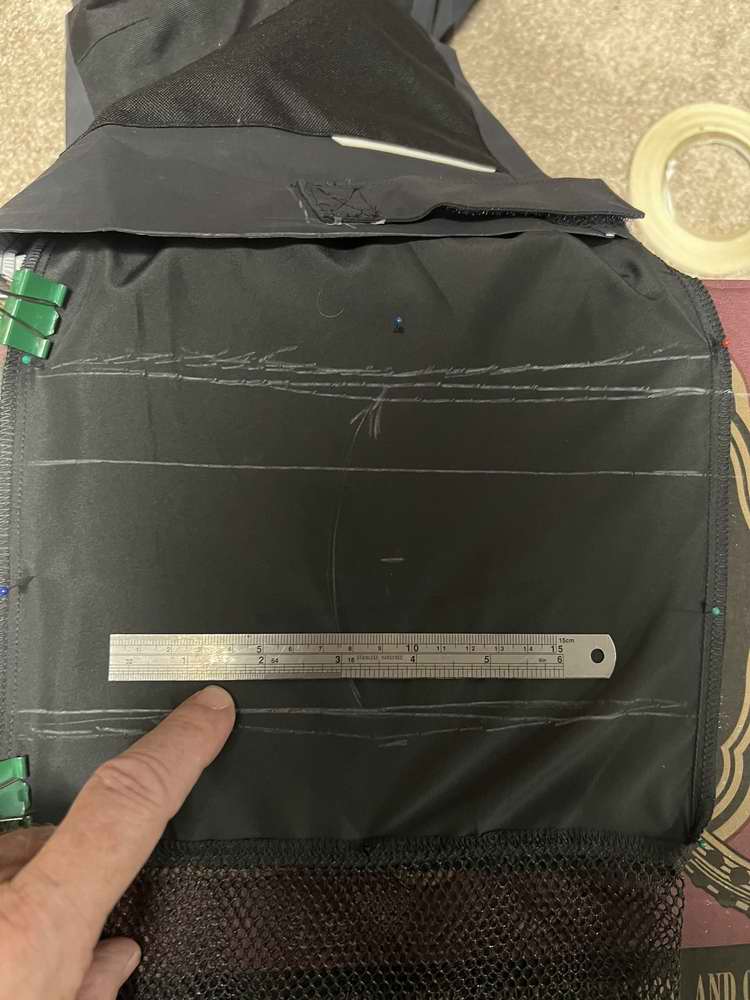 Fig 3, Shorten the Liner - In this photo the shell is pulled back to expose the liner. I've already shortened the shell and sewn the Velcro just above the hem. Note the extra fabric below the strap where the bias tape will go. Fig 3, Shorten the Liner - In this photo the shell is pulled back to expose the liner. I've already shortened the shell and sewn the Velcro just above the hem. Note the extra fabric below the strap where the bias tape will go. The liner is pinned to cardboard to draw straight lines for cutting. Good thing soap stone washes out with water. You can see the trouble I had drawing a straight line prior to pinning the liner. I always keep my basting tape handy. The wide portion is to be removed. The bottom portion (below the ruler) was sewn to the top with a 1" overlap. I used basting tape between those two to ensure nothing moved while sewing the seams. A wide overlap (top on the inside) is stronger and smoother. I can't feel it. The two lines at the top indicate the upper and lower limits of the overlap. Sewing was done along the top
(arrow) and bottom of the overlap. With the liner now shortened to match the shell,
apply basting tape to the outside of the mesh. Apply the
tape to the inside cuff of the shell matching the seams to each other. Do this
with great care to stick the two evenly. Have patience. This part
is tricky. If done correct, the liner will fit perfect inside the shell without only slight puckering of the liner fabric. Now sew the perimeter of the two together. Apply basting tape to the outside of the hem to secure the bias tape for sewing. This stuff is great to keep things in place. When sewing the bias tape over the cuff, double check to ensure the liner is pulled back so you don't sew it inside the tape. Don't ask!
|
Fig 4, First Leg Shortened.
|
Fig 5, Second Leg Shortened.
|
Fig 6, Hem complete with bias tape back in place. - I cannot feel the seam in the liner where I shortened it and my toes don't snag on it. Success.

Now that the legs are the correct length for me they fit very well and feel comfortable. The rain is cold in Alberta and staying dry is everything. I can't wait to try them in the rain. This is going to be a total game changer for sailing in wet weather.
|
Q - So why go through all this instead of finding a tailor?
A - The only tailor in town was on an extended vacation and he was not due to return for several months. The sewing part wasn't too difficult. Its the measuring, cutting and fitting of the flimsy fabric to work around the limitations of the sewing machine that made it difficult. Wood is much easier to work with!
|