| SJ23
Tech Tip B12, (Updated 2017-12-11) Bob Schimmel |
Index |
|
Leaky or Damaged Bow Cap -
Replace a Worn Unit.
INDEX -
Versions I, II,
III & IV. |
|
Fibreglass
is a tough and durable material if
it matches the application. For the wrong application it can be brittle
and weak. On the bow of an
SJ23 it's quite suitable as long as you don't stand on it or rub a line
over the edge of it. Try telling that to a weekend cruiser who's
working up a sweat to retrieve 100 feet of anchor line and chain without an anchor roller!
They're very likely to use the edge of the cap to pull the line in. That being the case, the edges of the cap
will develop grooves very quickly.
What prompted me to make a new cap for Panache was an incident I had
moving a very heavy mooring prior to having an anchor roller. See Tech
Tip B26. The
1/2" line slipped off the cleat and as the cement block went screaming to
the bottom the line melted a groove through the edge of the cap, melting it
like hot butter. I temporarily sealed the groove with Sikaflex,
but it's not the same as an intact cap.
At the time of this writing
Gene
Adams of PORT GARDENER SAILBOATS manufactured black
replacement fibreglass caps and sold them for about $35.00 US each.
They are far more robust than the original factory caps.
San Juan Sailboats
still sells them today.
But
if you want a really tough bow cap that will probably outlast your boat
consider making one from sheet metal. Enclosed in this Tech Tip are three
versions plus another idea for sealing a cap. They may seem
difficult to make,
but with a little forethought anything is possible. If you know somebody
who is experienced in sheet metal work you'll be surprised at the ideas
that pop up. You might require the services of a TIG (tungsten inert gas) welder.
|
|
HULL
CONSTRUCTION INFO |
| FACTORY
BOW CAP
- The factory bow cap shown below is made of a black fibreglass material
that is glued to the bow with the same polyester mash (a lightly catalyzed putty called thicksol)
that is used to
fasten the hull liner to the hull. The edges of the cap are sealed with a
marine adhesive
that is likely Boat Caulk, Life Caulk or maybe butyl rubber.
The first two were
popular sealants in the early 1970s. (Butyl rubber was used for a car windshield in the 1970s when they weren't an integral body component like they are today). If one of
the of two caulks was used it is likely dried up and leaking by now. In fact, it would surprise me if it
didn't leak!
 HULL
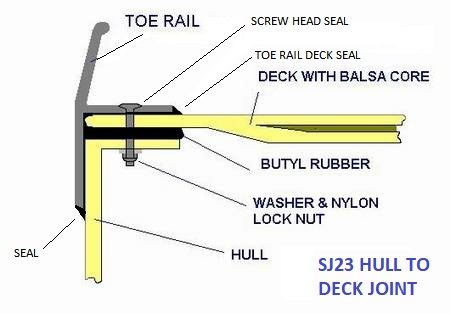
TO DECK CONSTRUCTION - The SJ23 hull to deck joint consists of an
inward pointing fibreglass flange that is actually the top 1" of the
hull, rolled inwards. The balsa cored deck lays on top of the flange and
butyl rubber is used as a sealant and an adhesive between the flange and
the deck. The edge of the deck consists of solid fibreglass for strength.
An aluminum toe rail caps the joint and the toe rail is
through bolted to the deck every 6". The
screws should be tightened occasionally to keep the joint snug. Do not over tighten,
slightly tighter than snug is sufficient. You should not compress the butyl
rubber. This joint is designed to be slightly flexible. Fiberglas HULL
TO DECK CONSTRUCTION - The SJ23 hull to deck joint consists of an
inward pointing fibreglass flange that is actually the top 1" of the
hull, rolled inwards. The balsa cored deck lays on top of the flange and
butyl rubber is used as a sealant and an adhesive between the flange and
the deck. The edge of the deck consists of solid fibreglass for strength.
An aluminum toe rail caps the joint and the toe rail is
through bolted to the deck every 6". The
screws should be tightened occasionally to keep the joint snug. Do not over tighten,
slightly tighter than snug is sufficient. You should not compress the butyl
rubber. This joint is designed to be slightly flexible. Fiberglas 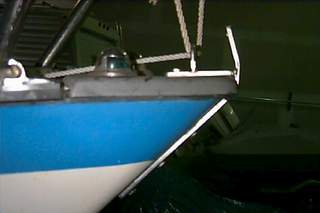 mash was used under the bow cap to fill gaps and to hold it down to the deck.
The
last through bolts are installed in the end of the toe rail about a foot
from the stem, just aft of the cap. The deck extends to the
stem where the end is covered by the bow cap. The deck fits snug on top of the
stem and is attached to the fibreglass hull flanges with two pop rivets.
It is also through bolted to the forestay
fitting. (If this sounds like minimal support
under the bow cap, keep in mind that the small bulkhead that forms the aft
end of the anchor locker adds significant strength to the bow by keeping
the hull sides together). However, the lack of a toe rail in the
forward section creates a relatively unsupported area. In addition,
several 1" diameter holes may be drilled through this portion of the
deck to pass the electrical wiring for the bow running lights. See
images above. Unfortunately the factory didn't seal the edges of these
holes so the balsa core is exposed to the full humidity of the anchor
locker. In addition, the leading edges of the toe rails are probably NOT
sealed to the deck so any water that is driven under the cap will flow
under the toe rail and likely appear somewhere alongside the low side of
the hull. Gawd such simple things to do properly
at the factory! However, NOW is an excellent time to seal
these holes after the core of the wood is bone dry. Use epoxy to seal
the balsa core in the holes. Use Sikaflex to seal the hull to deck joint
around the deck and to seal the leading end of each toe rail.
mash was used under the bow cap to fill gaps and to hold it down to the deck.
The
last through bolts are installed in the end of the toe rail about a foot
from the stem, just aft of the cap. The deck extends to the
stem where the end is covered by the bow cap. The deck fits snug on top of the
stem and is attached to the fibreglass hull flanges with two pop rivets.
It is also through bolted to the forestay
fitting. (If this sounds like minimal support
under the bow cap, keep in mind that the small bulkhead that forms the aft
end of the anchor locker adds significant strength to the bow by keeping
the hull sides together). However, the lack of a toe rail in the
forward section creates a relatively unsupported area. In addition,
several 1" diameter holes may be drilled through this portion of the
deck to pass the electrical wiring for the bow running lights. See
images above. Unfortunately the factory didn't seal the edges of these
holes so the balsa core is exposed to the full humidity of the anchor
locker. In addition, the leading edges of the toe rails are probably NOT
sealed to the deck so any water that is driven under the cap will flow
under the toe rail and likely appear somewhere alongside the low side of
the hull. Gawd such simple things to do properly
at the factory! However, NOW is an excellent time to seal
these holes after the core of the wood is bone dry. Use epoxy to seal
the balsa core in the holes. Use Sikaflex to seal the hull to deck joint
around the deck and to seal the leading end of each toe rail.
|
|
VERSION 1 - A Replacement Cap from Stainless Steel or Aluminum. |
CONSTRUCTING the CAP - Unbolt
and remove the forestay fitting. Scrape the old sealant off as the fitting
will be reused. Gently remove the old cap with a knife, long screw driver,
etc, cutting through the sealant and gently prying the cap up. Scrape the old
sealant off the deck area till it's whistle clean.
- The first decision is to determine if you will make the cap
from, aluminum or
stainless steel. Either material is a
lot tougher than the original cap and will outlast it. I
suggest using 18 gauge stainless steel or .062 aluminum. This is
about the maximum thickness you can cut with hand snips.
- TEMPLATE - Lay a sheet of cardboard on
the deck and draw an outline of the hull on the bottom of the cardboard.
Draw another line about 1/2" outside the deck line. This will
become the edge of the flange that will be bent over the side to protect
the anchor line from being chafed over a sharp edge. You
can alter the width of the flange to suit your own requirements but a
1/2" wide flange lines up with the bottom of the toe rail to create
a continuous line along the hull. Allow
enough material at the peak to bend the flange around the stem to the
forestay fitting. Make the cap long enough to create a 1/16" gap to
the toe rail. There is nothing more unsightly than a big gap from an
obvious screw up! Since the two toe rails are likely not the same length shorten the longer one with a hacksaw to create symmetry. It is not uncommon to find different length toe rails.
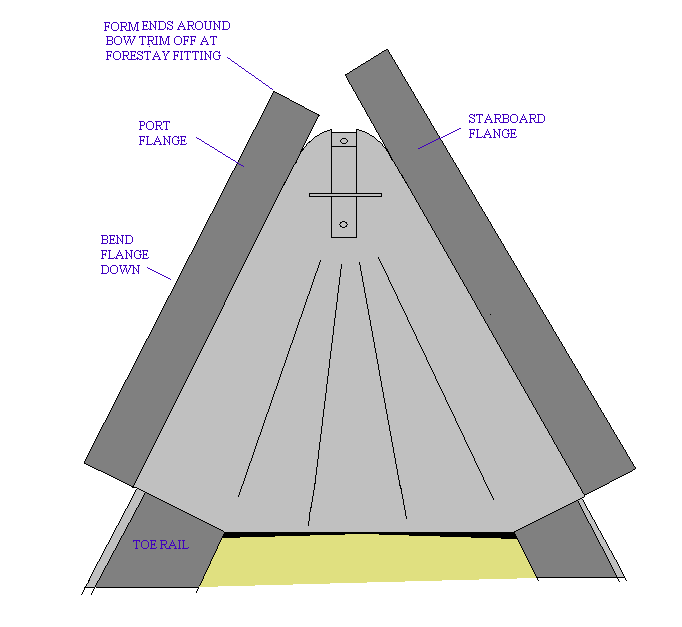 The
bow cap template show at right is NOT drawn to scale because every hull
has slight differences. It is a rough sketch to demonstrate the concept.
It's fairly easy to draw your own template so it matches your hull,
perfectly. The factory cap fits a bit sloppy so it fits all hulls.
The protruding sides were filled with sealant to make it look acceptable
and some caps simply fit tighter than others. The
bow cap template show at right is NOT drawn to scale because every hull
has slight differences. It is a rough sketch to demonstrate the concept.
It's fairly easy to draw your own template so it matches your hull,
perfectly. The factory cap fits a bit sloppy so it fits all hulls.
The protruding sides were filled with sealant to make it look acceptable
and some caps simply fit tighter than others.
- Cut out the cardboard template and dry fit it to verify accuracy.
Pencil some alignment lines between the template and the hull.
- MOLD - If all fits well, spread the cardboard template on a piece of
3/4" fir plywood and draw the outline of the bow, excluding the
flange. Cut out the plywood to make a male mold of the bow. Slope the
sides 160 and the bow 450 to match those of
the hull. The top of the mold should have a 1/4" high crown to
match the curvature of the deck. Fit the plywood mold to the deck to
ensure accuracy.
- Lay the sheet metal on the plywood mold and transfer the outline
including the scribe lines. Allow for at least a 1/2" wide flange.
Cut out the new cap.
- FORMING - Lay the sheet metal on the plywood mold, aligning it at your
scribe lines and bend the flanges over the edge. To make a really
professional looking cap, bend the sides using a break (sheet metal
bender). Remember to bend both sides using the same technique; i.e. side
up or top down. (There is a difference). Bend the front end of each
flange around the bow till they overlap. Cut the overlap off to create a
1" gap for the forestay fitting. It most cases this gap extends
back into the top of the cap but it differs on each boat. You should install
the cap so the forestay fitting can be removed independent of the cap.
Test for fit.
- If you made your cap from stainless steel, have the welder 'tack' the
assembly to lock it. Test it for fit and then finish welding the
remainder of the bead. Grind off any rough spots, smooth with a wire
brush and polish the surface so your lines don't chafe over a sharp edge.
-
If you made your cap
from aluminum you could use "liquid steel or liquid aluminum
epoxy" to bond the ends of the flanges to the top of the cap.
I
used PC-7 epoxy which has never let go. Rough up the inside with a wire
brush, clean with acetone and work the epoxy into the inside of the turn
with your fingers. Fill in any voids to create a smooth surface. I suggest anodizing the aluminum cap as it is a lot tougher than
paint. Having said this, my painted cap has stood up very well as
I still have all the original paint.
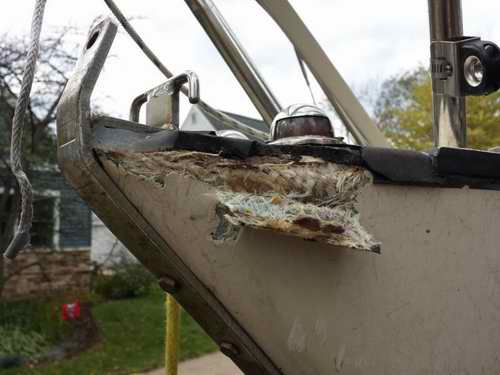
INSTALL the CAP
-
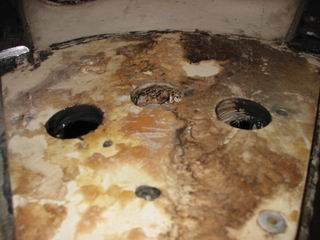 At
right is a picture of Panache's bow with the cap removed. You can see
the pop rivet at the bottom right holding the deck down and the three holes that the factory
drilled through the deck to install the electrical wiring for one
navigation light! Unfortunately they didn't seal the edge of the holes
leaving the wood exposed to the moisture of the anchor
locker. Notice the exposed balsa core in the center hole. If the
wood on your bow is bone dry then saturate it with unthickened epoxy, seal
the wood with thinned and then thickened epoxy, insert a wood plug in each hole followed
up with cloth laid on top and bottom to seal the plugs. If you were real picky,
you could lap a bit of cloth over the
edge to bond the top to the bottom. The left hole is sealed and some of the exposed wood
is still visible on the right hole before I sealed it. At
right is a picture of Panache's bow with the cap removed. You can see
the pop rivet at the bottom right holding the deck down and the three holes that the factory
drilled through the deck to install the electrical wiring for one
navigation light! Unfortunately they didn't seal the edge of the holes
leaving the wood exposed to the moisture of the anchor
locker. Notice the exposed balsa core in the center hole. If the
wood on your bow is bone dry then saturate it with unthickened epoxy, seal
the wood with thinned and then thickened epoxy, insert a wood plug in each hole followed
up with cloth laid on top and bottom to seal the plugs. If you were real picky,
you could lap a bit of cloth over the
edge to bond the top to the bottom. The left hole is sealed and some of the exposed wood
is still visible on the right hole before I sealed it.
- Check the fit of the cap
against
the forestay fitting. The metal cap sits lower on the deck since
it is thinner than the manufacturer's cap. This creates a gap under
the forestay flange (portion that rests over the cap to which the jib is
attached) and quite possibly another gap under the cap as well. Both gaps MUST
be filled with metal shims to prevent flexing the forestay flange. Install the
bottom or deck/cap shim now, fastening it so it can't move.
- Temporarily set the forestay fitting in
place to drill the deck hole through the cap and bottom shim.
Drill holes through the top shim as well. Decide
now to install new navigation lights somewhere else! There is absolutely
no point in fabricating a perfectly watertight bow cap only to drill a
bunch of holes through it to mount a next to useless light that will be
in the way anyway. (Boy talk about an opinion). It's dubious just how
visible a deck mounted light really is. Remember to extend the wiring to
the lights.
- After you're happy with the
fit of the cap, seal the front of the toe rail (just visible in the
photo above) and the hull to deck joint with a high quality elastic
marine adhesive like Sikaflex. Force it deep into the joints.
Apply a liberal amount of Sikaflex to the bottom of the cap so it
fills all voids to the deck surface. Once cured it will support
the cap. 'Air support' isn't adequate!
Use masking tape over
the gel coat along the perimeter of the cap to prevent the sealant from
smearing, making a mess that is difficult to clean. Pay special
attention to circle seal all
fitting holes and the perimeter of the cap. Some adhesive should ooze out the sides to ensure that the void
under the cap is completely filled. This will require about 3/4 of a
consumer size caulking tube.
-
Bolt
the forestay
fitting in place including the top shim you made. Seal all the
inside surfaces with Sikaflex. (Before you bolt
the forestay
 fitting
in place, consider bending the tack horns down about ten
degrees. (See Tech Tip B27)
Square as they are from the factory, they don't hold a sail securely.
If
you bend them down a bit, the jib hardly ever comes off. If you
don't like using the horns then now is the time to drill a hole between
the horns. Make the hole big enough to
attach a clevis. This is how I attach the jib on Panache.
End of hassles) fitting
in place, consider bending the tack horns down about ten
degrees. (See Tech Tip B27)
Square as they are from the factory, they don't hold a sail securely.
If
you bend them down a bit, the jib hardly ever comes off. If you
don't like using the horns then now is the time to drill a hole between
the horns. Make the hole big enough to
attach a clevis. This is how I attach the jib on Panache.
End of hassles)
You
may find it convenient to use a mechanic's aligning tool to pull the forestay
fitting into place over the mounting holes. Use nylock nuts to bolt the
forestay fitting as this is the last fitting you ever want to come
loose!
- The
reach into the peak of the bow is extremely long and difficult as
Panache does not have the anchor locker lid. To
protect my kidneys I placed a long (2x6)" plank on the bottom of the
anchor locker bulkhead in the cabin. I consider myself quite flexible but it was all
I could do to reach the top bolt. In fact, I screwed a foot stopper to
the plank to push myself deeper into the anchor locker just to reach
this bolt. The others were somewhat easier!
Now I understand why Clark added the deck anchor locker lid! The tall
skinny guy at the factory must have quit after the first year and they
had to find an easier way for the "rotund" guy to do this job!
- Remove
the masking tape after the Sikaflex is smoothed down. Wipe off any excess
sealant with paper towel dampened in acetone. Since my hands were
dirty
and I was in the 'neighbourhood' I also resealed the trailer eye, the
mooring cleats, the pulpit feet and the mount for the stem strut to
my bow roller. Let the Sikaflex cure
for two days with the occasional splash of water to speed up the cure.
Clean
up your mess, have a beer and contemplate your next upwind trek ploughing into
bow sinking waves! Above is the finished project on Panache.
|
|
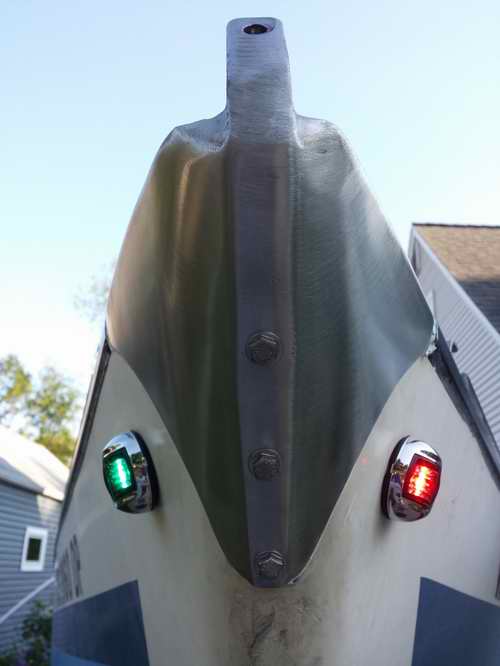
VERSION 2 - A New Stainless Steel
Cap,
2005 |
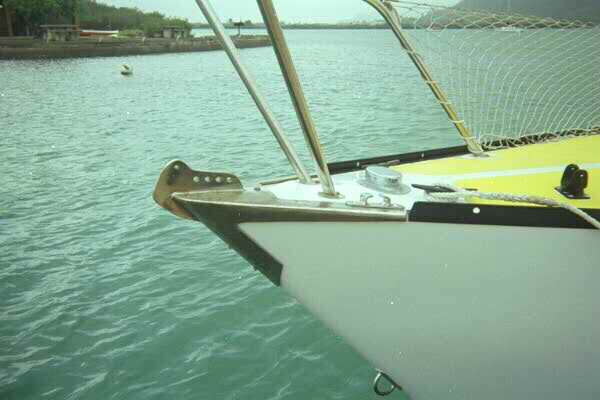 Tom
decided to replace the bow cap on Malia. The redesign and installation are
all his handy work. He made a pattern and a local welder cut the stainless
steel sheet metal then welded them together. The integrated cap & forestay
fitting is bolted down by
the screws through the mooring chocks and through the holes where the
forestay fitting is bolted. The entire structure is strong enough that
it replaced the forestay fitting with a new plate you see welded
here. Tom
decided to replace the bow cap on Malia. The redesign and installation are
all his handy work. He made a pattern and a local welder cut the stainless
steel sheet metal then welded them together. The integrated cap & forestay
fitting is bolted down by
the screws through the mooring chocks and through the holes where the
forestay fitting is bolted. The entire structure is strong enough that
it replaced the forestay fitting with a new plate you see welded
here.
The top
plate is extended back to fit under the
chocks and the hull portion is extended down to cover the forestay holes.
The forestay load is supported by the stem bolts. The smooth shape creates excellent protection from anchor damage,
adds strength to the bow and totally seals the bow. The outside corners
below the mooring cleats are rounded so the mooring line can't chafe. Rather
than match the blunt bow curve of the stem, he extended
the deck and stem lines out to where the two sheets meet, creating a distinctive and
shape. Another nice feature of his design is the smooth
bottom of the cap edge. If the bow should come down on something solid,
this will minimize the chances of "lifting" the cap off the deck.
|
|
VERSION
3 - A New Stainless Steel
Cap,
2016 |
|
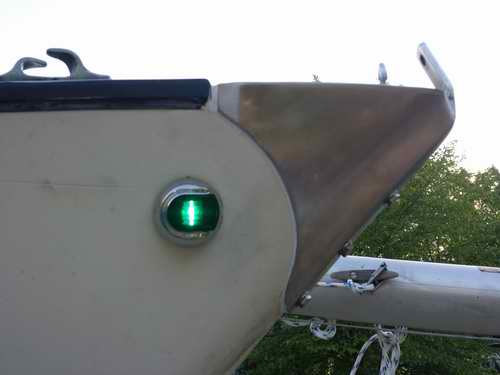
Alan had a bit of a nasty surprise when Elizabeth Jane broke free from her
mooring. Her mast got hung up on a tree and her bow was scraped when it met with a sandstone cliff. A new stainless steel bow
cap was fabricated by a local Wisconsin machine shop at a cost of $850 US.
The new cap is well sealed to the hull to prevent water ingress which
further increased the overall strength.
The end product is far stronger than the factory original. Similar to version II above, Alan also incorporated smooth sides so the cap cannot
be lifted. And while he was at it, he installed new running
lights on the hull to clear the cap for deck work. Its always good to
consider all aspects of a repair. Very clean neat job.
|
|
VERSION
4 - Seal the top of an Existing
Cap,
2016 |
And finally if you've replaced the puny factory deck lights with Fresnel lights (Aqua
Signal 25) installed on the pulpit and the cap is still in good condition, then all you
really have to do is plug the light fixture holes. This
is what Randy did. He cut an aluminum plate to fit the cap, sealed it with
butyl rubber then screwed it down with 4 stainless screws. It
takes a bit of pressure to spread the butyl rubber which is best done with
a heat gun. Alternatively you can park the boat in the hot sun and let Mother Nature do
the heating for you. Make a fillet with the rubber that oozes out
along the perimeter and remember
to seal under the screw heads. Job done. No point in making it
more complicated than it needs to be.
By the way that's a Hood furling system fitted to the boat.
I knew you were going to ask this. |
|
Return
to Tech Tip Index. . . . . . . . . . . . . . . Have
a Question? |