|
A cabin heater gives you more early and late season time
to enjoy your boat. You can be comfortable onboard in a quiet
anchorage while others stay
home. It is probably the most comfortable way to extend your sailing into
a shoulder
season. A warm, dry cabin can change a marginal day into a good
day and we all know that any day spent on the water is a good one.
 Using a cooking stove to heat your cabin may be quick but it's
also dangerous due to the lethal carbon monoxide gas that
quickly accumulates in a closed cabin. If you adhere to this practice you will likely find yourself on the list of those who visit St. Peter each year, in which case you better know the answer to the secret question or he's not letting you in! Succumbing to carbon monoxide poisoning is very preventable. The other problem of
heating with
a stove is the moisture an open flame produces. A
purpose made cabin heater with a chimney to vent dangerous exhaust
fumes
outside is safe and clean, assuming you allow make up air to enter the
cabin. Using a cooking stove to heat your cabin may be quick but it's
also dangerous due to the lethal carbon monoxide gas that
quickly accumulates in a closed cabin. If you adhere to this practice you will likely find yourself on the list of those who visit St. Peter each year, in which case you better know the answer to the secret question or he's not letting you in! Succumbing to carbon monoxide poisoning is very preventable. The other problem of
heating with
a stove is the moisture an open flame produces. A
purpose made cabin heater with a chimney to vent dangerous exhaust
fumes
outside is safe and clean, assuming you allow make up air to enter the
cabin.
The Cozy Cabin Heater is designed to operate when the boat is on a relatively even keel
but an occasional roll from a wave doesn't bother
the flame as it can stay lit and the chimney draft isn't affected. I've turned this heater on it's side and the burner stayed in place,
which is remarkable since it is held in place by gravity. Before I installed my heater I
operated it at 300 for 15 seconds. It continued
burning without a problem but the draft was reduced. Continued operation with
a boat heeled over like this is inviting trouble.
You'll find these heaters used most often at the dock or anchored
somewhere in the rain. Check out a rainy anchorage and watch which
boat has people onboard. Nine times out ten they'll be on the
heated boat, regardless of its size. I've seen people doing
maintenance, partying or reading a book. There is probably nothing
more soothing than reading a good book in a warm cabin with a coffee in
hand. Some popcorn wouldn't hurt either. Makes you feel snug
and cozy all over doesn't it? Motoring through the drizzle in a
warm cabin is another experience not to be missed. Sometimes I
wonder if these aren't the best parts of sailing! Alternatively
there is nothing more miserable than a cold, damp cabin to drive you off
the water. Given that situation I would much rather be on land
where my activity can keep me warm. This is precisely the reason
why I installed a heater on Panache.
When
the Cozy Cabin heater was introduced in the 1970s it was available in
four fuel models, diesel/kerosene or propane/compressed natural gas, with an adjustable
heat output of
4000 to 6000 BTUs. To roughly calculate how many BTUs are required to heat a cabin,
calculate the cabin volume by (H x W x D) = V ft3, then multiply
the volume by 10 if the cabin is
insulated, or by 15 if
it is not insulated. The SJ23 volume calculates to (7.5W x 16.5H x 7D)=189 ft3,
where the required heat is 12,000 BTU. From my experience a Force
10 heater produces adequate heat in the shoulder seasons. I seldom
run it on full heat. I even use it during the winter while working
on the boat.
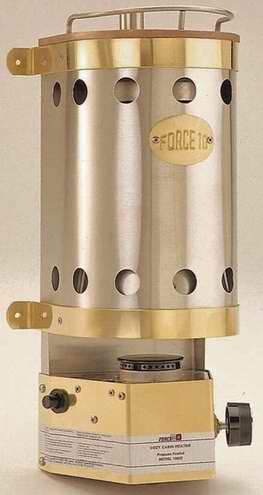
PARTS & SERVICE - This 1970s bulkhead cabin heater
(Model FT 100 PR OXD) was
designed and manufactured by
FORCE
10 in Vancouver, B.C. Canada. As of 2000 the unit was manufacture discontinued
when the company changed their product line to stoves shown on their web
site.
Sig Marine now
sells parts for the Cozy Cabin heater in Surrey, B.C. (Canada).
Email for technical assistance
or phone 1(800) 659-9768 for service.
| HEATER
SPECIFICATIONS |
| Height |
16.25" |
| Width |
7.75" |
| Depth |
7.25" |
| Cook Top |
4" x 5" |
| Fuel Consumption |
3.3 hr/lb |
| Safety |
Flame out thermocouple & O2
Depletion |
| Power Consumption |
0 Amps |
MANUFACTURER INSTALLATION RECOMMENDATIONS for the FORCE
10 COZY CABIN HEATER.
- SPECIFICATIONS - Height 16.5", width 7.5", Depth
7", weight 11 lbs, cook top (4x5)", heat 6500 BTU.
- CLEARANCE - Ideally, you should leave 6" of clearance from the sides and the bottom of the heater
to any combustible material, 36" from the floor to the top of the heater and
24" or more of clearance above the heater. 72" of headroom is ideal.
To prevent the bulkhead from overheating Force 10 supplies insulating washers
to use behind the feet of the heater. To protect the wood bulkhead against
heat discoloration it is recommended to install ceramic tile or a sheet of stainless
steel behind the heater. Since the majority of the heat is radiated
from the top plate and from the flame, pay particular attention
to combustible material close to either of these.
-
 DECK CAP -
The chimney stack must be mounted through a 2" ID hole drilled
through the deck or side wall. Seal the edge of the hole with epoxy to protect
the wood core. The chimney or deck cap MUST be mounted on top of a hardwood spacer
ring with a gasket between for insulation. If the deck is
sloped, taper the spacer so the cap fits vertical. DECK CAP -
The chimney stack must be mounted through a 2" ID hole drilled
through the deck or side wall. Seal the edge of the hole with epoxy to protect
the wood core. The chimney or deck cap MUST be mounted on top of a hardwood spacer
ring with a gasket between for insulation. If the deck is
sloped, taper the spacer so the cap fits vertical.
- STACK - This heater requires a 1" stainless steel flue or stack. Ideally the
stack should not have a bend
greater than 450 at any one turn. To vent horizontally out the
hull requires two 450 bends. For a side vent installation the ideal vertical rise is 3' and the ideal horizontal run is 1' or less.
Too much rise
will draw excess warmed air out. Too long a horizontal run
will hold hot air back. A chimney damper is not allowed.
- FUEL (Diesel/kerosene)
- The pressurized fuel tank for the diesel/kerosene
heater must be installed
lower than the burner as an extra safety measure
to prevent fuel being siphoned onto the cabin floor. Diesel/kerosene
is always a liquid feed from the bottom of the tank via an internal
dipper tube that goes through the top of the tank. The manufacturer recommends
a 1/4" rubber fuel hose BUT make sure the rubber is rated
for the type of fuel the heater uses. Most fuel hoses are compatible
with only one type of fuel like diesel/kerosene. A gasoline hose is
NOT compatible with diesel/kerosene. Above all,
don't install an old propane hose for diesel/kerosene simply because you
are too cheap to buy the correct hose. The problem is that the
fuel will slowly dissolve the rubber which will plug the holes in the hot burner. This problem may take a few years
to manifest itself. It's a very frustrating thing to resolve
when cause
and effect are so far apart in time. While the
fittings on a propane hose are usually crimped, those on a diesel/kerosene
hose may be attached with barbed fittings and hose clamps. This
combination is well within the 30 psi system operating pressure of the air pump on
the fuel tank.
- FUEL (LPG/CNG) - The pressurized fuel tank for the
propane or compressed natural gas heater must be installed in a
vented compartment to keep unburned heavier than air propane gas from
entering the cabin or bilge. LPG or CNG fuel is always a gas feed from the top of the tank
so install the tank upright. Force 10 recommends a flexible hose
equipped with crimped connectors approved for LPG or CNG.
USING THE HEATER - Regardless of which
version of Cozy Cabin bulkhead heater you have, they all produce enough
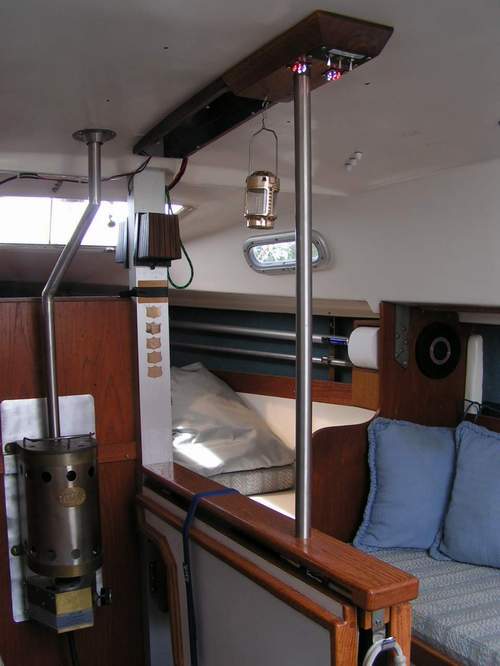
heat for an SJ23 cabin. However, the secret to a successful installation is to
install a Caframon or other small whisper quiet
fan above and to the side of the heater to drive the hot air down to the cabin floor.
Now that
feels good! This is the only way you will ever warm
your tootsies which would otherwise be immersed in the three foot deep layer of cold air below the
heater! If the top of the bulkhead is
open to the ceiling then you can pivot the fan 1800 to send the hot air forward to dry
the berth. It's so nice to crawl into dry bedding on a rainy day.
The
other reason for a full articulating fan is to satisfy all those
'adjusters' out there! I've never seen a fan that somebody didn't
want to point in another direction. If it can oscillate, then all the better.
By the way, the fan is great for cooling you off in hot weather.
- The height of the flame is adjustable by the red control knob in the photo
above. The propane version
will operate at full throttle for about 15 hours on a one pound disposable
bottle. The diesel/kerosene version will operate about 24 hours on
one US gallon of fuel, provided you maintain tank pressure. The propane
version can burn unattended till the fuel is consumed. You will
have to pump the tank pressure every few hours or so.
- You can restore and preserve the steel top plate of the heater with
Stove Polish. This is a paste that easily restores the lustre to a
black finish.
- SMART IDEA It is very
advisable to leave a hatch 'cracked' open to let some fresh air in.
Oxygen
deprivation can sneak up on a person, making you feel lethargic and
dropping your defences to where it can be dangerous.
- DUMB IDEA It is NOT recommended to hang wet clothing above the heater.
The smart idea is to hang the clothing to the side and blow
hot air at it with the fan you installed.
- It is NOT recommended to use the heater
while sailing, despite the fact that the flame can stay lit at 300
of heel. The problem is that the hot exhaust gas will escape out the
lower side of the hooded vent holes, overheating the wall and dumping
dangerous fumes inside the cabin. I can only imagine the problems that can arise when wind and waves
combine with fire and carbon monoxide in the cabin. You are
welcome to it. The safer thing to
do is pack the sails, drop the anchor,
light the heater,
make a pot of coffee/tea and enjoy life. By the way,
this heater will keep a pot of coffee warm. You just have to find a
4" diameter pot that can fit inside the fiddles. I've also
heard of people who warm soup on the heater. A can of beans would
fit nice as long as you don't let it boil over.
TOP
PROS & CONS - The FORCE
10 Cozy Cabin Heaters were manufactured in four fuel types, each with their pros and cons. All
are bulkhead mounted. They are now manufacturer discontinued but parts are
still available at the time of this writing.
Pros and Cons of Liquid
Versus Gas Fuel.
|
|
|
LIQUID FUEL - Diesel or Kerosene |
GAS FUEL - LPG or CNG |
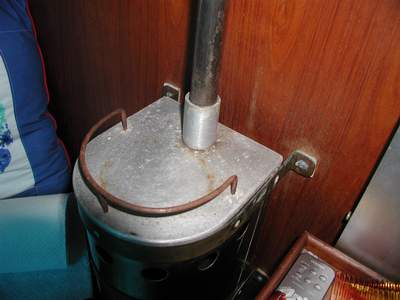
| Preheat |
The burner MUST be preheated by
burning a combustible
paste spread in the basin under the burner. If the preheat is
incomplete (burner too cold to support combustion) then the fuel
will not ignite when
it comes out the burner. If the burner temperature is
almost hot enough then it will produce a low yellow flame that will burn sooty till
the burner heats up. The flame may also flare up while the burner
heats up. Flaring can be dangerous in a confined cabin and
the valve should be shut off immediately. The problem can be minimized with a judicious application of the volume of
paste. Soot coming out the chimney will stick to things on deck.
|
The LPG & CNG versions start
immediately, provides virtually
instant heat and burns clean all the time. While preheat is not required
the flame sensor must be heated during start up which requires you
to press and hold the knob for 10-20 seconds. LPG is
heavier than air making it dangerous when accumulated in the
bilge. CNG is lighter than air, making it safer. Both
gasses are very explosive. |
| Operation |
The flame should burn with a solid
blue colour. You may see the occasional yellow tipped
flame which is OK. The tank
looses pressure as the fuel is consumed but with a bit of experience you'll know when to apply a few more
strokes on the pump to maintain a hot, clean burning blue flame. Usually
every 90 minutes, modified by gas consumption and flame height.
|
The heater will burn as long there is fuel in the tank since the
evaporating gas in the tank is what creates the
pressure for the burner. |
| Fuel Tank |
- The pressurized tank for the diesel
or kerosene versions must be installed
lower than the burner as an extra safety measure to minimize the
risk of liquid fuel flowing on the cabin floor after the flame goes out.
- The tank must be installed (clamped) with the hose at
the bottom to achieve a
liquid feed.
- All fuel must be filtered to prior to going into the tank.
|
- If you equip the heater with a refillable propane tank,
it must be
stored in a vented locker. (see propane locker).
- All styles of propane tanks must be clamped vertical with the
valve at the top to achieve a gas
feed.
- The continuous propane supply hose (flexible
fire-resistant UL or CGA equipped with 3/8" flare nuts on each end)
without couplings or Ts should have an automatic shutoff valve to protect against a leaking hose.
- Requires a high quality low pressure regulator; 11" water
column or .0274bar (.5psi).
|
| Safety |
- Spilled diesel or kerosene is
unlikely to ignite and less dangerous than propane
gas settled in the bilge. However, it MUST be wiped up immediately.
- On land it is OK to use a liquid fuel to preheat the
burner. On a rocking boat you must use a paste that
can't spill.
- The starter paste must be lit with a flame from a BBQ
lighter or a match, not a
spark lighter. See safety note
below.
|
- Heater is equipped with an automatic fuel shut off to guard
against a flame out
or oxygen depletion.
- If the internal piezo-electric igniter fails to spark the gas can be lit with a
BBQ flame lighter (not a spark igniter). Use a flame since leaked raw propane gas will collect in the bilge where it
can accumulate to a potentially dangerous quantity. See safety note
below.
|
 It is arguable which
type of fuel poses the greatest potential
hazard. There are pros and cons to each type and your operating knowledge, along with proper
maintenance, is key. LPG (propane) is an excellent and convenient
fuel if used in accordance with rules, safety and common sense. Neither of the liquid fuels are as explosive as the
gaseous fuels but if they puddle that fuel can also be dangerous.
Regardless of which
type you have, it is a
wise to stay awake (both feet on the floor and
sitting upright) while the heater is burning. It is
also wise to install a carbon monoxide detector in the cabin, especially if you intend to
nap, even if for only five minutes! Thankfully not many people can sleep comfortably with a heater
burning, however slight the hissing noise of the flame is. The
smartest thing that most people do is
keep the cabin heated till the sun fizzles below the horizon and then snuff the flame, preferring to rely on the warmth of a good sleeping
bag and the comforting knowledge that you won't succumb to carbon monoxide poisoning
overnight.
In marginal, damp weather I consider the heater both a safety
feature and a luxury. It is arguable which
type of fuel poses the greatest potential
hazard. There are pros and cons to each type and your operating knowledge, along with proper
maintenance, is key. LPG (propane) is an excellent and convenient
fuel if used in accordance with rules, safety and common sense. Neither of the liquid fuels are as explosive as the
gaseous fuels but if they puddle that fuel can also be dangerous.
Regardless of which
type you have, it is a
wise to stay awake (both feet on the floor and
sitting upright) while the heater is burning. It is
also wise to install a carbon monoxide detector in the cabin, especially if you intend to
nap, even if for only five minutes! Thankfully not many people can sleep comfortably with a heater
burning, however slight the hissing noise of the flame is. The
smartest thing that most people do is
keep the cabin heated till the sun fizzles below the horizon and then snuff the flame, preferring to rely on the warmth of a good sleeping
bag and the comforting knowledge that you won't succumb to carbon monoxide poisoning
overnight.
In marginal, damp weather I consider the heater both a safety
feature and a luxury.
BULKHEAD
INSTALLATION in a SJ23 - While an SJ23 has a roomy cabin for its
length, there
is really only one practical place to mount a bulkhead heater, against the
port bulkhead. If you find
this spot too intrusive you may want to
invest in a portable heater like an Origo alcohol stove that can be
placed on the floor. However, if you operate
your boat in an
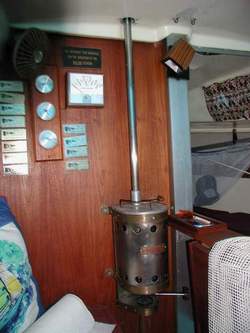
area with lots of marginal weather then a permanent cabin heater is the best way to go. The FORCE
10 diesel/kerosene heater shown at right was installed on
"Gecko" by the original owner who worked for Clark during the
summer. Joe
Thomas now owns her and has sailed her out of Seattle for many years.
The FORCE 10 propane heater shown below was installed on
"Panache" by Bob Schimmel.
TOP
 FIRE
PRECAUTION - Fire at sea is the most feared of all hazards
for a sailor. There is virtually no way to escape from it. Going
over the side it hardly a solution and riding it out in the dinghy is only
marginally better. Fire prevention is everything. For this
reason you MUST install this heater with ALL the safety precautions
recommended by the manufacturer in the manual, plus any other that are required
by the
unique requirements on your boat. This is your responsibility to
figure this out and definitely NOT a time to make a
short cut. FIRE
PRECAUTION - Fire at sea is the most feared of all hazards
for a sailor. There is virtually no way to escape from it. Going
over the side it hardly a solution and riding it out in the dinghy is only
marginally better. Fire prevention is everything. For this
reason you MUST install this heater with ALL the safety precautions
recommended by the manufacturer in the manual, plus any other that are required
by the
unique requirements on your boat. This is your responsibility to
figure this out and definitely NOT a time to make a
short cut.
Check gas connections for a leak at the start of each season and whenever
else you think it necessary. Turn the heater
valve OFF. Open the gas valve of the supply tank. Note the
pressure. Shut off the gas tank. The pressure should stay constant for 10 minutes.
THERMAL
PROTECTION for TABLE - A forward section of the port leaf of
Panache's table was cut out to clear the body of the heater. Ooh it hurt to cut such nicely finished wood work! However,
the cut out section created the required 2" air gap around the heater,
thereby keeping the edge of the table cool when it is up. Long term heating of the table fiddle shouldn't be
a problem. However, I will apply reflective aluminum tape to
the fiddle as a precaution. I may not be onboard if someone
else operates it! The top metal plate
radiates lots of heat sideways and a lot of hot air passes out of
the heat exchanger holes at the top. The flame also
radiates heat sideways but not nearly as much the plate and the
holes at the top.
At the height
shown in my installation, it is quite easy to light or service the
burner, which is an important consideration.
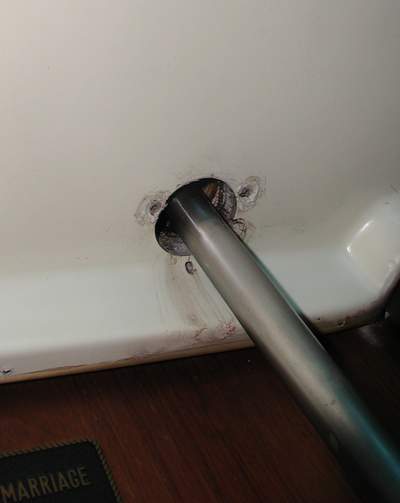
THERMAL PROTECTION for BULKHEAD - Use high temperature
fiber washers
under the mounting feet to insulate them from the bulkhead (shown
below). To keep the bulkhead cool I mounted sheet metal behind the heater
(shown at left) but I've also seen ceramic tile used.
This
is important if you operate the heater for an extended time,
especially if it's a really good book! If
you use sheet metal, install it loose against the wall so the slight
air gap behind it can't conduct the heat to the bulkhead. Most
of the heat will be reflected if the sheet metal is shiny.
Panache's
installation shown above is polished aluminum (light sand paper) and the wood bulkhead
always stays stone cold. Maybe I'm anal about this stuff but
I regularly check the heater for over heating while it
runs.
TOP
STACK
-
The chimney stack doesn't have to go
straight up as shown in Joe's installation at left. To keep hot exhaust
gas away from poly deck lines I
installed Panache's
deck cap about 8" off to the side of the heater. This was
beyond the limits of a bender so I cut the stack in two places, 300
each, and welded the assembly back inline. Polishing was
accomplished with a Dremel tool using successively finer
compounds. As an
alternative to offsetting the deck cap you could use a straight
stack and raise the deck cap above the deck
lines with a
thick wood spacer ring. The extra height has the
added benefit of keeping more solid water out. As you can
see in the photo below I offset the stack and raised the deck cap.
If you want to make smooth bends then use a stainless steel
tube bender on the stack. Don't use an electrician's conduit bender
as it does not grip the tubing which will kink
it due to the properties of stainless steel. An alternative
to bending is to cut
and weld the tubing, especially if the desired turning radius is
tighter than the
limits of the bender, which is usually a 5" radius. Grind the welds
smooth to eliminate hot spots, meat hooks and to improve the
cosmetics. The maximum number of bends
allowed are two, 450
each. You could split a
single 450 bend into two 22.50 bends to achieve a
smoother transition, but this complicates the welding
more and adds to the labour. Still, certain installations
might require it. Leave about a 1/8" air gap between the end of the
stack
and the bottom inside of the cap for thermal expansion. This helps to
protect the cap from being pushed up off the deck and maintains the deck seal.
THERMAL PROTECTION for the
CHIMNEY DECK HOLE -
The deck hole for the chimney must be 2" ID which creates 1/2" clearance all around the 1" OD
stack. A hole saw is perfect for this job. Drill half way
through from the top then finish the hole from the bottom. The
ceiling finishing ring is missing on Joe's chimney at right but it
illustrates the installation. Seal the exposed
deck core in the stack hole with epoxy to maintain the
strength. If the cap is to be installed where you expect
solid water to come over the deck, then I suggest using at least a
2" thick wood spacer ring to minimize the amount of water that can find
its way below.
Taper the sides of the ring to 300 so a
deck line can slide over the cap. The cap is fastened to the top of
the ring with three wood screws and a fibre thermal washer between
them. Do not use sealant here. The wood ring is fastened to the deck with three wood screws from below
(inside the cabin) and sealed with Sikaflex to the top of the deck,
forming a fillet around the base of the ring to keep water
out. The thickness of an SJ23 deck
adjacent to the mast is 5/8". Remember
to face the cap opening aft to keep spray out. Position the bottom
ring mounting screws between
the cap screws for maximum strength. The stainless steel inside finishing ring
also keeps the stack centered
in the deck hole and in the chimney cap. Use it as a template for
the bottom ring mounting screws. Judging
from the cap diagram the chimney stack ends right at the top, inside the cap.
This keeps the exhaust fumes from entering the cabin, protecting the
crew. With all the exhaust gas evacuated outside, the deck
hole should stay relatively cool. A favourite trick is to line the perimeter
of the deck
hole and wood ring with thin aluminum or stainless steel sheet
metal. The metal
reflects most of the radiant heat keeping the deck cool. This
is very important if you operate the heater for an extended time.
If the chimney
stack is a wee bit short of the cap then stuffing loosely crumpled
aluminum foil inside the deck hole should create a seal to prevent fumes from entering the cabin.
If you ever have to service the heater or the stack, remove
the heater from the bulkhead and allow the stack to drop out of the cap.
This maintains the water tight integrity
 of the cap to the deck. If you have to remove the cap
then release the three screws on top of the ring, leaving the wood
spacer ring
sealed to the deck. If the cap is sheared
off in an accident, seal the deck hole with a rag or tapered wood
plug. Now aren't you glad you sealed the edge of the deck hole with
epoxy!
TOP of the cap to the deck. If you have to remove the cap
then release the three screws on top of the ring, leaving the wood
spacer ring
sealed to the deck. If the cap is sheared
off in an accident, seal the deck hole with a rag or tapered wood
plug. Now aren't you glad you sealed the edge of the deck hole with
epoxy!
TOP
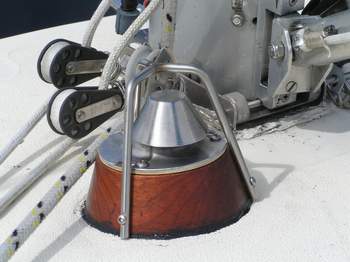
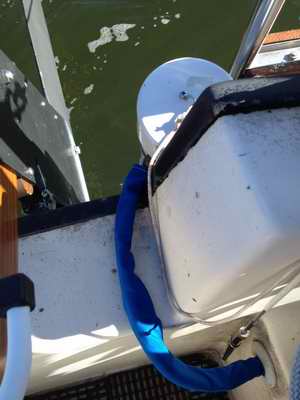
WHERE
TO INSTALL THE DECK CAP (Charlie Noble) -
Remember to mount the deck cap with the opening facing aft and to use a hard wood ring under the cap for thermal insulation to the deck. If you
sail in an area where you expect to receive lots of spray or solid
water over the deck, then make this ring at least 2" thick to
minimize the amount of water that can flow down the chimney. The higher
the cap is off the deck the less water you will take in.
Use Sikaflex to seal the
ring to the
deck. Coat the ring with Sikkens Cetol Marine as
this is the only finish that will survive the heat of the chimney whereas varnish will flow off.
Install guard rings over the deck cap so you have to
 make fewer
trips to release a snagged line. Keep in mind that the system isn't perfect!
I don't
want to hear any swearing about this! make fewer
trips to release a snagged line. Keep in mind that the system isn't perfect!
I don't
want to hear any swearing about this!
The cap at right belongs to Joe's boat. The cap to the left belongs to
Panache. The spacer and guard rings are
my design. For service I simply remove the guard rings and cap screws.
The spacer is fastened with screws from the bottom, inside the cabin, and sealed to
the deck with Sikaflex. I doubt the spacer ring will ever be removed.
The reason why I used such a thick spacer ring is to vent the hot exhaust above the deck lines.
If I ever kick it, well the spacer can stand up to the force better
than the cap and I will probably utter a few words in the process! So far it is totally
out of the way. I'm happy about this because I spent a fair amount
of time assessing this location, going through all my usual motions
and contortions.
I found this spot to
be ideal for both venting and foot clearance. It's not often that
you can satisfy all requirements.
TOP
|
|
Propane is a very convenient gas to use
in
North America. It is potentially dangerous on a boat since it is heavier than air
and will accumulate in the bilge creating a
very dangerous situation. Oh joy, another bomb waiting for a spark to ignite it!
For this reason the only place to store a propane bottle is where fumes can vent overboard. If you want to protect it from the heat of the sun
or hide it cosmetically then install it inside a propane storage locker that
is vented to outside the hull AND SEALED from the cabin. Since propane
gas is heavier than air the tank
must be installed high and the drain vent MUST be installed low, at the
bottom of the locker. The drain vent MUST also remain open when the boat is heeled.
This is one of those cases where the tank cannot be stored
low in the hull to become
part of the ballast. You also have to decide which type of tank to use;
disposable steel or refillable steel/aluminum, which determines where and
how it can be stored and how it is to be vented. This decision is not to be taken lightly.
A
propane tank must always be clamped vertical inside the locker to achieve
a gas feed from the top of the tank, unless you have a tank that is
designed to be installed horizontally. The first device connected to the tank
valve should be a pressure gauge to allow you to easily and frequently test
the gas distribution system for a leak. Immediately after the gauge, you should connect an electric solenoid
valve controlled by a gas detector for emergency shutoff. Finally there is the supply
hose to the appliance. The supply
hose
that is ported out through the propane locker wall, MUST go through a gas tight bulkhead fitting.
Consider one of the following
ideas for a locker:
LOCKER for 5lb BOTTLE THAT VENTS OVERBOARD - A good place to install a propane
locker on an SJ23 is inside the port locker just aft of the opening. Build a strong sealed box and mount it securely so it stays put,
(with a bottle in it), regardless of how much motion the hull goes through.
The
box MUST be 100% gas tight, including the fittings for vent hoses and the
forward facing door. The forward facing door should be easy to operate so you can
easily reach inside to operate the valve or replace the bottle. The box may be
made from fibreglass, heavy duty vinyl or plywood saturated with
epoxy. If you have to go through all the work of fabricating a
box then you may as well make it big enough to house a 5 lb refillable
bottle. Remember to leave room above the bottle for a pressure gauge, a shutoff valve
and your hand to operate the valve. The only acceptable method of venting
any locker
is from the bottom via a slight down sloping 1/2" ID hose.
Install
the drain vent fitting on the port side of the transom, away from the outboard
engine, just below the bottom of the locker and above
the water line on all angles of heel. Install
the inlet vent hose from the top of the locker to a
fitting installed high on the transom. It
is OK to include an upward loop in the top vent hose to prevent water from coming in.
Now your propane locker can vent
heavier-than-air fumes over the side, which is the safest place.
You should also
consider making the locker removable so you can crawl under the cockpit to inspect the
various nuts and bolts that go through the transom. This will
require some creativity on your part. LOCKER for 5lb BOTTLE
THAT VENTS INTO THE COCKPIT -
A variation on the locker described above is to vent into the SJ23 cockpit. This method
uses the cockpit drains to vent
the heavier than air propane fumes overboard. It is acceptable ONLY IF your cockpit drains go through the transom and you anchor bow into the wind. See Tech
Tip B17 for installing cockpit transom drains. In this configuration the bottom of the locker
must be about 1/2" above the cockpit sole. Drill
a 1" hole, about 1/2" above the cockpit floor, through the
cockpit wall into the propane locker. Cover the vent hole with a small stainless
steel clamshell vent. Fumes more than 1/2" deep inside the
locker,
can flow out the drain hole and down the cockpit drain. Thanks to
Jim
Thompson for this idea.
Just to be on the safe side, Jim also installed a Zintex propane/gasoline sniffer
in the cabin that
detects the smallest whiff of propane from careless operation of
the cabin heater. In two years of use his custom fuel locker has
been 100% effective at keeping noxious and dangerous fumes out of the
cabin as detected by the Zintex sniffer.
NOTE - While venting propane fumes into the cockpit may be acceptable if your cockpit drains
through the transom, any fumes lingering in the bottom of the locker could be blown into the cabin
with a following breeze. It's for this wind direction that I
caution you that a minor leak could develop into a major problem. (Murphy's Law). While many people have
used this technique with no problem, you should check your local regulations for storing
propane on a boat. It's just a tad important to stay in compliance
with your insurance requirements, never mind meeting St. Peter before your
allotted time.
5lb
BOTTLE CLAMPED ON TRANSOM
- A common place to clamp a 5 lb bottle is on the transom or stern rail. This is very convenient but not as elegant as a concealed storage compartment.
However,
it is definitely safe and not too difficult to install.
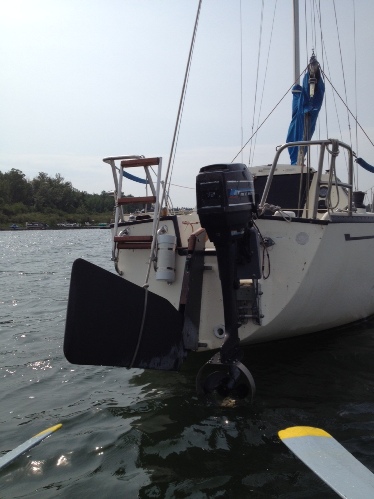
5lb
BOTTLE
MOUNTED IN THE ANCHOR LOCKER - Another ingenious
idea is to store the propane bottle in
the bow anchor locker. This is ACCEPTABLE IF the locker is totally sealed from
the rest of the boat AND the locker has an open drain hole to vent propane fumes overboard.
You must ensure that the drain hole is NEVER plugged with mud
or weeds. See Tech Tip B11.
As an added safety benefit, you should be able to smell leaking propane fumes
when
the bow is
upwind of you. Due to the humid conditions in the anchor locker,
it is best to use an aluminum tank.
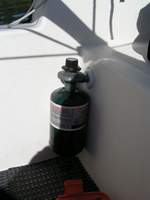
1lb DISPOSABLE BOTTLE STORAGE - If
you decide to use a disposable propane bottle because you don't want the complexity of
constructing a vented storage locker for a 5 lb bottle then consider one of the following
solutions. You will run out of propane one day, so carry a spare!
I hope that people store their disposable bottle in a safe place where
it
can vent overboard. Hardly anyone mentions this. I have no idea which regulation allows a retail store to
hold
pallets of full 1 lb bottles inside when at the same time they hold
pallets of 20 lb bottles outside. A leaking 1 lb bottle stored where it can bleed into the bilge can easily blow the deck off an SJ23. Think about this!
-
BOTTLE
BAG - Hang
a disposable propane bottle in a cloth bag from the stern rail or a
life line. Any fumes that leak will automatically spill outside
the hull to be blown away. These "bottle bags" are commercially
available at a chandler.
-
 4"
PVC STORAGE LOCKER - The horizontal PVC storage locker shown at
right is fastened to the swim grid with two stainless steel U bolts. Located here it can vent fumes overboard
while the boarding ladder affords some kick protection. 4"
PVC STORAGE LOCKER - The horizontal PVC storage locker shown at
right is fastened to the swim grid with two stainless steel U bolts. Located here it can vent fumes overboard
while the boarding ladder affords some kick protection.
This PVC tube is long enough to store two disposable bottles and being
white, stays cool in the sun. If you decide to store two bottles
in the tube then keep the vinyl caps on the bottles to protect the
thread. Unfortunately an SJ23 transom is too small for a two
bottle locker.
I'm not sure how this PVC tube vents. But knowing the owner that
is well taken care of.
- COCKPIT MOUNTED PVC LOCKER -
This is a variation of the storage locker shown above to test the feasibility of a PVC "cockpit propane locker". I wanted cabin heat for the end of the sailing season when I planned to do
some
interior work, this time with warmth!
 Later I made this locker functional to use
during the sailing season. I had no problems with it, although it took me a Later I made this locker functional to use
during the sailing season. I had no problems with it, although it took me a
 some time to stop kicking it! The propane bottle survived and it stayed cool in the hot sun. The
PVC tube has a false floor to keep the bottle up off the wet cockpit
sole. There were scuppers around the bottom of the tube to maintain
water flow to the cockpit drain. The wood cap kept the sun off
the regulator. I also removed the vinyl bottom from the steel
propane bottles to prevent rust. What made this design possible is
the small BBQ regulator equipped with a shutoff valve and some approved
brass adapters for the propane supply hose. Considering that this
bottle was permanently connected to my Cozy Cabin heater, I feel very safe with an accessible shutoff valve outside the cabin. However, I wanted to clear the cockpit floor so it was converted to a transom mounted version. some time to stop kicking it! The propane bottle survived and it stayed cool in the hot sun. The
PVC tube has a false floor to keep the bottle up off the wet cockpit
sole. There were scuppers around the bottom of the tube to maintain
water flow to the cockpit drain. The wood cap kept the sun off
the regulator. I also removed the vinyl bottom from the steel
propane bottles to prevent rust. What made this design possible is
the small BBQ regulator equipped with a shutoff valve and some approved
brass adapters for the propane supply hose. Considering that this
bottle was permanently connected to my Cozy Cabin heater, I feel very safe with an accessible shutoff valve outside the cabin. However, I wanted to clear the cockpit floor so it was converted to a transom mounted version.
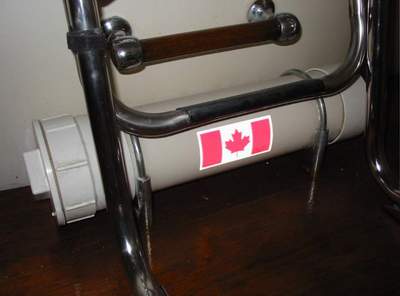
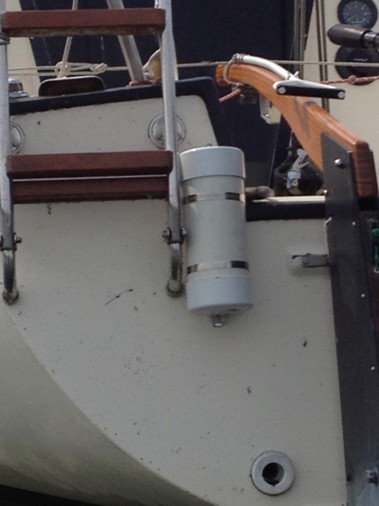
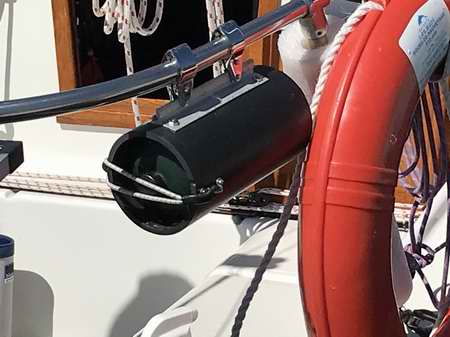
 TRANSOM MOUNTED
PVC LOCKER -
Similar to the cockpit PVC locker
above but installed against the outside of the transom where it can safely vent fumes overboard, is easy to access the valve and I can't stub my toes on it. White PVC stays cool in the hot sun
and doesn't deteriorate. The 4" diameter PVC locker
is
mounted adjacent to the boarding ladder with 3/8" clearance to the
rudder when the tiller is pulled hard over. TRANSOM MOUNTED
PVC LOCKER -
Similar to the cockpit PVC locker
above but installed against the outside of the transom where it can safely vent fumes overboard, is easy to access the valve and I can't stub my toes on it. White PVC stays cool in the hot sun
and doesn't deteriorate. The 4" diameter PVC locker
is
mounted adjacent to the boarding ladder with 3/8" clearance to the
rudder when the tiller is pulled hard over.
- Drill a 3/8" hole through the bottom end cap to vent fumes and
drain water. Glue the cap to the tube and install with the vent/drain
hole at the lowest position.
- Cut a (5/8x2)" slot down the top side of the tube for the
propane fittings to go through.
- An end cap pushed on the top makes a neat removable cap. When in
place it closes the top end of the slot, leaving a 5/8" square hole for
the propane hose fittings to go through.
- Secure the cap to the hull with a short line so you can't drop it
overboard.
- The exposed propane hose is covered with Sunbrella to protect it from UV
damage.
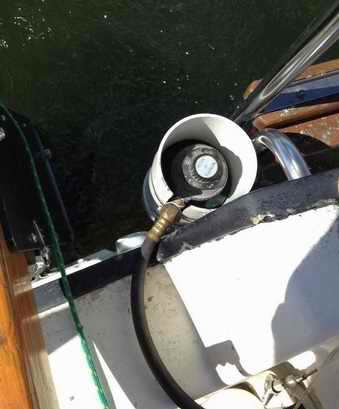
SAFETY FEATURE - When the gas valve on the bottle is open, place the PVC cap on the cockpit
seat as a
reminder that the gas is ON. Replace the cap after the valve is
closed. I set the regulator at low to control the fuel
flow at the heater.
- The
propane hose leads out of the locker, through the tiller slot to a hole at the back of the
cockpit seat (see photo below).
To replace the bottle, lift the cap, pull the bottle and valve
assembly out (there is enough slack in the hose), screw a fresh bottle to the
valve, slip the bottle in the locker and
push the cap back on. This is a
very safe, workable solution. I also like the fact that the cockpit
floor and drain hole is clear again.
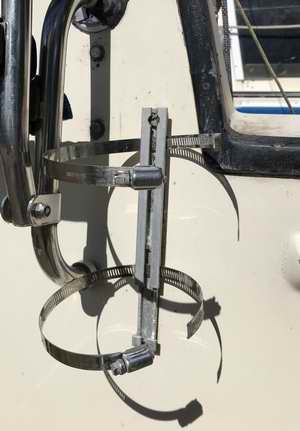
 4"
PVC STORAGE LOCKER - I'm not the only one who doesn't like storing propane in the cabin. John took the locker idea from
Panache to the next step by making a PVC storage locker that hangs
on the pushpit. Notice how well this vents from both ends. 4"
PVC STORAGE LOCKER - I'm not the only one who doesn't like storing propane in the cabin. John took the locker idea from
Panache to the next step by making a PVC storage locker that hangs
on the pushpit. Notice how well this vents from both ends.
PROPANE (LPG) SUPPLY HOSE INSTALLATION - Having
decided on a storage locker for your propane bottle, you next have to
consider the supply hose. Support and protect it along its full
length and you should only occasionally have to check it for chafe. This being the
case, it should be installed where it can be inspected easily. Consider the following
installation safety guidelines:
- If you install the heater on the cabin port bulkhead and the tank at the
transom, then the supply hose must be 20' long.
This
leaves about 2' of slack at the transom to replace an empty
tank.
- SETTEE HOLE - Starting from the heater on the port bulkhead, drill a
1" hole through the settee wall adjacent to the heater. The hole must be big enough to accept the hose
connector.
- SETTEE TRAY - Install a "wood tray" to support the supply hose along the inside of the port settee.
Position it high and away from stored
items. Make the tray from two 42" long lengths of wood so they can slide
in through the settee holes. Fasten it with stainless wood
screws through the settee wall.
- LOCKER BULKHEAD - Drill a 1" hole through the bulkhead at the forward end of the port
locker. The hole must be aligned with the wood tray to eliminate
stress and big enough to accept the hose
connector. This bulkhead consists of 1/4" plywood coated on
either side with fibreglass. For this reason seal the plywood
with epoxy and inserts a fitting to eliminate chafe. Seal this hole for water leaks after the hose is
installed.
- COCKPIT TRAY - Install a "wood tray" to support the supply hose along the inside of the port
locker. Position it high and away from stored
items. Make the tray from a single length of wood so it reaches
to the aft end of the locker. Fasten it with stainless wood
screws through the locker wall.
- COCKPIT HOLE - At the aft end of the port locker drill another hole to exit the hose
to the tiller slot. From there the hose lays in the tiller slot
and connects to the propane bottle.
- PROPANE HOSE - Propane hoses are manufactured in multiples of 5'. For
marine compliance the hose MUST
be continuous (one piece) to eliminate any hidden couplings that can
leak propane into the bilge. No point in joining the heavenly hosts
before your time! Buy a commercial made hose with crimped
fittings for peace of mind AND compliance with your insurance
policy.
NOTE - Cover the exposed hose with
Sunbrella to protect against wear and UV.
- The preferred supply hose is a UL listed thermoplastic LPG hose
because it can't corrode or develop stress or fatigue cracks like
rigid copper tubing can. It is also easier to install than rigid
copper tubing.
- A commercial made hose is fully assembled with solid brass
fittings and leak tested to 100 psi. Specifications are: 1/4" ID
with a 3/8" female swivel flare fitting on the heater end. The tank end fitting
must be
ordered to fit either a POL or the disposable bottle type
connecter. Adapters are available to convert a fitting but using
one on a boat would be violating the marine compliance.
CARBON MONOXIDE - A carbon monoxide detector is
recommended in the cabin to warn and protect the occupants. More heavenly
host advice!
OXYGEN CONTENT - The Force 10
propane heater consumes cabin air and is equipped with an oxygen
depletion device that shuts off the heater when the cabin oxygen
level falls below 95% of normal. Mine works very well.
NOTE - If you want to see how quickly the oxygen level in a cabin
can drop, just close all the openings and light a few lanterns.
Now
watch the flames lower in about 5 to 10 minutes. The amount of time
this takes depends on how many flames are burning and how quickly people
consume air in the
cabin; i.e. how quickly the oxygen content is reduced. If you open
the sliding hatch the flames will pop up instantly to normal height.
If you stick your head outside the cabin just then, you will
experience that rush of fresh air going into your lungs that feels
so refreshing. What's interesting is that humans can survive at the
lower oxygen content at which a flame cannot burn. However, with
time you will feel lethargic which is a dangerous situation to be
in.
If your internal
tank is not
vented outside the hull, please install vents
immediately. I prefer not to read about an SJ23 sailor in the
obituary column! Besides, it's too nice a boat to blow up!
TOP
|
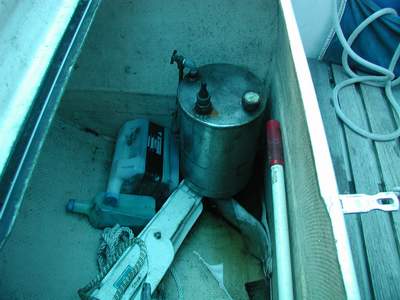 The
diesel/kerosene pressure tank is best installed in the port locker,
up off the floor so it stays dry and where the air pressure pump is easy to
reach. This is also a relatively safe place to fill the tank since
a fuel spill stays inside the locker where it can be wiped up and fumes
can
evaporate outside the cabin. The fuel system operates at approximately 30 psi so all
hoses and fittings must be in
good order.
The
diesel/kerosene pressure tank is best installed in the port locker,
up off the floor so it stays dry and where the air pressure pump is easy to
reach. This is also a relatively safe place to fill the tank since
a fuel spill stays inside the locker where it can be wiped up and fumes
can
evaporate outside the cabin. The fuel system operates at approximately 30 psi so all
hoses and fittings must be in
good order.