| SJ23 Tech Tip B11, (Updated 2024-04-21) Bob Schimmel | |||||||||||||||||||
|
Anchor Locker -
Foredeck Conversion & Common Issues. |
|||||||||||||||||||
 NOTE
- "I no longer have any intention of building a deck locker access for Panache but have
left the info here for your consideration.
My original plan was to cut the deck open early in
the Spring then epoxy the edge of the hole during the warmer weather. When I
realized how much time the job would take from my short sailing
season I opted for a bow roller that I could fabricate over winter along with
a removable inside anchor storage shelf. See
Tech
Tip B26. NOTE
- "I no longer have any intention of building a deck locker access for Panache but have
left the info here for your consideration.
My original plan was to cut the deck open early in
the Spring then epoxy the edge of the hole during the warmer weather. When I
realized how much time the job would take from my short sailing
season I opted for a bow roller that I could fabricate over winter along with
a removable inside anchor storage shelf. See
Tech
Tip B26.While this
deck locker project is feasible, (one boat was converted), I now think this conversion is of questionable value given the
small volume of the locker due to the forward
sloping bulkhead of the first production hulls.
Have you ever wanted a
bow anchor locker in your first production SJ23? The convenience and safety of being able to store
your anchor where it's needed it not to be understated. Despite the fact that Panache has an
excellent anchor roller, she can't hang on a mooring with the anchor on
the roller. The anchor stock will saw through the two mooring lines
laid over the rollers. Not good!
Other style bow rollers would have the same problem. This forced me to
temporarily store the anchor on the cabin sole, a location that was real
nasty on my toes and a nuisance when storing anything there.
That was then. Today
my anchor is stored on a removable shelf at the forward end of the V berth.
It was a temporary solution that has become permanent. When I'm
in cruising mode it goes to the bow roller.
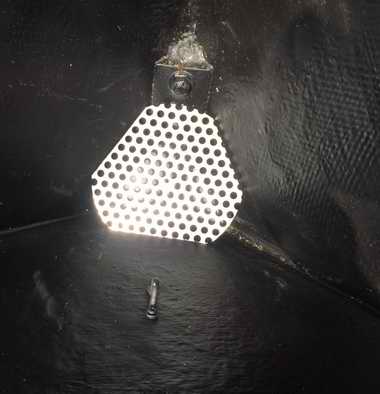
The bitter end of the 25' anchor chain hangs inside the hawse hole from a
clevis that is slightly larger than the 1.25" inside diameter of the hawse
hole. I
simply flip up the hawse cover, reach in to pull up the end of the chain,
attach it to the anchor stock and When the anchor was stored on Panache's floor I longed for a locker
with a deck opening. But I put this conversion
on the back burner because I thought that cutting a hole might
weaken the bow. That is, until I discovered that all later productions of the
SJ23 Mark I have a factory installed bow anchor locker. All right, so there is hope after all.
However, there is a hitch (like you didn't expect
this?). There are two factors that make a factory deck
anchor locker possible. The top of the anchor locker bulkhead is bonded to the
under side of the deck to maintain the hull strength (Titanic style bulkheads are
frowned upon
today!) and the bulkhead is sloped 50 aft, into the
cabin. The aft slope creates a big
deck hole to stuff an anchor through without sacrificing the
forward berth space.
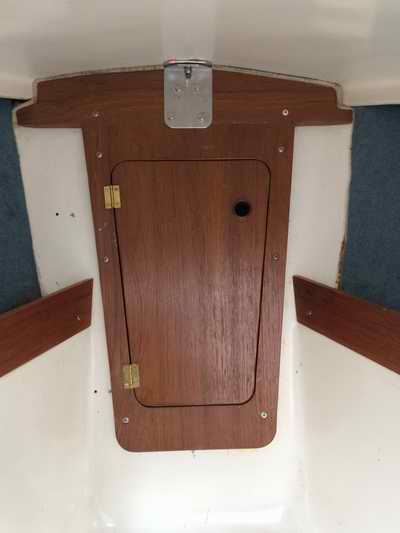
The photo at left is from a Mark
II SJ23. This is the "convenience feature"
that the later version SJ23 owners take for granted. The locker is huge
as it can easily store 200'
of line, 20' of chain and a 5Kg Bruce anchor with room to spare for a
small propane bottle. See
Tech Tip C07. Note the bungee cord tied to the bottom of the lid. The tension
keeps it in place.
The anchor locker bulkhead of the
original SJ23 is actually the
fibreglass
hull liner wrapped around the front with an access hole cut through it.
There is at least one layer of 2" wide 1.5 oz roving in the locker to
bond the bulkhead to the hull. It was painted over with interior
gel coat. Foamy mush was sprayed between the liner and the hull
for rigidity. The hull liner was coated
on the cabin
side with gel coat to improve appearance.
People are finicky about silly things like this!
The
bottom of the locker is flat and the bulkhead slopes forward at (200).
A
1" wide
air gap above the
bulkhead was cosmetically closed
with a piece of teak faced plywood
screwed to the cabin side of the bulkhead. More people
finicky stuff. The centre of the bulkhead was cut open to
create a submarine shaped
access hole to the
locker.
Judging from the irregular cut of the hole, it was done after installing
the liner.
I think it is was through this hole that the
In
subsequent builds (don't know what hull number) of the SJ23 the flat bottom of the locker was
eliminated by moving the bottom of the bulkhead forward to the stem and sloping
the top of the bulkhead aft 50 to
create more deck space for the lid. The full
perimeter of the solid bulkhead was fibreglassed to the hull and deck to
create a water tight seal and
to stiffen the forward portion of the hull.
The bow hardware and
the nuts were tightened through the deck hole. The fasteners are quite easy to reach so the factory no longer needed the tall skinny kid! See how a simple design change can improve things for both the factory and the boat owner? I have no idea at which serial number the switch over was made. |
|||||||||||||||||||
|
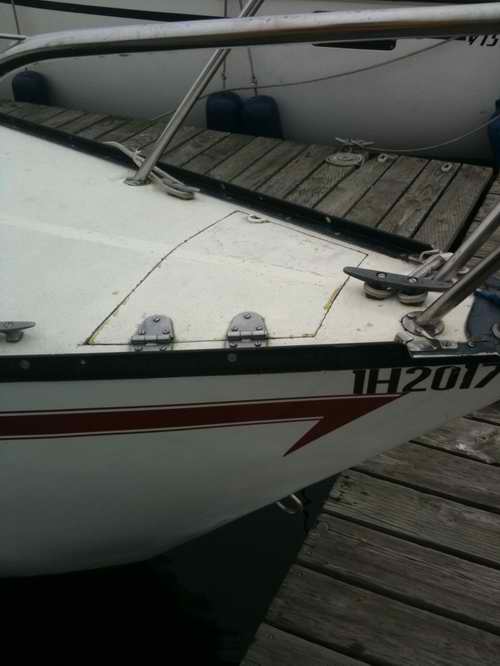
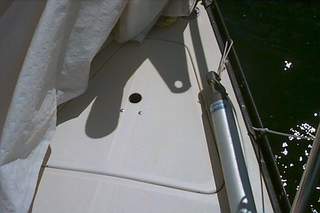
Since early and late production SJ23s have identical hulls, there is no fear of weakening the bow of an early version boat by cutting a hole in the deck. The photo shown below is of an early production Mark I SJ23 that was modified and raced for many years. While the corners of this locker hole were cut square you should cut radius corners to prevent stress cracks. Having said this, the hull is still as solid as the day it came out of the factory. Panache is hull #109 with a forward leaning bulkhead and the lid dimensions for her potential locker are shown at right. The drawing is not to scale or perspective. Before you cut the hole you must determine if your anchor can fit through it. This is where a template becomes a really effective tool to determine feasibility, size and position. Fold the template in half along the fore/aft dimension to ensure it is symmetrical. Draw a center line along the fold and use it to align the 'lid' along the center line of the hull. This way you can position the hole on the deck without optical illusions affecting your judgment. Equal spacing to both toe rails is important. There is nothing worse than a really good job that isn't laid out symmetrical. Planning and execution are everything. If your deck hardware is installed inside the lid dimensions, I see nothing wrong with relocating the hardware, scaling the hole down or beefing up the hardware mounting on a skinny place. Remember to leave enough deck surface to support the hardware for its intended load and ensure that you can slide your anchor through the locker hole BEFORE you cut the deck! Apply 4" wide masking tape
on the deck where the outline
of the hole will be drawn. Trace
around the template for the cut line. The
4" wide masking tape on the deck
will also prevent the jig saw from marring the gel coat with black skid marks. Drill a sequence of
tiny holes along the line to start the cut. If you start at the
anchor line hole the messy start marks will be
removed with the material. Use a new double
cutting jig saw blade. This style
of blade cuts both up and
down, leaving an extremely
NOTE: The cut line should be as narrow as possible to prevent the lid from sliding sideways in the hole. This helps to protect the hinges if you install them. Also a good reason for a latch on the opposite side.
You must seal the exposed cores as soon as possible. I prefer to undercut the exposed edges (the dark grey sections in the diagram above) about 1/8," leaving the top skin intact. Use a Dremel tool with the router attachment for this job. Then epoxy the support lip to the underside of the deck and apply a coat of unthickened epoxy to all core material. This will create a 1/8" deep "groove" that will be easier to fill since the "top skin" and "bottom lip" will contain the fibreglass and epoxy filler. Fill the gap flush to the edge of the top skin. Seal the undercut edge of the lid using the same technique. You won't have the benefit of filling a "gap" but you can create a temporary one with thin plywood clamped to the underside of the lid. Cover the plywood with wax paper to prevent bonding. Remember to create a 1" diameter hole at the forward edge of the lip and lid for the anchor chain/line. Round the corners of the lip slightly so the gel coat will stick. Finally cover all repaired surfaces with gel coat to protect against UV damage.
SECURE
THE LID - There are
couple of popular
ways to open and secure the locker lid. Many people leave the lid
to float free in the deck recess and secure it down with a bungee
cord. This requires an eye
strap attached to the bottom of the lid and another near the middle of the
bulkhead. The bungee cord must have sufficient tension to hold the lid down when the boat is heeled.
See photo above. It is can be
lifted from the finger hole in the
center of the lid.
CLOSE THE TOP OF THE BULKHEAD TO THE DECK -
Having cut a deck hole it is
now quite easy to access the forward side of the bulkhead. There
is a 1" wide air gap above the bulkhead that must be bonded to the
ceiling so the deck is structurally strong
enough to support an adult. You can do this by inserting a section of formed fibreglass
board and epoxy it to the locker side of the bulkhead. Roughen the inside of the bulkhead
with a hand grinder. Wear a mask as this is very dusty. The cabin access hole
through the bulkhead must also be closed to keep water out of the cabin.
Piecemeal fibreglass
work can be very tedious and messy. Fact is, you
will likely leave a tiny hole somewhere so water can drain into the bilge.
Not good! For this reason I'd be tempted to
seal the hole and reinforce the deck
with a single section of fibreglass board. Seal it with Sikaflex
and secure it with nuts and bolts all around. After all, the butyl rubber at
the toe rail holds the majority strain of an SJ23 together, not the bolts.
See Tech
Tip B16. DON'T leave any rough edges exposed inside
the locker. They will snag the anchor line and do God knows
what else at the worst possible time. Verify that the sides of the
bulkhead are sealed to the hull.
Finally, install a nice section of teak plywood on the cabin side to
cover the repairs. If you want to get real fancy you could build a
shallow cabinet to store little things that you will never use!
Finishing trim like this satisfies the finicky people and adds value.
|
|||||||||||||||||||
|
IMPORTANT:
If you perform this modification, it is imperative you fibreglass the
full perimeter of the locker bulkhead to the hull & cabin ceiling to strengthen the deck and maintain
the water tight integrity of the cabin. You must also confirm that
your anchor will fit through the new deck hole and that all of your anchor line fits inside the locker. Please follow ALL the steps listed above and any
other that you think may be necessary. You only get one chance to
royally screw this up! Don't create another Titanic by leaving the top of the
old bulkhead open! Do this job correctly.
If you are successful, please
email your
photos to me. |
|||||||||||||||||||
|
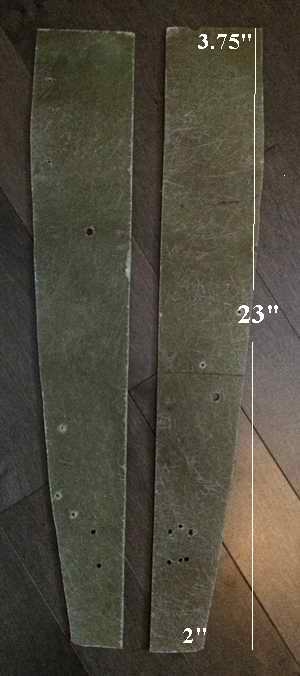
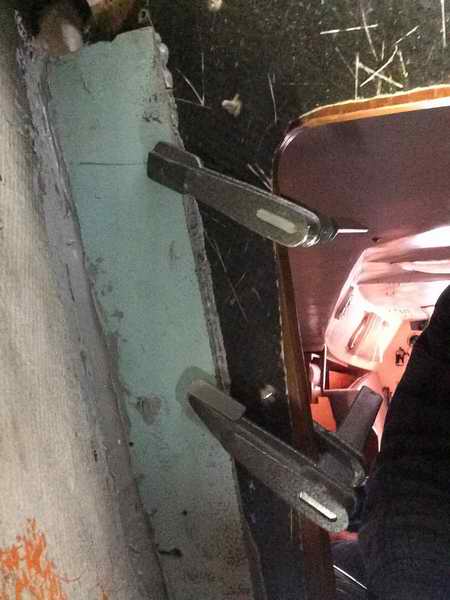
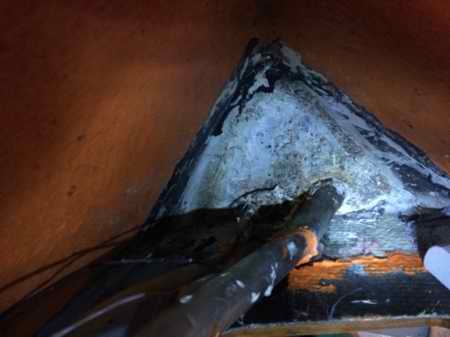
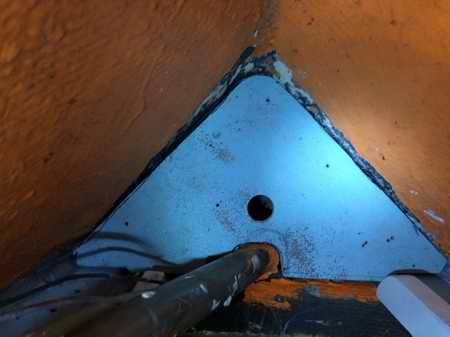
To effect a repair I opened the drain hole and removed the false bottom. While dry fitting a new 1/4" thick fibreglass bottom I discovered the lower sides of the bulkhead (below the top of the 2" wide ledge in the forward berth) are not extended to the hull. This triangular gap is 2" wide at the top and tapers 12" down to 1/2" wide at the bottom. You have to get your head really deep inside the locker to see this. What a surprise after all these years. These 2 passages let water flow directly from the locker to the bilge. Prior to capping the gaps I removed a lot of my water proof orange fire retardant coating with a knife, chisel & rotary wire brush. This is a tight spot so a rotary brush with a small drill was the easiest way to go. Cardboard templates ensured the new fibreglass caps would fit. They are a mirror image of each other. At this stage of the job the dry fitting of components is complete as is a dry run for applying the sealant. The combination of foam and fibreglass board will seal the locker and strengthen the bulkhead to support the deck mounted pad eye as in Tech Tip F36.
EPOXY - If you want to epoxy the board to the hull use thickened epoxy so it sticks to a vertical surface. If your fiber board is too thick for the cloth to easily conform over the edge, taper the edge of the board down to 1/8" to form the fibreglass cloth over. The installation procedure is similar to that using sealant with a few epoxy type exceptions. Using epoxy is a far more complex process. Wear gloves or a mask where required for the following steps.
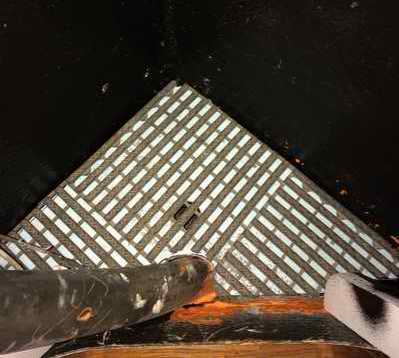
FALSE BOTTOM - Since Panache's anchor locker has a flat bottom that can collect water I installed a sloped false bottom of fibreglass board above it to direct water to the drain hole. The false bottom rests against the walls and is removable for service. DRAIN HOLE - Drill a 1/16" hole at the lowest spot inside the locker. This is the surest and easiest way to drain the locker drip dry. Drill out through the stem, perpendicular to it, sloping downward. Drill this pilot hole very slowly so you don't "blow out" the gel coat on the outside. Damage to the gel coat can be minimized with masking tape on the outside and by holding a backing block of soft wood against the stem to drill into. Enlarge the hole to an adequate flow size by step drilling from the outside with a 3/16" bit. Again, drill slowly. Seal the inside of the hole with epoxy using a pipe cleaner. It's my experience that a 3/16" hole is large enough to allow most debris to dribble out without plugging the hole. But size the hole to suite your local requirements. It all depends on how clean the anchor line is when you stuff it in the locker. The factory drain hole was 1/4" ID.
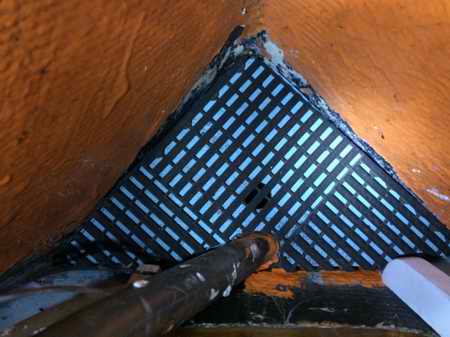
WATER PROOF THE INSIDE OF THE LOCKER (2024) - During 1999 I sprayed the bottom portion of the locker with a fire retardant coating to seal the fibreglass from water. I wish I could remember the name because it does an amazing job of keeping the fibreglass dry. In the cured state it is a bit spongy and tough as nails. Then in 2014 I was given a long anchor line that would easily fill the locker. So to expand the water proofing to the top of the locker I sprayed
a coat of tough truck bed liner in the locker, top to bottom. An aerosol can is perfect for
this application. Just as long as the bed liner you use can stand up to the regular dousing of water and abuse from the line, chain and anchor. Frankly I think the back of a pick up truck takes a worse beating than an anchor locker which is why I didn't hesitate to use truck bed liner. The alternative to the spray coating would be to apply a coat of Interlux Bilgekote paint. Use white so you can see inside the locker. Bilgekote demands a bottom temperature of ~5C. Thorough preparation will be everything for success. CONCLUSION
- Voila,
now you have a foredeck anchor locker that can hold 200' of
1/2" line plus 20' of 5/16" chain and an anchor. As a
rule of thumb, the minimum length of chain should be equal to the length of the
hull. You might even find enough space to store a second anchor
line (in a bag) when you need to deploy two anchors to keep from "sailing"
at anchor during a blustery night. |
|||||||||||||||||||
|
Return to Tech Tip Index. . . . . . . . . . . . . . . Have a Question? |
|||||||||||||||||||
 I'm in business. Very convenient
and it sure beats trying to find the end of a chain in a bucket. From
my point of view, removing the anchor from
the cabin sole was like increasing the floor space!
I'm in business. Very convenient
and it sure beats trying to find the end of a chain in a bucket. From
my point of view, removing the anchor from
the cabin sole was like increasing the floor space! 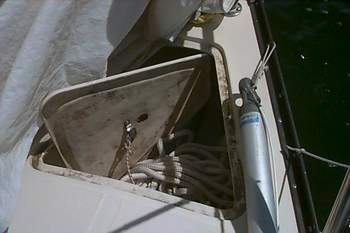 Panache's bulkhead slopes forward 200, making for
a small anchor locker of questionable value. The bulkhead I'm
referring to is the dividing wall between the locker and the cabin.
Panache's bulkhead slopes forward 200, making for
a small anchor locker of questionable value. The bulkhead I'm
referring to is the dividing wall between the locker and the cabin. 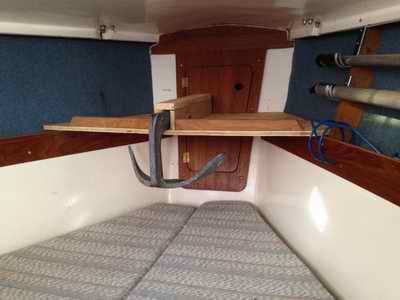 ANCHOR
LOCKER HISTORY
- "The anchor locker came along with the newer
interior pan, probably in 1989 or so, with a minor modification to the deck
and a removable locker lid. I tooled the interior mold but not sure if
I did the locker lid. You can tell the difference between the old and
new interiors easily. The new has a locker lid on the bow, leading into the
anchor locker that has less than adequate space for enough rode and
anchor due to the pointy bow. The bulkhead seems to suffer abuse easily.
The newer interior has some marked improvements, though: the space
under the V-berth hatch is a molded/bonded fibreglass box that adds
stiffness to the forefoot of the boat, and the sleeping platform where
it bonds to the hull is wider with more surface area. It stiffens the
rather flat bow sections with little added weight. I think there
are a few little tweaks in the main cabin and quarter berth as well.
Second generation tooling is a nice place to make little changes. I was
not too enthusiastic about the anchor locker idea: the 28 has it, but
there were market pressures to conform to what an interior designer
thinks a boat should look like. The one who writes the checks makes the
final value judgements, so I just built it. Perhaps a viable
solution is to move the anchor to the stern and use the bow for some
other storage purpose. Most know that I am an anchor from the cockpit
guy, with safety and simplicity in mind, and then tethering off the bow
when all gets settled. Not as pretty and yachty as a little boat towing
a beautiful little dinghy behind on a calm sea, but then again, I don't
tow stuff either. For good reasons. Keep sailing."
Gleno
ANCHOR
LOCKER HISTORY
- "The anchor locker came along with the newer
interior pan, probably in 1989 or so, with a minor modification to the deck
and a removable locker lid. I tooled the interior mold but not sure if
I did the locker lid. You can tell the difference between the old and
new interiors easily. The new has a locker lid on the bow, leading into the
anchor locker that has less than adequate space for enough rode and
anchor due to the pointy bow. The bulkhead seems to suffer abuse easily.
The newer interior has some marked improvements, though: the space
under the V-berth hatch is a molded/bonded fibreglass box that adds
stiffness to the forefoot of the boat, and the sleeping platform where
it bonds to the hull is wider with more surface area. It stiffens the
rather flat bow sections with little added weight. I think there
are a few little tweaks in the main cabin and quarter berth as well.
Second generation tooling is a nice place to make little changes. I was
not too enthusiastic about the anchor locker idea: the 28 has it, but
there were market pressures to conform to what an interior designer
thinks a boat should look like. The one who writes the checks makes the
final value judgements, so I just built it. Perhaps a viable
solution is to move the anchor to the stern and use the bow for some
other storage purpose. Most know that I am an anchor from the cockpit
guy, with safety and simplicity in mind, and then tethering off the bow
when all gets settled. Not as pretty and yachty as a little boat towing
a beautiful little dinghy behind on a calm sea, but then again, I don't
tow stuff either. For good reasons. Keep sailing."
Gleno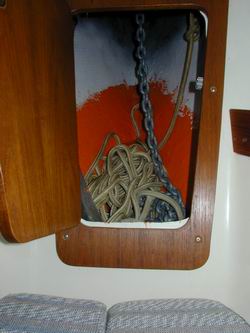
 SUPPORT
THE LIP - Fabricate a very strong
one piece lip to
support the locker lid at the perimeter of the hole and to restore most
of the
strength to the deck. The lip must be strong enough for a crew to stand on
with no hint that it will give. A lip can be made
from 1/4" thick 2.5" wide fibreglass or plywood saturated in epoxy.
It must
fit flush with the underside of the deck for maximum strength so remember to allow for the
curvature of the deck. Regardless of which material you use
for the lip, select a suitable thickness appropriate to its
strength. If you
prefabricate the lip as a complete assembly, it will be easier to shape
and align to the opening than
to struggle with
individual pieces. A single piece will also shorten the job of
sealing the exposed wood core in the deck. Fit the lip in place so it protrudes equally
into the
hole, about 1/2" all around.
Remember the dock watchers! Use
lots of clamps to hold it in place while the epoxy cures. The end result of superior workmanship is
a reinforced deck and lip that are strong enough to stand on. A rubber gasket is not
required as water will flow out the drain hole.
SUPPORT
THE LIP - Fabricate a very strong
one piece lip to
support the locker lid at the perimeter of the hole and to restore most
of the
strength to the deck. The lip must be strong enough for a crew to stand on
with no hint that it will give. A lip can be made
from 1/4" thick 2.5" wide fibreglass or plywood saturated in epoxy.
It must
fit flush with the underside of the deck for maximum strength so remember to allow for the
curvature of the deck. Regardless of which material you use
for the lip, select a suitable thickness appropriate to its
strength. If you
prefabricate the lip as a complete assembly, it will be easier to shape
and align to the opening than
to struggle with
individual pieces. A single piece will also shorten the job of
sealing the exposed wood core in the deck. Fit the lip in place so it protrudes equally
into the
hole, about 1/2" all around.
Remember the dock watchers! Use
lots of clamps to hold it in place while the epoxy cures. The end result of superior workmanship is
a reinforced deck and lip that are strong enough to stand on. A rubber gasket is not
required as water will flow out the drain hole.