| SJ23 Tech Tip C16, (Updated 2004-12-291) Bob Schimmel | |||
|
Companionway Bug Screen. |
|||
 It should go without saying that if you want a restful
sleep, it's a "good idea" to keep the "skeeters" out. Those
pesky little bugs are out for blood and just don't let up! Closing the companionway with the
drop boards is not the answer because the heat and humidity build up in
the cabin,
both of which attract mosquitoes. Therefore, you must have adequate
ventilation to cool and dry the cabin on those hot, sticky summer nights. In some cruising areas the value of a good bug screen
is worth its weight in gold. I can think of a couple of places on our lake that qualify. It should go without saying that if you want a restful
sleep, it's a "good idea" to keep the "skeeters" out. Those
pesky little bugs are out for blood and just don't let up! Closing the companionway with the
drop boards is not the answer because the heat and humidity build up in
the cabin,
both of which attract mosquitoes. Therefore, you must have adequate
ventilation to cool and dry the cabin on those hot, sticky summer nights. In some cruising areas the value of a good bug screen
is worth its weight in gold. I can think of a couple of places on our lake that qualify. A good method of sealing a
flexible bug screen to the companionway sides is to glue a strip of Velcro,
the "hook" (soft) side, all around the opening and another strip, the
"eye" side, to the perimeter of the screen. It is fairly easy
to put the bug screen in place and it can be rolled up for compact
storage. Knock off the morning condensation. While Velcro is a wonderful
product on a flexible surface, it detaches all too easily from a rigid
surface like the side of the companionway that gets rubbed. Once it comes lose from the gel coat, you have no way gluing it back on while out on the water. (I don't know why but the hook side stays fastened longer than the
eye side). The best luck I have had is to first sanitize the surface with acetone. The hook side of Velcro also snags
sweater fluff, leaving a messy appearance and separating the Velcro
strips is the LOUDEST sound in
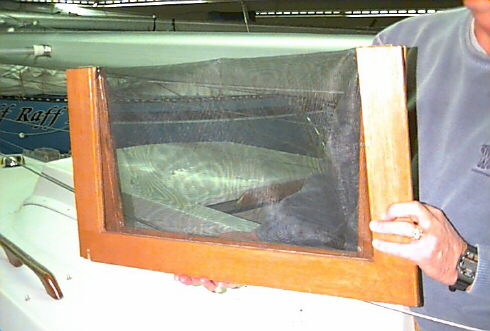
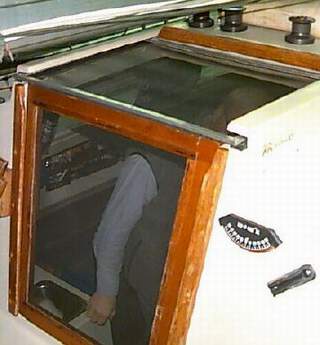
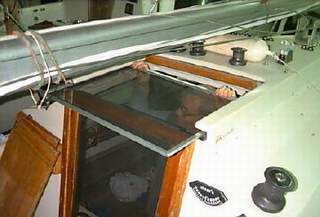
the middle of the night. Shown here is an excellent one piece wood framed screen that fits snug in the companionway. The owner also has a top screen for extra ventilation since it can pass a terrific amount of heat, which is something to consider on a hot sticky night. If you think it might rain overnight then pull a tarp over the boom before you go to bed. The top screen is framed in aluminum to fit in the narrower sliding hatch track. This is a Mirage 27 that incorporates an acrylic slider into a storm hood. The screen was made by a local glass shop that specializes in window repair. It's actually not difficult to make yourself as the parts are available in many home repair depots.
At right is another variation on a bug screen. This person folds it for compact storage. The hinges are hidden on the inside to keep them out of the weather. He protects the screen from impact damage with a light rigid case.
_____________________________________
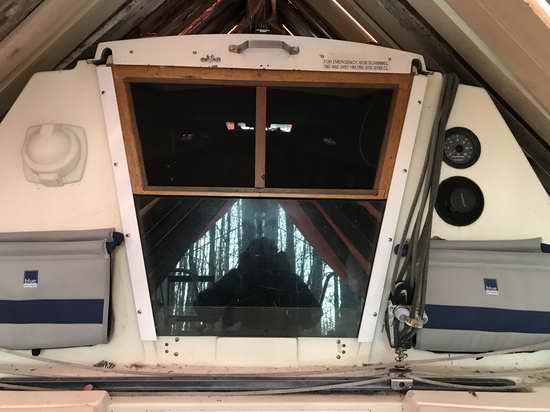
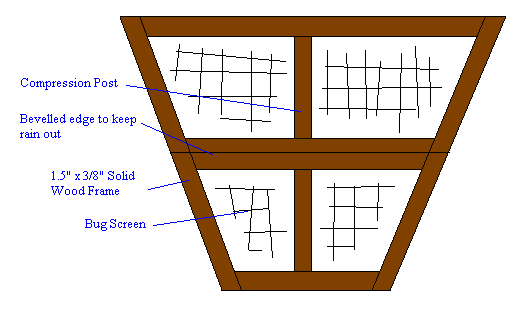
I built a two wood framed bug screens, the same size and thickness as the existing drop boards, so they fit snug inside the drop board tracks for quick deployment. This way I can interchange them with the top or bottom drop Plexiglas boards to deal with most any weather or privacy situation. The photo at right was taken during winter storage before I built the squirrel proof winter storage version of it. The frame is constructed of (3/8 x 1.5)" hard wood. It really doesn't matter which type of wood you choose but since it's only 3/8" thick, make sure there are no knots. Glue the joints for strength and coat the wood with your favourite stuff to protect it from the weather. Make sure to coat the inside of the groove to prevent rot. I used tung oil because it is easy to recoat in low temperature. It is also tough and doesn't blister in the sun. After the coating is dry, its time to stretch the screen over the frame.
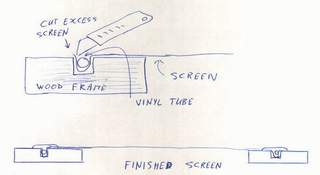
The vinyl bug screen can be attached to the outside of the wood frame in a fashion similar to a screen door on your house. Use a router to bore a 1/8" wide and 3/16" deep groove all around the frame, about 3/8" from the inside edge. The dimensions of this groove are proportional to the thickness of the screen material and diameter of the vinyl tube that holds it in the groove. Experiment on a piece of scrap wood. Use a bug screen roller to depress the screen to the bottom of the groove, followed up with pushing the tubing in the groove. Cut off the excess screen material with a razor knife as shown here. It is advisable to have a compression post in each frame so the screen material doesn't pull the long horizontal sides of the frame together. If it does, it will create a gap between the lower and upper sections, which is tantamount to leaving the front door open to mosquitoes. I believe the whole idea is to keep the pests out!! Install your screen so the mesh is parallel to the wood frame. Crooked mesh looks tacky. The vertical compression posts also provide strength when leaning on it while in the companionway. Little details that I thought of after I built mine. If you wish, you can cover the groove with wood moulding for a finished appearance. I left my groove exposed because the appearance is not objectionable and two smooth sections can store flush against each other without damage. Some day I may build a storage box under the cockpit but so far they have survived quite nicely leaning against the side. Remember that the sliding hatch is not sealed at the front or at the top corners of the companionway. See Tech Tip B4 for sealing this part of the sliding hatch. |
|||
|
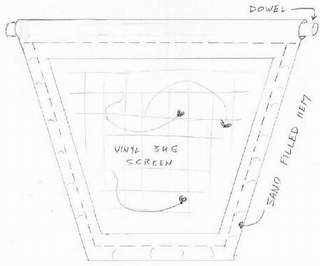
Sew a 1.5" wide hem of acrylic all around the screen. Fill the bottom hem with sand or lead pellets to the density of a bean bag to keep the sand from shifting to one end. If you overfill the hem it will become too stiff for folding. Fill the side hems with flexible foam that can be jammed into the grove to create a seal. Insert a dowel through the top hem to hang the screen in the companionway. The weight of the sand should keep the screen in place and hence, the "skeeters" out. Rolling it up is probably the best way to store it. |
|||
|
FLEXIBLE SCREEN for FORWARD
HATCH - Go to Tech Tip C25. |
|||
|
Return to Tech Tip Index. . . . . . . . . . . . . . . Have a Question? |
|||
 I have yet to go through the companionway
without letting a mosquito in because it takes too long to set the
screen
back in place! Hence my desire to build a rigid bug screen that is
easily picked up and quickly set back in place, with minimal noise.