| SJ23 Tech Tip E05, (Updated 2021-09-30) Bob Schimmel | |||||
|
Install a Depth Sounder. |
|||||
| There are two things to consider when replacing a depth sounder; installation
of the bulkhead display and the location of the transducer.
DISPLAY - Consider yourself lucky if you can buy a replacement depth sounder with a display that fits in the same size hole as your original. There is some obscure law of technology evolvement that states a device must get smaller with time. Problem is that as a device gets smaller the aging population has difficulty reading the small font. To maintain functionality in a small unit a manufacturer will add "multi-function" switches that unfortunately sacrifice simplicity. This combination guarantees frustration for a user during an emergency. Best to take the time to read the manual and add extra labelling to satisfy your needs because this problem ain't going away. Take heart. New instruments are more water tight, consume less power and have greater functionality. You just have to use some clever thinking to install the smaller display in the larger hole. There are a couple of choices;
I choose the latter option because my colder climate in the shoulder seasons does not give me the luxury to spend oodles of time to cure epoxy and repair gel coat outside. It would be easy if I had a heated shop to put the boat into but working in the bush is just too much. So I opted to make an acrylic plug because I always wanted a wee bit of a window to the cockpit anyway. I chose 1/2" smoked acrylic because it matches my companionway drop boards. A word of caution about night sailing with a clear acrylic "window." Remember to switch off the cabin lights or run red lights otherwise the light shining in your eyes may affect your night vision! I've never had a problem with smoked acrylic though. As an alternative you could use wood or UHMW.
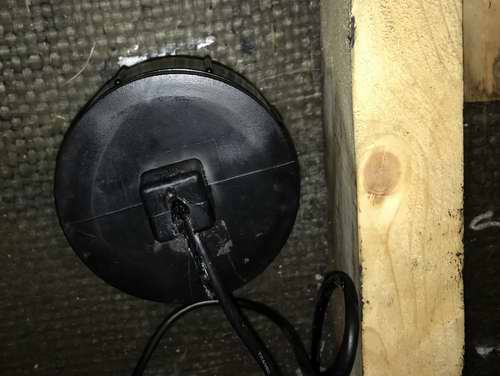
So that's it. Now all you have to do is install the wires and fasten the transducer to the hull. Below you can see the sounder installed from inside the cabin. The wiring is finished so it gives you a good idea what it looks like. I will likely cover the back of the display with a paint spray can lid or similar cap if for no other reason than to muffle the power on and alarm beeps a bit. Wow is it loud in the cabin. I don't mind the alarm being loud but the power on can easily be 10dB quieter. The terminal strip to connect the display power is just visible below the radio. Each terminal will be labelled to facilitate repair. I hate having to reverse engineer one of my installations especially when labelling is so easy while it is fresh in my mind. Not getting any younger! WINTER
STORAGE - "The HawkEye D10DX display is rated for storage at -400C. The
liquid crystals in the display will return to normal operation
once the display is above freezing, with no abnormal effects. The
transducer in our lab is regularly subjected to -400C and tested for operation
afterwards." NorCross Marine. ______________________________________________________________________
To begin with, you don't have to drill a hole through the hull to achieve good performance. If you are like me, I dislike having another hole through the hull just to measure the depth of the water. Another hole is simply another step closer to sinking a boat! I would rather heave a lead line than drill a hole in a perfectly good watertight hull. Consider what happens when the transducer packs it in, or worse yet, springs a leak, through itself? Well I guess you can always ask the scuba divers how deep the water is! So put your drill away, there is an easier method. What follows is the personal experience of some SJ23 sailors. But first some theory to held understand. THEORY - A depth sounder uses a transducer to convert an electrical signal to an acoustic (ultrasonic) signal to transmit pulses through the water to the bottom. The pulses bounce back to the surface to be received by the transducer which converts them back to an electronic signal. The difference in time between a transmitted pulse and a received pulse is equivalent to the depth of the water. "There's math involved in knowing the propagation delay through the water and the electronics to measure it, but I'll spare you the details." In order to receive the very weak reflected pulses the transducer must be mechanically coupled to the water through a uniform high density material like fibreglass. The pulses are readily passed by a dense material like fibreglass and absorbed by a low density material like wood or a foam cored hull. A high density material equates to low signal loss and low density material like wood or foam equates to high signal loss. Since a pulse can be transmitted or received through the fibreglass hull, you don't "need" another hole through the hull. The location of choice for a transducer in a sailboat is forward of the keel, under the forward berth. In order to pass the pulses through the hull efficiently (least signal loss) you must bond the transducer to the hull with no air bubbles (uniform density) between the two, otherwise you will receive a very strong echo from the bubble resulting in no depth reading being displayed. This technique is quite easy to install on a solid fibreglass or metal hull. There is an alternate technique to install a transducer on a wood or foam cored hull having multiple layers. Replace a small section of the core material, under the transducer, with solid epoxy to create a dense functional installation. Fortunately the SJ23 has a solid hull and this is not required so I don't have to describe it! TRANSDUCER INSTALLATION - The key to a successful installation is to install the transducer out of the way where it can be serviced. The transducer and the wiring MUST be protected so an object can't slide against it to shear it off the hull. Now aren't you glad you didn't install it through the hull! The second point is to aim it vertical so the signal passes through the hull to measure the depth accurately when floating level. Compensating for an angle will be a lifelong frustration. The preferred location is under the forward berth just in front of the keel. This spot is a well protected, relatively easy to access and is the furthest forward for piloting your way through shallow water. It is the best you can do without having forward looking sonar. It is better to read the water depth ahead of the keel, than behind it! Here is a simple test you can perform to confirm a suitable location or to test the sensitivity of a transducer shooting through a hull.
DEAD RISE CONSIDERATION (SLOPED HULL) - The most suitable location for a transducer on an SJ23 is just forward of the keel under the V berth. The dead rise here is ~20 making for a simple installation. Most manufacturers claim a wedge is not required unless the dead rise is >200. That being the case, make a dam of Silly Putty to pour a batch of epoxy into, creating a wedge so the transducer can shoot straight down. This way the transducer can show an accurate reading. While still pliable push the transducer, covered with a thin plastic food wrap, into the top to create a depression that perfectly matches the business end of the transducer. You might have to use some tape to hold the transducer in position while the epoxy cures. Once the epoxy has cured, you can test the depression with a thin film of water in it. You should get a reading. To make the installation permanent spread a thin layer of epoxy on the surface of the transducer and insert it in the depression. TRANSDUCER IN WATER BATH - Lower the transducer into a thin plastic grocery store "baggy" filled with water or antifreeze and seal the top of the bag around the cable with a tie wrap. Place the transducer against the hull with the depth sounder on and sensitivity at max (assuming it is adjustable). The display should show a depth reading. If it does, turn the sensitivity down to determine how strong the signal is. If you don't get a reading, sprinkle water on the hull or move the bag/transducer to another spot till you get a reading. You may have to experiment with this. The water in the bag is very effective at coupling the signal between the rigid hull and the transducer. This technique works so well that I know of several people who use it on a permanent basis. Empty the bag for winter freeze up or use antifreeze! TRANSDUCER IN OIL BATH -
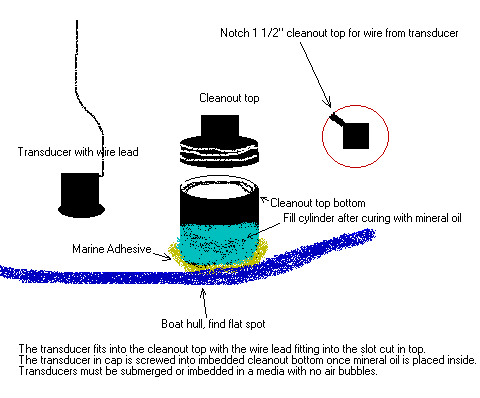
"I
shoot through the hull by installing a 1.25" diameter transducer inside a 1.5" diameter grey PVC plumbing cleanout
fitting. The grey fitting is equipped with a
screw cap and affixed to the inside of the hull with Sikaflex. Allow it to cure for 48 hours
then pour in the mineral oil. Lower the transducer
inside the cleanout and pour in enough mineral oil to immerse the head. TRANSDUCER IN EPOXY - If you intend to epoxy or glue the transducer directly to the hull, then switch the depth sounder on and monitor the display to confirm a functioning installation as you push and twist the transducer into the pliable goop to squeeze out any air bubbles. If you have an older depth sounder with manual sensitivity control, reduce the sensitivity it just detects a signal. This way you can be guaranteed of an installation that will work to full depth after the epoxy has cured. I suspect it will be a very thin layer so the transducer is very close to the fibreglass. If the unit is sensitive enough and the signal loss through the hull is low enough it should detect the bottom similar to operating the transducer hanging in free water. To remove an epoxied transducer, set a wood dowel against the bottom edge of the transducer and give it a sharp rap with a hammer. The transducer should just pop off. ______________________________________________________________________ PANACHE INSTALLATIONS - For my first installation I used a 4" ABS cleanout fitting filled with oil to house and protect the transducer. It was installed forward of the keel for maximum "ahead look" while gunk holing. The bottom of the fitting was shaped ever so slightly to follow the curvature of the hull. The transducer cable lays safely on the hull with no flexing due to boat motion. The "fluid bath" technique is a good system to install if the temperature is too cool to epoxy the transducer directly to the fibreglass. (My situation). Although you could use cold cure epoxy provided the temperature is above freezing. (Didn't have any). For this reason I used butyl rubber since I may also have to move the fitting out of the way to remove the water tank. Cutting through sealant is a lot easier than cutting through epoxy. After about 6 years the oil leaked from under the ABS fitting. (That was a mess to clean). Problem is, I had sealed the fitting to the hull with butyl rubber which is incompatible with mineral oil. The best oil resistant sealant to use is silicon or a polysulfide like Sikaflex or 3M5200 (Fig 1). But one oil leak was enough for me to try water in a thin grocery store "plastic baggy", so I installed this in the Spring of 2021. I let the Sikaflex cure for a few days before placing the baggy filled with water in it. (Cont'd below).
The epoxied depth sounder showed a constant reading while sailing all afternoon. This is far superior performance to the inconsistent readings with either of my liquid filled versions. At right is proof that shooting through the hull actually works. I've since found the deep holes and several mounds on the lake bottom that I had only previously heard of. This is a whole new way of navigating for me.
COMMENTS FROM OTHER OWNERS
|
|||||
|
Return to Tech Tip Index. . . . . . . . . . . . . . . Have a Question? |
|||||
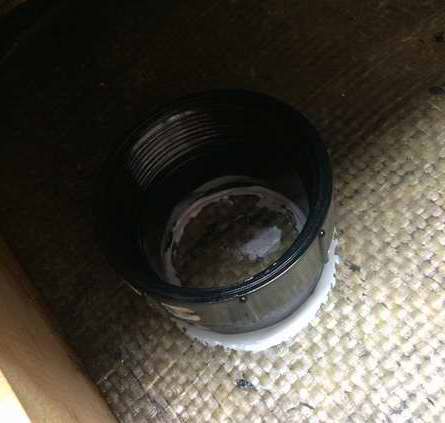
 Fabricate a
reducer plug of an acceptable material to plug the large hole and house the smaller display.
However, the material has to look good otherwise it looks, well tacky!
Fabricate a
reducer plug of an acceptable material to plug the large hole and house the smaller display.
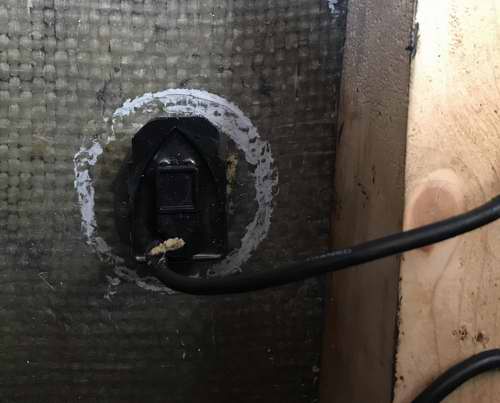
However, the material has to look good otherwise it looks, well tacky! 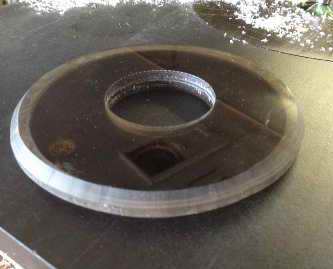 Using the same center as the previous step, drill out the center hole
for the required size of your new
display. I used a hole saw for this cut.
Using the same center as the previous step, drill out the center hole
for the required size of your new
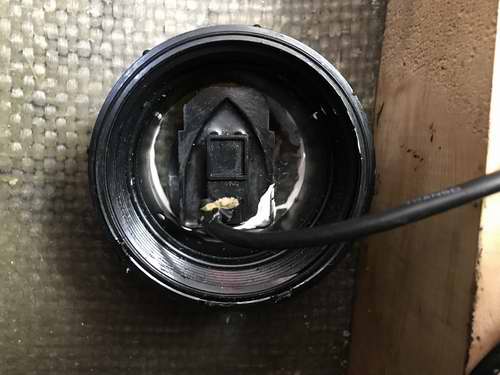
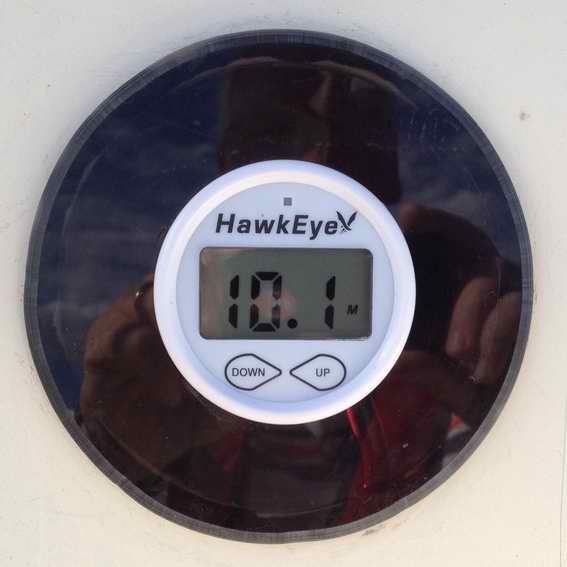
display. I used a hole saw for this cut. 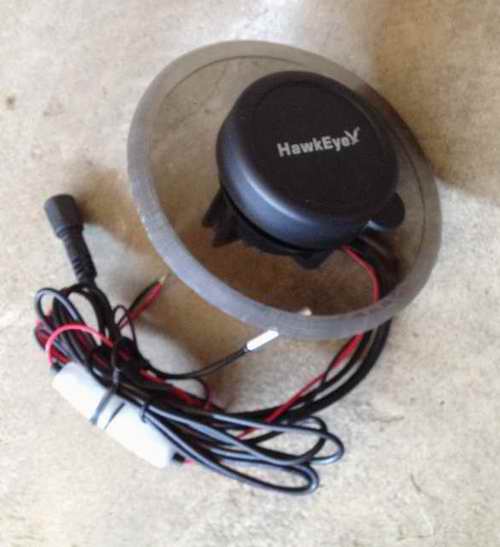 At this point I
installed the display through the acrylic plug, sealing it with butyl rubber so it
would be ready to install on the boat during warmer weather. The plug
was then sealed to the bulkhead with butyl rubber under the flange.
The gauge was oriented vertical and pushed it into place till the butyl rubber
oozed out. It held very quickly at 200C
outside and never slipped. If you feel it slip, support it with tape
across the face. I really like working with butyl rubber because it adheres
better than
marine sealant and isn't as sticky or messy to work with. Full cure comes
in about 24 hours but I'm not really sure if it ever hardens.
At this point I
installed the display through the acrylic plug, sealing it with butyl rubber so it
would be ready to install on the boat during warmer weather. The plug
was then sealed to the bulkhead with butyl rubber under the flange.
The gauge was oriented vertical and pushed it into place till the butyl rubber
oozed out. It held very quickly at 200C
outside and never slipped. If you feel it slip, support it with tape
across the face. I really like working with butyl rubber because it adheres
better than
marine sealant and isn't as sticky or messy to work with. Full cure comes
in about 24 hours but I'm not really sure if it ever hardens. 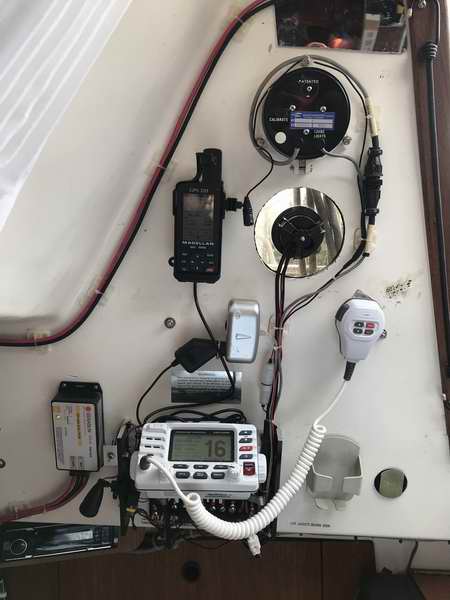
 A
variation of the water in a bag technique is to put oil in a bag or oil directly
in the fitting as my buddy did for on his Cal 25
A
variation of the water in a bag technique is to put oil in a bag or oil directly
in the fitting as my buddy did for on his Cal 25