| SJ 23 Tech Tip E06, (Updated 2019-09-16) Bob Schimmel | |||||
|
Install a Portable
Instrument. |
|||||
|
Every once in a while someone asks me, "Where
do I
install the knot meter (or other instrument) on my boat?"
Unfortunately there is no simple answer to this question because the
best location usually depends on several factors. My preference is to install the instrument where it is easy to see
and
out of the way for boat handling. Easier said than done!
Take an example from
a car where
the speedometer is placed directly in front of the driver so the eyes
are off the road for the shortest possible time. This
way the driver can stay focused
on manoeuvring safely. Many new boat owners may object to the
"easy to see location" based on how they
think their boat will be used. This objection usually changes after the first season of use! Most of these objections come from people who are ignorant
of the "ballet" of movements required to handle a sailboat. Then there are those
owners who are scared to
drill a hole through the bulkhead, fearing strength concerns. Wise idea I think,
but. I know several sailors who installed dual instruments, on port and starboard, just to be able to glance at a meter around a crew member or to eliminate parallax error looking across the hull. (Parallax is an error created by looking at an analogue meter movement from a side angle. Look straight on and there is no error). On a wheel steered boat the natural location is to install the instruments on the pedestal, directly in front of the helmsman. This is perfect if the boat speed is below 10 knots. However, when the speed exceeds this, it is better to have instruments on the coach roof or at the mast base so they are in the line of sight. But then the digits better be big. When considering a location you should also think of the crew, they need feedback too and a well placed instrument go a long way towards a quieter cockpit which is always a tactical advantage in a race. The best idea I can suggest to a novice sailor is to study installations on other boats and ask the owner how well it performs for them and more importantly, if they would change it. You should temper their advice with the type of sailing they do compared to what you do. Long distance cruising or round the buoys racing have far different demands. Night sailing has a set of requirements all its own. The next best suggestion is to sail on that boat to observe first hand the pros and cons of the installation. Also, don't be too quick to write off an installation that you judge to be weird, unnecessary or complex. Some of them are tried and true methods that continue to work when things go south. Lastly, don't assume that with your "vast experience" you have seen all the variables that Mother Nature can hand out. Just when you've seen them all, along comes a new version. So keep an open mind.
INSTRUMENTS ON A COMPANIONWAY DROP BOARD - A popular technique is to make an instrument board that fits snug in the bottom of the companionway. It can hold the chart plotter, compass, GPS, iPad or other instrument in a recess to protect it. It must not interfere with the operation of the mainsheet traveler installed in front of it. Use your existing drop board as a template for the instrument board and maintain the same thickness so it fits snug in the side grooves. The last thing you want is for it to pop out. By having it the same size as your existing board, you can leave it in place and add the top board if the weather should turn foul on you. Cover the back of the instruments with light plywood or other style of hard cap for foot and weather protection. If possible, build a storage box or cover that protects the face while the unit is stored down below.
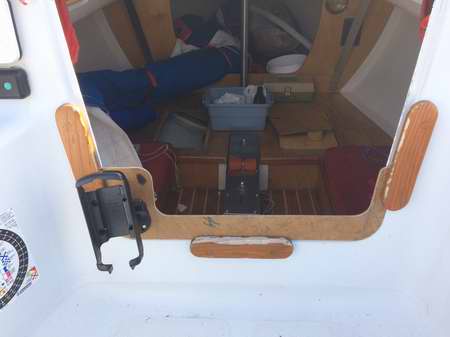
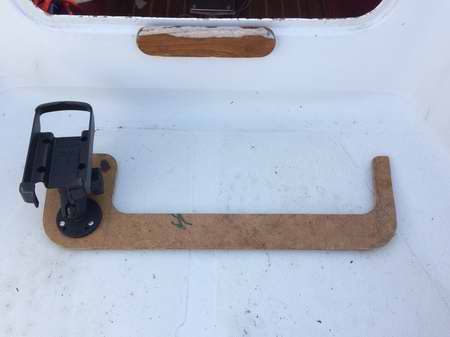
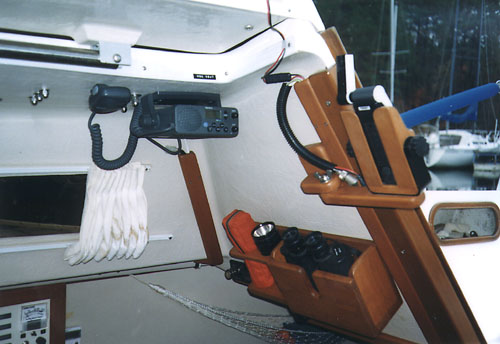
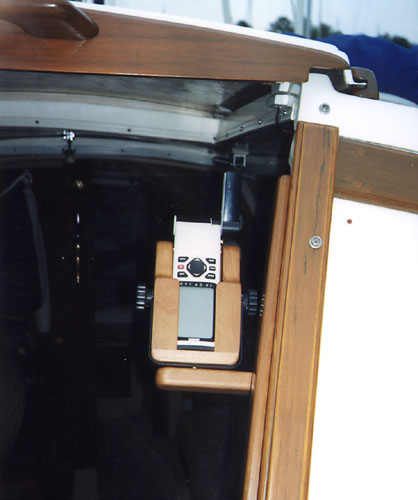
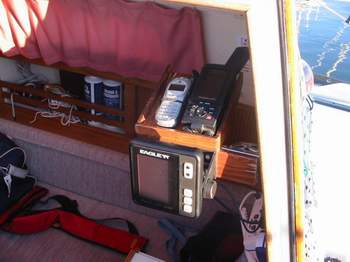
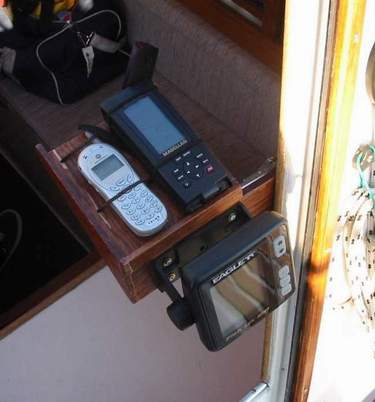
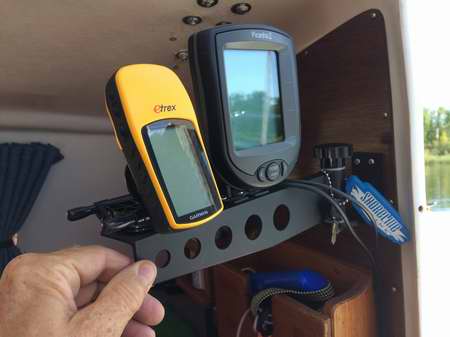
INSTRUMENT ON TOP OF THE SLIDING HATCH - Another technique is a mounting board that rests at the top of the companionway to view them while looking over the water. It has the advantages of being out of the way and therefore difficult to damage and all crew can view it. A variation on this location might be to mount the instrument board on the forward end of the sliding hatch. The instruments will be a little bit further forward but will also be more out of the way. "Dave built a lovely, heavy Plexiglas, instrument panel to hold the compass dead center to the cockpit with the knot meter beside it. The panel is mounted to the cockpit side top lip of the sliding hatch. There is a cut-out for the hinge/padlock. The panel extends just high enough over the hatch to accommodate "bulkhead style mounting" instrument holes and extends an inch or so above the instruments for strength. There is perfect visibility through the Plexiglas between the instruments and the boom does not contact the top of the panel. We attach this panel with bolts and wing nuts to the cockpit side of the lip and remove it when we leave the boat. A simple extension cable for the power and signal leads from the back of the instruments to the inside the cabin allows us to quickly hook up. These bundled wires are the weakest link but they fit nicely through the hole in the corner of the hatch when it is closed. Otherwise the cable just slips up behind the panel with enough slack to fully open or close the sliding hatch." Betsy. INSTRUMENT BELOW THE SLIDING HATCH - If you don't like mounting the instruments above the hatch then hang them from below the aft lip of the hatch. Only problem is to remember dip your head as you in/out the cabin. It has the advantage of better weather protection and you should see it easier being in a darker place. iPad in a PELICAN CASE - An iPad equipped with the Navionics mapping application can be a good alternative to a chart plotter. This can be placed at the forward end of a cockpit seat, hung on the cabin bulkhead facing the helmsman or hung on a swing out from inside the cabin. The Pelican case is waterproof. INSTRUMENTS ON A SWING AWAY BOARD - Yet a third technique is to incorporate a swing away board mounted to the side of the companionway. To view the instrument you simply unlatch the lock and swing the board into the companionway then swing it to the operating position. This is very useful for the type of instrument that must be protected from the weather or is only required for occasional use. If you can work around the requirements for flexible wiring and can remember to lock it back into the storage position when the action on board gets hot and heavy, then this may be a great way to go. I love this technique because it produces so many creative ideas that sometimes work very well. Some of them are down right slick which is really important to achieve bragging rights in the marina!
ELECTRICAL WIRING - If any of
your portable instruments require external electrical power then determine before
hand if the instrument will be damaged by connecting or disconnecting
the cord with live power. This is an important point that is
usually overlooked. Use stranded wire
on the electrical cable, a strain relief for protection at the end of the
cable and a good
quality weather proof connector. You should also have some method of securing the
loose wires to keep them away from crew who are busy
handling the boat. The wiring issue of a portable instrument is one of the compelling
factors for a permanently installed instrument. |
|||||
|
CONSIDERATIONS
FOR A BULKHEAD ANALOGUE COMPASS -
Are you considering removing a bulkhead mounted compass? While the oil filled analogue compass
(Saturn, Ritchie, etc) serves a
very useful purpose with NO power consumption there is no denying that
it's bulky size can interfere with cockpit activities. I have never found a comfortable
position to lean against mine since there is little room beside it. With the advent of the hand held
portable GPS receiver the temptation to remove the compass may be
compelling, especially since the GPS receiver can show so much other useful data
and requires no power to measure direction.
However,
the GPS receiver is NOT a true compass in that it cannot show direction while
standing still (at least not yet). Your new GPS receiver is an excellent compliment to
a magnetic compass, don't be too hasty to remove your trusty compass.
An alternative to the bulbous compass is a flat flux gate electronic compass. A fluxgate compass retains the accuracy of the analogue compass AND achieves a flat bulkhead so it doesn't interfere with cockpit sitting. About the only drawback is that the unit consumes power, minimal as it is, and the display is likely digital which may make steering difficult for some people. If the unit displays an electronic version of an analogue compass card, all the better. Always mount the compass as far away from a magnetic field as possible, (DC distribution panel, other wires carrying heavy current). Twist the wires supplying the night time illumination.
"A compass mounted to the
boat is a very useful
tool that can tell you which direction the boat is headed. A hand-bearing compass is also a useful tool, but
more for position fixing to get a relative bearing between you and another
object. Taking bearings over time of a nearby boat on the
same course, will tell you if you are gaining, loosing or on collision
course. Sailing upwind,
a fixed compass shows wind shifts, and the navigator
just keeps track of the numbers relative to your close-hauled course.
This
is important to determine the optimum time to tack. A hand-held compass helps
little here, unless in the hands of a wizard. Sailing downwind, a fixed
compass shows the slight wind shifts so you can follow a dead-downwind
heading with each change in wind direction. Gybe tactics rely on this
input but it takes experience to detect a 50 or 100
wind shift. Just as there are short cuts to sailing upwind,
there are shortcuts to sailing downwind. BULKHEAD INSTRUMENT RETAINING RING -
Sometimes you find a really good deal on a used instrument that you just
can't pass up. Unfortunately many instruments seldom include
the retaining ring to clamp it against the bulkhead forcing you to make one yourself. Simply sealing the
instrument
to the bulkhead with silicon sealant isn't effective enough because an
errant nudge when the boat heels can result in a loose instrument. BULKHEAD INSTRUMENT PROTECTION BAR - There are times in the heat of battle when you discover you have "nudged" an instrument with your knee. Typically the bulkhead seal is broken or the face has been pushed in. My instruments are installed at knee height so I have lots of personal experience with this problem. The cure is to install a protective stainless steel bar in front of each instrument. They are worth their weight in gold if your instruments are very old and therefore difficult to replace; or very expensive, which is still difficult to replace! Protection bars may be bought from a chandler or home made from 1/4" stainless rod.
PLUG THE HOLE - Once
an instrument is removed you will have to
reseal the hole to restore the water tightness to the cabin. You could convert
the instrument hole to a small port hole using acrylic. If you get
crafty enough the porthole could also be opened for ventilation. An
alternative is to plug the hole with a slab of UHMW through which you
could install a smaller instrument. See Tech Tip
E05. |
|||||
|
Return to Tech Tip Index. . . . . . . . . . . . . . . Have a Question? |
|||||
 Assuming that you can't find a bulkhead configuration you like or
you don't want to cut any
holes (yet), there are several solutions. All of them have an advantage and a disadvantage. Would
you expect anything less? Pick the one that suits your sailing
demands.
Assuming that you can't find a bulkhead configuration you like or
you don't want to cut any
holes (yet), there are several solutions. All of them have an advantage and a disadvantage. Would
you expect anything less? Pick the one that suits your sailing
demands.