| SJ23 Tech Tip E07, (Issued 2001-09-08) Bob Schimmel | |
|
POWER UP WITH OUTBOARD GENERATOR -
Transom
Electrical
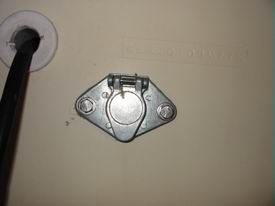
Connector for Starter/Generator. |
|
|
For those of you who trailer your boat to/from the water regularly wouldn't it be nice to quickly connect the outboard engine to the battery in such a way that the power cable is out of the way of cockpit activities? I mounted one on Panache by installing an external connector through the transom. What a relief. There are marine connectors designed for this purpose but they are also expensive and rightly so if you review the operational requirements; water proof, electrical isolation, equipped with a weather proof cap to keep water out and a strain relief to support the cable. All very necessary. However, I've found the equivalent (almost) in the form of a four pin automotive trailer connector at far less cost. The requirements under the bumper of a vehicle are not that different from the marine environment.
CONNECTOR ASSEMBLY - To increase the current handling capacity of the connector I doubled up on the pins by splitting the wiring between them. Two pins conduct the positive current and the other two pins conduct the negative. I used oversize stranded wire, stripping the insulation back about 3/4" and forming two parallel strands to slide into the receiving holes of the pins. Make ABSOLUTELY certain you have the same polarity on the jack (hull) and the plug (engine). If you cross wires on any of them you will have a very dangerous electrical short to the battery. So disconnect the cables connected to the battery and use an ohmmeter to confirm continuity. Positive to positive and negative to negative with NO shorts between. Finally, connect the cable to the battery and using the voltmeter read the correct polarity on the hull connector. The pins in the hull mount connector are set in a Bakelite barrel that is locked to the housing with a small set screw. To water proof this I disassembled the connector and coated the Bakelite barrel with Sikaflex. Then slid it back into the connector housing, screwed the set screw in place and let the Sikaflex cure. This will likely be a mess to undo if maintenance is required but my solution is to buy another connector since they are relatively inexpensive. INSTALLATION CONSIDERATIONS
|
|
|
Return to Tech Tip Index. . . . . . . . . . . . . . . Have a Question? |
|
 The
metal case of the connector is aluminum so that solves the corrosion
problem.