| SJ23 Tech Tip B10, (Updated 2004-04-27) Bob Schimmel) | |||||
|
Keep the Rudder Blade Locked Down and on the Transom. INDEX - Pintle lock, Blade lock, Construction, Operation, Prop Damage, Moored. |
|||||
|
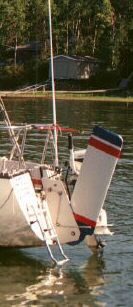
2004 - After fours years of use with my block and tackle blade pull down system the blade has some unexpected wear around the pivot hole and in the pull up bolt hole where the T-bolt rests. So I've developed a more robust solution for both and updated the text and diagrams as per below. The rudder has experienced no fatigue since then. _________________________________________________________________________________________________________________ There are two rudder versions for the SJ23, fixed and kick up. The fixed version is for sailing in deep water where you seldom or never expect the bottom to come up to 'touch' the hull. The kick up version is for sailing in shallow water where the "bottom may occasionally come up to touch" the hull. The kick up version has the additional safety advantage of protecting the blade and the transom in the event of an accidental grounding. This same safety feature also allows the party animals to hit the beach by allowing the sandy bottom to push the blade up. Notice I said sand, NOT ROCKS! I don't know about anybody else, but I've never been able to lift the blade by hand as I approach the beach. I find the reach into the murky depths just a wee bit beyond my hands! The factory designed kick up rudder (shown below left) incorporates several loops of heavy duty bungee cord at the leading edge of the blade hinge. The purpose of the bungee cord is to hold the blade down for normal sailing and allow the blade to be kicked up in the event of a grounding. The bungee cords are looped between two holes at the leading edge of the rudder hinges; a 1" hole through the top of the blade and a 1/2" hole through the bottom of the rudder head. This was the configuration when I bought Panache. For assured performance, the bungee cord must be replaced annually. What a pain for a system that doesn't work well! There are several drawbacks to the bungee cord system;
If you have a fixed rudder, you only have to consider locking the pintle. 1 - PINTLE LOCK - The factory stainless steel lock down spring is not particularly strong and is woefully inadequate for the job. Quite frankly I think this technique belongs on a dinghy, not on a pocket cruiser. The sooner you replace this spring, the sooner you will have a safer boat. Consider Frank's experience. "I was sailing pretty much at hull speed in 2' to 3' high waves with wind at about 20 knots and gusting higher when the rudder came off the transom, held only by my hand on the tiller and the Tiller Tamer line! We immediately lost steerage, both sails luffing like mad in the wind, the boat bouncing crazily in the waves, leading to an unintended jibe while I tried to reinsert the pintles in the gudgeons. Under these conditions the water pressure on the rudder makes this a monumental task, but we eventually succeeded and got underway again. The force on the rudder during this episode was great enough to bend the pintle to make reinstalling the rudder a challenge. The 3/8" stainless steel pintle is too stiff to straighten with a vice grip on board the boat! The total loss of rudder/steerage in strong winds/waves is a very unpleasant and possibly a dangerous situation." Frank. The point to note is that the rudder MAY pop out of the gudgeons through wave action when the boat is in a deep trough or the stern is lifted by a wave. The reason is that the foam cored rudder floats and the small metal spring that is designed to lock the rudder to the transom isn't strong enough to keep it attached. One solution is to install a short, strong bungee cord between the lower gudgeon and hook it to the hole in the upper pintle. Replace the bungee cord annually as it will fatigue with exposure to UV light. Another solution is to slip a hair pin or thick cotter pin through the hole in the upper pintle. Secure the pin to the rudder with a short line so you don't loose it. The pin MUST not come off on its own and you should be able to operate it without tools. I use a 1/8" thick cotter pin on Panache. The ends are slightly spread apart which is sufficient to keep it in the pintle. Just squeeze them together to insert. If a pintle bends, you can make a temporary one from a (4 x 3/8)" stainless steel bolt. Taper the end to facilitate installation on the gudgeon. Drill a small hole through the side of the bolt to accept a cotter or roll pin to secure it. This requires using a titanium or cobalt drill bit, turning at slow speed with cutting oil or paste, to keep the metal cool. Sharp matters! Also, file a slight depression on the side of the bolt to start the drill. Once the bolt is inserted in the rudder head, use marine sealant around the pin to prevent movement. The lower pintle should be longer than the upper one to ease installing the rudder pintles in the gudgeons. i.e... insert the lower one first and the upper one second. You'll appreciate this little bit of forethought when you have to install the rudder on the transom as Frank did.
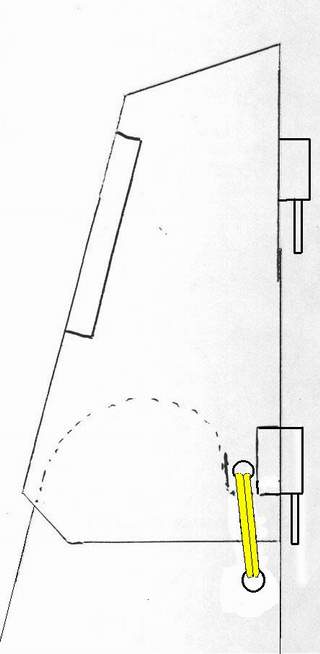
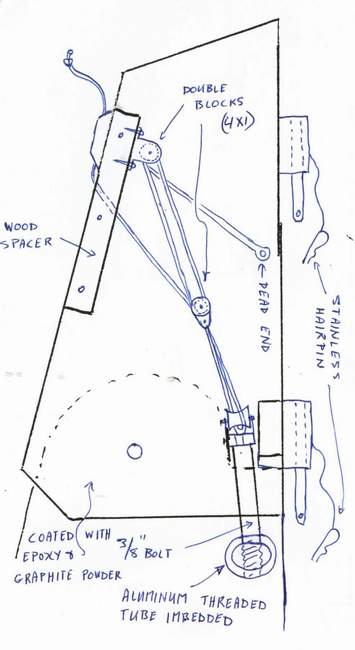
So I designed the internal 4 to1 block and tackle system shown below right. The free end of the line exists out the aft of the rudder head and is guided over the top where it lays over the tiller slot for ready use. The system works like a charm, both to hold the blade down and to release it quickly to allow it to float at the surface. Another reason why I developed this system was to lift the blade while motoring in tight quarters to prevent the propeller from hitting the blade when it is turned far enough to starboard. I have since installed a ring around the propeller to keep the rudder from touching it. See Tech Tip D06. The blade can be damaged from a myriad of other reasons so I'll let you use your imagination. See Tech Tip B09. CONSTRUCTION - Referring to the diagram below right, the first step is to imbed a 3/8" stainless steel bolt into the top of the blade to hold the turning block. The combination is effectively a T-bolt.
You now have a 3x1 purchase that is strong enough to pull the blade down while sailing. (To be a 4x1 purchase, the dead ended line should be attached to the bottom block). HINT: If you coat the hinge end of the blade (portion that fits inside the rudder head) with epoxy saturated with carbon graphite powder it will create an extremely hard and slippery surface, making it easier to pivot the blade. Mix the carbon graphite about 10% by volume. It makes a very black soupy mess! To complete the job, sand off any high spots and insert a bushing or stainless tube inside the pivot hole of the blade. Cut the tube ever so slightly longer than the thickness of the blade. This way you can tighten the pivot bolt and rudder head against the tube to eliminate side play without jamming the blade. Shortly thereafter I coated the entire blade with epoxy saturated with carbon graphite. NOTE: The short length of static line between the bottom double block and the T bolt prevents the control line from sliding across the round top of the rudder blade. This minimizes internal friction and possible line jamming with the rudder head.
|
|||||
|
OPERATION - The rudder is streamlined with the internal block and tackle and the system has sufficient mechanical advantage to pull the blade down, regardless of the side load on the blade due to hull speed or wind direction. If you decide to scoot through shallow water to win the race, you can release the blade so it floats to the surface. When you return to deep water there is enough mechanical advantage to pull the blade down, all without stopping the boat. A word of caution about sailing with the blade up; the forces on the rudder head and tiller can be tremendous, especially when sailing upwind with a few waves that you have to steer for. CAUTION: With the block and tackle locking system described in this Tech Tip, you MUST be ready to release the locking line when approaching shallow water. This is why it's so important to have an accessible and quick to release system. Failure to release the blade could result in structural damage to the rudder blade and/or the transom if you hit the bottom too hard. But then this would be no different than grounding with a fixed rudder. An improvement on locking the control line with a jam cleat is the Clamcleat® CL257 mini auto-releasing rope cleat. The advantage of the CL257 is that it has an adjustable release load setting that gives peace of mind to the single handed sailor who is too busy looking after something else. It never fails that fifty things happen at the same time! PS:
For those of you who don't have a depth sounder, a fully lowered
center board touches the bottom before the rudder! Hmmm. |
|||||
|
LIFT BLADE for MOORING
- If your boat swings from a mooring, it is best to pull the rudder
blade up out of the water so the hull lies quieter. I discovered this years ago through
some experimenting I did. In addition, there is less chance of the blade
absorbing water if it has a pin hole leak. To pull the blade up out of the
water I release the hold down line and flip a loop of wet line over the end of
the blade (lasso style). This requires some dexterous balance while standing on the transom
but I usually get it the first few times. Then
I pull the line up taught till the slip knot (lasso) tightens around the middle of
the blade. The free
end of the line is attached to the main halyard and a quick pull lifts the blade out of the water. The nice part of this is no
halyard slapping against the mast and no marine growth on the blade to
slow you down. I have yet to fabricate a pull up system. The design criteria has to include the following:
I know its a tall order but it can be done.
I'm open to ideas. |
|||||
|
Return to Tech Tip Index. . . . . . . . . . . . . . . Have a Question? |
|||||
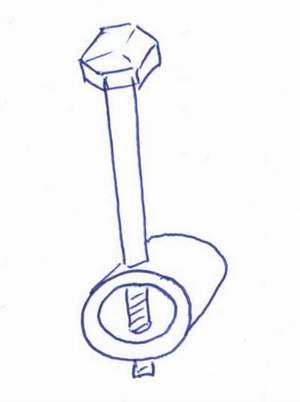 An imbedded T-bolt is the perfect solution for
anchoring the bolt. Make
the round nut from 3/4" OD rod or thick wall aluminum tubing.
Drill a hole across it, through both sides (center), and tap the holes
to receive the NC thread of the 3/8" bolt.
An imbedded T-bolt is the perfect solution for
anchoring the bolt. Make
the round nut from 3/4" OD rod or thick wall aluminum tubing.
Drill a hole across it, through both sides (center), and tap the holes
to receive the NC thread of the 3/8" bolt.