|
While it may
seem odd that my choice of a media player was an AM/FM/Cassette
radio equipped with a manual shaft tuner and 5 push buttons to store favourite stations, my rational is that it draws mere milliamps when switched on and does not draw power
when switched off. It also stays on station with the power switched off. Push the power switch and voila you have your favourite radio station or music playing. No digital media player is capable of
this. The power drain to support player memory is the primary reason why a car battery is dead after a
two week
vacation, sometimes shorter. All electrical loads are switched off when I leave
Panache so all the solar charge goes into the battery. In addition, I can play
endless music from my iPhone by plugging in a purpose made cassette equipped with an audio cord that plugs into the headset jack of my
iPhone. I thank my son for
finding this matching piece of archaic electronics in a Goodwill Store.
All well and good but that was the technology of the day!
FEATURES
-
But that was then! Unfortunately, my vintage player died
during the summer of 2016 and I can't find an equivalent to
replace it. I actually found a couple of
nice retro radios but they are ridiculously expensive and still aren't 100%
compatible to an original analogue unit. So after much
research for a replacement unit I've conceded that the additional features
of a digital media player "might be useful" after all and my dual solar
panels can handle the memory power drain and higher operating current.
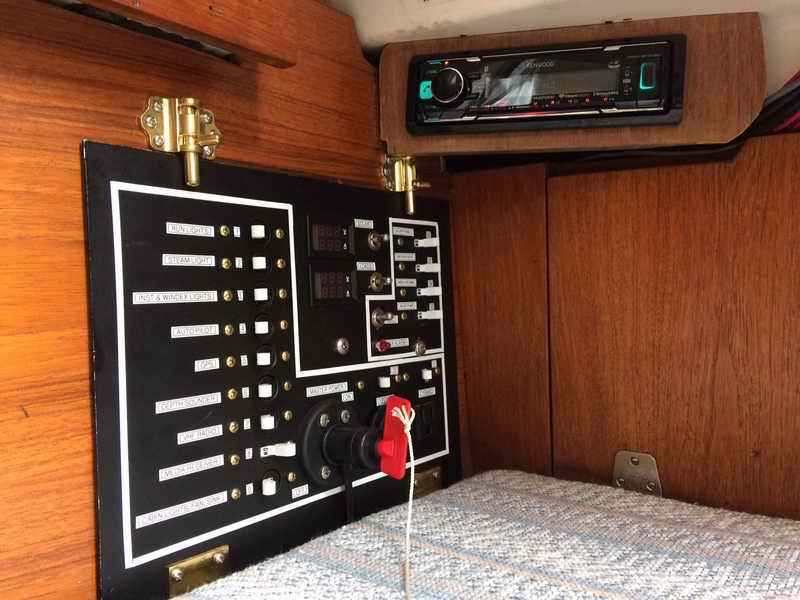
I decided on an aftermarket marine
Kenwood
KMM-BT315U digital media player.
(Its called a media player today instead of a stereo or radio receiver because it has
many inputs from which to source a signal; AM/FM tuner, USB jack, Aux jack, Blue Tooth, etc.
That's my theory and I'm sticking to it!).
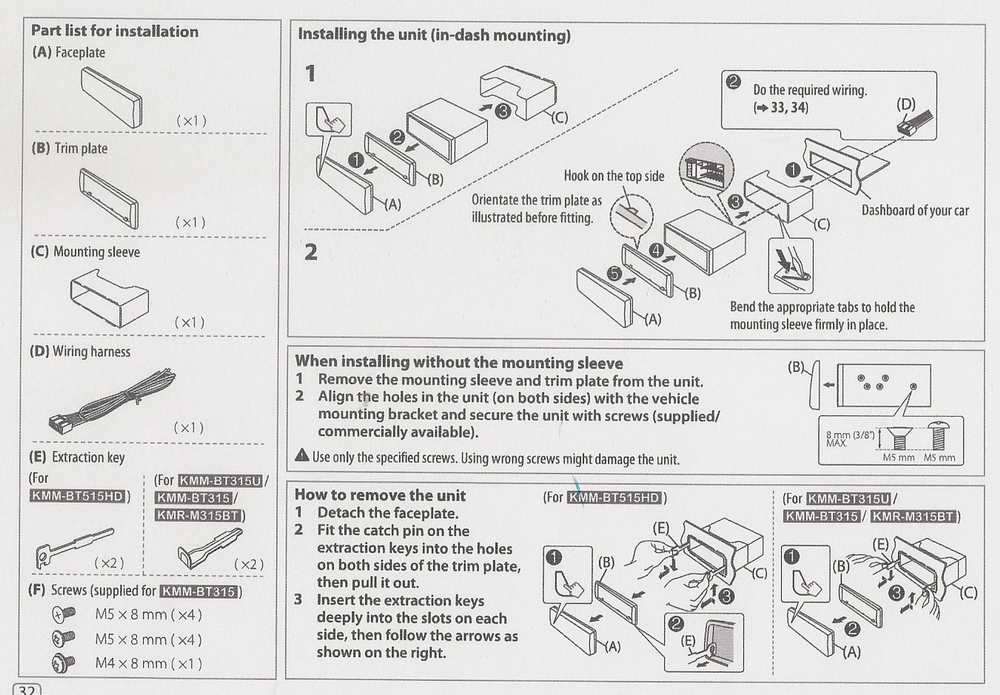
- A single DIN mounting sleeve for
a small installation foot print and easy access to service the player.
There is a
front panel bezel for a nice cosmetic finish to hide the sleeve. {Dimensions of a DIN sleeve are: 2-1/8”
(50mm) high by 7-1/8” (180mm) wide}. The player slides into and locks in
the mounting sleeve that is very secure
for marine operation. It comes with two extraction keys to remove the player from the
mounting sleeve. This is typical of
most
DIN after market players.
- Removable player and detachable
front panel.
(Perfect for winter storage to protect the LCD from condensation damage).
- Conformal Coating for Marine use.
(Protects the components from condensation related corrosion).
- Display illumination is
programmable through 24 colours to match other instrument lights. (Can
also assign a different colour to a
switch to draw your eye to
that critical
control on the front panel).
- Blue Tooth technology for
hands-free cellular operation using the speakers and wired external mic. (Max 2 cell
phones can be paired).
- Blue Tooth for audio streaming from
smart phone or tablet.
- AM/FM radio tuner with 18FM/6AM
presets, seek & scan. (AM has a longer range to detect
lightning).
Auto program feature to populate presets.
- AUX jack on front panel. (For a head set
or to connect
this output to the input jack of another device).
- USB jack on the front panel with
1.5A charging capability. (Compatible with select Apple or
Android devices for charging or playback of MP3, WMA, WAV, FLAC, and AAC
files. Music files can also be played from the USB drive).
- 4 Speakers, 22W per speaker.
(You'll go deaf at this volume!).
- SiriusXM satellite ready (requires
service contract), plus
support for Pandora Internet Radio (Android) and iHeartRadio (iPhone).
(Requires a downloadable application installed on the smart phone).
- Wireless remote control included.
(Why you need this in a vehicle is beyond me).
LIGHTNING
DETECTION - If you are considering a media player with digital
receiver, make sure it includes an AM/FM tuner that can be manually tuned. The advantage of
having AM, besides listening to news or sport reports, is that it can be
tuned off station to become a fairly effective lightning detector, albeit
without an alarm. You just have to crank up the volume and listen to
the lightning activity as it happens.
CELL PHONE -
An advantage of having Bluetooth for hands free cellular operation is that
you are more likely to hear an incoming phone call over the system speakers
(the music is automatically muted with ringing) plus the hands free
operation eliminates the risk of dropping your cell phone when your hands
are wet. Real handy when the boat is heeled or in wet weather. The
media audio resumes when the call is terminated.
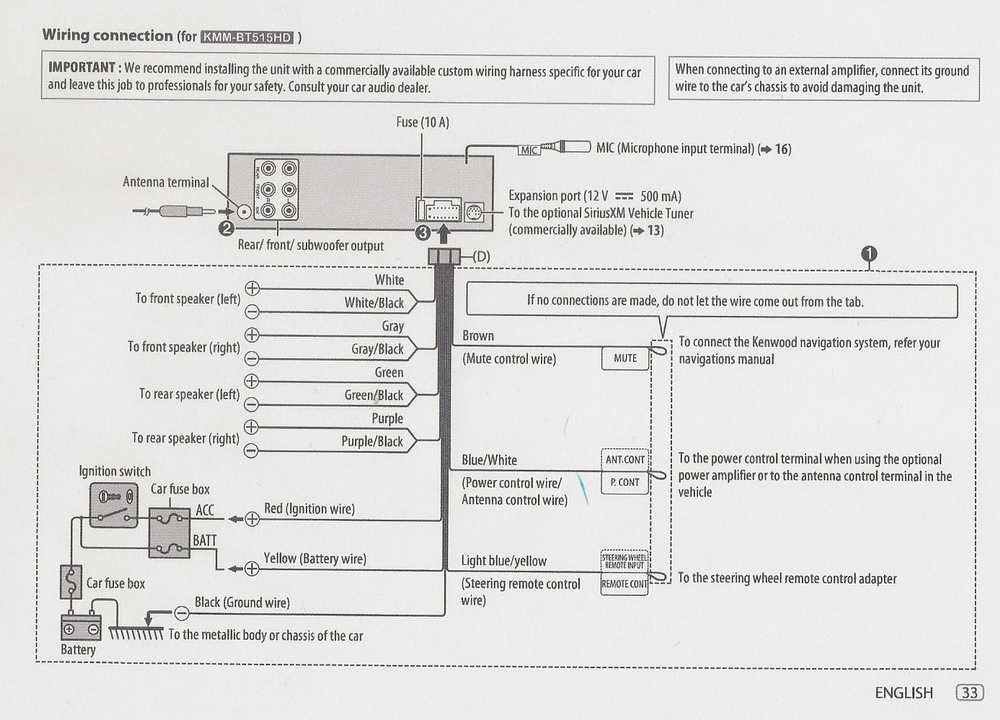
WIRING HARNESS - The easiest way to make the wiring harness is
away from the boat. Use same gauge stranded
wire as manufacturer and make it about 2' longer than you think is required. Splice the
extension wires to the stub wire ends of connector D (shown below) by soldering
and insulating with heat shrink. Its probably a good idea to extend
all the wires, even if you think they aren't needed now. But insulate the
unused ends to protect the player. Fit the harness in place
on the boat and cut it to length, leaving about 1' or more of slack at the
back of the player. This should be
sufficient to handle the player when it is removed from the mounting
bracket.
Remove the cable from the boat to install the spade lugs (crimped and soldered)
on each lead and label each wire as per the schematic below. There is nothing more frustrating
than to trace unlabeled wires once a harness is installed. Slip on
some
harness protection (spiral or split wrap) to protect the cable from abrasion.
Install a rubber grommet where the harness goes through a hole. Now
is the time to install
the wiring harness in the boat and form the cable in place. Connect the spade lugs
to a terminal strip located
close to the power panel for an organized installation and convenient trouble
shooting later on. All connections are polarity sensitive, so be very
careful. Confirm everything before making a connection. It is
doubtful anything will go wrong with your installation if you follow these
steps. The wiring diagram shown below is typical of many after market
players. Where the diagram refers to "car" substitute it with
"power
panel" as per your boat.
|
KENWOOD MEDIA PLAYER WIRING HARNESS |
| TO BOAT |
DESIGNATION |
TERMINAL STRIP
(TS3) |
| Bulkhead FL |
Front speaker (left) + (Wh) |
1 - Cable I, Wh |
| Bulkhead FL |
Front speaker (left) - (Wh/Bk) |
2 - Cable I, Gn |
| Bulkhead FR |
Front speaker (right) + (Gr) |
3 - Cable I, Rd |
| Bulkhead FR |
Front speaker (right) - (Gr/Bk) |
4 - Cable I, Bk |
| Companionway RL |
Rear speaker (left) + (Gn) |
5 - Cable II, Wh |
| Companionway RL |
Rear speaker (left) - (Gn/Bk) |
6 - Cable II, Gn |
| Companionway RR |
Rear speaker (right) + (Pr) |
7 - Cable II, Rd |
| Companionway RR |
Rear speaker (right) - (Pr/Bk) |
8 - Cable II , Bk |
| (not used) |
Antenna control + (Bl/Wh) |
9 - Cable III, Wh |
| (not used) |
Steering control + (Bl/Yl) |
10 - Cable III, Gn |
| BKR8 |
Switched power + (Rd) |
11 - Cable III, Rd |
| (not used) |
Mute control + (Bn) |
12 - Cable III, Bk |
|
BKR14 |
Constant power + (Yl) |
BKR14, Yl |
| Gnd Buss bar (BB3) |
Ground - (Bk) |
BB3 - x |
This Kenwood player draws 4 A with low volume and the memory draws
5 MA with the unit switched off.
I've researched 3 other manufacturers and they all draw
about the same amount of current which means they use similar electronics. You should determine if your charging system can keep ahead of this power drain. The
memory drain can deplete a battery with time if it is not charged by a solar panel or
other source. Keep
the player off when the battery is low so you can start
your electric start outboard. Always keep a starter cord handy.
If you want quality
sound to listen to your favourite music/radio station then you need clean power and
a good antenna.
- POWER - A digital player requires two
power feeds; switched (ignition) and continuous (battery). Of the 3
units I've checked out, all maintained memory power after switching the
ignition off. Clean power can be
had from the power distribution panel if it is equipped with a ferrite suppressor over the
positive wire. A ferrite blocks all spurious RF, noise spikes and
ignition noise riding on the power line.
- ANTENNA - If you don't have
a marine grade broadcast antenna then a good antenna
can be made from 75 Ohm coax (RG59) cable. Strip about 30" of
braid from the end and leave the remaining braid
to
shield the center conductor from radiated RF and/or ignition noise. Insulate
and seal the end of the braid and center
conductor to prevent corrosion. This
antenna is designed for FM but works well for AM
too, just like on a car.
- Just like the VHF antenna, height is everything. You can be clever
and slip the co-ax cable inside a hollow braid poly line and hoist it up as a flag halyard
to keep it out of the way. This is the same technique I used
to install wiring inside the mast in Tech Tip
E09.
- An emergency VHF antenna can also operate satisfactorily for AM/FM if it
is clamped on the stern rail.
- Because an SJ23 mast is deck stepped, you can't just shove the
co-ax cable through the deck and then to the mast. The cable would be
ripped apart as the mast is laid down. A good
technique is to install a marine bulkhead connector above the deck and
screw a dust cap on the deck connector when the antenna cable is removed.
- SPEAKERS - One final point
about stereo sound quality; all speakers must be phased correctly.
That is, the cones must move air in the same direction when the same
polarity is applied. If they are wired opposite, the speaker
furthest from you sounds dead. So connect the positive of the audio
out to
the positive of the speaker and the negative to the negative.
You can use an Ohm meter to confirm the polarity of the speaker wiring,
watching the speaker cone move as you momentarily touch the terminals.
- If your speaker magnets are not magnetically shielded it's a good idea to
cover them with a ferrous shield. The end of a metal food can is the perfect
shape provided it magnet attracts it. Use a diameter that is just a bit wider than the
speaker magnet. The closer the can is to the magnet, the more
effective it is. Shorten the side of the can so it covers
the side of the magnet just short of the speaker frame. You may have
to cut a notch in the side to clear the speaker terminals. Insulate the
cut edge in case the can rotates. Line up the notch with the
terminals and
place the can the over the magnet. The magnetic force will hold it in place. This can should contain the majority of the magnetic field and result in a truer
reading on the ship compass. You can test it with a handheld
compass. Install the speaker no closer than a 1' away. The cans will not affect the sound
quality.
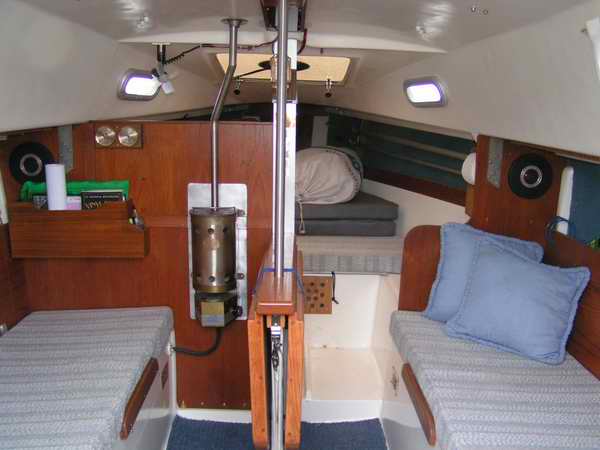
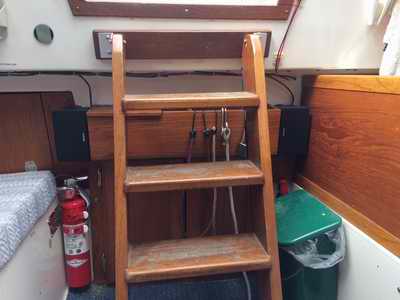
- My two additional speakers will be mounted under the companionway,
facing towards the cabin in poor man's quadraphonic style for optimum
sound quality in the small cabin. TOP
Front speakers on bulkheads
Rear speakers under companionway
|