| SJ23 Tech Tip F03, (Updated 2019-07-17) Bob Schimmel | |||||||||||||||||||||||
|
Internal Halyards Lead aft to Cockpit. INDEX
- Masthead Sheave & Divider, Bird Spike, Halyard Exit
Plates, Mast Foot, Deck
Turning Blocks, Internal Halyards, |
|||||||||||||||||||||||
| The San Juan 23 was originally equipped with two
wire/poly halyards, one for the main and the other for the jib. The main halyard
ran from the deck up the front of the mast, over both starboard sheaves in the mast head, to exit
aft down to the mainsail. The jib halyard ran in the
opposite direction over the two port masthead sheaves. A nylon dividing
plate between the sheaves creates port and starboard channels to separate
the halyards and keep them over their respective sheaves. It is
real annoying when a halyard jumps off its sheave and snags on a worn plate. You may be able to free the halyard by pulling
it back but
sooner or later you will have to climb the mast to release the snag.
A recent inspection of the spreaders reveals that the wire portion rubbed
metal off the forward and aft sides of the spreaders when the halyards
were clipped to the foot of the mast for storage in the slip. This
must have made quite a racket and I can't understand how the previous
owner lived with this. In 1993 I converted Panache's
original halyards from external to internal to reduce windage, eliminate
halyard slap and to
convert the original wire/rope halyards
to all rope to eliminate meat hooks. While there is a certain romance listening to halyards slap against the mast, it sure is difficult to
sleep with the racket. I really don't care if the racket comes from
my boat or another, I still can't sleep with it. I also like the clean look of an uncluttered
mast. I installed two jib halyards for wing-on-wing sailing or quicker
sail changes and one halyard for the mainsail. This leaves the port aft
sheave vacant for a future boom topping lift or other necessary toy!. All my halyards are colour
coded 3/8" polyester prestretched line. The following steps
describe my modifications. |
|||||||||||||||||||||||
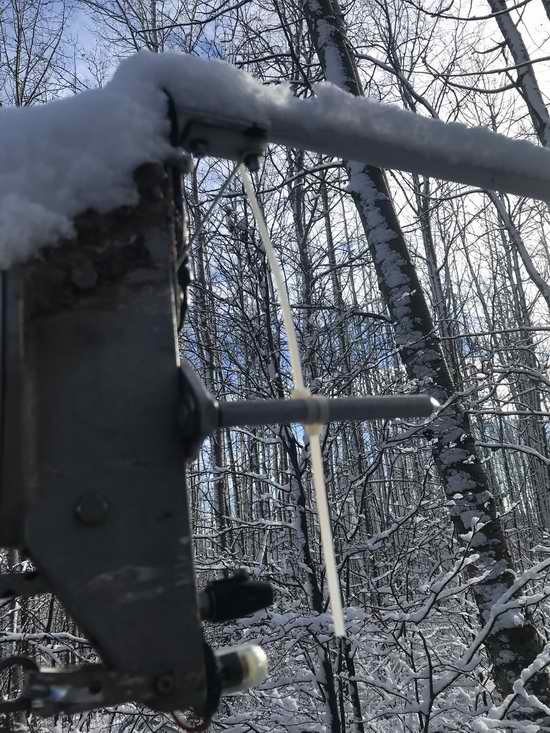
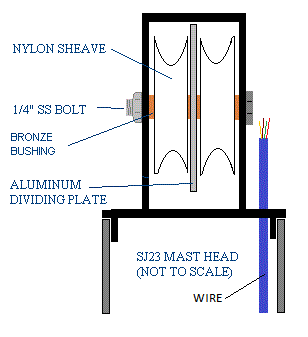 The
factory masthead sheaves are designed to handle
1/8" halyard wire spliced to 3/8" rope for the wire/rope
halyard the SJ23 was originally equipped with. I see no point
increasing the line size and weight aloft. At the time of this
upgrade no maintenance was ever done to
Panache's
nylon sheaves for 26 years since new from the factory.
The sides and face were in good condition but the bearing holes were worn oblong.
I had no idea where to find replacements so decided to insert
a bronze bushing into each sheave to restore them. I chose a
bronze 1/4" ID x 3/8" OD bushing.
This is quite easy to install by drilling out the
oblong
hole with a drill press and pressing the bushing into
the sheave using a bench vice or a bearing press. The
bushing must be pressed with machine precision in the hole to fit snug without stretching the sheave.
If the sheave is strained it could crack
during the first winter freeze. The
factory masthead sheaves are designed to handle
1/8" halyard wire spliced to 3/8" rope for the wire/rope
halyard the SJ23 was originally equipped with. I see no point
increasing the line size and weight aloft. At the time of this
upgrade no maintenance was ever done to
Panache's
nylon sheaves for 26 years since new from the factory.
The sides and face were in good condition but the bearing holes were worn oblong.
I had no idea where to find replacements so decided to insert
a bronze bushing into each sheave to restore them. I chose a
bronze 1/4" ID x 3/8" OD bushing.
This is quite easy to install by drilling out the
oblong
hole with a drill press and pressing the bushing into
the sheave using a bench vice or a bearing press. The
bushing must be pressed with machine precision in the hole to fit snug without stretching the sheave.
If the sheave is strained it could crack
during the first winter freeze.
 Cut the bushing to length so it just
protrudes out the sides of the sheave. I soaked the
bushings in oil prior to pressing them in. They get a drop of ATF oil
every time the mast is lowered, if I don't forget. The oiled bushing reduces
the internal friction of a sheave and
greatly reduce
the effort to hoist or lower a sail. No more sticky
operation and the mainsail sail drops very quick. Cut the bushing to length so it just
protrudes out the sides of the sheave. I soaked the
bushings in oil prior to pressing them in. They get a drop of ATF oil
every time the mast is lowered, if I don't forget. The oiled bushing reduces
the internal friction of a sheave and
greatly reduce
the effort to hoist or lower a sail. No more sticky
operation and the mainsail sail drops very quick. The factory sheave is 1 3/4" in diameter, 1/2" wide with a 1/4" hole. Replacement sheaves are available today from various chandlers. Best to order the sheaves equipped with the hard Delrin ball bearings. Panache's mast head nylon dividing plate had a V-groove worn in it from the wire halyard rubbing against it. Occasionally the plate snagged the wire halyard which I had to release by climbing the mast. "While I have no fear of height, it isn't fun being at the masthead of a small boat rolling in the waves. Later I fabricated a pole with a tapered wire hook to snag the errant halyard while standing on the spreaders. Much better." It didn't take long to tire of retrieving it so replaced the nylon plate with a full length 3/16" thick aluminum plate. This is thicker and tougher than the original plate so it will last forever. I also replaced all cotter pins associated with the mast head and standing rigging. The ends are twisted back around the pins to prevent a snag. Bend them only once. "The
SJ23 masts for the New Bern hulls were built by
Kenyon Marine in Guilford, CT.
They should have
replacement sheaves. Tom Hukle at Yacht Riggers in Seattle, was the mast builder for the SJ23s in the west but he
basically assembled the parts shipped from Kenyon. If that is too much
hassle, either West Marine,
Binnacle
or other chandler, etc. should have
them. Catalina Part #R6075. Specify wire or rope sheaves: Wire sheaves have an
additional inner groove to fit the wire which will cause excessive
load on an all rope halyard." Best regards, Glen Moore, Seattle.
(Glen used to rig the masts when the factory was operational). TOP
|
|||||||||||||||||||||||
 For whatever reason several red wing blackbirds have taken a fancy to park themselves on Panache's masthead this year and leave their droppings all over the mainsail cover and deck. This is only the beginning. Once they are done with Panache they move down the dock and defecate on those boats. Now I've got club members accusing me of attracting the feathered demons. These damned birds are so comfortable with resting on the masthead that even pounding on the mast doesn't scare them away. Besides, I can't be there every day of the week. For whatever reason several red wing blackbirds have taken a fancy to park themselves on Panache's masthead this year and leave their droppings all over the mainsail cover and deck. This is only the beginning. Once they are done with Panache they move down the dock and defecate on those boats. Now I've got club members accusing me of attracting the feathered demons. These damned birds are so comfortable with resting on the masthead that even pounding on the mast doesn't scare them away. Besides, I can't be there every day of the week. Quite a few years ago I installed a lightning rod on the masthead to prevent Panache from becoming a strike zone. That was done in conjunction with bonding all metal parts together as can be seen in Tech Tip E03 and the photo above. This spike did nothing to detract the birds. I swear that both of them just leaned against it for comfort. While it is a pain to clean the deck, the mainsail cover is slightly more difficult to clean. "30 Seconds" cleaning solution does a good job but it must be rinsed off after an application. A hassle at the lake to say the least. Enter the proverbial bird spike. Rather than reinvent the wheel, I thought that installing a couple of tie wraps across the top just might do the trick. They are flexible enough to not support their weight. I'll find out next year if this novel solution works.
|
|||||||||||||||||||||||
  The
halyards must exit somewhere near the bottom of the mast so I
installed four Schaeffer stainless steel halyard exit plates spaced
equally apart
(alternate sides) along the
bottom 5' of the mast. If they are installed at the same level, opposite each other, it will cripple the strength of the mast. The 2 jib exit plates are on one side of the mast and the main exit plate is on the other. One of the exit plates is shown at left. The spinnaker halyard is on the front. I never did make it internal. The
halyards must exit somewhere near the bottom of the mast so I
installed four Schaeffer stainless steel halyard exit plates spaced
equally apart
(alternate sides) along the
bottom 5' of the mast. If they are installed at the same level, opposite each other, it will cripple the strength of the mast. The 2 jib exit plates are on one side of the mast and the main exit plate is on the other. One of the exit plates is shown at left. The spinnaker halyard is on the front. I never did make it internal. The exit hole was cut oval to match the fitting plate and to retain maximum strength. The edge of the hole was filed glass smooth to protect the line. Each plate has sealant under it to prevent movement and marine growth. While cutting a hole in a mast always has the potential for weakening it, Panache's mast has survived two knockdowns with no damage. So spreading them apart was the correct thing to do. At right is the factory foot casting equipped with exit blocks on Art's boat. This option was designed for racing. Since the mast rests on top of the casting the mast strength is not compromised with cutting exit holes, which creates peace of mind. Notice that the pivot feature for stepping the mast is retained via the pivot plate at the base of the fitting. The structural strength (for stepping the mast) is retained via the four bolts into the top of the casting. You can see 2 of them in the photo at right. If you add this casting to a standard mast, remember to cut the mast shorter to allow for the length of the foot casting, otherwise the standing rigging will be too short. Now wouldn't you look silly stepping your taller mast in front of all those marina fossils lounging in the peanut gallery! Factory
castings are available from Spar
Tech. 15230 NE 92 St, Redmond Washington 98052, 425-883-2126 or
San Juan Sailboats.
Had I
known about this fitting I would have bought one and saved a lot of
time and effort by not having to install the exit plates, make a mast base plate,
and equip it with mast turning
blocks. But then, what else would I have
done with my time! If you use the casting from an SJ24, you will
have to install a wedge under it to compensate for the sloped deck of an
SJ24. TOP |
|||||||||||||||||||||||
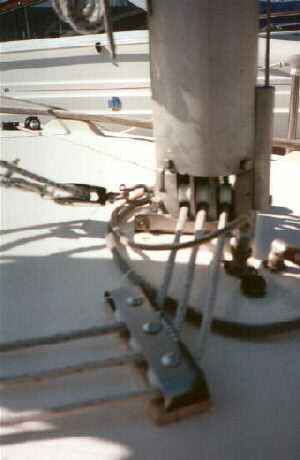
  I
fabricated a heavy gauge stainless steel plate to install under the tabernacle
or mast hinge to
attach Panache's halyard turning blocks to as shown at left. At right is another variation on Artful Dodger.
The deck
hinge plate is 3 7/8" x 6 3/4". Make each upturned tab about 1
1/2" wide and the full length of its respective side. Drill four 3/8" holes through the port and starboard tabs to mount the
halyard turning blocks to.
Drill a couple of holes through the forward tab to mount spinnaker
halyard blocks or anything else you
can think of. Then drill holes through the base, aligning them
with the tabernacle mounting bolts. Prior to assembling, scrape
the surface clean, drill the mounting bolt holes oversize, fill with
epoxy, fill any other cracks, drill to correct bolt size. Then clean the surface with acetone, spread a light I
fabricated a heavy gauge stainless steel plate to install under the tabernacle
or mast hinge to
attach Panache's halyard turning blocks to as shown at left. At right is another variation on Artful Dodger.
The deck
hinge plate is 3 7/8" x 6 3/4". Make each upturned tab about 1
1/2" wide and the full length of its respective side. Drill four 3/8" holes through the port and starboard tabs to mount the
halyard turning blocks to.
Drill a couple of holes through the forward tab to mount spinnaker
halyard blocks or anything else you
can think of. Then drill holes through the base, aligning them
with the tabernacle mounting bolts. Prior to assembling, scrape
the surface clean, drill the mounting bolt holes oversize, fill with
epoxy, fill any other cracks, drill to correct bolt size. Then clean the surface with acetone, spread a light 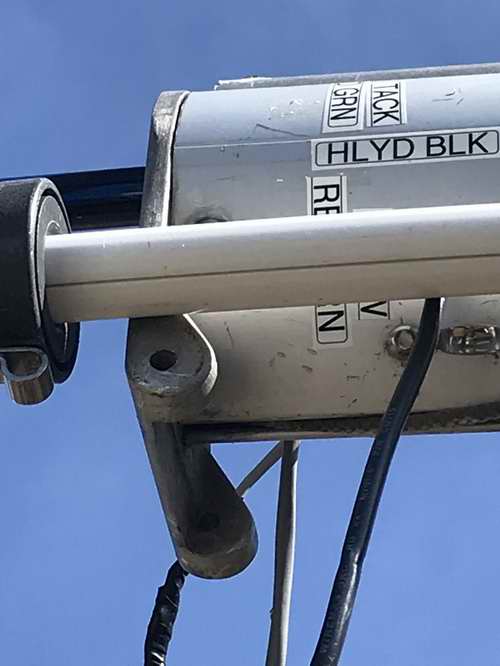 coat of butyl
rubber over
the deck contact area, push the tabernacle to
spread some of the sealant, circle seal the bolts and snug up the nuts. Drag
a popsicle stick across the bead of sealant that oozed out to make a
smooth round fillet to the deck. This guarantees uniform support, no air
holes under the plate, and no water leaks. I did this job to
Panache in 2001 and it hasn't leaked a drop since. coat of butyl
rubber over
the deck contact area, push the tabernacle to
spread some of the sealant, circle seal the bolts and snug up the nuts. Drag
a popsicle stick across the bead of sealant that oozed out to make a
smooth round fillet to the deck. This guarantees uniform support, no air
holes under the plate, and no water leaks. I did this job to
Panache in 2001 and it hasn't leaked a drop since.
Many people are superstitious about loosing their mast and will place a coin under it for good luck. However, placing your St. Christopher medal or other coin under an SJ23 mast foot is NOT the place to leave it. The electrical valence difference of the metals will create corrosion, guaranteeing that the mast will come down! Hmmm. Instead, fasten your coin to the inside of the mast base or stick it to the outside of the base somewhere. Just as long as the two different metals don't contact each other electrically to create electrolysis. Get creative and make the installation look good. Trust me, the gods will like it! There are 3 three screws that hold the mast foot in place. One at the front and one on either side. TOP |
|||||||||||||||||||||||
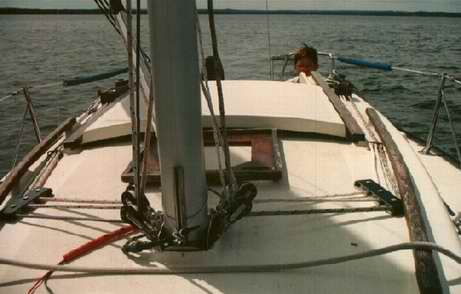 Shown
at right is Panache's first version deck hardware to guide the lines from
the mast
base to the
cockpit. There are three blocks on either side of the mast base.
Each
is supported off the deck by a Harken
block spring to keep it from flopping and in alignment with its deck
turning block. Without the springs, the blocks jam
against each
other which is a nuisance. They are dead quiet
now and always in perfect alignment for easy running. Shown
at right is Panache's first version deck hardware to guide the lines from
the mast
base to the
cockpit. There are three blocks on either side of the mast base.
Each
is supported off the deck by a Harken
block spring to keep it from flopping and in alignment with its deck
turning block. Without the springs, the blocks jam
against each
other which is a nuisance. They are dead quiet
now and always in perfect alignment for easy running. From the mast turning blocks the halyards go through a set of deck turning blocks to direct the lines aft to the cockpit. Through bolt them to the deck so they are really strong. Don't rely on wood screws as there isn't enough strength in them nor is the cored deck substantial enough to grip a wood screw. Remember to seal the wood core inside the deck holes with epoxy and seal the bolt holes with butyl or Sikaflex. From here the halyards go through a short section of angle aluminum with holes through it to guide the lines around the front of the sliding hatch retainers. I drilled three 1/2" holes in each and filed the insides smooth so they don't impede line movement or chafe the line. They are my design. Finally the halyards are held by a triple rope clutch mounted on the aft end of the coach roof with the free ends hanging in the cockpit. As far as I'm concerned, a rope clutch is the best way to secure a line if you sail single handed. They are quicker to set/release, generally never slip and have less wear and tear than a cleat. At the aft end of the coach roof, aft of the rope clutches, is a #6 winch and a cleat, in that order. A #7 or #8 winch would have more power but is heavier. While I've never had a problem with the rope clutches, I've retained the original cleat behind each winch as back up. You can never be too sure. Besides, it is a great place to clip my wet bathing suit to. UPDATE - In 2014 I upgraded this deck hardware to add four reefing
lines and two more rope clutches as described in Tech
Tip F05. Some time before that I removed the solar panel
mounting board on the deck, just aft of the mast. TOP |
|||||||||||||||||||||||
|
The technique of pulling the halyards through the mast is already
described in
Tech Tip
E09. I suggest you run the halyards through
the space aft of the spreader compression bolt (between the spreaders) to direct them to the aft facing exit holes at the bottom of the mast
or through the exit holes of the foot casting, if so equipped.
This reserves the front space for the electrical wires.
NOTE - Whenever I convert something, I seldom remove or dispose of
the original hardware, just in case the conversion doesn't work. This way I can
restore to the original. In my conversion to internal halyards I removed the
mast cleats thinking they were unnecessary. That was a mistake.
They are required to terminate the halyards for stepping the mast and were
reinstalled a few years later.
TOP
|
|||||||||||||||||||||||
| The
simplest method of pulling a new halyard through the mast is to use the
old one as a fish tape to pull the new one through. Stitch the two ends together, aligning
the butt ends snug to each other, then gently pull
the old line out till the new line is in place. The stitch technique will
pull a line over a sheave or through a block and is particularly
useful if you don't want to lower the mast. If the mast is down and you don't already have a line inside the mast then you stitch and pull a line through or make a fish tape to get the lines through the mast. 3/4" PVC tubing is excellent as a fish tape as you can push, pull and turn it through the mast with sufficient flex and control to get it around an obstacle. Cut the end off to a 4" long taper to facilitate poking and prodding through or around an obstacle. The spreader bolt, half way up the mast, divides the mast cavity into fore and aft sections. Pull the jib and spinnaker halyards through the forward space and pull the main halyard and other aft lines through the aft space. Once you've pulled a set through, stretch each halyard very tight and tie them to their respective side. This temporarily keeps this set of halyards to its respective side, keeping the opposite side clear. Then roll the mast over so the clear section of the mast is at the bottom and pull the second set through. After you've pulled all your lines through, loosen all halyards.
Then tighten each individually while looking inside
the mast as someone shines a light down the mast from the opposite end. This
will verify that lines are NOT wrapped around each other. THIS is ABSOLUTELY ESSENTIAL.
If you have a wrap, pull the
two offending lines out till the wrap is exposed, undo it, and pull the
lines
back in again. Use a light line to pull them back. The object of this
exercise is to have all lines straight and
NOT wrapped around each other or anything else. Wrapped halyards are a
real nuisance as they
CANNOT be tensioned or RELEASED properly AND there's not a bloody thing
you can do about it on the water. Once it is determined
that a halyard is clear and free, guide it out of the mast through its
assigned exit hole. As a final test, temporarily install the
cap and foot and pull each halyard (with the
rest tightened) to feel if it is free to move. They should all
slide through the mast with minimal resistance. You'll
be able to feel and hear if a halyard is still wrapped. TOP
|
|||||||||||||||||||||||
|
|
|||||||||||||||||||||||
|
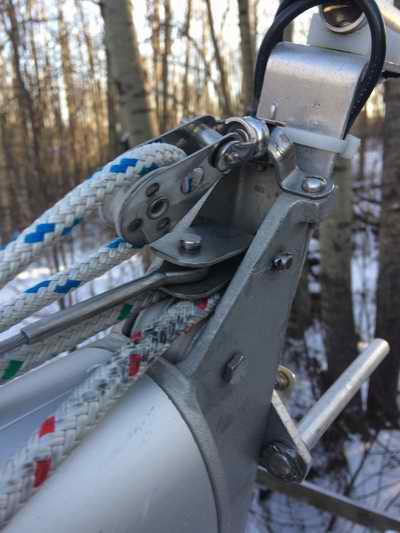
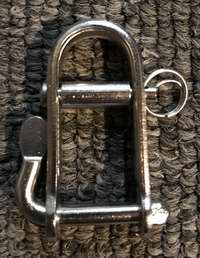
The style of halyard shackle (Ronstan RF1032) shown at right doesn't let go. It is equipped with a pin that separates the halyard from the sail to prevent loss or jamming. This pin is removable so it can be slid on a line equipped with a spliced eye. The lever style keyed locking pin is relatively easy to operate with cold fingers and can handle a large load. It stays latched in the detent. In fact I don't know of anyone who has experienced a release on a jib. While this release problem is not so prevalent on the mainsail I see no reason for restricting such a good device to the jib. Install one on the mainsail as well! MARK a HALYARD - You should mark your jib halyard to know when
the genoa is at the mast head. Also mark your main halyard for each reef
point. TOP
|
|||||||||||||||||||||||
Those inconsiderate people who leave their halyards slapping against the mast at night deserve to have them cut! That's my personal opinion and I'm sticking to it! I know of many others who share my opinion. When I spend a night in a marina, one of the first thing I do is listen for slapping halyards around me. Then I flip it around the spreader or secure the bitter end to a point away from the mast, finally tightening it so it doesn't move. If I keep the halyard attached to the mainsail then I'll use a strap to my flag halyard or shroud to secure it. In either position it can't slap against the mast. I like marinas that enforce this. Who can
sleep with that racket all night? TOP |
|||||||||||||||||||||||
|
All
the previous discussion in this Tech Tip describes restoring the running rigging in a standard configuration. I have added this section since few people are aware of the
benefits.
If you intend to race the boat successfully or sail in really heavy weather, then you should give some consideration to running the jib sheet across the cockpit to the windward side. You can do this temporarily by taking a turn around the idle leeward winch and across the cockpit to the windward winch. This is a good technique to use if the boat starts to heel towards 300 and you want to counter balance the heel by staying on the high side. It is much easier to grind a winch on the high side than the low side, especially when sailing solo. I do this regularly in heavy weather as a safety factor to keep from being dumped into the drink by a wave I didn't anticipate. For this capability the free end of the sheets must be long enough to reach the windward winch, plus a bit more!
At least one person I know has rigged his SJ24 permanently by moving the primary winches from the gunwales to the cabin top and
installing large turning blocks on the gunwales to direct the sheet to the cabin top. The sheet is run through
the turning block and then across the
cockpit to a winch located on the windward coach roof. The benefits are
that a crew grinding the jib sheet on a
cabin top winch has their weight close to the maximum girth, helping to keep the boat upright for more drive and frees up
valuable cockpit space. By being further forward they maintain fore aft trim and the helmsman is free to concentrate on
steering without interruption. Additionally, the extra leverage that can be applied to the winch while
positioned securely on the high deck is significant. In summary, if the trimmer can stay forward, to windward, and
out of the cockpit, he is contributing all the key
factors to sailing a San
Juan fast. The overall effect can be more
dramatic than you realize. However, if the weather is really light
then it is advantageous to induce some heel, so have the grinder stay in
the companionway. TOP
|
|||||||||||||||||||||||
|
|||||||||||||||||||||||
|
Return to Tech Tip Index. . . . . . . . . . . . . . . Have a Question? |
|||||||||||||||||||||||
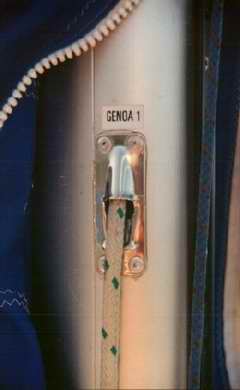
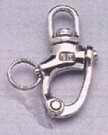 It's
my experience that the
very convenient jib halyard snap shackle shown at left has a tendency to let go at the
most awkward of times; usually with somebody watching. Therefore
I've stopped using it. If you enjoy climbing the mast, then fill
your boots! The problem stems
around the ring or pull knob that
protrudes beyond the edge of the casting. You can be rest assured
that it will snag on something and release, sometime! What a pain.
While a pull knob might snag fewer times than a ring, it is also more
difficult to grab. I'm told that a Wichard snap shackle has a bullet
proof design but it is also very expensive. A solution that
some manufacturers use is to slip a vinyl or leather sleeve over the top
end of the snap shackle.
It's
my experience that the
very convenient jib halyard snap shackle shown at left has a tendency to let go at the
most awkward of times; usually with somebody watching. Therefore
I've stopped using it. If you enjoy climbing the mast, then fill
your boots! The problem stems
around the ring or pull knob that
protrudes beyond the edge of the casting. You can be rest assured
that it will snag on something and release, sometime! What a pain.
While a pull knob might snag fewer times than a ring, it is also more
difficult to grab. I'm told that a Wichard snap shackle has a bullet
proof design but it is also very expensive. A solution that
some manufacturers use is to slip a vinyl or leather sleeve over the top
end of the snap shackle.
 The sleeve just covers the release pin
to protect it and
maintain speed of
operation during sail changes. It may not be easy to operate in
cold weather but if it works why not.
The sleeve just covers the release pin
to protect it and
maintain speed of
operation during sail changes. It may not be easy to operate in
cold weather but if it works why not.