| SJ23 Tech Tip F10, (Updated 2024-11-11)
Stan Franklin, Ralph Fuchs, Alan Weld, Randy Cook, Robert Hasegawa & Bob Schimmel. |
Index |
|
Roller Furling for Panache.
Index -
Harken 00AL, CDI FF2,
Hood Seaflex, Selden/Furlex,
Alado.
PANACHE INSTALLATION -
Schaefer CF-500,
A new Forestay,
Assemble Furler,
Furling Control Line.
Replace a Damaged Forestay,
Reference Links.
|
 The reliability of a jib furling system on a pocket cruiser is beneficial for a
solo sailor since reducing sail area quickly from the safety of the
cockpit is your safety valve. It eliminates a trip to a pitching foredeck that can
require a fair degree of balance in steep waves. Then there is the
issue of leaving the tiller while the boat does squirrelly things all on its own. The reliability of a jib furling system on a pocket cruiser is beneficial for a
solo sailor since reducing sail area quickly from the safety of the
cockpit is your safety valve. It eliminates a trip to a pitching foredeck that can
require a fair degree of balance in steep waves. Then there is the
issue of leaving the tiller while the boat does squirrelly things all on its own.
For a trailerable sailboat the easy collapsibility
(for lack of a better word) of the
standing rigging is important when the mast comes down at the end of a season. I have seen many an expensive aluminum foil get kinked
or bent while stepping the mast with little to no damage while sailing. Damage can also occur during road travel, which is usually due to inadequate
support for the foil & drum.
The simple task of lashing a support pole to the mast or removing the
drum escapes some people! The damage is sometimes impossible to
repair and requires expensive replacement.
While I'm not trying to talk you out of installing a
furling system, but failures due to component weakness or
corroded bearings are two of the reasons why die hard sailors of the
1970s, including yours truly, stayed with a hank on jib and a down haul line. Thankfully flexible furlers are dependable today
due to improved foils
and drums to prevent salt water corrosion and Torlon ball bearings to make it easy to turn. The advantages of a correctly
installed flexible system are; ease and speed of use, less fatigue,
dependability, fewer bagged sails cluttering the cabin and a drier cabin since you are not hauling wet
sails inside. I am not going back to hanked sails.
Read Tech Tip F10a, "How to keep your furling
system alive" before you install your new system. You can glean some really good rigging tips from Brion Toss. VARIOUS FURLERS TO CONSIDER FOR AN SJ23 -
The difficulties of designing a strong furling system that can be shipped
easily have been solved. Two techniques have evolved; sectional aluminum extrusions
that are screwed together for installation or a flexible vinyl extrusion that is rolled in a coil for shipping and cut to length for installation.
Hence the term flexible furler. The furlers shown in this Tech Tip are operational on various SJ23s. See
Tech Tip H02
for
rigging specifications to assist you in choosing a furler.
TOP
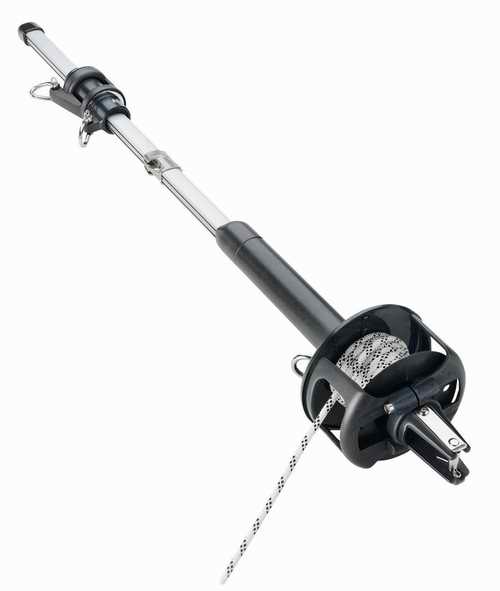
HARKEN 00AL
-
This
sectional furler (shown at right) has the following features;
| BOAT |
Designed for an (18-26)' or (6-8)M
sailboat.
|
| FORESTAY |
To install this
furler you must cut the forestay and purchase a Harken clevis pin
to match your chain plate.
|
| TURNBUCKLE |
Requires an open turnbuckle with
T-bolt & toggle at the bottom. An open turnbuckle can easily
be lock wired.
|
| FOIL |
The early
version of this furler has a double grooved sectional aluminum
oval foil up to 31' long that can be built out to 35'. Later versions of
this furler have vinyl foil.
|
| DRUM & TORQUE TUBE |
The torque tube has a free spinning omni directional ball bearing
system with multiple bearing races. A large spool for easy reefing or furling.
The split drum can be removed for racing or road transport.
|
| FURLING CONTROL LINE |
Single line, about 40' of 5/32"
or 3/16" braided Dacron. Install 1 swivel block on pulpit &
2 fairleads on stanchions.
|
| SAIL |
#6 luff tape with webbing on the tack and head recommended to avoid
bulky furling.
A UV strip along the foot and leech is recommended to protect the
cloth.
|
| HALYARD |
Lightweight halyard swivel.
The halyard should be lead 10 degrees away from the forestay to
prevent halyard wrap.
|
| INSTALLATION TEMP |
20C or warmer.
|
The entire system can be removed from the forestay
but it would be a lot of work. (Harken furling 101)
"The roller furling on
Sail Boar is a
Harken 00AL. It has a flexible two track foil and the furling
drum is a split design that can be removed for trailering or racing.
This frees up the full length of the forestay to attach the largest jib
possible. I purchased the Harken 00 from the North Sails, Vancouver
loft for approximately $1000 CA, (1996). Dave Miller at North Sails
also removed the extra roundness of my 135 genoa and installed UV
protection along the leech and foot for about $250. The loft needs
the forestay length of the furling system to modify the sail. The
installation of the furling gear is fairly routine since the system uses
the existing forestay and turnbuckle. While Harken says, "It should not be necessary to install a
 halyard restrainer at the masthead," they are wrong. This is essential, unless you enjoy running up the mast to clear a wrap! halyard restrainer at the masthead," they are wrong. This is essential, unless you enjoy running up the mast to clear a wrap!
The
Harken 00AL works very well for single-handed sailing. The
furling control line is fed back along a lifeline to the cockpit. My converted 135% genoa still has reasonable shape
when partially furled. On Dave Miller's advice, I also converted a
"Blade" as a heavy weather sail but so far have not hoisted it. From my experience the Harken system
is built first class and virtually bullet proof."
Stan Franklin.
PREVENT
a HALYARD WRAP - A wrap can be a real nuisance when you can't undo it,
leading to forestay failure in a worst case scenario.
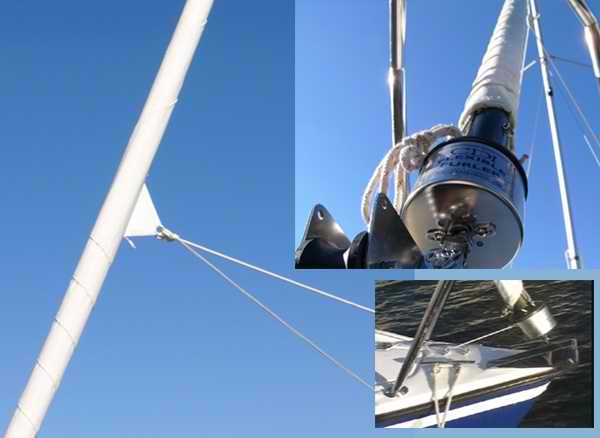
Take every precaution you can to prevent one. "The extra block installed on the mast
for the halyard is a modification I made after the
Harken 00AL roller furling was
installed. The jib halyard (green tracer) and the forestay through
the furling foil were almost parallel to each other. The forestay
(pulled away from mast for visibility) is attached just above the green
halyard. Because they were almost parallel, there was a risk of
wrapping the halyard around the forestay when operating the furling
system. It never actually happened but came pretty close a few
times. The solution was to add the block on the mast and run the
halyard through it, thereby increasing the angle between the head stay
and the halyard."
Ralph
Fuchs.
TOP
|
|
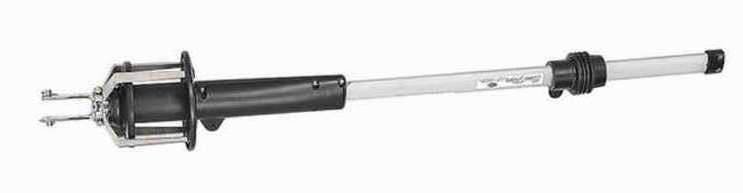
 CDI
FF2 - In 2012 I helped install a CDI FF2 flexible furling
system on a friend's MacGregor and was impressed with the robust
simplicity of the hardware. Especially the one piece tough vinyl foil that has
incredibly high torque properties. This was my
first time to install a flexible furler. Once assembled
it was easy to push the drum and foil up to adjust the turnbuckle.
Overall this is a very clever design that fully incorporates the kiss
principle. I've since seen this system installed on other sailboats,
all operating with no problem. The hardware can be removed from the forestay.
It comes with a life time warranty to the original owner. Bob Schimmel. CDI
FF2 - In 2012 I helped install a CDI FF2 flexible furling
system on a friend's MacGregor and was impressed with the robust
simplicity of the hardware. Especially the one piece tough vinyl foil that has
incredibly high torque properties. This was my
first time to install a flexible furler. Once assembled
it was easy to push the drum and foil up to adjust the turnbuckle.
Overall this is a very clever design that fully incorporates the kiss
principle. I've since seen this system installed on other sailboats,
all operating with no problem. The hardware can be removed from the forestay.
It comes with a life time warranty to the original owner. Bob Schimmel.
-
"One of the sailors at a local club on
Wabamun Lake contacted North Sails in the Spring of 1997 about
installing a Harken 00 system on his MacGregor 26. This time Dave
Miller recommended the roller furling system made by
Cruising Design Inc. (CDI). Boat
Journal apparently rated it #1 among flexible furlers for trailerable
sailboats. The unit was installed on the MacGregor 26 without any problem over the
existing forestay. The foil has a single track but the drum cannot
be removed for racing, if that is important. The components have a lifetime warranty to
the original owner.
The cost in 1997 from North Sails in Vancouver was about $850.00
Ca. The Cruising Design system is somewhat less expensive than the
Harken unit and according to Dave, more reliable." Stan Franklin.
- "I love my FF2 and have had no
problems with it. However, it is not rated for my 150% jib and if
I had to do it over again, I would buy the FF4, the next size up. In addition, the FF4 drum is larger so it can handle larger line which is easier on the hands. I did buy
the FF2 model equipped with the synthetic ball bearings so it rotates easier under load. As a result my FF2 is very smooth and
operates well
when the wind pipes up." Alan Weld.
The Cruising Design Inc. web site shows a good explanation of the
hardware for all four models. Their specs will guide you to the
model FF2 that fits the SJ23 with a 29' 3" forestay. For assistance 1(844) 379-2407 or
info@sailcdi.com.
|
BOAT |
Designed for an (18-26)' or (6-8)M
sailboat.
|
|
FORESTAY |
1x19 SS, 1/8" to 3/16" wire.
|
|
TURNBUCKLE |
Requires an open turnbuckle with
T bolt & toggle at the bottom. An open turnbuckle can easily
be lock wired.
|
|
FOIL |
A flexible one piece oval extrusion
with stainless steel cable co-extruded into the vinyl foil to minimize
twist. Single track. Max length, 28'.
|
|
DRUM & TORQUE TUBE |
Can slide up to adjust
turnbuckle. Bushing is standard. Synthetic bearing is
optional and can be added later.
|
|
FURLING CONTROL LINE |
Single line, about 40' of 5/32"
or 3/16" braided Dacron. Install 1 swivel block on pulpit &
2 fairleads on stanchions.
|
|
SAIL |
#6 Luff tape with webbing at the
tack and head to avoid bulky furling.
A UV strip along the foot and leech is recommended to protect the
sail cloth.
|
|
HALYARD |
Can't happen with the CDI furler which means you can
hoist a jib with any length luff.
|
|
INSTALLATION TEMP |
20C or warmer.
|
The drum can be slid up the foil to expose
the turnbuckle for adjusting. Once adjusted, the head stay tension
is set by the backstay adjuster. See
Tech Tip F09.
INSTALLATION - I installed a CDI FF2 on Wild Tangent during a weekend using Sta-lok fittings with the mast standing. This created a couple challenges that were easily resolved after I figured out what to do. Installing a CDI FF2 with the mast standing and the boat in the water requires a spinnaker and jib halyard as a temporary forestay to keep the mast standing. Below is a high level summary that might help others. Robert Hasegawa (2024-11-11).
Make sure your forestay is properly tensioned and mark the proper location on the screws with tape. There is no way to put a Loos gauge on the head stay after the foil is installed.
- Measure the mast rake and the backstay tension with a Loose Gauge prior to this installation. If the mast rake and the backstay tension are the same after the installation, assuming the new forestay is the same length, then all is OK. Assemble the FF2 head fitting as per CDI instructions. For Sta-lok fittings. Enlarge the center hole on the bow end of the foil to .5" diameter x 3” deep. The CDI foil is designed to slip over a swaged fitting, but Sta-lok fittings are much larger in diameter. Peck at the extrusion with your drill in a controlled way or it will “cork screw” into the material. This step is not required for a swaged fitting. Attach spinnaker halyard to the stem head fitting to function as a temporary forestay. Loop the jib halyard around the top of the foil and attach the jib shackle to the halyard making a “noose” of sorts. This will be used to hoist the foil. Do not wrap this around the halyard, only the foil. That is part of the CDI system. TIE A MESSENGER LINE TO THE JIB SHACKLE. This will be used to retrieve the shackle once installation is complete. Remove the forestay pin and remove the Sta-Lok fitting from the cable. Feed the cable through the center hole of the foil. Use the jib halyard to hoist the top side of the foil while carefully feeding the cable into the center hole. At some point, the end of the foil will be beyond reach. Just pull the halyard carefully, wiggle it around if necessary, and it will feed all the way through. I did this on the first try with no problem. When the end of the cable is through, cleat the jib halyard. You should have a few inches of cable sticking out the top. Reinstall the Sta-Lok fittings using a new wedge and former. Continue the drum installation per the CDI instructions. Re tension the head stay using the tape. Safety wire in place. Uncleat the jib halyard and use the messenger line to retrieve the shackle. Job done. Check the mast rake and backstay tension after a couple of weeks. Don't be surprised if it requires adjusting to restore settings.
TOP
|
|
HOOD SEAFLEX FURLER -
Incorporating all the experience and quality of HOOD Yacht Systems, the
SEA FLEX flexible furler is created with
the needs of a pocket cruiser in mind.
|
BOAT |
Designed for an (18-26)' or (6-8)M
sailboat.
|
|
FORESTAY |
Forestay 1x19 SS, 1/8" to 3/16" wire.
|
|
TURNBUCKLE |
Requires an open turnbuckle with
T bolt & toggle at the bottom. An open turnbuckle can easily
be lock wired.
|
|
FOIL |
A flexible one piece oval extrusion
with stainless steel cable co-extruded into the vinyl foil to minimize
twist. Single track. Max length, 33'.
|
|
DRUM & TORQUE TUBE |
Removable drum covers and guard
for performance sailing. Universal clevis mounting. Tapered
drive unit for clean sail entry.
|
|
FURLING CONTROL LINE |
Single line, about 40' of 1/4"
braided Dacron. Install 1 swivel block on pulpit,
2 fairleads on stanchions, 1 swivel block at the aft stanchion, a
cleat on the cockpit coaming away from sheet activity.
|
|
SAIL |
#5 Luff tape with webbing at the
tack and head to avoid bulky furling.
A UV strip along the foot and leech is recommended to protect the
sail cloth.
|
|
HALYARD |
The halyard should be 10
degrees away from the forestay to prevent a wrap.
|
|
INSTALLATION TEMP |
15C or warmer.
|
  The drum can be released from the furler housing and the side of the
housing removed to expose
the turnbuckle for adjusting. Once the turnbuckle is adjusted to the correct
mast rake the head stay tension
is set by the back stay. See
Tech Tip F09. The drum can be released from the furler housing and the side of the
housing removed to expose
the turnbuckle for adjusting. Once the turnbuckle is adjusted to the correct
mast rake the head stay tension
is set by the back stay. See
Tech Tip F09.
"I acquired this system with the
purchase of my boat. After I replaced the missing components all
is working well with the boat on the trailer. The 150% genoa rolls
up nicely. Once the boat refurbish is
complete I'll report my on the water experience here." Randy
Cook.
TOP
|
|
SELDEN / FURLEX 50S FURLER - Perfect choice for a sailor
wanting a compact, low height furling and reefing system. This is
the
only manufacturer to supply a complete kit of the following: a new forestay wire
e/w Sta-Lok terminal, halyard lead, stanchion block,
pre-feeder and furling control line with the furler. Everything included. Here's
how to install it and
measure it.
| BOAT |
Designed for an (18-26)' or (6-8)M
sailboat.
|
| FORESTAY |
1x19 SS, 4-5 MM equipped with Sta-Lok
terminals.
|
| TURNBUCKLE |
Fork and toggle mounting.
|
| FOIL |
Flexible one piece vinyl
oval extrusion. Max length is (7.7-10.1), (7.7-12.5) M.
|
| DRUM & TORQUE TUBE |
SS sail feeder for smooth
hoisting.
|
| FURLING CONTROL LINE |
Single line, about 40' of 1/4"
braided Dacron. |
| SAIL |
#6 Luff tape with webbing at the
tack and head to avoid bulky furling.
A UV strip along the foot and leech is recommended to protect the
sail cloth.
|
| HALYARD WRAP |
The halyard should be 10
degrees away from the forestay to prevent halyard wrap.
|
| INSTALLATION TEMP |
15C or warmer.
|
TOP
|
|
ALADO
- Another good sectional furler for an SJ23. It has lifetime
warranty, double sheaves for twin sails, double integral halyard
sheaves, dual interlocking aluminum foils for aerodynamic profile and
optimum torsion strength, polypropylene bushings, no swivel under
tension to jam eliminating halyard wrap, open drum. Furling drum,
sheave boxes & luff feeder are made from aluminum. The aluminum
foils rotate on bearings around the forestay, keeping it centered and
straight.
TOP
|
|
PANACHE
INSTALLATION (2018-04) - "I had
no intention of installing a furling system but I'll admit that I was getting
 tired of the "panic" trips to the foredeck to douse a jib. Then in Fall of 2017
I was offered a
Schaefer Snapfurl CF-500 furler for a
price I just couldn't turn down. tired of the "panic" trips to the foredeck to douse a jib. Then in Fall of 2017
I was offered a
Schaefer Snapfurl CF-500 furler for a
price I just couldn't turn down.
FORESTAY
- A new furler also meant I had to install a
new forestay and of course a 'perfect time' to install a
back stay adjuster. See Tech Tip F09. FURLING CONTROL LINE
-
The design of the furling control line was reconfigured several
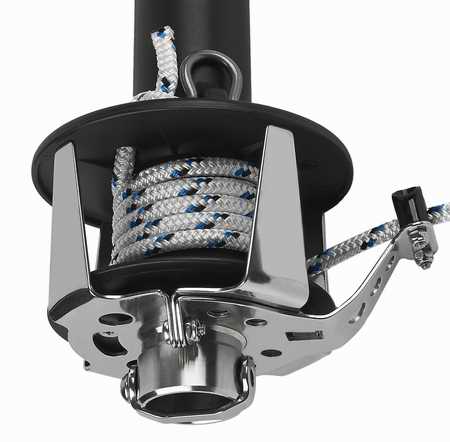
times to accommodate my anchor roller which lead to installing the fairlead bracket (CF-500-22) on the drum, fairleads on the stanchions and roller blocks along the toe rail. CONVERT JIB
- During installation I thought it expedient to
convert my 110% jib to furling since I knew
it would fit, so off it went to North Sails, Vancouver. JIB SLEEVE
- Since I already owned
a slightly used
jib sleeve I chose not to add UV strips to
the jib. JIB OOPSY
- A problem with the top pennant of the 110% jib was solved with trial and error during the
first summer. CONVERT GENOA
- The next summer my 150% genoa was converted to furling.
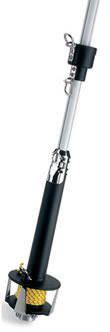
 SCHAEFER
SNAPFURL CF-500 - An excellent USA built flexible furler with a
flexible foil designed specifically for stepping the mast of a
trailerable sailboat. This is perfect if you frequently step the
mast as it is less prone to damage while doing this
job. It is easy to store on the mast for transport. It comes with a 5 year warranty to the original
owner. (Keep your receipt). The vinyl foil extrusion halves are coiled and shipped in a (36x36x5)" box
with the associated hardware tucked inside. Keep that in mind for shipping.
The two foil halves, fore and aft, snap together over a 1/8" to 3/16"
diameter forestay. The swivel and drum are equipped with Torlon
bearings. The swivel slides to the top of the foil to hoist the
jib and tension the
luff. The drum is equipped with a retaining clip and a locking
strap to keep the turnbuckle toggle extended out the bottom for
"pinning" the forestay to the deck. This is a clever design that
allows a person to push the torque tube down to guide the turnbuckle into
place over the chain plate, saving time by keeping
parts attached. Once the forestay is on, the drum can be
slid up the foil by loosening 4 captive 5/32" Allen screws on the
sail feeder and the two screws on the bottom locking strap you see at right. Sliding the drum up over the foil exposes the turnbuckle so the tension can be adjusted.
Once the turnbuckle is adjusted with the correct mast rake it is lock
wired and the head stay tension is set by the back stay. This is why I
installed a back stay adjuster on Panache. See
Tech Tip F09. To remove the drum and swivel for winter storage loosen the 4 Allen screws and slide both off the bottom of the foil. For road travel and storage secure the
foil with enough straps along the mast to prevent drooping and support the protruding end of the foil. The alternative is to support the
torque tube with a (2x4)" or ski pole. SCHAEFER
SNAPFURL CF-500 - An excellent USA built flexible furler with a
flexible foil designed specifically for stepping the mast of a
trailerable sailboat. This is perfect if you frequently step the
mast as it is less prone to damage while doing this
job. It is easy to store on the mast for transport. It comes with a 5 year warranty to the original
owner. (Keep your receipt). The vinyl foil extrusion halves are coiled and shipped in a (36x36x5)" box
with the associated hardware tucked inside. Keep that in mind for shipping.
The two foil halves, fore and aft, snap together over a 1/8" to 3/16"
diameter forestay. The swivel and drum are equipped with Torlon
bearings. The swivel slides to the top of the foil to hoist the
jib and tension the
luff. The drum is equipped with a retaining clip and a locking
strap to keep the turnbuckle toggle extended out the bottom for
"pinning" the forestay to the deck. This is a clever design that
allows a person to push the torque tube down to guide the turnbuckle into
place over the chain plate, saving time by keeping
parts attached. Once the forestay is on, the drum can be
slid up the foil by loosening 4 captive 5/32" Allen screws on the
sail feeder and the two screws on the bottom locking strap you see at right. Sliding the drum up over the foil exposes the turnbuckle so the tension can be adjusted.
Once the turnbuckle is adjusted with the correct mast rake it is lock
wired and the head stay tension is set by the back stay. This is why I
installed a back stay adjuster on Panache. See
Tech Tip F09. To remove the drum and swivel for winter storage loosen the 4 Allen screws and slide both off the bottom of the foil. For road travel and storage secure the
foil with enough straps along the mast to prevent drooping and support the protruding end of the foil. The alternative is to support the
torque tube with a (2x4)" or ski pole.
| BOAT |
Designed for an (18-26)' or (6-8)M sailboat.
|
| FORESTAY |
1x19 SS, 1/8" to 3/16" wire. I
replaced Panache's forestay.
|
| TURNBUCKLE |
Requires an open turnbuckle with
T-bolt & toggle at the bottom so it can be wire locked.
|
| FOIL |
A flexible one piece round extrusion made from high grade Geon PVC. Single track. Max length, 31'. The instructions provide clear step by step directions for cutting the foil to the correct length.
|
| DRUM/TORQUE
TUBE |
An injection molded drum/torque
tube equipped with Torlon bearing(tm) and SS sail feeder. Once the sail feeder is loosened and the retaining clip removed, it can slide up
the foil to adjust
the turnbuckle. While the torque tube does not touch the open turnbuckle inside it,
Schaefer recommends lock wiring the turnbuckle to prevent accidental
unscrewing.
NOTE - Like most furling systems this one also benefits from an external prefeeder to load the jib onto the foil, unless you enjoy walking to the drum to guide each foot of sail into the prefeeder.
|
| FURLING CONTROL LINE |
Single line, ~40' of 1/4"
braided Dacron. Install a swivel block on the toe rail just
aft of the pulpit and a SS fairlead on each stanchion. Install the cleat away from the primary winch. If
the cleat is installed at the aft end of the
cockpit coaming you will also require a swivel block mounted on the aft
stanchion to turn the line forward.
|
| SAIL |
#5 Luff tape (standard & good
quality, CANNOT BE HEAVY) with webbing at the tack and head to
avoid bulky furling. To protect the cloth from UV damage
install a UV strip along the foot and leech or use a jib sleeve.
|
| HALYARD |
Requires a halyard restrainer
attached to the top of the mast so the halyard is angled at least 100 away from the forestay
with the swivel within 5" of the foil cap.
If the sail is not full hoist a pennant is required between the head
and the swivel so the swivel
is within 5" of the foil cap. It is OK to add a
short pennant at the tack.
NOTE - A correctly positioned foil restrainer can prevent the swivel
from being pulled off the top of the foil.
|
| INSTALLATION TEMP |
150C or warmer.
|
PANACHE
Measurements
for Schaefer CF-500 |
(Forestay =
29' 3-1/4"), (Foil LOA = 28' 8.5"), (Foil clevis/clevis = 27' 6"), (Jib luff = 27' 3").
NOTE - These measurements apply to Panache. Use them as a guide. You MUST measure the dimensions for your own boat.
|
-
Locking strap and turnbuckle retaining clip - Schaefer equips
this furler with a locking strap (holds torque tube up) and a
turnbuckle retaining clip (holds torque tube down) installed below the
drum (read the CF-500 manual). With both installed the drum/torque tube can't slide on the forestay, making it possible to pin the forestay to the deck by pushing down on the drum. In
Panache's case the turnbuckle toggle didn't stick out far
enough to easily pin the forestay, so I added a
3/4" spacer and a custom retaining clip.
- Schaefer Lead Arm - The CF-500 drum installs too low to the deck of an SJ23 to
install the first
control line block on a pulpit leg, there being no 900 line
up. This is the reason
I installed the Schaefer Lead Arm, option CF-500-22. It works
well.
-
Sail
Feeder - The
square corners on the inside of the metal sail feeder make removing a jib very
difficult when the bottom of the luff tape has frayed
cloth that binds on the inside square corners of the sail feeder. (Later
I learned they should be bonded to each other). One of the loose outside layers of cloth will inevitably pile up on
one side of the top of the feeder, preventing the sail from sliding out. This was
the case with my modified jib. In an emergency it is
possible to remove the feeder and pull the foil up to remove the jib.
A better solution is
to glue the 1/2" edge of layered cloth into a single rigid form.
The glue must not be longer than 1/2", as it must slide through the .062" gap of the feeder. DO NOT GLUE THE
BEAD as it must remain flexible to slide through the feeder. In addition, I filed the inside
corners of the feeder to a slight bevel and polished the bevels with
600 grit emery cloth. Voila, the jib slips in and out much
easier.
-
Prefeeder - Its also a good idea to use a pre-feeder to guide the jib to the
foil feeder, especially if you hoist the jib on your own. It's really frustrating having to walk
between the bow and the mast for each foot the jib is
hoisted, not to mention damage that can be done to the luff tape by snagging
it on the
foil feeder. The best prefeeder is one equipped with rollers at
the business end.
 Transport & Storage - For trailering and winter storage
Schaefer recommends the drum and swivel
be slid
off the foil and stored in the cabin to remove excess weight. Transport & Storage - For trailering and winter storage
Schaefer recommends the drum and swivel
be slid
off the foil and stored in the cabin to remove excess weight.
- On
Panache the foil protruding beyond the mast is supported by an old ski pole jammed into the top hole in the mast base. This works very well and simplifies the job.
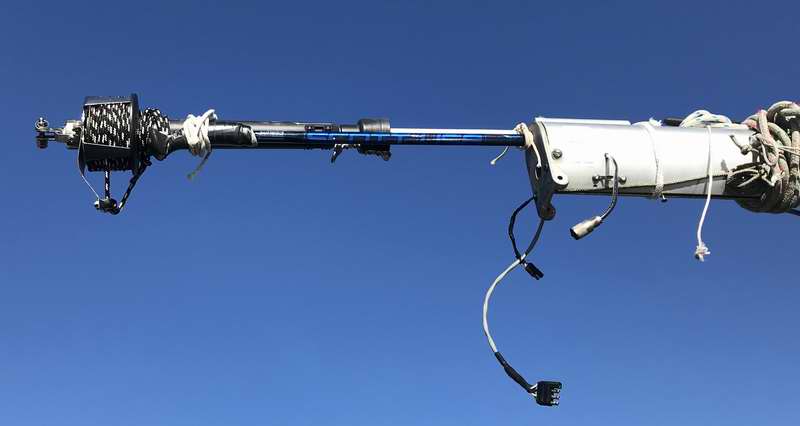
- One less hole for the birds to nest in!
- Alternatively you can support it with a (2X4)" as shown for a CF-700 furler ready
for a trek down the lake. In either case there is no strain on the drum or
foil.
|
|
A NEW FORESTAY
YOU SAY
- When you read the installation manual of any of these
flexible furlers you'll discover all of them recommend
replacing the forestay if it is even slightly suspect OR more than 4 years
old. Selden goes so far as to supply a new forestay! All
of them recommend using an open turnbuckle that is locked with SS wire since a roller furler has been known to unscrew a
locked barrel type turnbuckle. "Nasty that would be."
An open turnbuckle sheds water & debris where a barrel turnbuckle can trap
both. I have no access to a rigging shop to
swage a new 1/8" forestay so I upgraded it to 316 SS 5/32" wire (left hand lay) with a Sta-Lok eye terminal at the top and a Sta-Lok 5/16"
turnbuckle stud terminal at the bottom. 5/32" wire is more robust
than 1/8", has less stretch and a Sta-Lok terminal can be repaired in the field.
-
Keep this in mind. "Corrosion resistance, fatigue resistance, proper scantlings, proper tune, proper use, and quality of metallurgy are all more likely to prevent rigging failure than ultimate strength will. Rigging afloat is very unlikely to be stressed anywhere near the breaking strength of its mechanical fittings but Mother Nature is always acting to corrode, fatigue or otherwise break it." Practical Sailor.
-
Just in case you have the heebie
jeebies about installing a mechanical
terminal, watch the applicable "how to" video: Sta-Lok,
Hi-Mod (Hayn) or Norseman. (Norseman
went out of business in 2014).
-
A marine sealant
can displace the water and air inside a compression
terminal to prevent cracking in freezing weather and/or crevice corrosion in salty air. Sta-Lok leaves the decision to fill the terminal to the installer as long as the
sealant is not acidic. Suitable sealants are:
Sikkens Sikaflex 291, marine silicone sealant (with no vinegar smell), 3M4000 UV or BoatLIFE polysulfide.
- I live in a
freezing climate so filled Panache's terminals with
Sikkens Sikaflex 291.
STEPS to INSTALL a
Sta-Lok
TERMINAL.
|
|
To replace the factory forestay and turnbuckle I installed the bottom Stay-Lok terminal first and placed the turnbuckle eye on the measuring board, next to the old forestay (Board shown for demo only). Then I tightened the forestay and the 5/32" wire side by side to transfer the LOA to the new wire. Stretching was done with the turnbuckle screwed in 1/3 of the way which so you can adjust the mast rake as needed for sailing. I measured the LOA a zillion times before I finally cut it as I had very little extra wire.
|
|
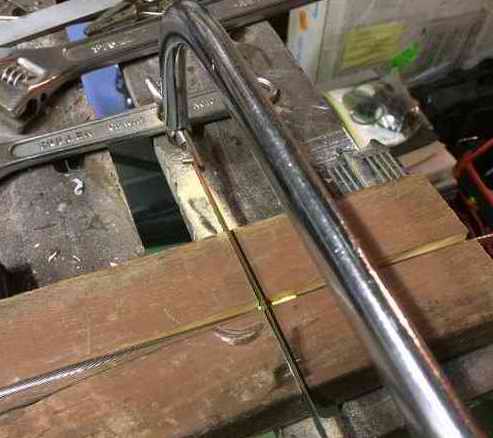
Fig 1, CUT WIRE SQUARE - Tape the wire to keep the strands together
while cutting through the tape. It cuts absolutely square
without burrs if just the weight of the hack saw cuts the
strands with support from a (2x4)". The alternative is to use a Dremel tool with a cutting disk using light pressure.
|
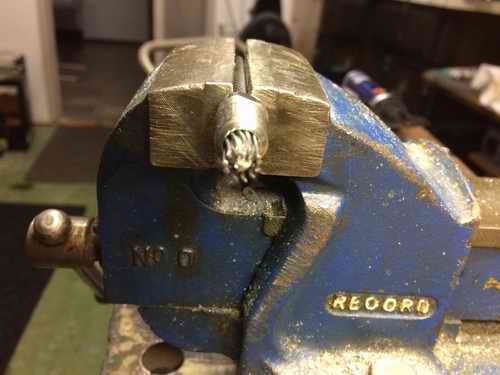
Fig 2, ASSEMBLE THE TERMINAL - The socket was slid over the wire & the outside strands unravelled. The wedge was slipped over the core leaving 1/8" protruding. The outer strands were evenly spaced around the
wedge & across the split. The socket was slid against the strands to
maintain their spacing. Then I held the end fitting with the open end pointed up so the former stayed on the bottom. 1 drop of Loctite went on the former and 2 drops on the socket thread. The two were tightened till just snug.
|
|
Fig 3, FORM THE STRANDS - I removed the end fitting to confirm correct forming and even spacing of
the strands as per this photo. The center
core MUST stick out a bit. It fits in the hole through the former, provided the burrs were removed. Wet Loctite is an excellent lubricant to use between the strands and the face of the former. Also on the
thread to prevent galling. Once cured it prevents the
Stay-Lok terminal from working itself loose. The terminal can be opened
for inspection years later, provided you replace the wedge. I haven't done this yet. 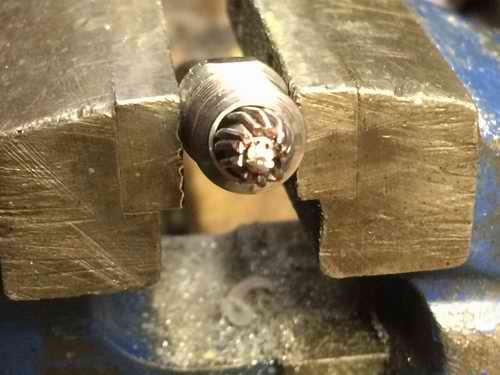
|
Fig 4, SEAL THE TERMINAL - The excess Sikaflex oozed out between the wire strands and the thread when I tightened the end fitting. The sealant guarantees a water tight seal to prevent corrosion in this deck level terminal. The threaded stud end was tightened on the stationary socket to maintain the integrity of the wire strands against the former.
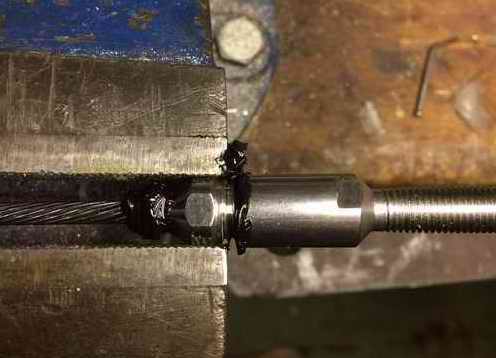
While I used a wee tad too much Sikaflex, it turned out good. Its not often that the stud end is shown. This screws into the top of a turnbuckle. It sure simplifies the rigging assembly.
|
|
Fig 5, TOP
TERMINAL
- I determined the cut length of the new forestay by lining up the Stay-Lok pin hole to the factory masthead toggle hole. The black pointer indicates where the wire ends inside the Stay-Lok terminal. The forestay length is crucial to maintain mast rake.
|
Fig 6, TOP
TERMINAL - Top Stay-Lok terminal installed on the
new forestay.
The excess Sikaflex was wiped off leaving some embedded between the strands to shed water. The black pointer indicates the alignment of the clevis pin hole to the factory forestay toggle hole.
|
|
The San Juan mast head toggle was retained to pin the Sta-Lok eye to. The toggle spreads the load evenly on the horizontal pin across the masthead.
Back to Tech Tip F34a
|
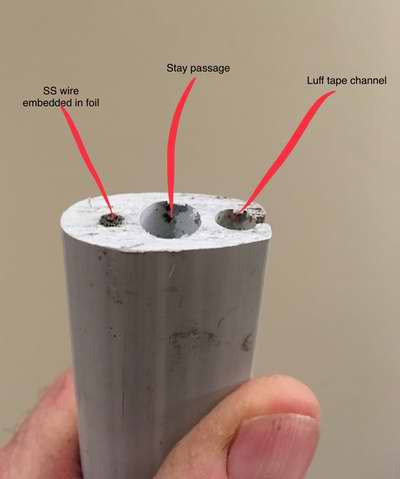
With the new forestay fabricated the "cut length" of the Scheafer vinyl foil was measured for installation. Then the maximum luff length of the 110% jib was measured for conversion (first sail to be converted). These two critical measurements were made with a 100'
tape measure to ensure accuracy. Now we're making progress.
|
|
TIME TO TEST - There comes a time in any project when you just have to put
the pieces together to confirm that things fit before moving to the
next critical step! So on a warm Spring day Panache's mast was stepped using the factory backstay
to maintain the original mast rake. The new forestay was a perfect fit with the mast at the
correct rake and 1" of thread left on the turnbuckle. Its sweet when all the measurements are correct
and things fit. Next step is to
install the furling system.
|
|
INSPECTION (2023) - Inspecting the forestay turnbuckle should be done on the hard prior to launch where it's somewhat easier to find a dropped part. Just say'n. If you inspect it on the water it means more work, since sliding the drum/torque tube up to expose the turnbuckle demands that you remove the jib and not drop anything.
"By the way, inspecting the turnbuckle during the winter with snow on the ground is about as intelligent as inspecting it on the water! Naturally I inspected Panache's turnbuckle on the water because I forgot. But at least I did this on a calm day before the jib was hoisted with both halyards attached to the pulpit to support the mast. Thankfully the temporary lock wires were still in place and the grease on the thread was still good after 5 years of service. No problems after all. Phew. However, in Spring 2024 I replaced the temporary wires with permanent SS wires. Nothing wrong with the temporary wires but I like SS better."
TIP: One way to monitor the length of the forestay, terminals and turnbuckle is to measure the mast rake. The rake is the sum of all adjustments. It's peace of mind to see no change. But you should still visually inspect the terminals and turnbuckle on a regular basis. Panache's rake is ~6" aft at the foot.
|
 |
|
TOP
|
|
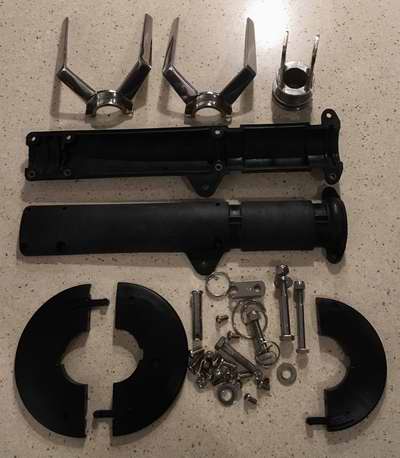
ASSEMBLE
FURLER - "Prior to installing a CF-500 furler on Panache in Spring
2018, the system was
assembled and tested on a new 5/32" forestay stretched between two trees.
Its a lot easier working horizontal on the ground than vertical on the boat!
Besides, the lake was still frozen.
It took two of us to snap the foil halves together, one to guide the
curled extrusions and the other to snap them together. As curled as the extrusions were
coming out of the shipping box, its
amazing they snapped together to form a fairly straight foil that
rotated easily on the forestay. To "help
it" acquire a new memory of being straight
I left the assembled foil to bake in the sun for several days, stretched between those two trees. 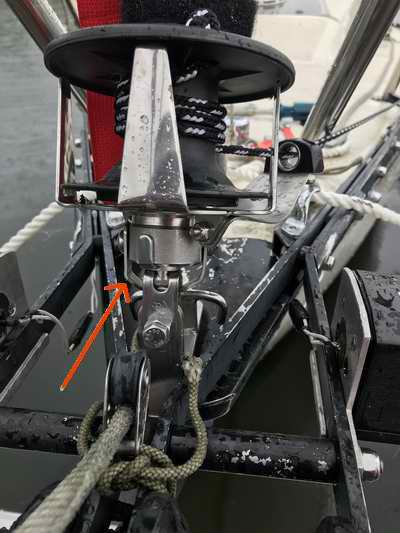 The 2' end section that didn't want to straighten was "persuaded" to do so with a
heat gun. The top of the foil
terminates about 2" from the end of the new forestay. The
halyard restrainer was installed on the front of the mast, level with
the top of the foil. The 2' end section that didn't want to straighten was "persuaded" to do so with a
heat gun. The top of the foil
terminates about 2" from the end of the new forestay. The
halyard restrainer was installed on the front of the mast, level with
the top of the foil.
NOTE - The halyard
restrainer MUST be attached very securely to the mast if you use the
halyard to step the mast. Its worthwhile to check these fasteners every once in a while!
PIN THE FORESTAY UNDER THE LOW FURLING DRUM - After a few
frustrating times
to pin Panache's forestay while stepping the mast I needed a
better solution for the drum installed low to the deck. The
Schaefer manual shows a sideways pin installation that would work well
for a low drum installation but offers
no suggestion for a fore aft pin configuration as on an SJ23.
While some sailors like a low drum for a deck sweeper jib, this sailor prefers
ease of access to the stem plate to confirm a secure pin.
 1
PIN
- The first problem is that the turnbuckle toggle didn't
stick out far enough to easily insert the pin. The toggle must
stick out reasonably far enough to
quickly pin it on the ramp. It's why I
fabricated the 3/4" spacer shown at right to push the drum up to
expose more of the toggle. I also fabricated a new turnbuckle
retaining clip (see red arrows above) that has a
longer reach up to the mounting screws. This clip holds the drum down so the jib can be tensioned
without pulling the foil up. Sounds confusing doesn't it? 1
PIN
- The first problem is that the turnbuckle toggle didn't
stick out far enough to easily insert the pin. The toggle must
stick out reasonably far enough to
quickly pin it on the ramp. It's why I
fabricated the 3/4" spacer shown at right to push the drum up to
expose more of the toggle. I also fabricated a new turnbuckle
retaining clip (see red arrows above) that has a
longer reach up to the mounting screws. This clip holds the drum down so the jib can be tensioned
without pulling the foil up. Sounds confusing doesn't it?
2
RING
- The second problem is that it is really difficult to twist
the ring through the aft pointed pin since it is difficult to see under
the low drum with my hands in the way. "Last I checked, these parts roll real easy on
the parking lot, never to be seen again!" It doesn't help
that the SJ23 tack horns block
access! I'm hesitant to remove the horns because I use them to attach the
jib sleeve zipper pull line to.
- NOTE - Regardless of
which direction the pin was installed, it always slid till the ring was
against the turnbuckle toggle. There should be no strain on the
ring as this increases the risk of loosing the pin and dropping the
mast. Nasty that is. One should be forgiven to assume all is safe by installing the pin
pointed downhill but I was really surprised one day to discover it slid
uphill in only 15 minutes while rocking at the dock. This was
immediately after a launch. See Tech Tip F34.
The obvious solution is
not so obvious after all.
 The following season I replaced the pin with a
standard (1.5 x 5/16)"
bolt pointed downhill. The
extra nut and stack of washers are there to fill the space along the
clear shank.
They are glued together with Marine Goop so I don't mess with a bunch of loose
washers at launch time. The threaded end of the bolt was bevelled
so it slips easily through the stem & toggle holes without damaging the
thread. A hole was drilled across the end of the bolt to accept the locking ring.
It is now easier to slip the ring through the hole. The following season I replaced the pin with a
standard (1.5 x 5/16)"
bolt pointed downhill. The
extra nut and stack of washers are there to fill the space along the
clear shank.
They are glued together with Marine Goop so I don't mess with a bunch of loose
washers at launch time. The threaded end of the bolt was bevelled
so it slips easily through the stem & toggle holes without damaging the
thread. A hole was drilled across the end of the bolt to accept the locking ring.
It is now easier to slip the ring through the hole.
CONCLUSION - Inserting the spacer and fabricating a new
turnbuckle retaining clip saved me the effort of having to shorten the
forestay foil and possibly the genoa (Argh, neither of these are gonna
happen any time soon).
Had I known about this problem before I fabricated the
new forestay and cut the foil to fit, I would have included an extension. The trials and
tribulations of installing new hardware on my own with a boat on the
hard 15 KMs away from home."
Another thought was to fabricate a 2" extension
on top of the stem
plate using two 1/8" thick flat
bars (shown at left) or a 2" long
eye to jaw toggle (shroud extender). The top of either extension could fit inside the 3/8"
jaw of the turnbuckle toggle.
The bonus of an eye to jaw toggle is that the top pin
could go
athwart ship, as shown in the manual, making the job of pinning the
forestay easier.
The bottom bolt would stay permanent and the
top
would be removable. This is still a viable solution for others so I'll leave it
here as food for thought.
TOP
|
|
FURLING CONTROL LINE
- All furling systems use similar hardware for the furling
control line. The idea is to have as little friction in the system as
possible.
-
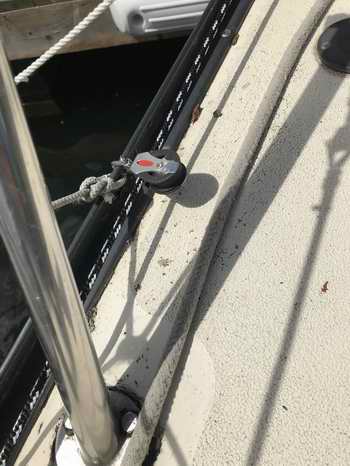
Furling Drum - At the bow
I installed the furling control line to port so it is away from the anchor which
is to starboard.
"Make life
easy for yourself, not more difficult. I'm right handed and stand
to port when I handle the anchor line. It made sense to me." The fairlead bracket
(CF-55-22) is on the drum to guide the line on it for an even wrap. The first ball bearing swivel block is installed
just forward of the aft pulpit leg. Thereafter a SS lined fairlead is on each
stanchion post with a small ball bearing block clipped
to the toe rail between the stanchions to keep the deck clear. And finally a swivel
ball bearing ratchet block is on the pushpit to direct
the line up to the cleat.
Notice that all blocks are ball
bearing and swivel to minimize friction. I can't emphasize this enough. How to operate
a furling jib.
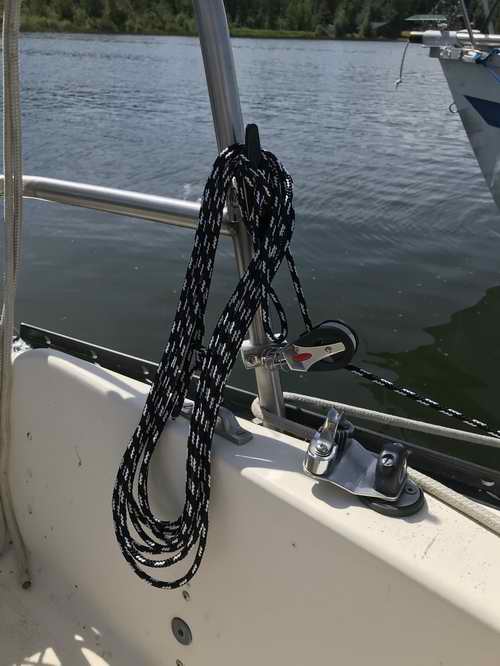
Furling Control Line - The system requires 40' of 1/4"
soft line which is long enough for the 150% genoa or the 110% working jib.
However, the 1/4" line spooled up against the
inside of the four drum stakes, causing friction. So it was replaced with 7/32"
line which works fine. It's important to maintain
a minimum of three warps around
the drum with the sail out.
-
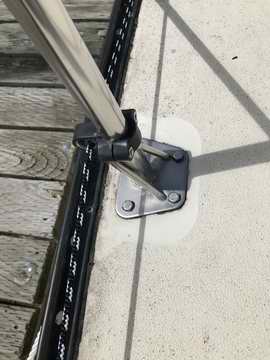
 Forward Block - The location of the forward block
is critical so the furling control line meets the middle of the drum at 900 to
spool evenly. Get this wrong and you'll be walking to the bow to undo
a nasty snarl.
Take a knife or marlin spike with you and quit grumbling!
This is a Ronstan full articulating, ball bearing block installed
on the toe
rail, just forward of the aft leg of the pulpit. It is a perfect spot for this. Forward Block - The location of the forward block
is critical so the furling control line meets the middle of the drum at 900 to
spool evenly. Get this wrong and you'll be walking to the bow to undo
a nasty snarl.
Take a knife or marlin spike with you and quit grumbling!
This is a Ronstan full articulating, ball bearing block installed
on the toe
rail, just forward of the aft leg of the pulpit. It is a perfect spot for this.
-
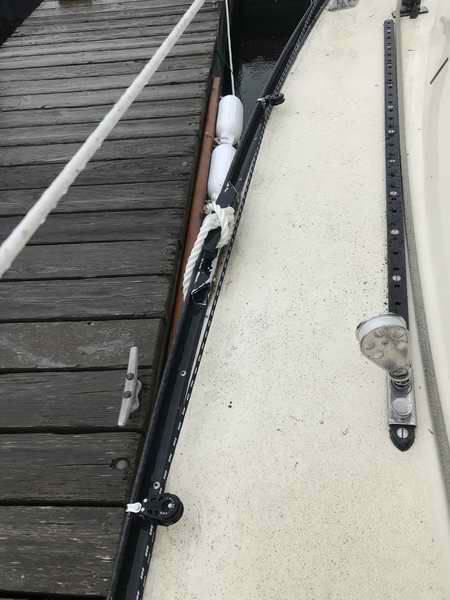
 Stanchion Fairleads
- To retain as much clear walking space on the side deck, I installed a stanchion
bulls eye fairlead (Nautos 605740) on the outside. Use metal lined fairleads as
they have less friction and stand up to wear better than vinyl ones.
For the same reason use ball bearing turning blocks where needed. Stanchion Fairleads
- To retain as much clear walking space on the side deck, I installed a stanchion
bulls eye fairlead (Nautos 605740) on the outside. Use metal lined fairleads as
they have less friction and stand up to wear better than vinyl ones.
For the same reason use ball bearing turning blocks where needed.
-
 Mid Deck -
Two mid deck Harken ball bearing blocks were added to keep the side deck clear and the spring line cleat
free. The last thing I
need is a tripping hazard when I'm in a hurry to scoot around the
shrouds. Mid Deck -
Two mid deck Harken ball bearing blocks were added to keep the side deck clear and the spring line cleat
free. The last thing I
need is a tripping hazard when I'm in a hurry to scoot around the
shrouds.
Cockpit - At mid cockpit I installed a tiny Harken 16MM ball bearing block
on the toe rail to keep the line low and prevent a tripping hazard. To maintain a tight
roll of the jib I installed a Ronstan RF42100 automatic ratchet block on the
bottom of the pushpit
leg. A
ratchet block works in much the same fashion as holding a line
wrapped around a winch, it maintains tension. The ratchet is automatically enabled in
proportion to line load and the force required to enable the ratchet is
adjustable at the swivel. It took very little time to adjust to this
feature and produces a neater wrap than a free spinning block.
This Ronstan block swivels so it always creates a fair lead to where
I stand. The spring under it quiets the block. The cleat
installed above it works well with the ratchet block to secure and store
the line.
If you have
the factory corner stanchion you could install a turning block there
with a cleat
slightly forward to secure your furling control line to. You'll have to
get creative here.
TOP
|
|
HOW to
REPLACE a DAMAGED FORESTAY (REPAIR 101) -
Just suppose
your forestay develops a problem and the foil can't be
removed. Now what do you do? Its always good to have a plan for
this prior to installing a furling system.
-
When you need to replace the forestay inside
the foil of your furling system, here's
a
video to replace the forestay without damaging the foil. These
guys do
a better job of showing it than I can describe it.
-
The overall length of the new forestay MUST be exactly the same length as the
previous to retain the mast rake. Of course if the rake is wrong, now is your chance to correct it.
NOTE - I have done this job on another sailboat and it was
extremely difficult to install the bottom Sta-Lok terminal due to the
short protruding wire beyond the bottom foil. My hands cramped up trying to hold the strands in place while screwing on the threaded stud. Seriously, consider removing at least the
drum and torque tube plus maybe a bottom section of foil prior to attempting this
job. It may seem like overkill but it is the best way to guarantee a correct
installation.
TOP
|
|
CONVERT the
FACTORY JIB to FURLING -
See Tech Tip F10b.
TOP
|
REMOVABLE INNER STAY (Food for Thought 2)
- While not a go fast gadget, a storm sail set on a removable inner stay,
instead of a deeply reefed roller furling jib or a storm jib slipped over
a furled jib, can keep you going in rough weather by maintaining a more
balanced sail plan. See Tech Tip F36 for more
information.
TOP
|
|
USEFUL REFERENCE LINKS (Practical Sailor)
|
|
Return
to Tech Tip Index. . . . . . . . . . . . . . . Have
a Question? |