| SJ23 Tech Tip A01, (Updated 2024-12-24) Bob Schimmel, Betsy Schultz & Randy Cook | |||||||||||||||
|
SJ23 Trailer Desirable Features, Maintenance & Launch Tips. MECHANICAL - Frame Type, Coupler
& Ball,
Axles, Tires,
Rims, Spare Tire, Keel Support,
Bunk Boards, Rollers. |
|||||||||||||||
| I
can't recommend any particular trailer manufacturer over another, as
there are good and bad designs all over this planet. But you
definitely get what you pay for. The majority are
good, most are adequate, some are downright slick but a few are just
plain lousy. The latter are pretty easy to spot. I
wouldn't touch them with a 10' pole. It many cases a good design depends on which
boat it has to support. There are designs specifically suited for power boats,
others for sail. Don't interchange these because each have unique requirements. Some trailers intended for a deep keel
boat can be converted
to handle a shoal draft boat but this takes a lot of cutting,
grinding and welding. Most designs work well on a
gently sloped ramp but few designs work well on a
steep ramp. With some ingenuity a trailer can be modified to operate
better on a steep ramp but there is a limit. It all depends on the combination of
frame, support pads, centering guides and the hull shape. If you want worry free trailering for your SJ23, read
on. The following ideas are the culmination of many knowledgeable, experienced
SJ23 owners. |
|||||||||||||||
|
MECHANICAL
LEFT IMAGE - With a single draw bar
style trailer the side rails are connected to the draw bar some
distance back from the coupler. This must be a very strong connection.
I beefed this up on Panache's trailer with a (3x4)" draw bar that goes deep between the rails.
RIGHT IMAGE - With an A frame style trailer the connection to the coupler is strong. COUPLER and TRAILER BALL - Ensure the coupler is bolted to the frame with the correct size and grade of bolts. Lock the nuts. If the coupler is also welded to the frame, all the better. A friend of mine had a very narrow escape due to a welded only coupler that cracked. Because of this incident, most of us now inspect our trailers annually, cross our chains and use heavy cargo straps to secure the hull to the trailer. But people forget with time, so heed this advice. Lock the coupler before driving down the road. Use a 2" solid
ball with lock washer and torque the nut to specification.
Solid balls are the strongest and the metal is not prone to crystallizing
(becoming brittle), resulting in breakage. A split ball doesn't have as
much shear strength as does a solid ball. It should be understood that
the coupler MUST MATCH the ball size and that the latching adjustment on
the coupler MUST
be set to have no more than 1/16" play! AXLES - Choose tandem axles
with a minimum 3500 lb load rating, each. This way, if you have a flat,
the remaining axle can still support the boat till you come to a stop.
Tandem axles contribute greatly to equal load distribution, cool running
tires & bearings, directional stability at highway speed and smooth riding, as
both
Betsy and I will tell you in our
modifications. Equip all four wheels with brakes for safety and to be
legal, regardless of where you travel. Equip the wheel bearings with
BEARING BUDDIES to easily grease the bearings
and keep the water out. Use
a bearing bra over the buddy to keep the dirt out. Don't
cover the vent/drain hole of the Bearing Buddy with the sleeve of the
vinyl bra since this traps damaging water on the outside of the Bearing Buddy seal.
I cut a small V notch in the bra to leave the vent hole open. Use a grey bra to
minimize hot cold cycling from the sun. A bearing exposed to the
sun will always run warmer than a bearing in the shade. TIRES - Many trailers have old tires with lots of tread. The problem with these tires is they age out well before they wear out; usually from the inside out. This is why they still look good from the outside. Typically they are >10 years old with only about 1000 miles (1500 KMs) of wear. For example, I haul Panache's trailer only 130 Km / year. This is pittance, to say the least and I have started to tow it further occasionally to test everything! Read the following and consider new tires before hauling your boat. "Test data performed by the National Highway Traffic Safety Administration (“NHTSA”) proves that after a tire reaches six years of age, the chances of catastrophic tread separation increase substantially. A tire’s biggest foes are heat and oxygen. Over time they break down a tire’s adhesive bond between the various layers of the laminate structure. This phenomenon is known as thermo-oxidative degradation. Thus, tires older than 6 years that have been exposed to prolonged heat and oxygen, cause the tire to become a safety risk. Consequently, any such tire should be removed from service and destroyed. To determine the age of your tires, read the D.O.T. code adjacent to the bead of the tire. The last four digits of the D.O.T. code show the week and year of manufacture. For example, the last 4 digits of a D.O.T. code end in “0806." This tells you this tire was manufactured in the 8th week of 2006. When purchasing new tires for your vehicle, you should always check the D.O.T. code. If the tire was manufactured more than six months ago, consider asking for newer tires. Even though a tire has never been used, thermo oxidative degradation affects it." Betsy Schultz The other obvious thing you can do is to cover the tires to protect them from UV damage. Its important, even in winter.
RIM STYLE - A HUB MOUNTED
center rim is superior to a lug mounted rim because the weight is
supported by the
hub. This style of rim slips over the axle hub with only a few
thousands of an inch for clearance. The trailer weight is transferred to
the rim via the hub to hole contact and the tapered studs simply hold the
rim against the brake drum. Since there is little shear force on the studs
this is a very safe design for a trailer and one loose stud should not
result in the loss of a wheel. WHEEL STUDS -
Studs and lug nuts on a trailer require more maintenance than an
automobile since they receive a "thorough" dousing of water during a launch and are
usually dried with road speed. Rust
is the end result with slow but sure failure if allowed to drip dry in the parking lot. You can use your
imagination as to what happens to the boat when the studs fall
off, one at a time. If you launch in salt water, rinse the lugs nuts, brake drums and rims off with fresh water. Spray across the trailer and you are apt to rinse the inside of the drum. This goes a long way towards preventing corrosion and keep the brakes functioning. TOP
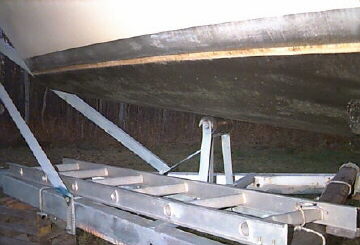
KEEL SUPPORT BEAM - Panache's trailer is equipped with an adjustable (up/down) keel support. Most trailers have a fixed keel support. But the advantage of an adjustable support is that the load can be proportioned between the keel support and the hull support pads to distribute the strain equally throughout the hull, preventing stress. The height of the beam determines how much it supports the keel. The (2x3)" steel tube is mounted across the trailer under the middle of the keel. The fixed end of the beam (curb side) is loosely bolted to a 1/2" bolt to create a hinge and the adjustable end (driver side) is mounted on a screw jack. A 1/4" thick flat steel support plate is welded on the top of the beam where it contacts the keel to full width. The support plate is covered with soft wood to protect the bottom of the keel. It could also be covered with slippery UHMW so the keel could slide but I think that most people would opt for the sticky surface to minimize movement while towing. Click here for a photo of the support beam (white). The photo also shows the keel guides to center the hull on the trailer. The screw jack is made from a 5/8" threaded rod (1.5' long) with a crank welded to the top. The rod goes through a plate welded to the inside of the trailer frame. Two sets of nuts are tightened against each other (cotter pin could also work) above and below the plate. Together they act like a thrust bearing to lock the height of the rod. The hole through the plate is slightly larger than the rod. Below this plate the end of the rod is threaded through a large nut imbedded inside the support beam. Finally two nuts at the bottom of the rod are tightened against each other to prevent the beam from dropping off. Leave about 3" of free thread to raise or lower the beam along the rod. Determine the final proportions with the boat positioned on the trailer. The height of the handle must be positioned so it does not touch the hull or bunk board while being accessible by the operator. Voila, the beam goes up or
down, depending on which direction you turn the screw jack. Simple and slick if you keep
everything greased. It is amazing how easy it is to
lift the hull with this simple lever, so I don't overdo it. If
you do, the boat will develop a nervous rocking motion when traveling
down the highway. I support the keel only enough to take some strain
off the hull. Also, the keel settles on the support as it floats on the trailer and lifts off the support as it floats off the trailer. So you shouldn't have to adjust the support for launch or retrieval. TOP BUNK BOARDS - The wood bunk boards or support pads should be wide and covered with rug to protect the gel coat on the hull. The more surface area against the hull the better. After all, they support the entire weight of the boat while stored on the trailer. Panache is supported by eight 36" long 2x4s with a total area of 1008 in2. This equates to 2.98 lbs/in2 loading on the pads. Most of the keel weight is supported by the keel bar and the bow is supported by the front roller. With the keel support holding 950 lbs the pads now hold 1.8 lbs/in2 while traveling down the road. If a trailer has two long bunk boards they are generally shaped to match the curvature of the hull. I have seen them with 2 and 3 support posts under each bunk board. 3 seem best because it is possible to force the curve to match the hull. If the trailer has separate support pads they must articulate to align to the hull. A limit to the articulation movement is desirable when retrieving the boat on the ramp. You don't want a surprise of a rolled over pad supporting the hull when it comes up the ramp. That is really annoying. The height of each support post must be adjustable to distribute the weight proportionally. If the posts are made of metal tubing, each post must have a large drain hole at the bottom to drain water so the post can't split with freezing. Even if you use a crane or travel lift to launch your boat, there is always rain water, wash water or dew to contend with. All the water must run off so the metal drains drip dry. Dry metal can't rust and salt encrusted or dirt coated metal have an affinity for water, causing it to corrode all too quickly. IMPORTANT - Most bunk boards or support pads are made of wood that can suffer from dry rot. Dry rot has a way of sneaking up on you at the most inopportune time, like just before a road trip. The pads may look perfectly fine until just at the point of failure. The wood is likely damp and may be soft or slightly flexible (punky). If you fail to recognize this symptom in time, you may discover that a support post has punched a hole through the hull with the collapse of a pad! Ouch. So much for the hull and the road trip. Pads are usually covered in rug or artificial grass (Astro Turf) by the dealer to protect the gel coat. Rug rots and wears out quite quickly but it breathes moisture. Artificial grass, on the other hand, doesn't rot, but also can't breathe air and is almost water tight. It is usually wrapped tight around the support pad to look pretty in the showroom which is about the dumbest thing to do for wood that is backed into the water. And I haven't even mentioned an empty trailer exposed to the rain. Problem is, by encapsulating the wood pad it traps moisture so the bunk boards are guaranteed to rot. So, if this is the situation on your trailer, remove the artificial grass from the bottom of the pad so the wood can dry. An angle grinder with a thin disk cuts through Astro turf very easily, making a very quick and neat removal job. Leave about 1/2" material wrapped around the bottom for the staples. This way there is less chance of them scratching you as you rub against a pad. If you find any wood with the least sign of rot replace it with pressure treated wood. If the boards are all the same age and you find one rotten board, you may as well replace all of them while the boat is off the trailer. Panache's trailer is just fine now, thank you very much Phil! TOP ROLLERS - Rollers are adequate for power runabouts or ski boats because these hulls are built stiff to take the wave pounding. As such they can be supported by the small surface area of the rollers. Rollers are not good for a displacement sailboat as they cannot adequately support a fiberglass form shaped hull that doesn't have internal stiffeners. If the hull is stored on the rollers for a few years it will develop a dimple at each roller. You cannot alleviate this by transferring most of the stored weight to the keel support as this will result in the keel being pushed up, developing a cracked hull liner. A sheet of UHMW at the bottom of the keel support helps to minimize the friction. Avoid rollers for a sailboat trailer like the plague. Having said this, there is one person who reversed the dimples in a roller supported hull. See Tech Tip B28. TOP |
|||||||||||||||
|
ELECTRICS LIGHT BULBS & CORROSION - Dribble Super glue all around the glass to base joint of an incandescent bulb to keep water out. Smear lithium or white grease over the base of a bulb to ensure
continued operation after a launching or driving in the rain. The grease
keeps oxygen & water away from the electrical contacts, preventing
corrosion. DO NOT spread grease on the glass bulb so keep your greasy
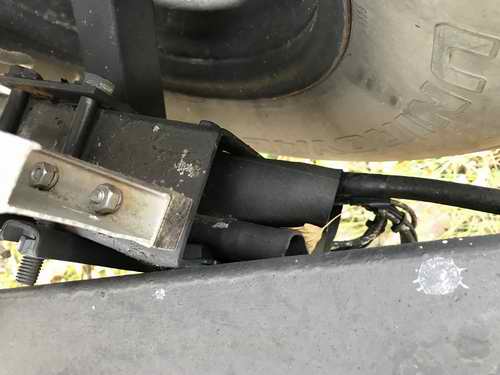
fingers off. Electrical brakes are usually connected to the wiring
harness with Marrettes. Fill the Marrettes with
water proof grease to prevent corrosion. Point the Marrette up so water drains out. Set a tie
wrap around the wires to eliminate straining the electrical connection. This goes
a long to preventing the connection from coming
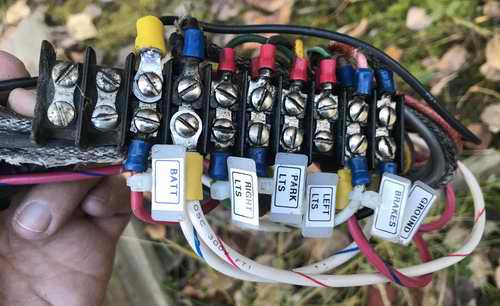
loose in a Marrette. See Tech Tip A08 for wiring info. TOP TRAILER PLUG & VEHICLE JACK - Certain oils are excellent at preventing corrosion on electrical connections. Outboard Marine Corp (OMC) retails a spray foaming oil
called, "6 in 1". ATF and WD40 works much the same way and other manufacturers sell a similar product. Any of these oils are excellent at repelling water and preventing
corrosion on metal. "6 in 1" was designed to protect a Sea-Doo engine so it can restart out
on the water, a loooong way from shore. When applied, it foams on the surface and then creeps into cracks.
When dry,
the dust does not stick, yet it repels water. The
trailer jack on my vehicle had corrosion on it, so I sprayed
it with "6 in 1". The copper oxide corrosion (green grunge) floated off with the foam and after half an hour it left the terminals shiny and conductive.
No more
intermittent electrical connections! The trailer plug and vehicle jack should be checked annually, if not more often.
The pins must not have corrosion. I also sprayed the lower leg of Panache's
outboard and after an hour it lifted off twenty years of accumulated alkali deposits,
leaving the paint shiny as new. After one season of use, it still repels
water. (I sure wish I had the rights for this
product). TOP WIRING TO CODE - Do yourself and anyone else a favour and follow the trailer wiring colour code. It eliminates so much confusion, especially if another person is doing repairs for you. Translating your wire colours is a PITA when trying to solve a problem. If you can't correct the colour code, then at least label the wires. See Tech Tip A08 for wiring info. TOP BRAKE CONTROLLER & BRAKES - My preference is electric brakes with an inertia activated proportional brake controller because you then have a manual override switch conveniently located on the brake controller to "stabilize the train" when things get out of hand (swaying) back there. Surge brakes have no such manual override that I'm aware of as the braking action is only initiated by an inertia sensor mounted on the trailer tongue. It is the deceleration of the tow vehicle that operates surge brakes. When a surge brake equipped trailer starts swaying it helps to have nerves of steel to push the gas pedal because acceleration is an action that can stretch the train to stabilize it. Not that I drive like "Ronald Racer" when towing a trailer but I've had two experiences that required me to manually operate the electric trailer brakes to stabilize the "train". Each time I was so thankful to have electric brakes. Both Tekonsha
&
Reese (there are others) manufacture an electronic brake controller
that is equipped with an inertia activated proportional braking system.
These models have an adjustment to compensate for the ANGLE
the controller is installed and a GAIN adjustment to adjust the braking
force. If adjusted correctly they create buttery smooth
braking down to almost crawl speed. A proportional
controller is direction and angle sensitive so follow the installation
instructions exactly. This is likely the preferred controller if you
value the gel coat on your SJ23. Smooth braking always treats the hull kindly. NOTE: Most vehicles (since 2005) equipped with a trailer towing package have a connector under the dash where the brake controller plugs in. In many cases the vehicle manufacturer supplies a short cable with a mating connector for the brake controller. Check the glove compartment for the cable and read your manual to locate this connector. If you can't find the cable go to your favourite trailer shop. This cable will save you oodles of wiring time. It sure saved me a ton of time on my Tacoma. IMPORTANT - Electric trailer brakes MUST be tested before each road trip to confirm operation and inspected annually for proper maintenance. Boat trailers should actually be tested more often since they are immersed in water. This is especially important if the trailer has been idle for a long time. Corrosion has a way of deteriorating an electrical connection. This is the reason why you should apply the brakes after pulling the trailer out of the water. In addition, all brakes must be tested BEFORE going down a long steep grade. Use the truck lane provided for this purpose. The big boys won't mind you taking a spot. Surge brakes usually have less
braking power going uphill and some have to be defeated for backing up.
On some surge brakes this can be done automatically by using the power from the backup lights (Bargman pin 4, center). They are simple to operate when set up properly and many people swear by them since they operate so
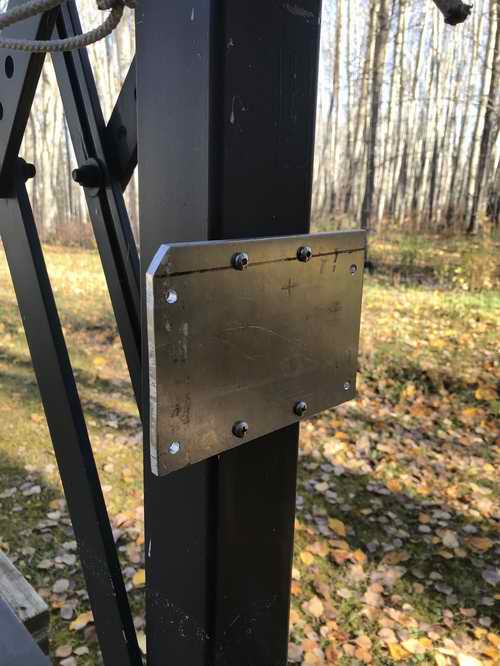
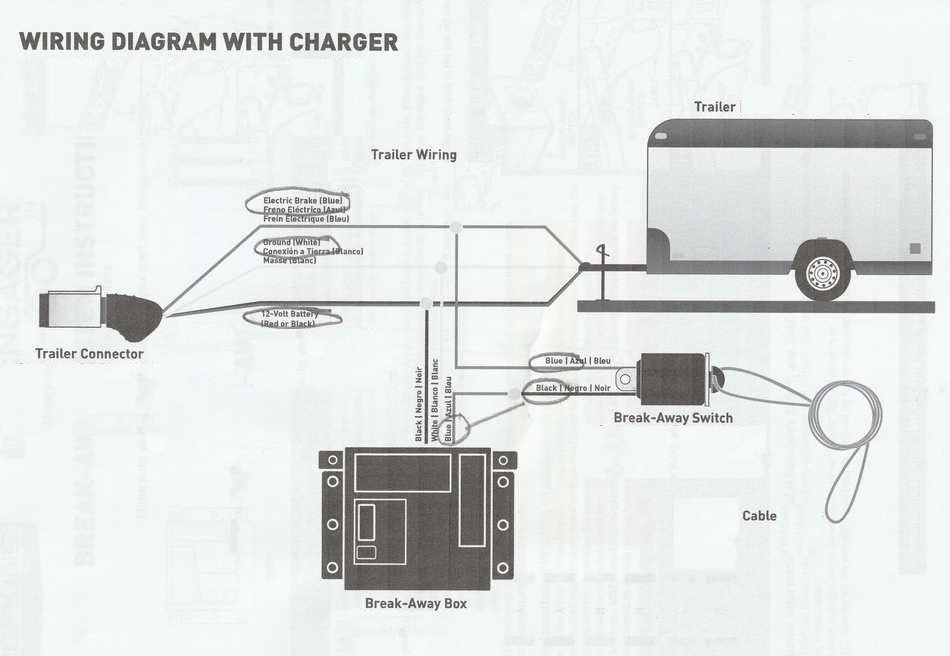
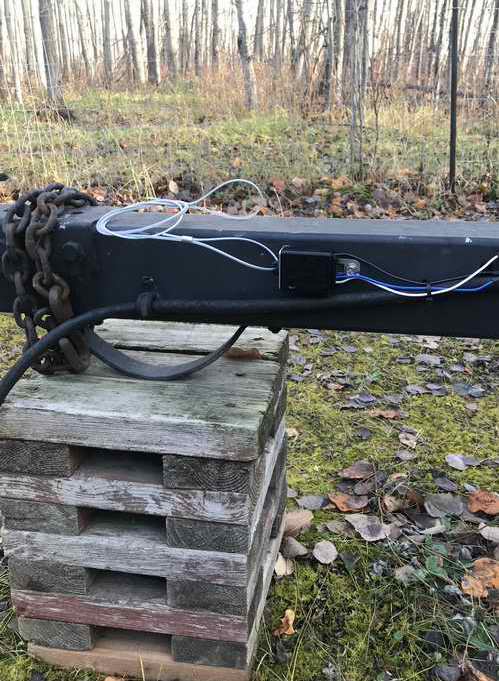
smooth. TRAILER BREAK-AWAY SYSTEM -
The emergency trailer breakaway control is a last ditch brake system to stop your
trailer when the coupler detaches from the tow vehicle. It consists of a break-away cable connected between the tow vehicle and the breakaway switch mounted on the trailer. When the trailer separates from the tow vehicle the tight breakaway cable operates a
self latching break-away switch which in turn applies power to the brakes, locking up the
wheels. Not elegant but it works and likely saves a life. Surge brakes have a similar break-away cable with switch that applies power to the master cylinder to apply the brakes, locking up the
wheels. In both systems the power comes from the trailer mounted battery. The US
Department of Transportation
Federal Motor Carrier Safety Administration
rule 393.43 section (d) states that all trailers with brakes must have a
breakaway system in place.
In Canada a trailer must be equipped with a breakaway system if
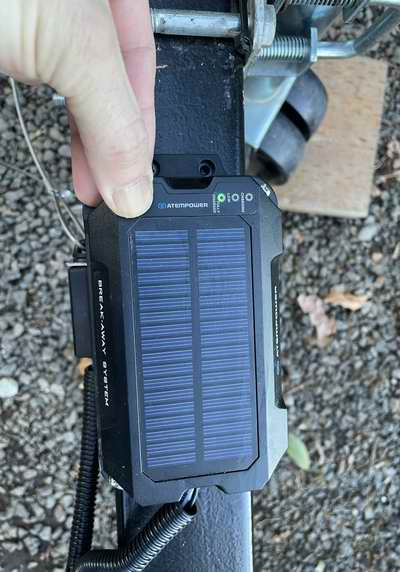
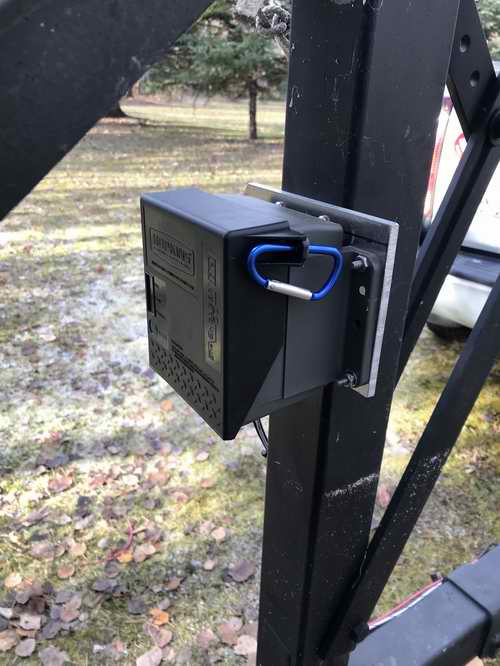
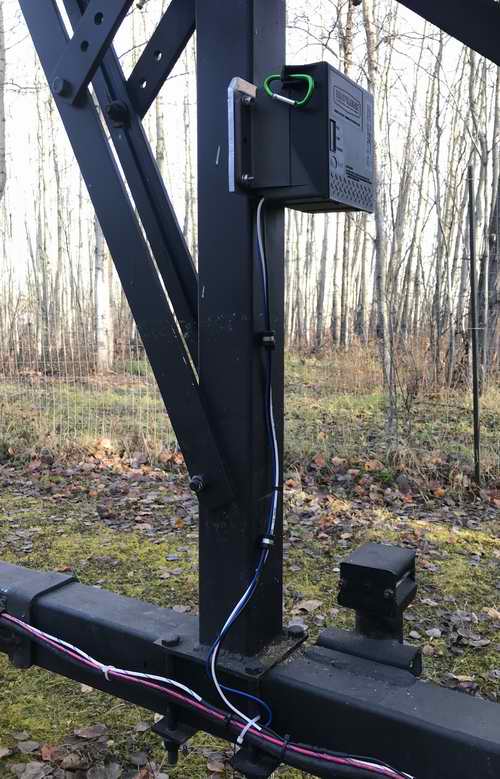
the gross weight >2000 lbs. (907 Kg). TOP BREAK-AWAY BATTERY - The charge of the 12V breakaway battery is ideally maintained from the vehicle alternator via the designated 12V pin on the trailer connector. This is rather "important" on a long road trip since driving with an isolated charged battery is of questionable merit. Problem is, not all vehicles have 12V wired to the trailer connector which means you must install your own wire. Installing power must be done securely so you don't have a hazard on the road. If you have a trailer package in your vehicle, there is almost certainly 12V power at the connector. If you are buying a new vehicle, it pays to order the trailer package. In lieu of any of this, install a battery box equipped with a solar panel to maintain the charge. The ATEM POWER Trailer breakaway kit with switch, 12V 3AH LifePO4 Lithium battery equipped with solar panel, LED charge indicator and breakaway switch can handle 4 brakes on 2 axles.
The state of charge indicator is peace of mind prior to a road trip. TOP
|
|||||||||||||||
|
SAFETY ANNUAL FRAME INSPECTION - If the trailer members are welded together, check all the welds annually for cracks. I usually do a thorough safety check during the summer when the boat off the trailer. The cracks are very tiny and may be difficult to see due to dirt, rust, etc so pick a sunny day for good visibility. Use a wire brush to clean the welds and take a REAL GOOD CLOSE look at each. You can increase the strength of the joint by welding a triangular gusset plate at each corner. I think a bolted trailer is better in the long run but then nuts can loosen as well! Nuts have to be checked for movement or torque on an annual basis. SAFETY NOTES - Remember, the wheels get immersed in water and receive a double dose of it while towed in the rain.
|
|||||||||||||||
|
When you consider all the work you have done to fit your trailer to your boat, the last thing you want is to loose it to theft. Just because you are with like minded people at the boat ramp or marina does not mean it is secure from theft. How do you secure it while on the road? (Peace of mind when you stop at a restaurant or stop overnight).
How do you secure it while in storage? (Making it difficult to steal).
|
|||||||||||||||
|
LAUNCH AND RETRIEVE In an ideal world the trailer is level with the surface and at the correct depth while on the ramp so the hull can float over it, centered by the guide posts. Then the bow line is attached to the trailer winch, pulled in snug and the trailer is pulled up the ramp with the boat perfectly placed on the support pads. Now wouldn't that be nice? This is basically what the operator at a local marina does using a tractor equipped with a 3 point hitch (up/down adjustable). This slick system works so well that many boaters no longer use the crane for launch retrieve. Many boat owners are happy to pay the nominal fee. The advantage is they are no longer restricted to crane day, being able to launch or retrieve on the their own schedule. NOTE: The SJ23 manual has a segment on
rigging and launching.
You can augment the manual with the following hardware additions to make this
job easier.
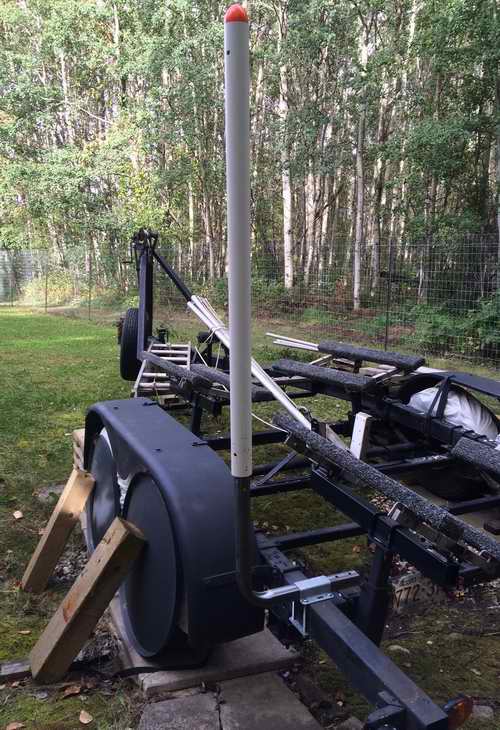
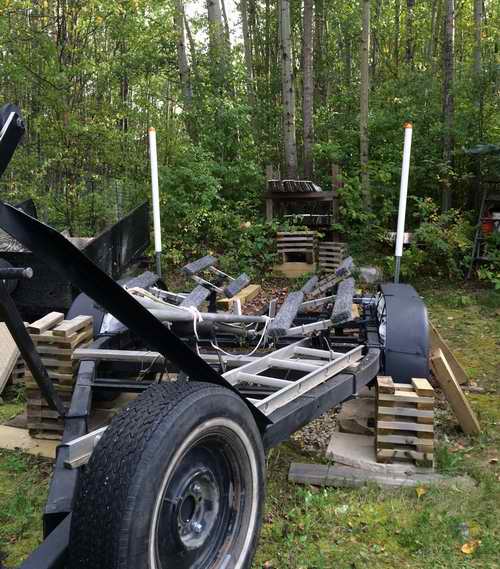
TOP 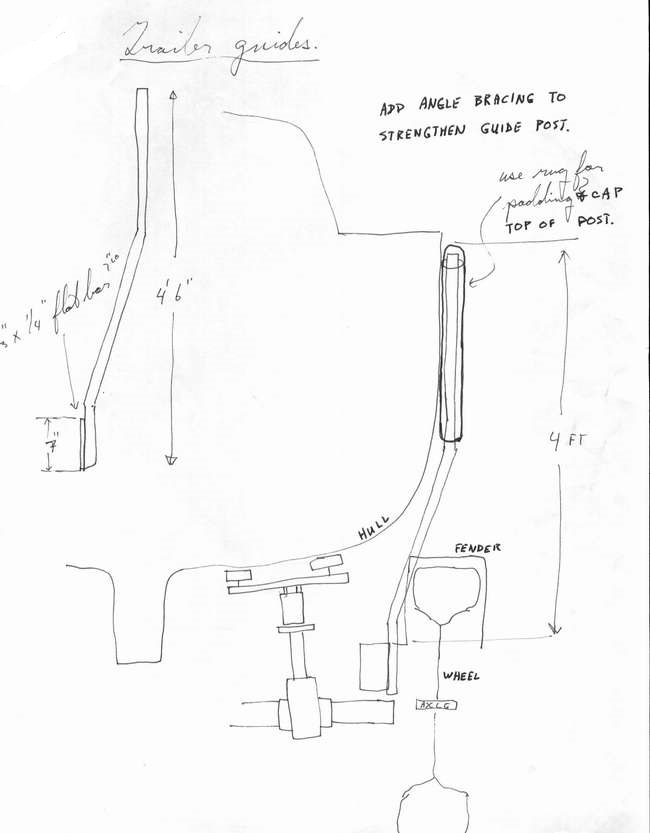 GUIDE POSTS on a SINGLE AXLE TRAILER (1996) - Having a pair of
guide posts on your
trailer is a real asset on the launching ramp, especially when you have a side wind
or current pushing the boat or
when the water is so murky you can't see the bunk boards to center the boat
over it. (I have never experienced dead
calm weather retrieving Panache. That would be a pleasure because
the boat wouldn't move as I drive up the ramp). Guide
posts for a SJ23 tandem axle trailer should be at least 4' or longer
for a deep ramp.
I know of at least one SJ23
sailor who installed taller posts than this sketch shows and said they work very well. GUIDE POSTS on a SINGLE AXLE TRAILER (1996) - Having a pair of
guide posts on your
trailer is a real asset on the launching ramp, especially when you have a side wind
or current pushing the boat or
when the water is so murky you can't see the bunk boards to center the boat
over it. (I have never experienced dead
calm weather retrieving Panache. That would be a pleasure because
the boat wouldn't move as I drive up the ramp). Guide
posts for a SJ23 tandem axle trailer should be at least 4' or longer
for a deep ramp.
I know of at least one SJ23
sailor who installed taller posts than this sketch shows and said they work very well. When the trailer is submerged on the ramp, the equal lengths of the exposed posts indicate the trailer is level (side to side) and it is at the correct depth to float the hull over. With the boat centered over the trailer there will be equal gaps (hull to post) on both sides, thereby ensuring the keel will drop in the keel slot with the hull resting squarely on the support pads. NO MORE GUESS WORK. All of this to ensure the gel coat is protected, there is equal load on the tires and the hitch weight is correct. Just knowing that the hull is centered over the trailer speeds boat retrieval. Etiquette on the ramp is directly proportional to a speedy retrieval. Another use of guide posts it to "see" the trailer behind your truck when backing up to the ramp. This is especially true when the trailer is so low, it can't be seen behind the tow vehicle. When Panache's trailer had a single axle and the tires loaded to ~90%, I made rigid guide posts similar to this sketch (not drawn to scale) and a keel guide (Tech Tip A05) to launch on a weather exposed ramp. I needed every bit of assistance to center the hull over the trailer. I couldn't afford the risk of overloading one tire due to an off center hull. With the boat off center by as little as 2", one tire had to support several hundred extra pounds, easily overloading it. My guide posts worked quite well, installed aft of the single axle. But after I converted the trailer to tandem axle the same guide posts would have to be installed further aft and were not long enough so I discarded them. In 2010 I temporarily installed two yellow fiberglass bicycle whips aft of the tandem axle. This was in lieu of the guide posts that I couldn't buy. The whips were installed at a
slight outward angle to create a 1" air gap at the toe
rail. The
yellow whips were very visible
as the trailer was backed down the ramp. Now I had a good guide again to center the hull over the trailer. I left
the whips full length for visibility and tucked the tops under the life line so they didn't
beat against the hull on the highway. I used this temporary system
for about 5 years. It was better than nothing and continued my
search for guide posts that could control the hull. Read on. TOP GUIDE POSTS on a TANDEM AXLE TRAILER (2016) - The guide posts on Panache's tandem axle trailer are installed just aft of the fender. The effectiveness of the posts can be improved by adjusting them as close to the hull as you dare, keeping in mind that the maximum girth of the hull will end up forward of where the posts are installed. But if you strike the correct balance between the spacing, height and angle of the guide posts, you can make use of the flex of the PVC to gently squeeze and hold the hull over the center of the trailer as it is floated over. With the stem pulled almost to the V-block the bottom keel guides take over to keep the hull centered. The flexible guide posts may still push against the hull a bit but they soon spring away as I drive slowly up the ramp. More often than not, I let the Tacoma idle up the ramp in 4 Low, then stop at the top to let the rails drain. Each heavy duty guide post consists of a galvanized steel elbow, a galvanized rail clamp, and an orange capped 4' long PVC extension tube. I clamped these to the (3x4)" rails on Panache's trailer where they fit very secure to the frame. The angle of the upright portion of the elbow was adjusted to be parallel to the SJ23 hull (about 100 outward). It was a bit of a challenge to bend them to the correct angle until;... see those trees? Two of them are the correct diameter and spacing to make a nifty pipe bender using a 6' snipe for leverage! I opted to mount the clamps on top of the rails, leaving the bottom clear. This is because I block up the trailer frame with wood cribs for winter storage.
The unequal length elbows can be installed for maximum reach sideways or upwards, depending on your requirement. I installed these for upward reach and adjusted them sideways till the posts fit the width of the hull. More later. I thought the upward reach was not tall enough so inserted a thick wall aluminum tube inside each elbow to extend the post up from 4' to 6.5'. This proved to be the right thing to do since it leaves about 1.5' sticking above the water to center the hull. Then to protect the hull, the white PVC tube was slipped over the aluminum tube. Each PVC tube has an orange cap for visibility and to protect the gel coat. While a PVC tube has a vent hole at the top to prevent it from floating off, it is also through bolted to the steel elbows to keep them there on the highway.
You should understand that the ramp I haul out on is not the most ideal for a keel sailboat. I usually haul out in late Fall when the temperature is between 5C and 10C. There is little ramp traffic then, which is very nice! Going in the water to solve a problem at that temperature is not an option so the system has to work. I don't have antifreeze flowing through my veins despite what some cartoonists will have you believe about Canadians!
NOTE - The original V-block on Panache's trailer was changed to a roller to receive the bow because of the difficulty I had retrieving when we ran out of ramp depth due to the really low lake level that year. 3 more feet of ramp would have created more depth to float her over the trailer. A guy loaned me a roller at the time and he didn't want it back. He thought it worked better on my trailer than in his spares bucket. Such a nice guy. That's when I discovered that a roller protects the gel coat on the stem better than to skid the stem along a sticky V-block. The roller also cups the stem perfectly which makes for a secure load while driving. Installed as such, the position of the roller now stops the trailer eye for correct fore aft weight distribution and position on the support pads. Without this, you are just guessing. Just winch the hull up till the trailer eye meets the bottom of the roller and the hull is perfectly positioned. The height of the winch must be such that the 3/8" line pulls the hull up slightly to prevent the hull from binding against the bunk boards. In addition, with the trailer eye and winch line under the roller it allows the boat to float off the trailer unimpeded. No more snagging the trailer eye on top of the roller, from which it is impossible to lift. If you look closely at the photo, there is a safety break away chain clipped to the trailer eye. Since this chain is not tight it can't prevent movement. Therefore, it is a good idea to tie the bow down and slightly forward around the winch tree for secure hauling.
NOTE: The boat must be floated on/off the trailer as the trailer
eye and winch
are not strong enough to pull ~3000
pounds over the support pads or bunk boards! That 3/8" line on the
winch is original when I bought Panache in the early 1990s. It gets
stretched really tight as it pulls the hull up to the roller. It has
broken only once, at a weak spot, which is OK. I would rather see
the line break than the trailer eye get ripped out of the stem. See
Tech
Tip B26. TOP BOW SUPPORT ROLLER - If your trailer is not
equipped with a bow support roller under the hull, install one. You'll be
amazed at how much easier the hull pulls up on the trailer, right to the
winch post roller (V block for those who haven't upgraded). As
the boat is winched up on the trailer the roller lifts the bow forcing the hull to be
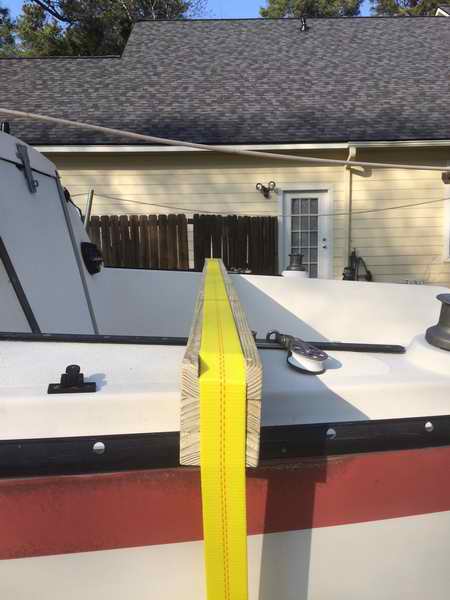
almost parallel (up/down) to STRAP BOAT TO TRAILER - "When towing an SJ23 it should go without saying that it must be secured to the trailer with cargo straps wrapped over the hull. It's just a wee tad important to ensure it doesn't roll off the trailer. However, the cargo strap must not crush the toe rails inward. Easy enough to do as you over tighten it with the ratchet. This can crack the seal, creating a nasty deck leak. In this solution I used
a 91" long (2x4)" across the deck to spread the compression load to the toe rail without touching
the gel coat. A 1/2" deep angled recess is cut into the
bottom of the wood spacer so it fits over the toe rail. The angle keeps the (2x4)" from
sliding as the recess is held captive by the curvature of the toe rail.
The corners under the turn of the strap were rounded off to prevent
wearing the strap. There are four
eye bolts welded to the frame to attach the straps to; 3/4" eyes in the
rear to handle the greater weight back there and 1/2" eyes in the
front since the bow is also held by the winch
cable." Coat the wood with your favourite stuff to protect it from the elements. Randy Cook. NOTE 1 - In a pinch I've used 1/2" Dacron yacht braid on Panache when I forgot my cargo straps since it is better than nothing. Problem is, polyester line is difficult to keep tight over any time on the road, even with a truckers rolling hitch. So check it often.
LAUNCH SPRING 2017 - So with all this hardware in place it is time to launch the SJ23 to confirm it works. Many people
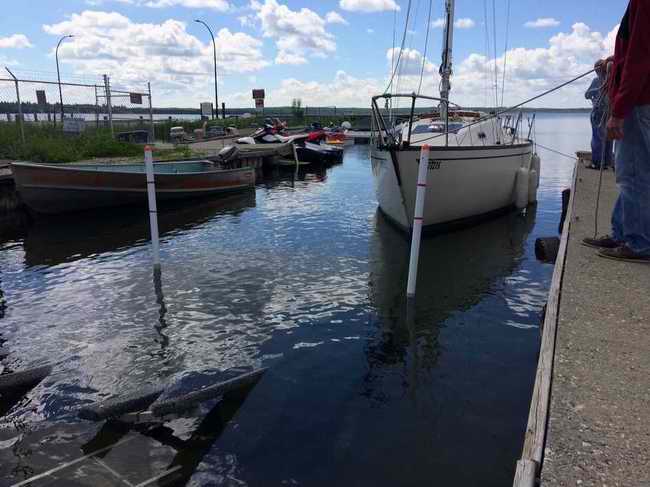
In the launch photo Panache has just slipped off the trailer with the new guide posts attached. The trailer is immersed 4'6" at the guide posts. Note the blue tape at the water line. (The upper red band on each guide post is level with the gunwale when the boat is on the trailer.)
Obviously the guide posts are long enough to center the boat over the trailer. Up till this time I only guessed at how deep the trailer had to go to float the boat. I like launching or retrieving with confidence. So now you have a good idea of the depth required to launch an SJ23. Panache requires 4.5' to get off/on the trailer and another .5' to float away. TOP
A WORD TO THE WISE- If you must stop on the ramp, use your emergency brakes to hold the vehicle and trailer. The park brake pawl in an automatic transmission is NOT designed to hold this much load on a slope. That is an expensive thing to replace. Oh, and release the emergency brake to continue!
At this stage the hull is almost parallel (fore/aft) to the trailer. Then as the trailer was pulled up the ramp, the hull settled on the bow support roller and the four support pads. As a side note, I stop at the top of the ramp with the trailer slightly sloped to let the water drain out the frame members, flushing them clean. Its a good way to wash the inside of the frame to rid it of any dust, weeds, bee hives or critters like zebra mussels trying to hitch a ride. All went very well. I love it when there is nothing to worry about. Retrieving the boat is now an easy thing to do that I no longer loose any sleep over.
UPDATES TRAILER EXTENSION for SHALLOW WATER LAUNCH - Clark offered a tongue extension on the Calkins trailer and perhaps on the EasyLoader trailer as well. The extension for the Calkins was ~10' long, which makes sense, since tubing comes in 20' lengths. The extension tube is 3" square tube with 1/8" wall thickness (Schedule 40 in tube lingo?). The end of the tube had a 2" hitch coupler. Two brackets (1x1/2x1/4" thick stock) were attached to the trailer frame to slide the 3" square extension tube through. When you want to deploy; park the rig, de-couple the trailer from the vehicle, slide out the tongue extension, hitch up the extension tube to the tow vehicle, stick a 1/2" bolt through the extension and one of the tube brackets to keep everything together, hook up to the truck and back the trailer down the ramp. This system works well on a shallow ramp, although it takes a few minutes to do the decouple/couple dance. Clark sold a lot of trailer extension kits to non-tidal owners. The system also pays dividends at a steep ramp, because it keeps the tow vehicle relatively free of corrosive launch water. But you have to be careful of rust. It will eventually have to be replaced due to internal rust, so I'm looking for another piece of 3" square tube stock.
The 10' long foot tube probably gives about 6' of extension by the time you subtract the material used to hold the extension and tongue together. With the SJ24 I've decoupled the trailer from the vehicle and attached a chain leash from the tongue to the tow vehicle and pushed the trailer down the ramp until the boat floated free. This is not as difficult as it sounds. When the boat floats off, retrieve the trailer with the leash and recouple with the tow vehicle on dry land. You could use the same method with the SJ23. Keep sailing. Gleno TOP SLICK LAUNCH/RETRIEVE SYSTEM - In 2002 I was told about the slickest launch/retrieval system of a sailboat I have ever heard. This sailor totally rid himself of the boat to trailer alignment problem and the strain of pulling the boat up the ramp by rethinking the whole process. What made his technique so remarkable is that he regularly retrieved a 32' deep keel boat on his own, with absolutely no problem, regardless of the condition of the ramp. The launch is pretty simple since all he did was back the works into the water till the boat floated off. The retrieval is slightly harder and went something like this:
The whole launch,
including stepping the mast, took a little over an hour which tells me
that his system is well thought out and he was
very well organized. One of these days I will see if this technique works on
an SJ23. The hull has sufficient buoyancy to
support a 1000 pound trailer (approx, but less in water) and the gunwales
are strong enough.
I confirmed this with a fellow SJ23 owner who accidentally launched his boat
in 2011 while still strapped to the
trailer. (Many
of us have come close to this). "The combo
floated quite nicely," he said. If you want the trailer to have more buoyancy it wouldn't be
difficult
to add some floats along the end of the frame by using fenders or such. This would
take
some strain off the gunwale. The four wheels of a tandem axle add a considerable amount of buoyancy.
Probably 200lbs each. Hmmmm, (1000-800=200). This is now sounding more workable
than ever. Slick idea huh? This system
would make the lousiest ramp useable. TOP |
|||||||||||||||
|
Return to Tech Tip Index. . . . . . . . . . . . . . . Have a Question? |
|||||||||||||||

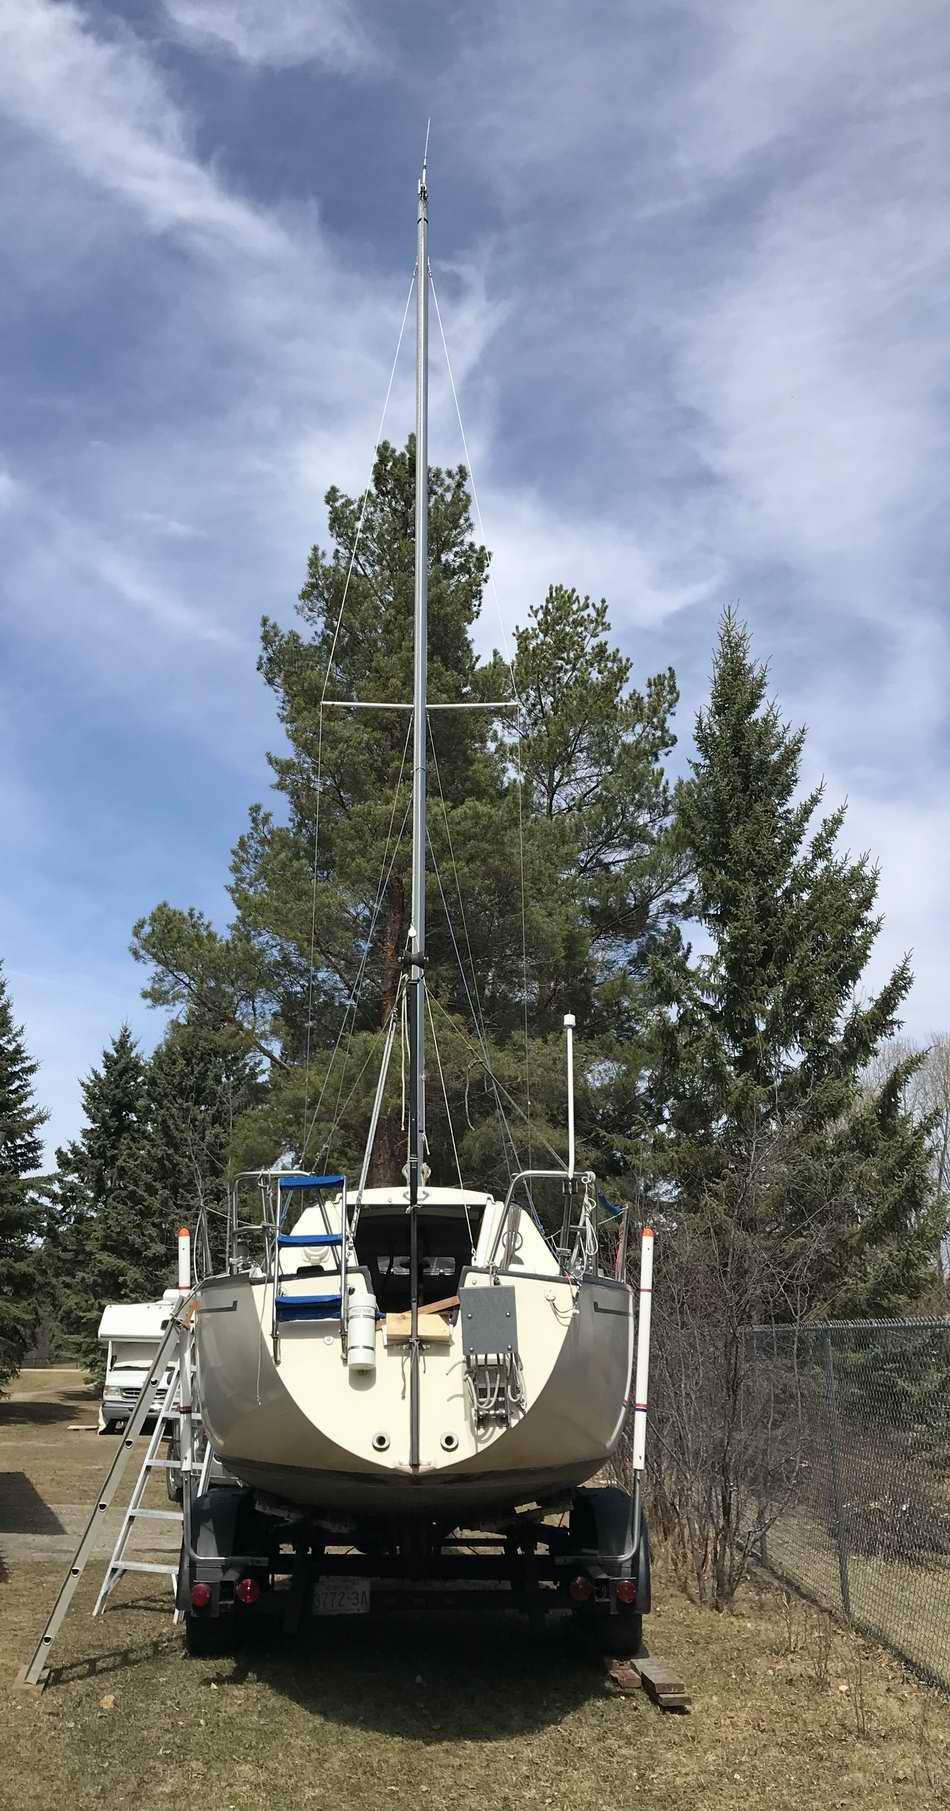
 The guide posts are positioned behind the fenders, which is just aft of the maximum
girth of the hull. They are set about
1/2" away from the hull (~94"
apart at gunwale height) which is slightly narrower than the
maximum beam of the hull.
Since each post can bend outward about 2" they can spread apart as the girth of the hull passes between them
and spring back to keep the hull centered as the narrower section of the hull
stops
between the posts. However, with the trailer underwater and the hull
several feet above it, the posts are not pushed apart. The hull can just settle between the posts as
it floats above the trailer. Looking aft over the trailer you can see
the posts are also angled outward about 100 which is another
feature that helps to center the hull as the trailer goes up
the ramp. It would have to be pulled up slowly for this to happen though. Anyone in a hurry?
The guide posts are positioned behind the fenders, which is just aft of the maximum
girth of the hull. They are set about
1/2" away from the hull (~94"
apart at gunwale height) which is slightly narrower than the
maximum beam of the hull.
Since each post can bend outward about 2" they can spread apart as the girth of the hull passes between them
and spring back to keep the hull centered as the narrower section of the hull
stops
between the posts. However, with the trailer underwater and the hull
several feet above it, the posts are not pushed apart. The hull can just settle between the posts as
it floats above the trailer. Looking aft over the trailer you can see
the posts are also angled outward about 100 which is another
feature that helps to center the hull as the trailer goes up
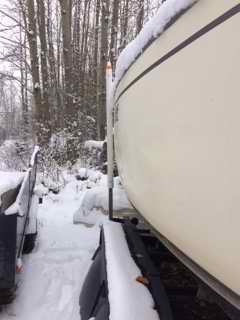
the ramp. It would have to be pulled up slowly for this to happen though. Anyone in a hurry? 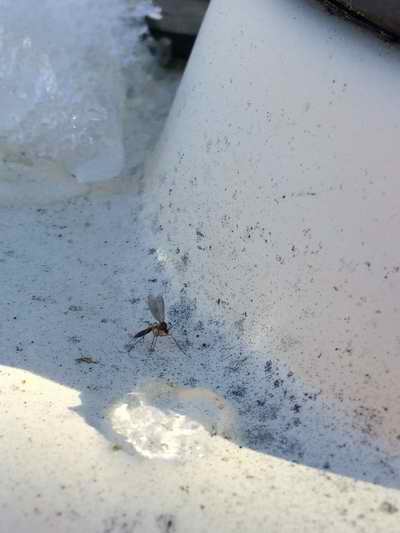 In the mean time I was cleaning the deck of snow & ice to pull the winter
covers over the boat when I spotted this little pest next to the winch mount.
Mother Nature was generous with her early delivery of snow in mid October.
We Canadians have quite a celebration after the first killing frost because
it means no more mosquitoes. I was quite surprised to see this one still
flying. That is a chunk of ice in the upper left corner. You can't convince me they won't be the last living
thing on this planet when everything fails!
In the mean time I was cleaning the deck of snow & ice to pull the winter
covers over the boat when I spotted this little pest next to the winch mount.
Mother Nature was generous with her early delivery of snow in mid October.
We Canadians have quite a celebration after the first killing frost because
it means no more mosquitoes. I was quite surprised to see this one still
flying. That is a chunk of ice in the upper left corner. You can't convince me they won't be the last living
thing on this planet when everything fails! 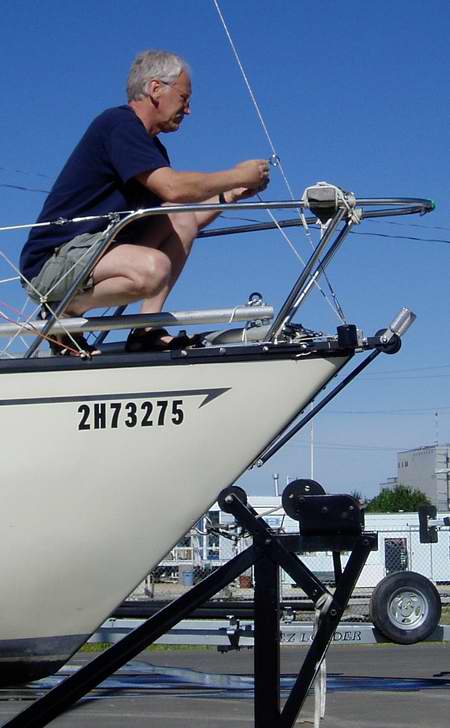
 the trailer
frame. At this point the aft of the hull is still floating just above the bunk boards. When the
trailer and boat are pulled up the ramp, Panache's bow remains
the trailer
frame. At this point the aft of the hull is still floating just above the bunk boards. When the
trailer and boat are pulled up the ramp, Panache's bow remains 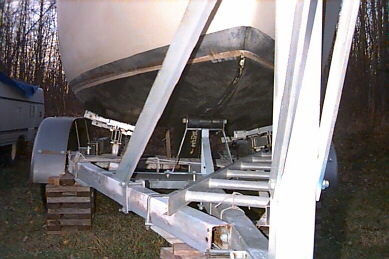 seated behind the tree roller with the hull settled on all 4 bunk boards.
Without a bow support roller the hull rocks back, pivoting on the front bottom corner of the keel, and the stem will be several inches back from the winch tree roller. Once the trailer/boat is on flat ground it is impossible to winch the boat forward. Although, you might be able to skid it forward by slamming on the brakes. I have done that once when the hull was still slimy with marine growth. A stem to roller gap makes for an unsteady ride down the road. With the bow wedged in the roller and secured to the winch tree, the boat and trailer are a steady load while traveling. No hull moving around to give you the willies. Panache's rubber bow support roller is 8" wide with a shallow V shape to gently direct the hull to the middle and keep it there. It is positioned 6' back from the tree roller. DO NOT use a flat roller. You DON'T want the hull to slide off the side of this roller so make sure the bow meets it on the center when starting to pull the boat out of the water! This roller also supports the bow to prevent drooping during storage. This is a design idea of mine that I installed on my
previous trailer and it works just as well for a SJ23.
seated behind the tree roller with the hull settled on all 4 bunk boards.
Without a bow support roller the hull rocks back, pivoting on the front bottom corner of the keel, and the stem will be several inches back from the winch tree roller. Once the trailer/boat is on flat ground it is impossible to winch the boat forward. Although, you might be able to skid it forward by slamming on the brakes. I have done that once when the hull was still slimy with marine growth. A stem to roller gap makes for an unsteady ride down the road. With the bow wedged in the roller and secured to the winch tree, the boat and trailer are a steady load while traveling. No hull moving around to give you the willies. Panache's rubber bow support roller is 8" wide with a shallow V shape to gently direct the hull to the middle and keep it there. It is positioned 6' back from the tree roller. DO NOT use a flat roller. You DON'T want the hull to slide off the side of this roller so make sure the bow meets it on the center when starting to pull the boat out of the water! This roller also supports the bow to prevent drooping during storage. This is a design idea of mine that I installed on my
previous trailer and it works just as well for a SJ23. 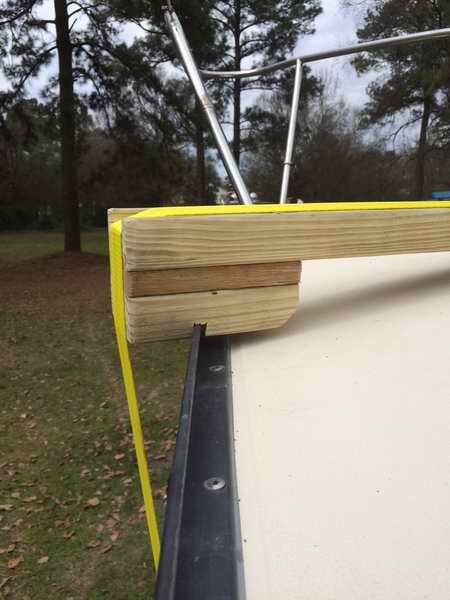
 have asked just how deep a trailer should be to launch or retrieve an SJ23. It should be noted that a launch is easier than a retrieve and can be done in slightly less water. Note the slightly greater exposure of the front bunk boards in the launch photo at right versus the haul out photo below.
 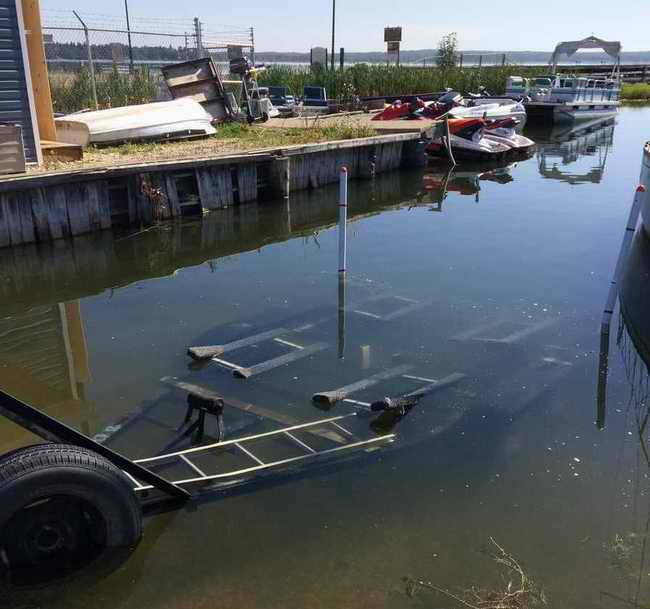 HAUL OUT FALL 2017 - This was the easiest haul out I have ever done due to the new guide posts. With the posts marked for retrieve depth I backed the trailer down the ramp till the marks were about 3" above the surface. The trailer was level (left/right) as you can see at right. (The angle of the guide posts are symmetrical by the way. Lens distortion is makes the right one lean further than it is.) The hull was floated over the trailer and the winch line pulled the hull up till the bow eye was snug under the roller as you can see below. The placing of the bottom marks was a guestimate that turned out to be bang on. Sometimes you get lucky.
 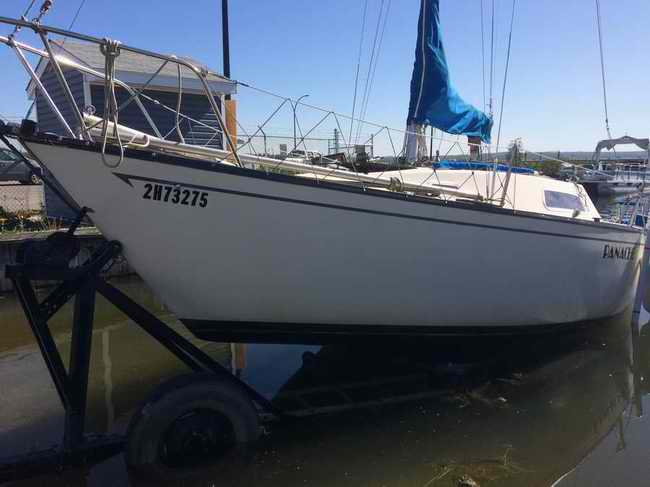 In this photo the hull was pulled up over the