SJ23
Tech Tip B01,
((UPDATED 2024-11-03) Bob Schimmel, Gene Adams, Paul Bailey, Mike Hancock, Mark Ludlow,
Randy Cook, Bill Ward, John Cowing, Jocelyn Chagon, & Robert Hasegawa. |
Index |
|
Centerboard, Repair & Modifications INDEX
-
Construction,
Pivot Hole & Pin,
Stirrup,
Raise the Boat - (Jacks/Trailer, Scaffolding, Floor Jack, Gantry Crane, Careen).
Restore the Board,
Install the Board, Make Your own Board,
Replace SS Lift
Cable, Install Double Ended Lift Line, Seized Board,
Conclusion
/ (Tech Tip B06 Board Performance Upgrade).
|
In
1996, the
year after I
bought Panache, I noticed the centerboard would vibrate
occasionally. The noise was more annoying than it was a concern, but
on
the advice of several SJ23 club members who said it
could seize in any position I decided to repair it. Being new to a San Juan 23 I
heeded their advice. After my board
removal and repair I discovered that a seizure is
associated with marine growth inside the slot and/or corrosion,
not vibration, so I had quite a different problem. My
experience with a seized board is through other sailors. However,
there is commonality in mechanics. So .......
- If your board is seized in the up position
then you can haul the boat out of the water using your trailer and effect your repairs on
shore. More on this technique
below.
- If your board is seized in the down position,
you will have to haul it out using a crane, a travel lift or contact your
scuba diving buddy to free it up in the water. Both lifting options are expensive and most scuba divers can make a case of beer disappear in a flash!
(I've done a board
lift cable repair under
Panache wearing my SCUBA gear and I can tell you
the feeling of looking up at the hull is weird. We all know what
a boat bottom looks like,
but until you've experienced looking up at a boat floating above you, it is like no
other feeling. I liken it to
Steve Robinson's
famous first "space walk" under the belly of Discovery to repair tiles. He commented on a similar feeling).
- If your lift cable
breaks you have to replace it before you
can haul the boat out on your trailer.
The
factory centerboard is galvanized steel plate. The galvanized coating
wears away over time after which the bare steel starts to corrode, swelling and flaking in the process. The
oxidation will continue inside the trunk and the board will get tight as
the rust associated swelling continues. This is a likely scenario for a boat
ignored in a slip.
For this reason timely
maintenance to the centerboard and its SS lift cable are important.
DO NOT let
either of them deteriorate to the point of becoming a major problem,
especially if you float the boat where the water tends to turn hard in
the winter! This is a
difficult enough repair without being forced to invent some dangerous technique
in the urgency of the moment. Some people remove the centerboard annually to clean the
keel slot and inspect the lift cable. This may be
a good practice
in salt water. My experience in fresh water is to inspect
the cable for fatigue once every few years. I have
experienced no corrosion but have changed it to Dyneema. I suggest you check
your
assembly before it slips down to Davy Jones's locker or you can't
retrieve the hull on a ramp.
TOP
 CENTERBOARD
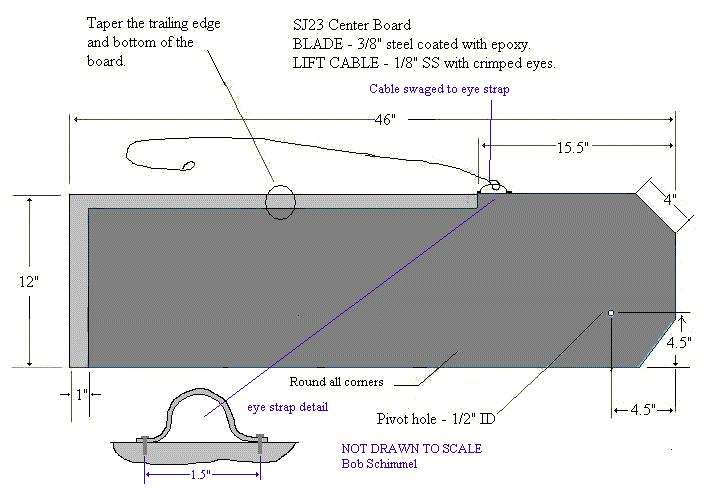
CONSTRUCTION - The
factory centerboard is made of 3/8" thick mild steel that was
hot-dip galvanized by Ace Galvanizing in South Park, Washington. The
60 lb steel board pivots on a 1/2" diameter SS pin welded to the side of the
SS stirrup. The board and
stirrup are housed inside a
~1/2" wide
keel slot. The pivot pin extends across the keel slot, snubbed
against the opposite face, thereby holding the centerboard captive
within the slot. The 3/8" thick centerboard is ~1/8" thinner than
the ~1/2" keel slot, leaving about 1/16" gap on either side for minimal
slop. The board is
raised by a
1/8" halyard grade (7x19) SS lift cable, factory installed, that must be replaced on a regular basis.
More on this below. CENTERBOARD
CONSTRUCTION - The
factory centerboard is made of 3/8" thick mild steel that was
hot-dip galvanized by Ace Galvanizing in South Park, Washington. The
60 lb steel board pivots on a 1/2" diameter SS pin welded to the side of the
SS stirrup. The board and
stirrup are housed inside a
~1/2" wide
keel slot. The pivot pin extends across the keel slot, snubbed
against the opposite face, thereby holding the centerboard captive
within the slot. The 3/8" thick centerboard is ~1/8" thinner than
the ~1/2" keel slot, leaving about 1/16" gap on either side for minimal
slop. The board is
raised by a
1/8" halyard grade (7x19) SS lift cable, factory installed, that must be replaced on a regular basis.
More on this below.
- The centerboard is fully enclosed inside the keel slot when it is raised to the top. It is then safe to rest the shoal draft keel on a soft bottom without damaging the board. This is one of the reasons why I
moor Panache with the board up, just in case she breaks free of her
mooring. The other reason is the board potentially swinging up, puncturing
the top of the keel slot. The
trailing edge is sharp so this is easy to understand. I have only
heard about this potential in discussions on mooring techniques in
very rough water. I have never heard of it happening.
However, I have seen what happens when the lift cable of
a ballasted swing keel breaks. The board swings down, cracks the
leading edge of the slot and the boat sinks. Its a good thing the
boat in question had floatation. I could only imagine this
happening to an SJ23!
PIVOT
PIN & HOLE
(1998) - After removing Panache's centerboard (2002) I realized I didn't have the seizure problem others experienced but
I was surprised at the 1" diameter hole over the 1/2" OD pivot pin and
considered this to be the source of the vibration.
(I've always
thought
the hole in Panache's centerboard was
too large to be worn to 1" ID
after only 25 years of use. (See Note 2).
In reading emails from other owners and seeing their boards, it is
apparent that new boards are made with this large hole.
I don't know what the factory thinking is but it seems crude. Silly me thinking this would be a machined installation. Another thought is the large hole is due to galvanic corrosion between the mild steel and the SS pin. A Teflon bushing would stop that).
Fortunately the 1/2" diameter pivot pin on Panache showed no sign of wear (See Note 3) and there was no marine growth on the board. To eliminate the vibration the hole had to fit snug over the pin. What also bothered me was the roughness of the inside of the
hole. It looks like it was blasted through with a cutting torch. So I filed the hole
round till it was smooth enough to bore out with a large drill
bit. Then pressed a chilled bronze bushing into the hole. It was the quickest and
easiest way to reduce the oversize hole. An alternate bushing might be an FEP bushing (hardest & toughest of the various types of Teflon). Use 3/4" OD, 1/2" ID tubing. Regardless of the material the bushing MUST be
installed perpendicular to the blade so the board is parallel to the
center line of the hull and can't jam inside the slot. A bronze
bushing is available from an automotive or bearing supply dealer. To
ensure the bushing remains snug over its life, I froze it in the freezer (-200C) to shrink
it and heated the board with a torch (to +x0C ouch) to
expand the hole.
Then I pressed the bushing in the hole and let the two get "comfy" with
each other. After the bushing seated, the pivot pin fit a bit too snug but some oil and twisting quickly solved that problem. Water will lubricate the
bushing
when the boat is in the water. If your boat is in salt
water it would be better to use a phosphor bronze bushing. Panache
is in fresh water and never connects to shore power, so the chance of
electrolytic corrosion is minimal. As of 2022 the board still doesn't vibrate.
 Hint - Just in case your
yard
charges by the hour, it is wise to contact an alloy welder prior
to removing the board. This way he can be ready to repair/replace the pivot pin if
it proves necessary. It would actually be a good idea to install a
larger diameter pin. Similarly, find a retail source of bushings if you decide to use
my technique to repair
a worn hole. Hint - Just in case your
yard
charges by the hour, it is wise to contact an alloy welder prior
to removing the board. This way he can be ready to repair/replace the pivot pin if
it proves necessary. It would actually be a good idea to install a
larger diameter pin. Similarly, find a retail source of bushings if you decide to use
my technique to repair
a worn hole.
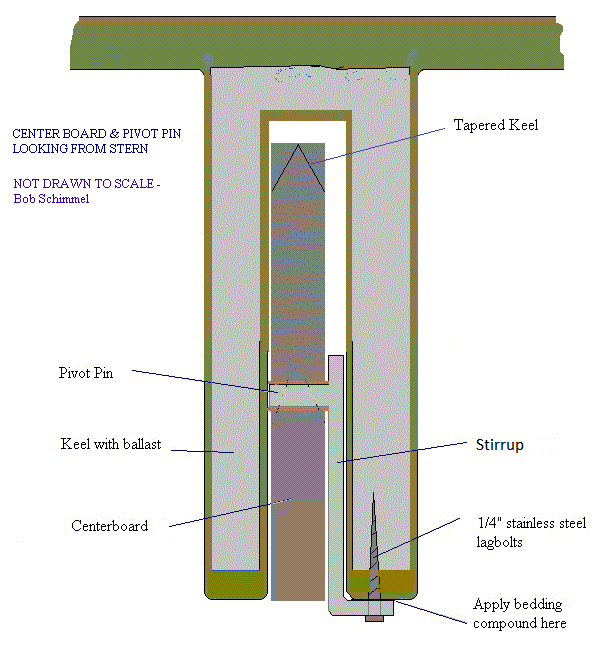
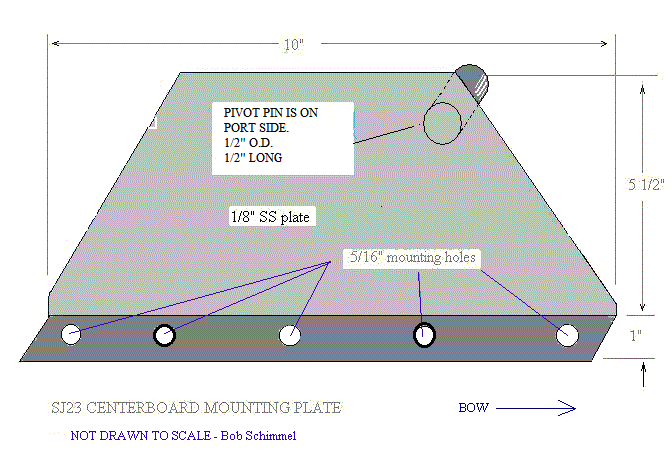
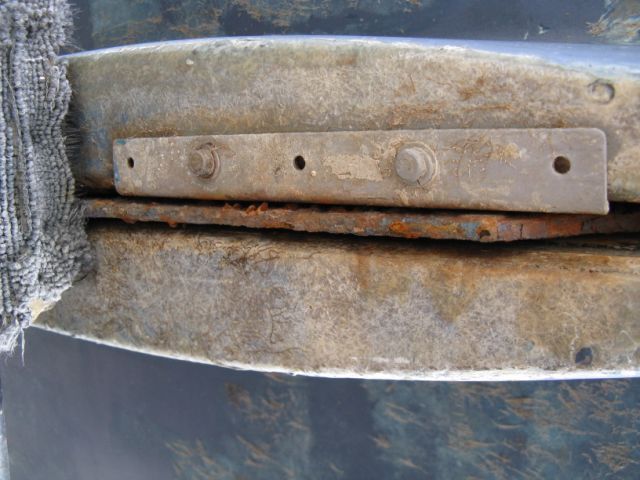
STIRRUP - The SS stirrup
has a flange that protrudes out of the keel slot and wraps
around the bottom of the
shoal keel,
to starboard. Here two SS lag bolts
(5/16 x 2.25)" with a 7/16" head, fasten the flange to the bottom of the keel. The cutaway
profile at right is looking forward through the
keel. The
stirrup has 5 mounting holes that line up with the
2 holes in the keel. To balance the center of lateral resistance, slide the
stirrup fore or aft till a new set of holes
line up, then screw the bolts in. Remember which 2 flange holes are
used on your boat so you can restore the balance. The factory used
holes 2 & 4, counting from the front.
Once you remove the lag bolts, the entire assembly is free to drop out
of the keel slot and the centerboard will separate from the stirrup. The board
weighs 60 pounds
so it is not that difficult to support. If the board or stirrup doesn't release from
the keel slot, you may have to pass a sharp hacksaw blade (or use a
Sawzall with a round tip blade) through whatever
crud there is in the slot. Once through, give
the support plate a sharp rap (fore or aft)
with a five pound sledge hammer and a length of flat bar or similar shaped punch. Be careful when "budging" it with a pry bar as this may
crack the gel coat. A combination of these techniques should break
the grip. To protect against that unexpected drop, leave about 3"
of slack in the lift cable to keep the board from falling on your lap. Things go easier and quicker if you have an
assistant inside the boat controlling the lift cable for you.
NOTE - DO NOT assume the lead ballast is positioned as shown above. This diagram is only my
rendition of the keel. There is no way of knowing if the lag bolts are imbedded full
depth in fibreglass or into lead. Assume they go into fibreglass in which case you should NOT over tighten the lag bolts. Doing so will strip the thread.
 The diagram at right shows the
starboard side of the
stirrup, with the dark grey being the mounting flange bent towards you and the pivot
pin welded to the port side of the plate, facing away from you. The diagram at right shows the
starboard side of the
stirrup, with the dark grey being the mounting flange bent towards you and the pivot
pin welded to the port side of the plate, facing away from you.
REMOVE
STIRRUP
in WATER - It may be possible to remove the
stirrup and
centerboard while the boat is floating if the 2.25" lag bolts "bottom out" in
solid material. That being the case it shouldn't spring a leak, but
I can't guarantee that.
The
lag bolt drill hole was measured at 2.5" deep and was solid at the
bottom on one SJ23. I never made this measurement on Panache so can't confirm this. But even then, depending on the vintage of the hull, the lead ballast is poured (early) or placed (later).
There may be all kinds of reasons why you would want to
remove the stirrup in the water, none of which I will list here!
The major problem is how to hold on to the board and stirrup once they
come loose. For this reason I suggest you do this in clear
shallow water with a sandy bottom so you have a fighting chance to find
the parts. Once removed, I suggest you immediately
plug each hole with a tapered rubber plug or flat neoprene and stainless
steel washer pressed against the gel coat using the original lag bolt. Don't
cross thread the bolt. Either
technique allows for a means
to seal it underwater or to slow water ingress.
Installing
the
stirrup
underwater is NOT recommended because water is the bane of all adhesives.
Only mussels and barnacles have solved the problem and nobody yet knows how they do it. Sikaflex cannot stick to a wet surface.
A Sikkens technical rep
 confirmed that to me.
Butyl rubber won't stick either.
However Tremco Gutter Seal
can stick under
water as
is used to seal an eavestrough.
Just hold the tip of the caulking gun
against the gel coat and squeeze the trigger to force it to stick.
It can be applied to circle seal a bolt hole with a temporary flat plate
on top or it can be injected directly into the hole for sealing by a lag
bolt. Be careful with this stuff, it can be messy. It will
stick to your skin and everywhere you touch it, even under water.
Keep some rags handy under water for cleaning. If you can't find
Tremco Gutter Seal,
you could temporarily fill the void between the plate and keel with a
1/8" thick layer of closed celled neoprene (wet suit material).
Scrub the fibreglass nappy clean with a Scotch bright pad before
installing the plate. Each lag bolt head could be sealed with flat
neoprene washer backed up with a large flat stainless steel washer.
(Some of the neoprene should stick out past the washer).
The neoprene washer
would have to fit very snug around the shank of the 5/16" bolt in order to
seal the hole. I suggest smearing a high quality goop over the washer
and shank before you take it underwater to fasten the plate. This
could give you a fighting chance to seal the hole. If
the bolt is a bit loose in the fibreglass (take note of this when removing the bolt) wrap it
with several turns of Teflon tape. This temporary
fix can be made permanent after the boat is back on dry land when the
fibreglass is clean and dry!
If you try this technique please let me know if it is successful. confirmed that to me.
Butyl rubber won't stick either.
However Tremco Gutter Seal
can stick under
water as
is used to seal an eavestrough.
Just hold the tip of the caulking gun
against the gel coat and squeeze the trigger to force it to stick.
It can be applied to circle seal a bolt hole with a temporary flat plate
on top or it can be injected directly into the hole for sealing by a lag
bolt. Be careful with this stuff, it can be messy. It will
stick to your skin and everywhere you touch it, even under water.
Keep some rags handy under water for cleaning. If you can't find
Tremco Gutter Seal,
you could temporarily fill the void between the plate and keel with a
1/8" thick layer of closed celled neoprene (wet suit material).
Scrub the fibreglass nappy clean with a Scotch bright pad before
installing the plate. Each lag bolt head could be sealed with flat
neoprene washer backed up with a large flat stainless steel washer.
(Some of the neoprene should stick out past the washer).
The neoprene washer
would have to fit very snug around the shank of the 5/16" bolt in order to
seal the hole. I suggest smearing a high quality goop over the washer
and shank before you take it underwater to fasten the plate. This
could give you a fighting chance to seal the hole. If
the bolt is a bit loose in the fibreglass (take note of this when removing the bolt) wrap it
with several turns of Teflon tape. This temporary
fix can be made permanent after the boat is back on dry land when the
fibreglass is clean and dry!
If you try this technique please let me know if it is successful.
CONCLUSIONS
-
After installing a bushing on Panache's centerboard, it swings freely and no longer vibrates
against the sides of the keel slot. Since 1998, I've experienced
no binding and the board is still quiet.
- WEAR - To
minimize board wear always moor the boat with the
board up, even if you are in a marina. My guess is that a board
stored in the dark keel slot will not experience marine growth. That's been the case for Panache.
- WEED FREE KEEL SLOT - Pull
the centerboard up before you sail into weedy water. This will prevent
pushing weeds into the slot as the board is raised, possibly jamming the
board in the slot. I suspect
this is more of a fresh water problem than a salt water problem.
- DAMAGE - Another
reason for pulling the board up in shallow water, as in beaching, is
to prevent damage. It is impossible to push the boat backwards
when the end is jammed into the bottom. Don't
push the boat so hard that you bend the hardware down there. There are lift cable
issues with this dumb stunt that very quickly change a sane person
into one not fit to be amongst general society.
- SIDE PLAY - If
the board has side play, you could insert a thin UHMW shim between the hull
and the centerboard plate, about 1/8" thick and 10" diameter. The end of the pin
must touch the opposite wall of the
slot. Drill a
5/8" diameter hole in the center of the shim such that it slides
over the pin. This should be sufficient to hold the shim against the
centerboard. Install the
assembly. This worked on my MacGregor. Let
me know if it works on your SJ23.
TOP
|
|
RAISE the BOAT USING THE TRAILER JACK & WOOD CRIBS, Bob Schimmel & Robert Hasegawa. |
|
The most
difficult part of removing the centerboard is to raise the boat off the
trailer, especially on your own.
Lifting would require three 6 ton floor jacks, stable enough to
raise the trailer and boat about 6".
-
GANTRY CRANE -
You could use an overhead gantry crane as used in a truck repair shop,
or build your own gantry from scaffolding as Paul did (shown below).
Either is very secure.
- TRAVEL LIFT - If
you use a travel lift or a crane to lift your boat then
this task is dead simple.
Then while the lift operator goes for lunch you get to work! Convince the operator you
will be done when lunch is over. However, few yards will let you work under a
suspended boat. Most yards will insist on placing the boat on a cradle or on jack stands chained together, which is the safer technique. If you are
going to do other long term repairs while on the "hard" it is
best to use a
fitted cradle or angled stands chained together. Then you can work at
your leisure to redo the bottom paint and reseal all the thru hull fittings
as well, described in Tech Tip B17. See
centerboard assembly
above for removal
instructions.
- SUPPORT BEAMS - You could park the boat
on a
concrete floor or hard ground. Jack up the trailer till the wheels
are off the ground. Slide
two strong wood beams under the hull, equipped with form fitting boards
to support the hull. Lower the trailer and roll it away. The stands must be
diagonally braced so they can't collapse.
-
MECHANIC PIT -
Alternatively you could park the boat over a mechanic's floor pit,
concrete floor or a hole in the ground. Jack up the trailer till the wheels are off the
ground. Place supports under the trailer frame then release
the springs from the frame and roll the axles away to access the centerboard. A lot of work. I did this only once when the trailer had a single axle.
Each of these options require a lot of preparation but if you don't have
access to a crane or a pit then you have to be creative. I
researched long and hard till I found a safe method to raise Panache on her EZ Loader trailer since she
was already stored in the bush for the winter and moving was impossible
due to deep snow around the boat. The steps below list the process I
developed to raise the boat on the trailer to "rock" it up, one end at a time. After all, the trailer frame is
strong and the bunk boards provide perfect support, so why not use them. The trailer had a single axle back then. Of course the
method had to be foolproof, without fear of toppling Panache on her side and crushing me in the process. The ground was frozen at the time so little fear of a collapse. SAFETY
FIRST - Choose a work location where the GROUND IS DRY, FIRM AND LEVEL TO PREVENT THE
WOOD CRIBS
FROM SLIDING OR SINKING. You will have to work under a 3000 lb. hull
resting on a
1000 lb. trailer. Snug
up the trailer winch line at the bow to prevent the boat from
sliding backwards off the trailer. Snug up the web straps
around the trailer and hull to steady the hull on the
trailer. Finally test
the load for steadiness before you crawl under it.
This load can easily kill you.
I
made four 2' high (2x4)" wood cribs to support the jacked up trailer frame. You can
see a wood crib
under the front of the trailer in
Tech
Tip A01. Each crib is 18" square and fastened at
the corners with 3" spikes. It takes a surprising amount of lumber and spikes to
make one crib. While it is OK to use old (2x4)s, make sure the wood is
structurally sound and the joints tight. Secure a line or metal band around each crib (top to bottom) to hold the
(2x4)s stack together.
NOTE - If you intend to use these cribs later for winter boat storage, I suggest shortening them to about 1.5' tall. Coat the "feet" with wood preservative to prevent wood rot and set them on a concrete sidewalk block to keep the feet dry.
- Using
the trailer jack, lower the front of the trailer till the back is as
high as it can go. Then jam two wood cribs under the back of the
frame.
- Jack up the front of the trailer as high as it can go. Jam two wood cribs under the front of the trailer. Rest the trailer on the cribs. (This is the stage at which I store Panache for the winter with most of the weight off the wheels.) At this point the tires should be off the ground a bit so you can
place a wood spacer under them to create a higher pivot point for
continuing this process. I jacked up the axles to add spacers
under them to speed up the lifting process.
- Place spacers under
the jack as well because
the jack simply isn't long enough to reach the ground once the trailer
has been raised. Then raise the front of
the trailer enough to remove the front cribs, lower the front of
the trailer till the back is as high as it can go. There should now be
a slight space between the trailer frame and the top of the back cribs. Build up the
height of the crib with wood spacers to fill the gap.
- Raise
the front of the trailer as high as it can go using the jack and add
wood spacers between
the trailer frame and the front cribs.
The tires should now be slightly off the wood spacers so
add more spacers under the tires. Jack up the axle if you have
to.
- Continue
this sequence till the trailer frame is slightly more than two feet off the
ground. This is tedious heavy work but if the cribs and spacers are
placed solidly then everything will be safe and secure for working
underneath.
- Finally,
place the four very solid 2' high wood cribs under the corners of the
trailer to secure and support the entire assembly. (See SAFETY
FIRST). I also supported the front of the trailer frame with wood cribbing
for extra support and security.
- Now
that the boat and trailer are resting securely on the two foot high
cribs you can lower the axle(s) to create the space to
remove the centerboard.
- If you have a single axle trailer remove
the front spring shackle bolts and lower the axle. This creates
enough room to remove the centerboard.
- If you have a
tandem axle trailer remove the front spring shackle bolts and the
idler bolts and lower the axle.
- In either case, it should not be
necessary to
remove the back shackle bolts. In fact, leaving them in place makes it
easier to align the axle to the frame for reassembly.
It
should be noted that I performed this lift when the trailer had a
single axle. I have NOT YET performed this lift with a tandem
axle. If anyone is successful with this technique on a tandem axle, please email me. I'd be very interested to know how you did it.
- Be very careful; ensure that the hull is very securely
supported before you crawl under it. You don't want to leave an impression of the keel
on your
face! (See SAFETY
FIRST).
This is a photo from Robert lifting Wild Tangent in 2023 using the steps 1-9 above. I wasn't in a position to take photos when I jacked up Panache so I'm grateful for this one.  "Ever since I bought Wild Tangent (previously named Aerial), I fretted about the condition of the centerboard, stirrup and cable. Every time I raised or lowered the center board, I pictured the eye strap breaking or pulling out and being SOL. "Ever since I bought Wild Tangent (previously named Aerial), I fretted about the condition of the centerboard, stirrup and cable. Every time I raised or lowered the center board, I pictured the eye strap breaking or pulling out and being SOL.
To remove the board I jacked my EZ Loader trailer up on 5 blocks, removed the wheels, and dropped the axle by removing the front pin of the leaf springs. I also had to remove the cross bar that supports the keel in front of the axle. Because of the maintenance I did on the trailer last year there were no seized nuts. The entire lift process took about 40 minutes. Wild Tangent
is now rock solid and safe to work under as you can see in the photo at right. The axle hubs were removed as well since I'm replacing them. The centerboard dropped out no problem. I'm going to leave the boat there for winter, lowering one set of bunks at a time to repaint with an ablative bottom paint. Anyway, what made me think of this was the comment in this Tech Tip that you only need about 6" to remove the board. So once again, the web site saved me from a bunch of hassles trying to lift the boat off the trailer." Robert Hasegawa
|
|
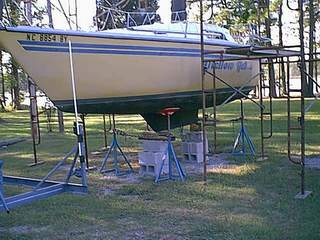
RAISE THE BOAT USING SCAFFOLDING, Paul Bailey. |
A
very secure method of raising the boat is to build an overhead hoist as Paul
Bailey did in 2000 for Mellow Yellow.
(See Note
1 below). He used scaffolding to support two overhead
(4x4)" beams to lift the hull off the trailer with four Come-a-Longs. This
is an excellent alternative to a crane or overhead hoist. It is
inexpensive, strong, very stable and you have unobstructed access to most
any part of the hull. Compression bars are not required but you must tie
the tops of the scaffolding together to solidify the structure. It
should be noted that Paul took all the necessary safety precautions by
working on hard, level ground and maintained some tension on the belly
slings while the hull was on the blocks. This helps to prevent a collapse.
No sense getting a "headache" while you're working under her. By the
way, each Come-a-Long has
to hold about 850 pounds, less if you empty the boat. Below is the
sequence of his repair work.
|
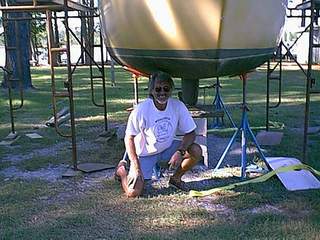
Fig 1
-
Erect scaffolding around hull. Secure the beams to the top
of the
scaffolding. Shake it hard to test the stability.
|
Fig 2
-
Jack the hull up off the trailer to fit the slings under.
Use wood that
can't disintegrate under load.
.
|
|
Fig 3
-
With the Come-a-Longs secured to the beams, hang the belly slings in place. Take up the slack to test the structure.
Slowly lift the hull off the trailer then pull the trailer out.
|
Fig
4
-
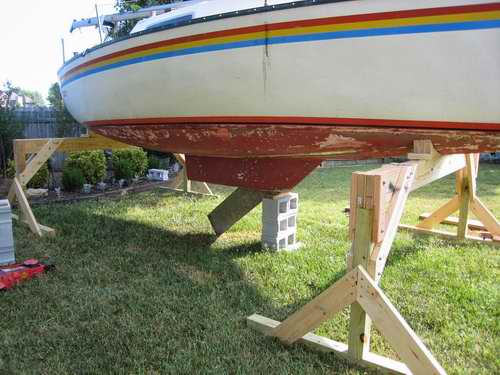
Place jack stands under the hull so the keel is about 2' off the ground.
A
little higher for those of you with bifocal lenses!
Add keel supports to hold the majority of hull weight and adjust the stands to steady the
hull sideways, (extremely important). Notice the space between the keel stands
so centerboard can be lowered.
|
|
Fig
5
-
And finally; well you just gotta have faith! Paul.
|
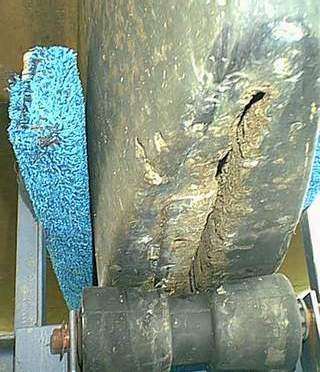
Fig 6 -
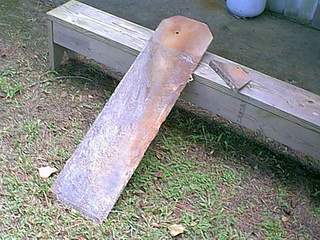
Here is the problem Paul is trying to resolve, marine growth inside the keel
slot and along the bottom.
|
|
Fig 7
-
Centerboard plate removed. Note the hole where the pivot pin was. The pin corroded off.
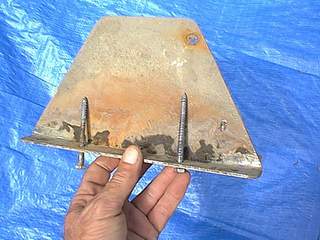
|
Fig 8
-
The centerboard and plate removed from hull. Note the eye strap.
From the corrosion pattern it looks like
the board was stuck partially down.
|
|
RAISE THE BOAT USING A FLOOR JACK, John Cowing. |
 WOOD CROSS BEAMS - John used an automotive floor jack to lift the trailer and boat approximately 8-16", one end at a time, then placed cinder blocks under the trailer for support. Jack up the rear first, placing two blocks on each side and blocking the trailer wheels so it cannot roll. Then jack up the front and place two blocks under the trailer. Then back to the rear and front till the boat is high enough to slip the stands under. Lastly he lowered the trailer away from the hull, leaving the boat supported as you see at right. John prebuilt his wood frames wide enough to roll the trailer out once the hull is supported. You should add padding to the forms
to distribute the load and
prevent the hull from sliding or rolling. Removing the trailer allows clear access to the center board. WOOD CROSS BEAMS - John used an automotive floor jack to lift the trailer and boat approximately 8-16", one end at a time, then placed cinder blocks under the trailer for support. Jack up the rear first, placing two blocks on each side and blocking the trailer wheels so it cannot roll. Then jack up the front and place two blocks under the trailer. Then back to the rear and front till the boat is high enough to slip the stands under. Lastly he lowered the trailer away from the hull, leaving the boat supported as you see at right. John prebuilt his wood frames wide enough to roll the trailer out once the hull is supported. You should add padding to the forms
to distribute the load and
prevent the hull from sliding or rolling. Removing the trailer allows clear access to the center board.
If you are going to support the hull on the wood beams for any length of time it is a good idea to support the keel to take the keel strain off the hull. That's what the three cinder blocks in the photo do.
John's support frames at right have (2x6s)" for horizontal beams and (4x4)" posts in compression. All wood is glued and screwed together. You can't be too careful when constructing these. John Cowing
|
|
RAISE THE BOAT USING A PORTABLE GANTRY CRANE, Jocelyn Chagon. |
|
This suggestion comes from a friend who bought a portable gantry crane from Wallace Cranes. The portable Tri-Adjustable Aluminum crane that Jocelyn has can lift up to 3 tons. Lift up one end of the hull and block it. Then lift the other end and block it as well. It might be wise to leave the crane in place. All made in the USA of top quality material. 
Confirm the crane dimensions so it fits an SJ23.
|
|
CAREEN THE HULL |
CAREENING - Lastly there is one other method. Careen the hull in a slip
sufficiently far enough to expose the top of the keel stub to the water line. Pull the
hull over using the halyards looped around the mast where the shrouds are attached. Also, tie some lines at the bow and
stern to keep the boat from turning in the slip. Then place a ladder on the lake bottom, leaning against the dock finger. Now you can climb down to the keel with tools in hand to replace the lift cable or remove the centerboard. Be real careful with this technique and careen the
hull with no other boats around. If your halyards let go, the mast
will swing well past vertical and smash into the adjacent rigging. In
addition, the hull could pin you against the dock as it rolls. There goes a perfectly good pair of swim trunks! You
wouldn't want that! On the other hand, this is a quick, slick way of getting the job done. TOP
|
|
RESTORE
THE CENTERBOARD |
| The
original factory
board is hot-dip galvanized steel coated with a black shiny finish. I
don't know what the black coating was but it seems pretty good at repelling marine
growth and corrosion. If you wish to
restore the finish to something similar, sandblast it, etch it with acid,
then coat it with WEST
system epoxy thickened with carbon graphite powder. The carbon graphite makes the
coating extremely
durable and slippery. It does not scratch over granite
rocks for instance and it just might be too slippery for marine
growth, especially if you retract the board inside the dark keel slot when
the boat is in her slip. Panache's rudder blade is coated with this
"chemical cocktail" and it does wonders for smooth flow. Some people
have suggested adding foil shape to the board to improve the hydrodynamic
flow. Unfortunately it can't exceed 1/2" thickness, the with of
the keel slot, and it is doubtful that this narrow foil shape can improve performance.
This effort will likely boost your ego more than improve
the performance of the board since the flow over a flat board is all screwed
up anyway.
Making this board slippery is probably the best thing you can do for hull
speed.
TOP
|
|
INSTALL
the CENTERBOARD |
To
reassemble the centerboard support plate, circle seal the lag
bolt holes with Sikaflex or butyl rubber and smear a thin coat between the mounting flange of the support plate and the
keel. Circle seal the under side of the bolt heads and tighten them to just snug, leaving some squish room
for the sealant when it has cured. Fight the urge to over tighten them or
you will strip the thread in the fibreglass. Then you will have to
do a fibreglass repair job as well. The hardened sealant will keep the water out and lock the bolts in place. Have faith, they won't drop to the bottom of the
ocean!
TOP
|
|
MAKE
YOUR OWN CENTERBOARD to REPLACE a CORRODED ONE, Mark Ludlow, Gene Adams. |
|
Sometimes a centerboard is so pitted from salt water corrosion that it
must be replaced. Several people have wondered about fabricating
their own board from 304 or
316 stainless steel. The thought being that a SJ23 centerboard will
occasionally scrape on a reef, sand bar
or beach, and the extra cost of stainless steel may be rewarded
by near indestructibility. Mark Ludlow has sailed his SJ23,
"la Loca", with a 1/2" thick stainless board since 2005. While he didn't take any photos,
the board looked like new when he hauled the boat in 2015. He sailed
at the mouth of the Columbia River.
What follows are his and my thoughts to answer questions from various sailors. Mark
works as a chemical process and design engineer, dealing with corrosion
all the time. I was tier 3 technical support for the local telephone company
where I was often confronted
with galvanic corrosion to solve a communication problem.
-
400 series Monel essentially doesn't corrode in salt water.
It has properties similar to 316 stainless steel. It machines
very well, just like mild steel.
"The
problem with Monel is that it is stratospherically expensive. Stainless
steel is
about 1/3 the
cost. Monel has a higher concentration
of nickel than stainless steel. The use of Monel is limited to valve trim, certain
chemical processes and demanding marine applications like a propeller
shaft. A Monel board would
require a
Delrin bushing to electrically isolate it from the stainless support plate.
Besides all of this, Monel plate is
nearly impossible to find, so forget this material." Mark
Ludlow
-
Cast iron is corrosion-resistant in salt water because of the
presence of graphite in the metal (about 10%, by volume).
"The danger of using cast iron is that corrosion can destroy the iron
matrix (leaving the graphite) which makes the iron both porous and
very weak. Cast iron is very brittle and corrosion only
makes it more so. The surface isn't smooth which can slow the
boat. A bad choice." Mark Ludlow
-
300-series stainless steel is very corrosion-resistant.
Much more so than cast iron.
"This is why the "no hub" cast-iron drainage pipe systems that are buried in soil use stainless connectors. Even the Cast Iron Soil Pipe Institute offers the following on their website: "...the 300 series of nickel-chromium stainless steel is even more resistant to corrosion than cast iron. 300 series stainless steel is much more difficult to machine than mild steel and could be quite expensive to fabricate. The higher cost of fabrication for an SJ23 can be offset by elbow grease. You will be rewarded with a corrosion free slippery board." Mark Ludlow
A stainless steel board may gall on the stainless pivot pin
if the two fit snug.
"I haven't found this to be an issue because if the fit is a bit loose
then water can lubricate the movement. The pivot pin is
underwater all the time. But for those who worry, drilling the
centerboard hole a size larger and inserting a $0.50 polyethylene
bushing is a ready fix." Mark Ludlow
While you may think that stainless steel is near
indestructible when it hits something, the malleable property of this
metal is not required because the board can swing back to deflect the
impact.
"A nice comforting feature to have though."
Bob Schimmel
Stainless may corrode under water in the absence of oxygen
but it can be slowed down by polishing it.
"This is a well known phenomenon but in some waters it does not
corrode. Probably has to do with the Ph of the water, but not sure. Polishing leaves mostly
a nickel surface that can't corrode. Use a nonferrous disk to
polish the stainless." Bob Schimmel
-
A powder-coat finish on mild steel (urethane is the
toughest) works very well as long as the finish stays intact. So
don't scratch it. This means you lift the board before you hit
the beach or launch/retrieve the boat with a trailer.
-
 A Coating of Epoxy Saturated in Carbon Graphite Powder works very well
on a mild steel board after the galvanized coating has worn off.
While granite can just barely scratch it, you should lift the board before you hit
the beach. It also might be too slippery for marine growth
to attach. Now there's a bonus. A Coating of Epoxy Saturated in Carbon Graphite Powder works very well
on a mild steel board after the galvanized coating has worn off.
While granite can just barely scratch it, you should lift the board before you hit
the beach. It also might be too slippery for marine growth
to attach. Now there's a bonus.
"If the stirrup is covered with a 1/8" thick
sheet of fibreglass and
a polyethylene bushing is used over the pin it electrically isolates
the board,
preventing galvanic corrosion.
Considering that the
majority of aging boards used in conductive salt water corrode next to the stirrup,
electrolysis
should not be overlooked."
Bob Schimmel
-
A 1/2" thick board will be ~25% heavier than a 3/8"
board necessitating a
thicker lift cable and stronger attachment.
"It may make the boat a bit stiffer which is
good."
Bob Schimmel
"Use 6/32" SS lift cable." Mark Ludlow
"Upgrade the block & tackle from 3:1 to 4:1 to make lifting the board easier." Bob Schimmel
"A thicker board will prevent it from vibrating or tilting to leeward. When I added shims to the sides of the ballasted
swing keel on my Venture 222 it did wonders for the sailing
performance. She sailed the same speed on both tacks and pointed
slightly higher. You won't see that much change on an SJ23 though." Bob Schimmel
-
Board Shape While it would be very nice to add some foil shape to the
board to improve the flow dynamics the board isn't thick enough.
"At the very least you must round off the
leading edge and taper the trailing edge. In addition, shape the end of the board
to elliptical. Lots of top performing race boats now use an
elliptical blade because it reduces drag due to
fewer vortices. Think of the highly manoeuvrable Spitfire in
WWII." If you are going to do all this work make
the board just short of the full length of the 52" slot and
install it using the same holes in the stirrup. However, you would NOT be
able to move the board aft. The forward end of
the slot is ~5/8" wide and it tapers to 1/2" wide at the aft end.
Bob Schimmel
-
If a replacement board were to be narrower, (11" wide instead of
the factory 12" width), the reduced surface area could be offset by making the board a bit longer.
"The keel slot is slightly longer than the board so you have to measure it to determine if
a longer board would have the same area. Sailing with the board more vertical may
also offset the narrower board. The factory changed the size of
the board over the years without much change in the sailing
characteristics. So this may not be as much of a problem as some
people think." Gene Adams
"So, all in all, I stand by my recommendation demonstrated by years
of successful operation under difficult corrosive conditions of using 300-Series
stainless steel for a centerboard. This being said, I wish to re-emphasize the need to
smoothly chamfer the edge-drilled hole where the cable leaves the
centerboard. I re-rigged the standing rigging on my boat with 5/32" cable so I used it
here as well. But as I mentioned, I have always sailed with the centerboard
all the way down, (although I suspect that's why "la Loca" has
so much weather helm). If the board were hauled back to 700, there
would be a constant strain on the cable and a smooth chamfer would be
required to prevent wear. It's easy to chamfer the hole with a grinding stone or a carbide burr in a grinder (electric drill at a slower
pace).
 "I
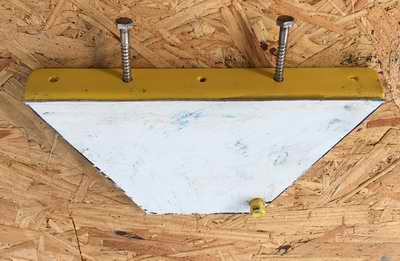
replaced my factory original steel centerboard with ½” stainless steel that I fabricated
around 2005. To attach the lift cable I cross-drilled a hole near the
up-haul edge and then drilled an intersecting hole (slot in picture) from the edge into the
cross hole. All surfaces were ground smooth, including chamfering the edge
of the drilled intersecting hole that is most likely to abrade the
cable. For the lift cable I used flexible 5/32” stainless steel
halyard cable and crimped a “ball” on the end that fits comfortably in
the cross hole. This method of attaching the lift cable is
similar to a brake cable on a mountain bike. A barrel would create better
support than a ball but it would be difficult to fit into the hole. "I
replaced my factory original steel centerboard with ½” stainless steel that I fabricated
around 2005. To attach the lift cable I cross-drilled a hole near the
up-haul edge and then drilled an intersecting hole (slot in picture) from the edge into the
cross hole. All surfaces were ground smooth, including chamfering the edge
of the drilled intersecting hole that is most likely to abrade the
cable. For the lift cable I used flexible 5/32” stainless steel
halyard cable and crimped a “ball” on the end that fits comfortably in
the cross hole. This method of attaching the lift cable is
similar to a brake cable on a mountain bike. A barrel would create better
support than a ball but it would be difficult to fit into the hole.
Initially
I tried poly line with a single loop through the centerboard hole but the
keel slot is quite narrow and anything that is much wider than the
centerboard causes interference in the motion of the centerboard. The
solution I used works flawlessly and the whole project, with stainless
steel at 2005 prices, cost under $150. This is less costly
than just the galvanized centerboard in the SJ23 parts
list." Mark Ludlow
CONCLUSION - The best material for a centerboard is 300 series
stainless steel. The next best is to coat a mild steel board with
epoxy and carbon graphite powder, pivoting it over a bronze bushing.
The latter is about as optimum as you can get, considering cost and
corrosion free operation. By the way, the extra thickness will make the
boat a tad stiffer which is always nice.
However, if you've stubbed your toes on that sheet of 1/2" thick stainless steel
laying in the garage,
you should definitely
try it. Judging by Mark's experience you have nothing to loose and
everything to gain. But if you don't want to lay out your beer money for
a new stainless steel board I would seriously consider coating the existing
steel board with epoxy and carbon graphite powder. The slipperier
the better. For an aging sailor who doesn't have that many years
left, it would be a cost effective solution! Elbow grease has its rewards!
TOP
|
|
REPLACE A SINGLE ENDED SS LIFT CABLE |
|
The
factory centerboard lift system consists
of a heavy duty eye strap screwed to the cabin floor at the base of the
table pedestal, a 3x1 block and
tackle shackled between the floor eye strap and the 48" long
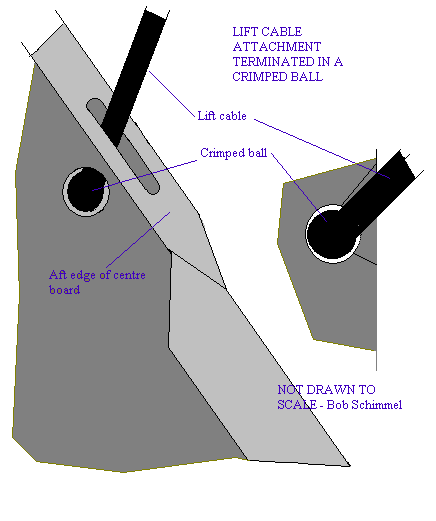
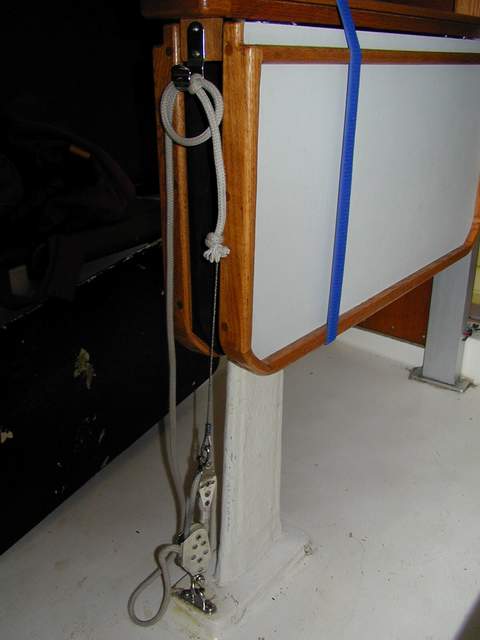
1/8" SS lift cable that goes over a sheave at the top of the table pedestal. It then goes down the pedestal to an eye strap screwed to the aft edge of the centerboard. At no time does the cable rub on fibreglass inside the pedestal.
The 1/8" lift
cable is made from (7X7) flexible halyard grade
SS cable to survive the flex and stress over the sheave. An eye
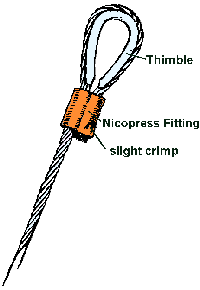
with thimble is swaged to each end of the cable (best to use a copper swage instead of
aluminum). You could make it easier on yourself by swaging the board end first, then pulling the line over the top sheave to swage it to length at the block & tackle on the cabin sole.
The lift cable eye is fitted directly to the eye strap screwed to the aft
edge of the board by two 10x24 3/4" SS machine screws spaced 1.5"
apart. While a #2
Roberts screw (red handle screwdriver) is factory standard, the screws on
Panache were slot drive, so be prepared for anything! If the thread stays clean they will be
replaced with Roberts screws next time since they are the easiest to twist
underwater without stripping the head.
The majority of lift cables break by being stressed over a misaligned sheave
at the top of the pedestal.
The first symptom to show is a meat hook on the cable so be wary of this. I've
also heard of a thimble that broke in the middle where it
rubbed against the inside of the eye strap on the board. The pull on the lift cable is
approximately 100-150 pounds with the 60 pound board pulled up inside the
keel slot.
Assemble the replacement cable exactly the same way as the
factory cable. The
cable eye installs directly
through the centerboard eye strap.
Therefore the eye rests across the keel slot. Since the keel slot is
just a smidgen over 1/2" wide, you MUST swage the 1/8" cable over a 1/2"
thimble (factory size) so it can fit inside the slot with the board fully
retracted as required for the trailer.
The factory specification
calls for the SS cable to be 48" long, measured from the end of one loop to the end of the
other, using a single Nicopress sleeve at each end. If
you want to double swage the cable cut it 50" long to allow for the extra
crimp, thereby maintaining 48" overall. Failure to do so will
prevent the board from being lowered to the designed
operating angle.
You could make the cable 51" long, making it possible
for the board to hang vertical, but don't make it
longer than 51" as you will not be able to pull the board up fully with the block and
tackle. The board must be fully retracted inside
the keel slot and locked there for trailer launching. The normal sailing angle
for the board is about 700
(aft) but I know of several sailors
who sail their boat with the board closer to vertical.
If you want to lower the board to the correct sailing angle every time,
tie a knot in the block and tackle line to limit the travel. I like this
technique as it is "idiot proof" during times of urgency or for
commands given to a green horn!
 NOTE: The centerboard eye is exposed
about 3" below the keel stub when the board hangs vertical. Therefore,
it is
possible to replace the single ended cable with the boat floating!
Look at the photo at right and notice the location of the eye strap
exposed just below the stub keel. (Left side of board). Best
to do this job with the boat in 5' deep water, over a hard or sandy bottom
so you don't kick up silt to block your vision. Wear a weight belt
for good
footing on the bottom. At least this part of the job is convenient! NOTE: The centerboard eye is exposed
about 3" below the keel stub when the board hangs vertical. Therefore,
it is
possible to replace the single ended cable with the boat floating!
Look at the photo at right and notice the location of the eye strap
exposed just below the stub keel. (Left side of board). Best
to do this job with the boat in 5' deep water, over a hard or sandy bottom
so you don't kick up silt to block your vision. Wear a weight belt
for good
footing on the bottom. At least this part of the job is convenient!
To access the centerboard
you
have three choices;
-
Don your snorkel or SCUBA gear and dive under the
boat anchored in 4-5' deep water. Wear a weight belt to stand on the bottom.
-
Careen the hull
400 next to a dock till the top of the keel is at the surface and the board is "within" arm reach.
-
Careen the hull 400 close to shore using bow and
stern anchors out to water and a tree on shore to tie the halyards to.
-
Lift the boat out of the water and work on the
hard. This option allows you to inspect and replace the sealant under the pivot plate.
CAREEN A BOAT -
"The hull can be careened 400 in a slip by pulling the main and a jib
halyard from the mast head. Wrap the halyards once around the mast where the shrouds attach to transfer the strain to the mast. Stand a long aluminum ladder on the bottom, leaning against the
dock. Climb down the ladder to
get within arm length of the board. You may have to stand in waist deep
water to do this but it sure beats diving under the hull. You could also careen the hull
in 4-5' deep water in
which case you will be standing on the bottom. You determine which technique is easiest for
you." Gene Adams.
CAUTION - "Be very careful with careening the hull in a slip. DON'T stand on the ladder between the hull and a dock where you can be pinned between the two should the halyards let go. This could be real nasty for your complexion! Also, careen the hull well away from your neighbours! The damage your mast could make to their rigging is not to be taken lightly. In addition, wrap your halyards one turn around the back of the mast to transfer most of the strain to the mast, close to the attachment of the shrouds. Finally, wrap the ends of your halyards two turns around whatever solid object it is secured to then clip the fitting back to the halyard. This reduces the strain on the fitting. With gators around I don't blame you for considering the dry land option, although I'm told they don't venture out to deep water, too often! Talk nicely to your lookout! Here in Canada we have 3' long "slough sharks" that patrol the shallows for morsels but I
don't worry too much about them. The small fish they eat along the shore are a lot tastier than I am!"
Bob Schimmel
 Assuming
you will replace the SS lift cable with the boat floating, remove the table to
open the top of the pedestal and lower the board to vertical. Attach
a light line to the top end of the new cable (so you don't loose
it) and lower the new cable down the pedestal till it exits the keel slot at the bottom. From this
point you can choose to dive under the boat or careen the hull and reach
into the water to replace the cable. Feel for the eye strap just below the
keel. Remove one screw of the eye strap and slightly loosen the other.
Be prepared to really torque on
each screw as they will likely be corroded. You might have to use
Vice-grips in conjunction with the screw driver. Rotate the eye strap
to the side a
bit, remove the old SS cable and slip the eye of the new SS cable under
it. Realign the eye strap to the screw hole, and drive the screws home. It seems prudent to apply some
water proof anti-seize thread compound to each screw before you tighten
them. After all, why not make life easier for the next time.
Pull out the old cable and test the operation by raising and lowering the board several times. Assuming
you will replace the SS lift cable with the boat floating, remove the table to
open the top of the pedestal and lower the board to vertical. Attach
a light line to the top end of the new cable (so you don't loose
it) and lower the new cable down the pedestal till it exits the keel slot at the bottom. From this
point you can choose to dive under the boat or careen the hull and reach
into the water to replace the cable. Feel for the eye strap just below the
keel. Remove one screw of the eye strap and slightly loosen the other.
Be prepared to really torque on
each screw as they will likely be corroded. You might have to use
Vice-grips in conjunction with the screw driver. Rotate the eye strap
to the side a
bit, remove the old SS cable and slip the eye of the new SS cable under
it. Realign the eye strap to the screw hole, and drive the screws home. It seems prudent to apply some
water proof anti-seize thread compound to each screw before you tighten
them. After all, why not make life easier for the next time.
Pull out the old cable and test the operation by raising and lowering the board several times.
KEEP THE LIFT CABLE OVER
THE SHEAVE - In 2004 I mindlessly drifted
over a sand bar that stopped Panache dead when the centerboard slid over the
bottom, pushing the
slack lift cable up off the sheave. This wasn't a big deal since all I needed to do was lift the board and
keep going, or so I thought. Back in deep water I had a bigger problem when I
discovered the lift cable had jumped off the metal sheave to lay over the bolt
the sheave turns on. It was now jammed solidly between the sheave
and the fibreglass pedestal. Why didn't Clark install a
keeper over this block to contain the cable? On the other hand, why
didn't I watch where I was going? Anyway, I tied a line
around the hull to lift the board after which it took a lot of
picking to pry that cable out. I wasn't about to repeat that
fiasco so fabricated an aluminum keeper over the sheave as shown here.
It also nicely centered the block to keep it from rubbing against the
fibreglass. The cable was replaced 2 years later as it was damaged in the process.
NOTE - If this metal sheave wears, replace it with a similar sheave to
handle the wire. Note the V groove on the face of the sheave to
support the shape of the wire. The sheave is 2" OD by 1/2"
wide turning on a 3/8" bolt. TOP |
|
INSTALL A DOUBLE ENDED LIFT LINE, Mike Hancock. |
|
SS CABLE
VERSUS POLYESTER or DYNEEMA LIFT LINE - Replacing a single ended stainless steel lift cable is a major "PITA" for the following reasons:
The hull must be lifted off the trailer to access the board, You dive under the hull and do the work under water, Careen the hull in the water to access the eye strap on the board.
The following are the main reasons why some sailors have switched to 1/4" Dacron or Dyneema line:
FLEX - Regardless of how flexible a SS lift cable is, it will eventually fatigue over the sheave at the top of the
pedestal, twisting and creating meat hooks in the process. This fatigue
ultimately determines the
life of the cable. Occasionally it wears at the eye strap.
- Polyester or Dyneema line can live
quite happily with this sheave. LENGTH - A single ended SS lift cable must be made to exact length with eyes crimped at both ends before it is installed.
- You don't have to know the exact length of a double ended polyester or Dyneema lift line. The line will automatically be the correct length when the free end is tied to the block & tackle. REPLACE - A single ended SS cable must be replaced at a travel lift/crane or other means to lift the hull.
- Once installed a double ended poly lift line is easy to replace can be done from inside the cabin anytime, anywhere, without lifting the hull.
SINGLE ENDED POLYESTER LIFT LINE - Attaching a single ended line to the centerboard is easy and neat if you splice a 2" loop in the end and "choke" it off to the eye strap. Stuff the loop half way through the eye, pull the free end of the line through the loop, pull the line tight around the eye and pull the free end up the pedestal with a fish tape or push it up with a stick and you are done.
Another way to attach a single ended line is to tie a bowline and whip the butt end to itself to eliminate a potential snag. If you don't have waxed lacing
twine for whipping then
dental floss works pretty well. The mint stuff tastes
good! Keep in mind that the completed knot MUST be
narrower than the 1/2" wide keel slot it has to slide into.
You could make it easier on yourself by attaching the board end first and then pulling the line over the sheave to tie it to length at the block & tackle on the cabin sole.
 This line should be inspected annually and replaced about every other
season since the bottom 1.5' is always under water inside
the pedestal. Replacing the line more often than the SS cable is probably the biggest disadvantage, but it is easy
and cheaper to do. Use
the old line to pull a new one up the pedestal, provided you had the
forethought to replace the old line before it broke! For all the
other excuses, you can push a fish tape down the
pedestal to pull the new line up! However, you still have to go under the hull to attach the line, hence the double ended lift line. This line should be inspected annually and replaced about every other
season since the bottom 1.5' is always under water inside
the pedestal. Replacing the line more often than the SS cable is probably the biggest disadvantage, but it is easy
and cheaper to do. Use
the old line to pull a new one up the pedestal, provided you had the
forethought to replace the old line before it broke! For all the
other excuses, you can push a fish tape down the
pedestal to pull the new line up! However, you still have to go under the hull to attach the line, hence the double ended lift line.
DOUBLE ENDED POLYESTER LIFT LINE - Here are two great ideas to improve the
single ended SS cable system with a double ended polyester or Dyneema lift line. It is dead simple to replace the line
using
one of the following techniques without lifting or careening the
hull.
-
THROUGH THE EYE STRAP
- "Loop
a 1/4" polyester line through the eye strap on the back of the centerboard and
bring both ends up through the top of the pedestal. Replace the single
sheave at the top of the pedestal with a double sheave and direct each
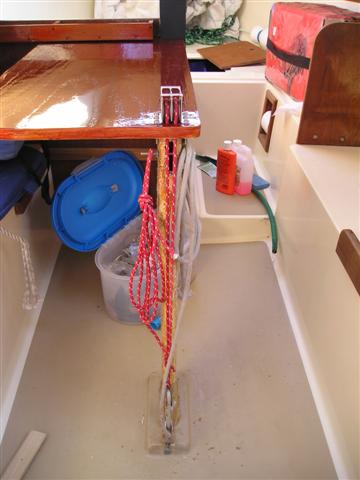
line over its respective sheave. A double sheave prevents the lines from twisting. Then dead end the lines to the top of the block and tackle, screwed to the cabin sole. You can cut off the excess line or tuck it away as shown at right to be used for future servicing of the line.
-
The divider between the sheaves keeps each line over its respective sheave when the line goes slack after the board is pushed up by a sand bar or beach. The divider prevents a nasty snag that can be difficult to undo. But hey, do yourself a favour and pull the board up before hitting the beach.
-
Replacing the line is simply a matter of sewing a new line to the end
of the old one and pull it through the eye. A simple job to do
annually on the trailer or in the water and a far easier thing to do than lifting or careening the
boat to replace a dead ended SS cable! Alternatively you could
leave extra line attached, as shown at right, so you can shuffle the
bottom of the loop to the top for inspection or move the wear point. The line can be replaced without removing the table while the boat is
floating or on the trailer. A real bonus." Mike
Hancock.
The stress on the line through the eye strap is not a problem. Mike leaves his board up all
the time in the slip. The
tension can never approach the rated strength of the line. He thought
about moving the loop an inch every so often, but never did.
He has experienced no problems with this configuration. However, you should
determine your own replacement schedule and err on the side of
safety. For peace of mind you could replace your line after the first season. If wear is
insignificant you could replace your line after two years. On the other
hand 8' of
1/4" line is pretty inexpensive to replace annually. The eye strap sticks out 2" below the keel with the board down, fairly close to the diagram below.
 THROUGH A STAND-UP BLOCK - "Dead end the lift line at the top of the pedestal. Direct it down the pedestal around a 3/8" wide upright lead block
(Ronstan
RF919 might do it) screwed (3/4" long 12x24 on 1.5" centers)
to the aft edge of the board. Direct it back up over the
sheave at the top of the pedestal. While you would have double the
line to pull, it is half the effort. You could use a small drum
winch to roll up the line. Add a stainless steel centerboard and it would
end the hassle of having to lift the boat or dive under it just to
replace a simple string!" Mark Ludlow. THROUGH A STAND-UP BLOCK - "Dead end the lift line at the top of the pedestal. Direct it down the pedestal around a 3/8" wide upright lead block
(Ronstan
RF919 might do it) screwed (3/4" long 12x24 on 1.5" centers)
to the aft edge of the board. Direct it back up over the
sheave at the top of the pedestal. While you would have double the
line to pull, it is half the effort. You could use a small drum
winch to roll up the line. Add a stainless steel centerboard and it would
end the hassle of having to lift the boat or dive under it just to
replace a simple string!" Mark Ludlow.
PS: If this is the first time to replace the steel cable, you
still have to dive under the boat to open the eye strap and remove the
steel cable. Sorry! Now you just have to decide which of the two techniques above is best suited to you.
Just so you know, the eye strap is positioned low
enough on the aft edge of the board for sufficient mechanical advantage to
raise it and high enough for minimal
drag through the water. See Tech Tip B32. However, since the cable protrudes ~3" outside the
keel slot when the board is vertical, it could still snag weeds if you
turn the boat sharply through the weeds. I don't trust the line to stay
weed free so I raise
the centerboard fully before moving through a weedy area.
If I discover the boat has floated into
a "salad bowl," I leave the board down as I'm likely to stuff the "salad" inside the slot
which is a real miserable
job to clear. It happened to me once and it took 2 weeks for weed to rot and drop out, saving me a dive under the boat. In addition, I leave the weed bed in a straight line to improve my odds
of keeping the board and lift line clear.
Hints:
- Remove the table before you fish a new cable or line down the pedestal. It is impossible to do this job with the top of the pedestal closed.
- While the table is removed, take the opportunity to insert a bronze bushing inside the single sheave as the hole is probably worn oblong after years of use. To restore the hole through the sheave, drill it out with an oversize bit and press a bronze bushing in. You'll be impressed with how much easier it is to raise the centerboard. Soak the bushing in oil overnight before you install it. While the oil will last in the bushing for many years of trouble free service, apply a dab of ATF oil each year.
- Add some stainless steel washers to either side of the sheave to keep it centered in the exit hole at the aft side of the pedestal. The sheave at the top of the pedestal is made of solid aluminum with a V groove to support the cable for minimal wear. The sheave is 1.5" in diameter with a 5/16" hole for the stainless bolt.
- It's also a good idea to add cheeks around the sheave to hold a loose cable captive in the event that it goes slack when you run aground. Failure to do this will result in the lift cable jumping off the sheave and dropping on the pivot bolt. Once the boat is back in deep water the lift cable will jamb there.
 Boy is that "&*%#@(&" frustrating to fix out on the water. I finally had to sling a line around the hull, going under the centerboard to lift it up. This created enough slack in the lift cable to pry it up over the sheave. TOP Boy is that "&*%#@(&" frustrating to fix out on the water. I finally had to sling a line around the hull, going under the centerboard to lift it up. This created enough slack in the lift cable to pry it up over the sheave. TOP
DOUBLE ENDED DYNEEMA LIFT LINE (2022) - Panache's factory SS lift cable was 25 years old when it was first replaced in 2002. I dove under the hull to replace it. In 2022 it was again due for replacement since there were so many broken strands where it connected to the block & tackle at the bottom of the table pedestal. The threat of it breaking during an inopportune moment is not something I looked forward to; been there, done that, no need to repeat it! This repair also required a dive under the hull. I have access to only one crane here (no travel lift) to hoist the boat and it is available for maybe 30 minutes, twice a year, at the start & end of the sailing season. Problem is, they don't allow a person in the boat while it is hanging from the hook and there are no suitable boat stands here. Not good enough.
Instead of installing a third single ended SS cable, I installed Mike Hancock's double ended lift line described above. After waiting 7 years to unsuccessfully get Panache on a local hoist, I again chose to dive under the boat. This time with my SCUBA gear for extra time to deal with unknowns.
Installing a double ended lift line is a 2 man job, best done over a sandy bottom to retain visibility. I am looking forward to this being my last dive on the centerboard and easy maintenance of the lift line thereafter. Read the installation description below. I couldn't be more pleased with the dead quiet smooth operation of the board and the improved performance sailing with a near vertical board. LINE CHECK (2024) - The burning question is, "How much wear does the Dyneema lift line have after 2 years of service?" The answer is in the photo at right, "NONE." The arrow points to where the line was under strain around the factory eye strap. The rest of the Dyneema is a bit stiff with marine crud, having been immersed for two seasons, but perfectly fine. Keep in mind this line held the board up horizontally in the slot for two seasons, except when
Panache was sailed. So it will go back to
service for another season.
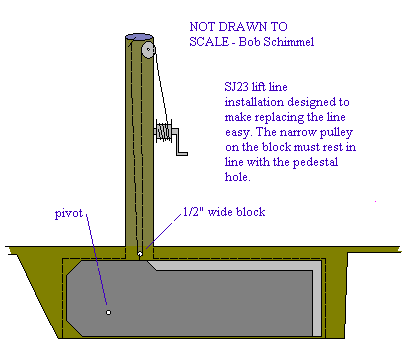
DUAL SHEAVE BRACKET FABRICATION, Spring 2015. |
The new dual sheave needs a strong mounting bracket to support the 100-150 expected pound pull at the top of the pedestal. I fabricated one from aluminum channel (Great, more garage stuff gone!) and added two horizontal screws and a shelf for additional support. The dimensions were then transferred to the pedestal for installation.
|
Fig 1, Bracket - This is the channel bracket that was fabricated to house the new dual sheave. The aluminum was formed with a 5 pound "persuader" over a bench vice. Its amazing how quickly sheet aluminum gives way to 5 pounds of flying steel!
 |
Fig 2, Pedestal - The top of the pedestal with the table still on it, marked for future cutting. Other than the table, this is the pedestal as it came from the factory. However, the gap above the sheave had to be closed to improve the strength for the bracket. 
|
| DUAL SHEAVE BRACKET INSTALLATION, Spring 2022 |
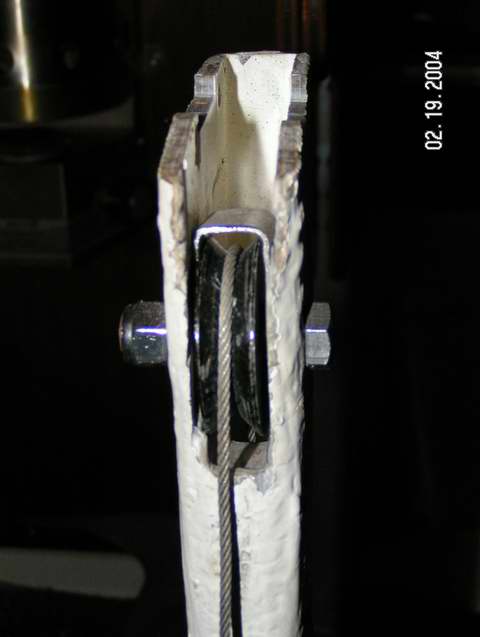
Fig 3, Top of Pedestal - The table removed from the pedestal to show the factory sheave with my DIY cable retainer in place. This pedestal is stiff. 
|
Fig 4, Factory Sheave - The factory sheave with cable retainer showing the bushing I added in 2004. Both have minimal wear after 18 years. 
|
Fig 5, Strengthen Pedestal - The gap at the top was closed with a fibreglass spacer to stiffen the pedestal before removing the pedestal material for the sheave. No going back now. 
|
Fig 6, Mark & Cut - To mark & cut the recess was a painstaking process requiring many measurements to ensure an accurate fit. Note the flat cut for the future support "shelf". 
|
Fig 7, Support Shelf - The fibreglass "shelf" that will support the dual sheave bracket & keep the pedestal sides in column. Shaping was done with a rotary rasp. 
|
Fig 8, Final Fitting - The two depressions at the top and the holes at the bottom line up with the nuts that secure the dual sheave to the aluminum bracket. 
|
Fig 9, Dry Fit - This is umpteenth time the assembly was dry fitted on the pedestal. I decided not to use sealant to prevent movement as it would prevent removal. 
|
Fig 10, Bolted in Place - The bracket is thru bolted to the pedestal with 2 vinyl compression sleeves inside to maintain column width. 
|
Fig 11, Temporary Cable Clamp - The temporary cable clamp that was used till the Dyneema was installed in summer. The broken strands are tucked inside. Only the table bridge was reinstalled to remove cabin clutter.

|
Fig 12, Ready for Launch - Centerboard operation was restored with the SS lift cable over one of the blocks. Panache is now ready for launch and the next step of this upgrade when the water warms. The sheave operated OK with the cable.
|
| DYNEEMA LIFT LINE INSTALLATION, Summer 2022 |
Fig 13, Dyneema - In the middle of summer I dove under Panache to push the Dyneema lift line up the pedestal with the centerboard resting on the bottom, 5' down. Panache was tied to a dock in calm weather. The factory eye strap was not replaced since the thread of the two screws (blade drive) were corroded in place. The screws were in good condition. So I pulled the Dyneema through the eye strap, wedged the lines in the V notch at the top of a 4' long thin stick then pushed the line up the pedestal using the stick. My buddy grabbed the line at the top of the pedestal. It was a bit difficult to get past a ridge inside the pedestal that can be felt from the bottom up, not the top down. Its good I had sufficient air in my SCUBA tank to fiddle with the stick. At long last, the Dyneema is through the pedestal. 
The SS lift cable was cut between the
thimble and the Nicopress sleeve. Bolt cutters work amazingly well
with the cable under slight tension and the centerboard resting on the bottom. One snip and the cable was gone! Lastly, my Klein pliers easily twisted the thimble off. Amazingly I was able to retrieve all the bits and
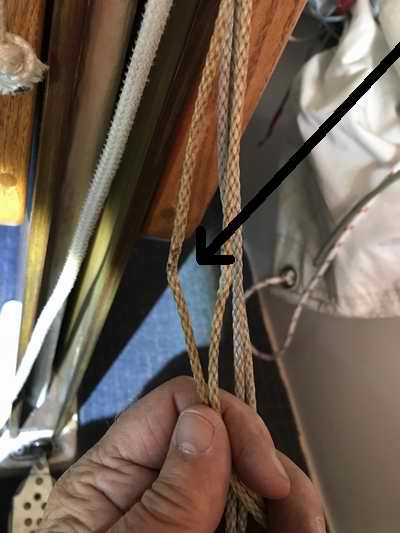
pieces as each was removed. Fig 14 - At right is the Dyneema secured at the top of the pedestal prior to sorting out the twisted strands. Just like halyards these strands must be aligned from bottom to top to run freely.
|
|
Fig 15, Dyneema Lines Aligned - A high intensity LED flashlight can easily light up the inside of the pedestal while I used a bent coat hanger to hook and pull each twisted line out of the tangle inside. While the lines operated freely for the remainder of the summer I confirmed them to be aligned when the boat was on the trailer and the pedestal is free of water. The four lines shown create two passes through the eye strap, spreading the load equally. All for minimal wear. 
|
Fig 16, Installation Complete - A slick, clean installation with little showing on the outside. The coil of excess line is stuffed inside the port pedestal cover. It will be used for future servicing. The Dyneema lift line works far smoother and with less effort than the single ended SS lift cable ever did. I believe this is due to the load being split between the two sheaves. This bodes well for low maintenance. 
Line Length - The easiest way to tie the lift line to the correct length with the boat floating is with the centerboard pulled up and a line tied around the hull, supporting the board. But even with this technique the board could stick out a bit due to slack in the line. The slack can be avoided with a stick tied across the bottom of the keel or a plank under the keel as it slides onto a sand bar. Why is this important? The protruding
corner of the board could nudge against a trailer cross member, preventing the boat from sliding OFF the trailer. This problem would be very difficult to resolve on the ramp, with the boat stuck half
way off the support pads!
|
Fig 17, Board Operation - I always pull the centerboard up inside the dark keel slot when moored to prevent marine growth on the board and inside the keel slot. Its also a great way to protect it against a grounding and the boat hunts less when at anchor. To limit the forward swing of the board I tie a stopper knot in the block-n-tackle lift line, thereby protecting the front of the keel slot. The Dyneema line operates the centerboard dead quiet with less effort than the SS cable. Sailing Performance - Panache's centerboard has always hung at ~300 aft with the factory SS single ended cable. With the slightly longer Dyneema line it can now hang vertical. The centerboard is guaranteed to be vertical when the lift line goes slack with the knot at the top. This means the center of lateral resistance moves slightly forward, making for better sail balance with the large 153% genoa. A trial sail has proven this to be true since the tiller
is almost neutral with just a slight
amount of weather helm. I'm going to enjoy this new ride.
TOP
|
|
|
SEIZED CENTERBOARD |
|
SEIZED IN THE UP POSITION -
The only good thing you can say about a board seized in the up position is that the boat
can still be retrieved on the trailer. Seized in the up position is the most difficult one to release. Some people have been able to
push it down with a rod through the table pedestal. The rod has
to be 41" long and no more than 7/16" thick so it can't jam inside the
1/2" wide slot. Once the rod is inside the pedestal, gently
prod around till you feel the stick on the back of the centerboard. If the end of
the rod is notched it can stay centered on the board.
You will have about 7" of rod sticking up from the top of the pedestal,
leaving enough swing room to tap or pound on it. Leave about 3" of slack on the lift
cable so the board doesn't slam down when it comes free. 60 pounds
of free swinging steel plate could damage the front end of the slot! Position the
rod as far aft as possible and tap on it with a small sledge hammer.
Light taps first until you get the feel of
it or the board
starts to move. The board will hopefully
drop the 3" so you can release another 3" of slack and repeat the
process till you run out of rod. Stop pounding when the top of the rod is
close to the top of the pedestal. Not a lot of point in driving the rod
out of sight down the pedestal! This technique worked for Panache's board jammed
by weeds and for several other boards seized by fresh marine
growth. Not sure if it will work for a heavily jammed or corroded board.
Another time Panache's board was jammed about 300 down due
to the SS lift cable that slipped between the board and the inside of the slot.
This happened when the boat slid over a shallow sand bank that pushed the centerboard up. Pounding with a rod didn't release the board so I
dove under the boat but couldn't push the blade down
with my back braced against the bottom of the keel. (What a
weird feeling that is looking up at the bottom of the boat). In desperation I used a three foot long (4x4)" as a
lever to pry the board down against the bottom of the keel. It took three
attempts, moving the (4x4)" forward a bit each time, till
it sprung free.
Obviously the leverage of the
(4x4)" can push a lot harder than
a direct push
using my body. Pry
small angles at a time to prevent bending the board.
ON LAND
-
However, if
the board is stuck hard (calcium) you
might be wiser to repair the job on land
so as not to damage the hull. Once on
land try removing the marine growth with one of the
following ideas, wearing goggles and or gloves:
- Use a mild acid like vinegar
to dissolve and weaken the calcified marine growth. To
do this effectively you should seal the bottom of the slot with duct tape. Let the vinegar sit for a while to
dissolve the calcium before you go to your next step.
- Remove the lag bolts and try prying the board down from the stirrup.
Use a large piece of wood over the fibreglass so you don't crush it.
- Try a hot power washer
armed with various nozzles. The high pressure can cut through a
lot of stuff to remove debris.
- Draw
a hacksaw blade, Sawzall (slow speed, small carbide teeth, rounded tip), or serrated knife along the length of the centerboard trunk
to
cut the marine growth or rust between the board and the side of the slot.
Bias the blade towards the board to protect the fibreglass. It should
cut through most of it. I know of several people who have been
successful with a Sawzall and it did not harm the inside of the slot.
NOTE - Don't cut into the top of the slot. The water can flow into
the cabin, etc if you do.
- Try a slide hammer hooked
over the top of the board to drive it down. You may need an
extension to attach the hammer part. I wouldn't hammer too hard.
You may damage the trailing part of the board.
- If you manage to budge
the board down a bit, thumping it from the top becomes less effective
due to the angle. In that case you might want to lift the board up
a bit to break the blockage free in a similar fashion to removing a
stuck bolt; back and forth. Once you get movement, with patience
you can likely get more. With access to a boat ramp you can use
the trailer to push the board back inside. If you get the trailing
edge outside the hull you can also use the trailer to pull the board
out. Loop a line around it and back the trailer into the water.
Remember to tie the line to the last cross member of the trailer so the
board drops outside the trailer. Once the board is out scrape it
and the slot clean. (Bill Ward)
- With
the board down, scrub the inside of the trunk with a round nylon brush
or an oval rasp if you have really hard stuff in there.
Alternatively,
use a 12 gauge metal bore brush (shot gun) and a section of cleaning rod
spun by a crank style handle. Not nearly as fast but it might
suffice to remove enough growth.
-
There comes point in the extraction process when you realize the board is
"toast". The steel has swelled against the slot and it gets really
difficult to do anything sensible with it. This is when you can
drill a hole through it, provided the board sticks out the slot a bit,
install a bolt through it and pry/lever/pull it out by pushing
against the bottom of the keel. Pretty drastic I realize but
necessary.
ON WATER -
The problem with freeing the board in the water is that it might stick in the down position, preventing you from retrieving the boat with your trailer. Keep this in mind. But honestly, you should be able to swing the board fore aft to free up the gunk around the pivot point.
- Drawing
a hacksaw blade or serrated knife
along either side of the board may break it free. Cut along the length of the centerboard trunk,
cutting through the marine growth between the board and the side of the slot.
- Use a slide hammer hooked
over the top of the board to drive it down. This is brutal.
- Remove the lag bolts and pry the stirrup plate down, taking the centerboard with it. Seal the lag bolt holes immediately.
- With
the board down, scrub the inside of the trunk with a round nylon brush
or an oval rasp if you have really hard stuff in there.
Alternatively,
use a 12 gauge metal bore brush (shot gun) and a section of cleaning rod
spun by a crank style handle. Not nearly as fast but it might
suffice to remove enough growth.
When
trying any of the above suggestions be very careful with the thin gel coat inside
the keel slot. After the centerboard trunk is clean you could apply a liberal coating of
antifouling paint with a long soft round brush or a rag on a stick. I'm
told that it is amazing how much
marine growth can accumulate there in warm water, salt or fresh. In
cold, fresh
northern waters
the slot stays clean. If there has to be a benefit to living with a cold
climate, this is it!
NOTE
1: If
you lift the hull off the trailer
with a crane, use a
correct width hoisting frame to prevent the straps from compressing the hull.
NOTE
2: If
two hard metals rub together, one of them will wear. If a hard and a soft
metal rub together, the wear is minimal. I'm not sure which
principle of physics
is at work here but I think it has to do with the softer metal
acting like a lubricant.
NOTE
3: If
the pivot pin wears badly, I expect it will do so at the top, probably in a
downward slope towards the end of the pin. I've also heard of a pin
that broke off due to corrosion, leaving an angled stub. In
either case the centerboard
will slide down the slope of the pin or stub, where it will wear against the keel trunk and the end of the
pin. As the end of the pin wears thinner, the board will eventually drop to wedge between
what is left of the pin and the opposite side of the trunk,
likely
resulting in a seizure. I've heard of
two boards that
did this so that's
my theory and I'm sticking to it, for now anyway! I sure would
appreciate it if someone else would confirm this. Please email me.
TOP
|
|
Return
to Tech Tip Index. . . . . . . . . . . . . . . Have
a Question? |