| SJ23 Tech Tip C12, (Updated 2020-10-08) Bob Schimmel & Bret Hart) | |
|
Cockpit Manual Bilge Pump - Installation Considerations. INDEX - Winter Prep, Location Considerations, Wiring, Manual Cockpit Pump, Knotmeter. |
|
|
Positioning a single bilge pump in a SJ23 usually triggers a long discussion of the pros and cons of various locations. With a deep bilge this would be a simple issue to resolve but since the bottom of the hull is fairly flat and sectionalized into five compartments; (stern, main cabin, two settees and the bow) you have the dilemma of where to install a single pump. In addition, there are no limber holes to let water flow to the lowest point. For those of you who would install only one pump, Murphy's Law will catch up to you! If you install the pump in the stern IT WILL LEAK in the bow. Well you know the rest! In the spring of 2000 I had the "joyous experience" of having 10" of water inside Panache due to a "slight error in judgment" at launch time. Panache was sinking perfectly level at the dock. I wasn't "level headed" at the time, but that was a different matter. The bottom line is that Panache took about 10 minutes to fill to this depth. A lot of owners at the time speculated on how an SJ23 hull would sink. So now you know. A quick dive to the knot meter confirmed I forgot to install the knotmeter impellor; which I immediately rectified. See Safety Note. Then I started bailing with my 5 gallon bucket. It's incredible how fast you can fling water when the adrenalin is pumping! No harm done and besides it cleaned the innards quite nicely. I wouldn't recommend this technique of "cleaning the bilge" to anyone but it sure did a marvellous job. All kinds of things came floating out of those dark unreachable cavities. A bystander asked me what I was doing, so I told him I was performing a Y2K test on the hull and he actually believed me! Note to tourists, ask a dumb question and you will get a dumb answer! I should also add that we took off sailing after the cabin was wiped dry but I noticed the boat handled quite poorly. While underway we heard water sloshing and upon further investigation I discovered the settees to be full of water. Oh oh, not good! Then the next big question, "do we have another leak or is this water from the original incident?" I quickly surmised that we weren't sinking and that I forgot to drain the settees. Like I have all the experience in the world with a sinking boat! I guesstimated that we had about 300 pounds of moving ballast. Again, a great way of cleaning the bilge but not the recommended technique! I dried the boat the next day and have not noticed any damage in the following years. She sure sailed upright with settees full of heavy water though!
Potential leaks in a SJ23 hull are the cockpit drain hose fittings, rudder gudgeon bolts, sink through hull fitting, knot meter, to a lesser degree the anchor locker drain, and deck leaks. With regard to a SJ23 sinking, keep the following ideas in mind:
WINTER PREPARATION - Its not unusual to have nuisance water in the bilge compartments from rain, deck leaks, knot meter extractions, water tank, etc. But once the boat is on the trailer all of it must be wiped dry for winter freeze. My experience is that what little water is left evaporates quite quickly if the bow, stern and settee compartments are left open at least a week prior to freeze up. Once the boat is bone dry it can survive winter freezing quite nicely. I passively vent these areas to promote drying prior to winter but sometimes Jack Frost arrives sooner than expected, in which case I'm wiping up slush. It demonstrates another reason for having bilge pumps to keep the bilges dry during the season. See Tech Tip A11. BILGE LOCATION CONSIDERATIONS - It's too bad that the SJ23 doesn't have even a tiny bilge below the cabin sole and above the keel for water to accumulate. This would have made the rest of the hull so much drier and it would be so convenient to install a single bilge pump. Since the SJ23 has many compartments due to the relatively flat bottom, the ideal arrangement is to install an electric bilge pump at the bottom of each settee and one in the port cockpit locker. The water under Panache's V-berth drains back to each settee through gaps I can't see so I see little reason to install one there. A pump in these 3 locations can take care of "nuisance" water but may also buy you extra time to motor to shallow water, a great way to prevent sinking out of sight. Perish the thought. You could also install a manual backup pump that can handle a larger volume of water using Bret's installation below.The inside of the cabin can be bailed manually with a bucket, dumping water into the cockpit. The port cockpit locker pump could discharge through the transom by the boarding ladder. The settee pumps could discharge through their respective hull sides or into the cockpit as I haven't figured a better place yet. Install each discharge line to a dedicated thru-hull fitting installed and sealed at cockpit seat height. This is a good compromise between minimum pumping height and still be effective while the vessel is sitting low in the water. There is no point in going higher than the bottom of the tiller slot. Ensure the discharge tubing is supported for its full length when filled with water. All these locations have relatively easy access for routine maintenance and cleaning of the pickup screens. The following are some general thoughts to consider for a bilge pump.
WIRE THE BILGE PUMP -
See Tech Tip E16 for wiring
considerations. |
|
|
NOTE: It is perfectly fine to have a large capacity
manual pump while you are onboard. If you sail solo then the operating lever should be within comfortable reach of the tiller,
probably near the front of the cockpit. This way you keep your weight
closer to the center of the boat, keeping it level. If this pump is portable it
can be used to assist another boat. In this case, equip it with a 20' discharge hose so bilge water can go over the
gunwale. With regard to the foot long operating lever on some pumps, most
people can last about half an hour by switching arms. With the older style
long lever pumps a person standing can usually last several hours,
pumping far more water. This leads right to Bret's manual pump
installation below. |
|
|
"I didn't have a pump installed on my boat and needed one to be compliant for PIYA / PHRF legalities for some racing I was doing. I devised this manual system recognizing the fact that when a person is in a sinking situation they are NOT going to be very clever or creative so they need a pump that is simple to operate and is extremely reliable. These two points can't be emphasized enough. In a desperate situation a person can be fast or clever, hardly ever both. That's it for man kind! It probably wouldn't be a big deal to race without a pump from a rules standpoint but if I didn't have it and if something went wrong, the insurance company would probably have something to say about it! Both of these points are ancillary issues compared to saving a life. The fact is that no boat should be without a pump and a single handed sailor isn't going to get the water out with a bucket! Here's what I came up with to overcome the compartment issue." 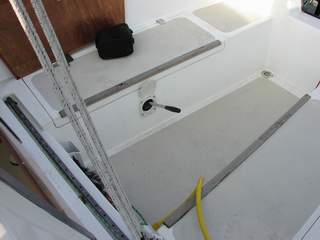 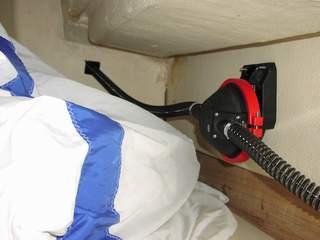 I bought a vertical mount
13 Gal/Min manual Whale Gusher
pump and installed it on the starboard side of the cockpit with the lever conveniently
close to the helmsman. The lever is detachable as not to interfere
with cockpit traffic. I bought a vertical mount
13 Gal/Min manual Whale Gusher
pump and installed it on the starboard side of the cockpit with the lever conveniently
close to the helmsman. The lever is detachable as not to interfere
with cockpit traffic.
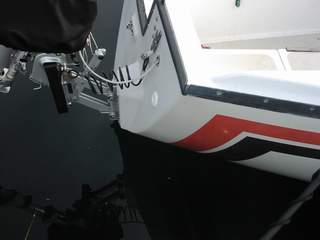
The output tube and fitting are permanently attached to the transom for overboard discharge. The transom fitting is installed at seat height as there is no point in placing it higher than the bottom of the tiller notch. The pump can easily function with water discharged at seat height (I don't even like typing this!). The back pressure from pumping slightly uphill is not a problem.
I have tested this installation by pumping water out of a 3 gallon bucket from within the salon and emptied
it in about four pump cycles. I was very satisfied with the
performance.
Most importantly it is very simple and doesn't rely on electricity
or complex
valve systems. The only part of the installation I would change is the
location of the output fitting as it is too close to the outboard engine
for my liking. I didn't realize how much water would come out when you pump
really hard. It can push
a stream of water 3' straight out the fitting. So you can see
that it's quite a fire hose! My current placement will work but
it should be away from the engine on the port side.
Bret. |
|
|
SAFETY NOTE 1: A removable through hull knot meter is always installed inside a through hull fitting, using a couple of O-rings seals to keep out the water. The O-rings should be lightly lubricated with lithium or silicon grease to stay pliable and to prevent damage as they slide in. Most knot meters are also equipped with a cap to seal the through hull fitting when the impellor is removed for inspection. BOTH the impellor and the cap SHOULD be attached to the through hull fitting with 1' of strong line to prevent either from rolling away to the dark reaches of the bilge where you can't reach it. This simple action really shortens the time to find the fitting, even if the water is so deep that you have to dive in and work by feel.
|
|
|
And lastly, DO NOT ABANDON a sinking ship till the water is up to
your belly button. Remember, there is no better bilge pump than a person
standing waist deep in water holding a bucket! So keep a bucket handy. Better yet, keep two buckets handy. The second one for the idle person
who finds it necessary to yell all the time! In reality it is best to stay with the boat as it might float at the surface with enough buoyancy to support you. The larger target in the water greatly improves your chances of being spotted by a rescuer as opposed to a person bobbing in the water hidden between the waves. If the boat should slip below the surface, get away from it and then hang on to each other for mutual support and warmth. Again, a group of people are easier to spot than an individual. Sailing solo? Sorry you are on your own! Attach a strobe light and compass to your life jacket and figure out which shore is the closest. |
|
|
Return to Tech Tip Index. . . . . . . . . . . . . . . Have a Question? |
|
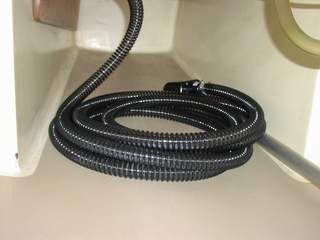
 I also bought 20' of pickup tube and installed a strum
box to the end. The tube is permanently attached to the pump and stows coiled up underneath the
cockpit ready for use. BOTH the input and output tubes are the SAME SIZE which is very
important to ensure flow volume. The fact that they are non-collapsing
ensures that you can't pinch a hose during this crucial time.
I also bought 20' of pickup tube and installed a strum
box to the end. The tube is permanently attached to the pump and stows coiled up underneath the
cockpit ready for use. BOTH the input and output tubes are the SAME SIZE which is very
important to ensure flow volume. The fact that they are non-collapsing
ensures that you can't pinch a hose during this crucial time. 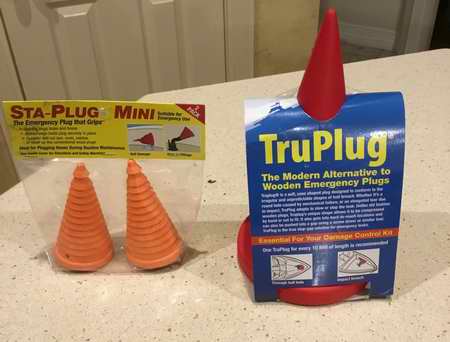 SAFETY NOTE 2: The same goes for
any other thru hull fitting that doesn't have a valve (i.e.: cockpit
drains). If the hose comes off or cracks you have an instant leak
to contend with.
Jam a close celled foam plug in the hole. This
ready made plug comes in a cone shape to fit most any hole. I think
this is superior to a wood plug since it can seal an odd shaped or rough
hole. Small toy footballs are sold in Dollar stores that fulfill
this requirement quite nicely. They work very well if your SJ23 is equipped
with a cross bar in the through hull fitting. For this reason I
keep several "footballs" onboard Panache.
SAFETY NOTE 2: The same goes for
any other thru hull fitting that doesn't have a valve (i.e.: cockpit
drains). If the hose comes off or cracks you have an instant leak
to contend with.
Jam a close celled foam plug in the hole. This
ready made plug comes in a cone shape to fit most any hole. I think
this is superior to a wood plug since it can seal an odd shaped or rough
hole. Small toy footballs are sold in Dollar stores that fulfill
this requirement quite nicely. They work very well if your SJ23 is equipped
with a cross bar in the through hull fitting. For this reason I
keep several "footballs" onboard Panache.