| SJ23 Tech Tip C01, (Updated 2022-05-21) Bob Schimmel | |||||||||||||||||||
|
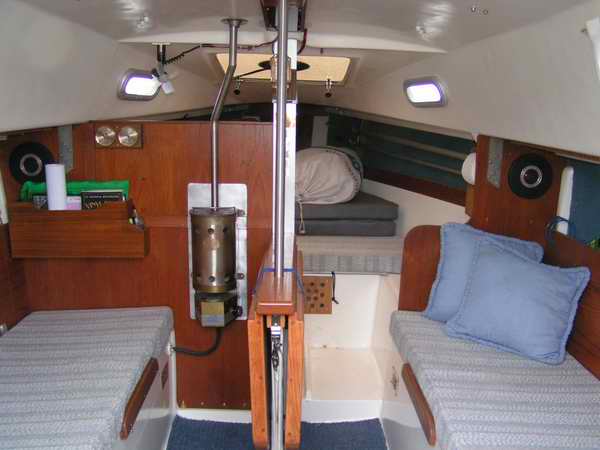
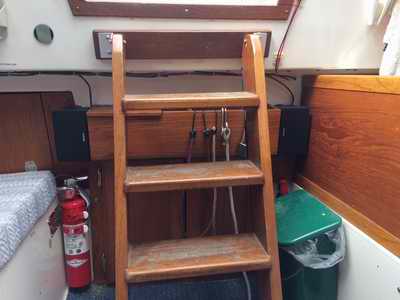
Cabin Layout, Panache Main. |
|||||||||||||||||||
| When
Panache came out of the Washington factory she was equipped with the standard
galley across the companionway. The first owner
removed it to lighten the boat for racing and later built two upper cabinets for cruising. When the boat was sold
two years later, the
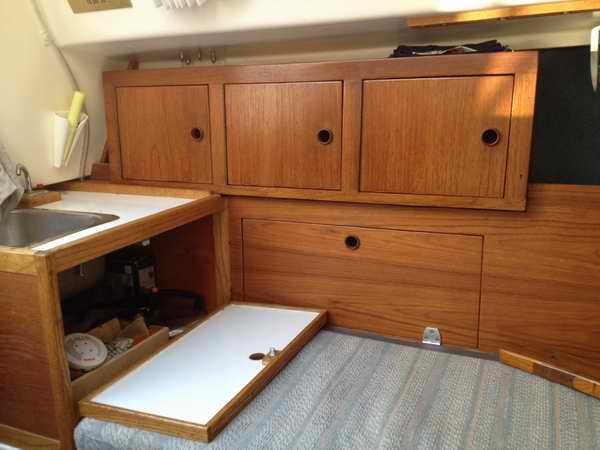
galley couldn't be found, so the second owner built a custom teak counter with sink over the aft half of the port berth, matching the upper cabinets.
The bottom of the counter was ~8" above the bunk with the
idea that a person could stretch their
legs under it for a restful sleep. I am the third owner and shortly after I bought Panache
in 1985 I tried sleeping on this berth. I lasted all of 30 minutes! Ever sleep with your legs locked in a bench vice?
While there was ample counter space, it was too low for standing and too high for sitting.
Awkward is the best word to describe it. For these reasons I chucked the counter, saved the teak, and kept the upper cabinets. COMMENT - To date I have built two sets of kitchen cabinets for our home and numerous other wood projects with a quality of construction to satisfy even my picky uncle. Way back then his compliments gave me the reassurance to know I was doing it right. I've never made household furniture though. My mix of hand & machine tools is not up to that calibre. I plan a lot with drawings to visualize the final product, including all the details. I am also a miser with wood, trying to achieve the most efficient cut to waste as little as possible. I scrounge every bit of teak I can find. If you consider how scarce aged teak is you'll understand why. If you keep your eyes open you can find 1970s Danish furniture that possesses that special patina of aged teak. Matching wood colour is difficult and rare. For these reason I measure 10 times to cut once! With this in mind I refurbished
Panache's upper cabinets & bulkheads, built settee backrests, storage boxes, speaker enclosures,
and modified the drop leaf table. All of it is documented below and in Tech Tip C04. Bob. |
|||||||||||||||||||
|
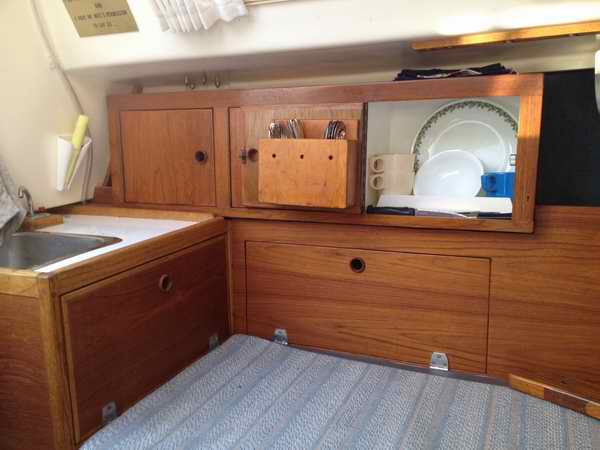
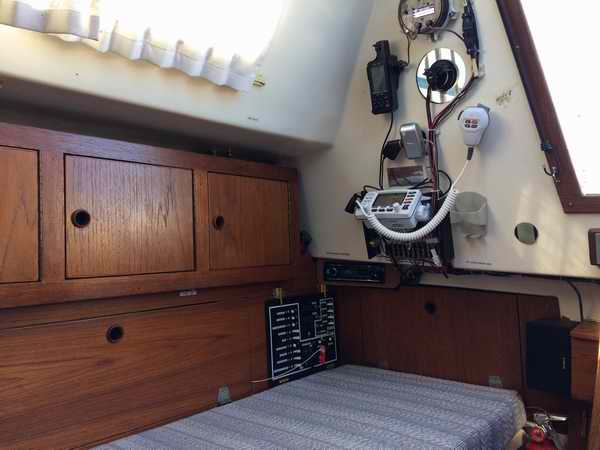
GALLEY UPPER CABINETS - Panache's cabinets rest on the settee shelf and overhang a bit through a recess cut in the top of the back rest. The 1/2" cabinet box is divided into 3 equal compartments and the back is closed with 1/8" teak plywood curved to follow the contour of the hull (see diagram below). All joints are pin nailed with aluminum nails and securely glued with water proof Gorilla Glue. The doors are supported inside a teak frame moulding (1/2 x 1)" glued to the front. The edges of the doors are capped with 1/8" thick teak and the finger pull holes are lined with purpose made teak inserts. Nice and smooth on the fingers. Each door swings on a brass piano hinge and is latched with a zinc coated roller catch, technology right out of the 1950s. They look ugly but never rattle and don't release when the contents push against the inside of the door with the hull heeled well over. I see no reason to replace them since some designs reach perfection and for that reason they should be left alone. I decided against "bullet proof" elbow catch latches when I saw a door blast open on my buddy's boat, heeled at 400. The contents ended up all over the cabin sole. What a mess and so much for the "bullet proof" latch. The cutlery is stored in purpose made wood pockets glued to the inside of a door and the plates, bowls and cups are separated by dividers inside the cabinet. If I do any extended cruising, food stores, beer, wine and scotch (not in that order) go under the settee in vinyl basins where it is cool. The cabinets are securely mounted to the settee with three well spaced SS machine screws backed up with large washers. The dimensions are shown below if you want to build your own cabinets.
CABINET UPGRADE (2015) -
In the Fall of 2015 I
reduced the height of both upper cabinets by 1/2" to place a 3/8" thick vinyl
grid spacer under each to keep them high and dry in the event of a
toe rail leak. This was a lot of work but turned out to be easier than trimming the downturned flange of the head liner above the back of the cabinet. Fortunately I was able to
retain the teak frame moulding. I also thought it prudent to drill some small drainage holes through the fibreglass settee shelf under each cabinet. If the toe rail should leak again, the cabinets will stay high and dry, resting on the vinyl grid. Ironically the vinyl grid spacer make it harder to pin point a leak as the water just flows on through to the settee bilge. I discovered this in 2023 with a toe rail screw that leaked when water only when it pooled on the deck. But this is much preferable than repairing wood rot at the bottom of a cabinet. The stuff under the settees is stored in vinyl basins to keep it dry and organized. The bins are convenient to drag sideways to a seat opening for unobstructed access. PORT UPPER CABINET - Lunch, emergency rations, snacks (Vitamin J), coffee & tea go in the aft cabinet. Spices, wind proof matches, large cooking utensils & stuff go in the middle cabinet. Cutlery, steak knives, coffee mugs, plates, bowls go in the forward cabinet. I've owned the vintage Melmac mugs for 55+ years which equates to a lot of camping trips. They are very difficult to replace and about 20 years ago a blue mug went missing at a club event. I was pissed. I'm happy to report that in 2021 it made its way back onboard Panache. It was sitting in the back of the club kitchen cabinet all these years. Some kindly soul washed and placed it there. Go figure. A light bungee cord is now installed across the plates to keep them in their place when on a port tack >200. The cord is under no stress so it can't loose its tension with age. The idea is that I can still remove or insert a plate with one hand.
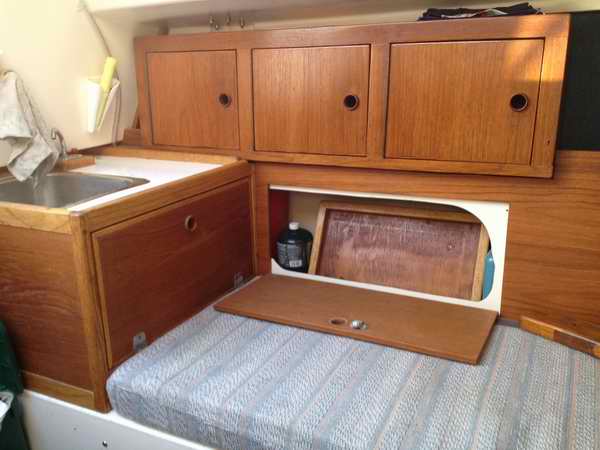
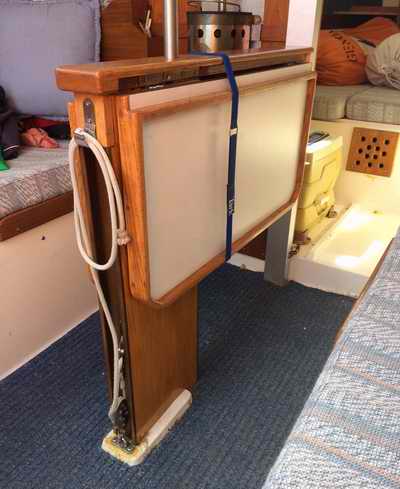
PORT BACKREST - I store a spare 1 lb. propane bottle, my companionway stove shelf, and my trusty 2 burner Primus cook stove behind the aft flip down door. Tools and spare parts go behind the forward flip down door. All of it rests on a 3/8" thick vinyl grid to keep it high and dry. Notice how the grain continues through the doors for that classy appearance. It took a lot of masking tape and a very sharp blade with no set to the teeth to cut them out of the sheet. You only get one chance at this!
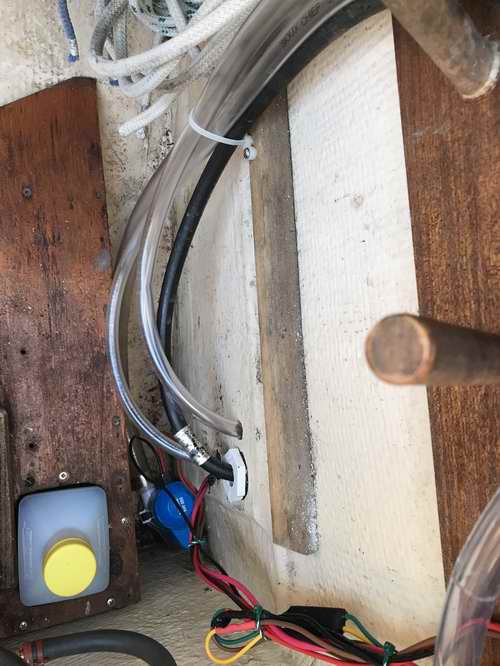
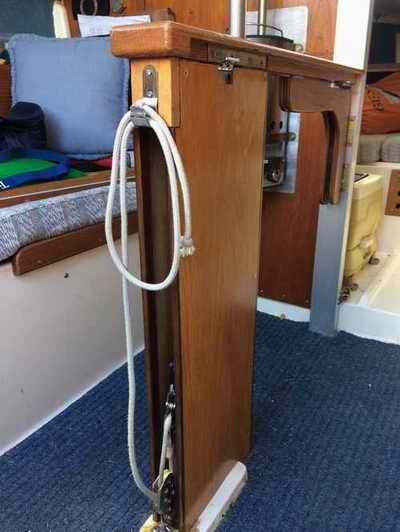
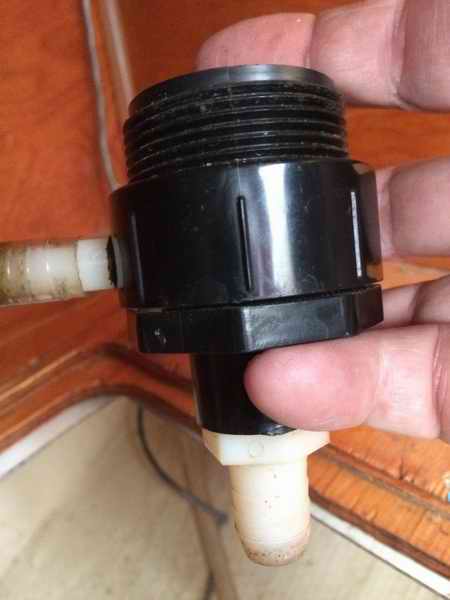
GALLEY with SINK (2003) - The "wood box" that houses the sink also stores the pots, pans, kettle, coffee pot, dish soap & scouring utensils. The faucet is equipped with a latching switch to operate the water pump installed adjacent to the water tank under the forward berth. See Tech Tip C18. For servicing and cable constrictions, the faucet is one of the few devices that is connected with grease filled Marrettes (wire nuts) instead of permanent connectors. The sink drains into a portable grey water tank. To speed up the flow the drain fitting is equipped with a clear vinyl vent hose leading to the top of the cabin. I drilled and tapped a hole through the side of the downspout ABS to screw in a threaded fitting. You can see the vinyl tube against the bulkhead in the photos above. Nice and high to keep lake water out.
Panache's galley takes up only 2' of the aft end of the port berth, leaving the remaining 6' 6" clear for all but the tallest crew. This galley is essentially a "wood box" constructed from a 3/4" red oak frame with 1/2" teak plywood sides set into the rabbet joints of the frame. I built the "box" extremely strong so I can stand on the corner straddling the companionway to work the mainsheet or the deck mounted line lockers; something I occasionally do in lumpy water because it's a secure place to stand. The galley is bolted to the settee with several 1/4" SS bolts and large SS washers. The flip down door can lay flat on the cushion (see photos above), doubling as extra counter space. It is equipped with low fiddles to keep the cushion clean. The inside of the door and the counter are both covered with white melamine for a water proof finish that is easy to clean.
GALLEY THRU-HULL
FITTING
(~2003)
-
The
faucet in Panache's galley (shown above) is equipped with a latching switch that operates the demand
pump next to the water tank under the forward berth. At one time I considered adding a second faucet
and pump for lake water since it would
be so convenient to have endless water for rinsing things.
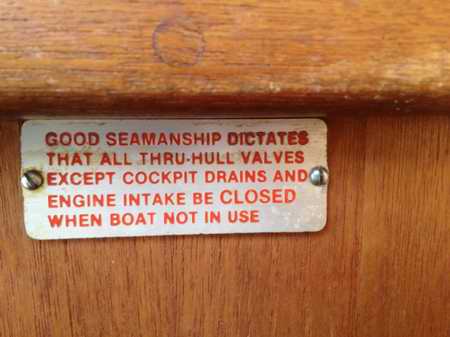
NOTE 1 - Some SJ23s were equipped with a gate valve for the galley drain. It should be exchanged for a ball valve since a gate valve seal can fail at the least opportune time. Operate a ball valve at least once a month so it is lubricated with water and free to operate when it must be closed. A valve that can't be closed will put you in deep el toro poo poo. While you are down there, check the integrity of the thru-hull with a severe wiggle after the valve is closed. If you close the valve every time you leave the boat you can dispense with this monthly routine. This warning label on my buddy's C&C27 is self explanatory. -->
NOTE
2
-
If
you expect freezing temperatures while
your boat is out of the water, set the ball valve to HALF-OPEN to drain the water between the ball and the valve housing. This simple action prevents the
housing from splitting
due to freeze
expansion and protects the seals.
OPERATE THRU-HULL VALVE
with an EXTENSION ROD
-
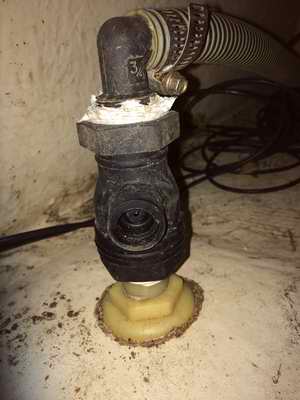
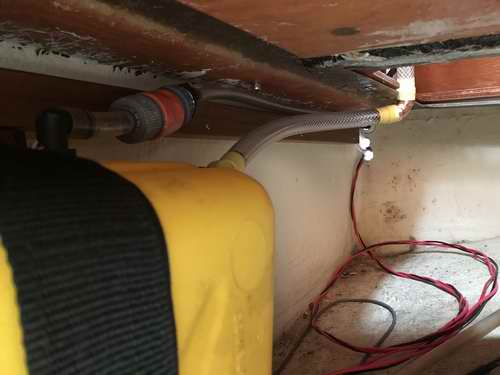
The drain line
(5/8" fiber reinforced vinyl hose)
of Panache's sink
(10x12)" is on a continuous downward slope to
the bronze ball thru-hull valve shown above right.
Prior to this extension rod I installed I could barely reach the valve since it was installed so far aft for a previous
galley. I'm not about to relocate this valve so in 2018 I
installed an extension rod to operate it through
the middle opening of the settee. I cannot jeopardize the safety of
this thru-hull valve by letting one of my settee storage tubs slide against the
end
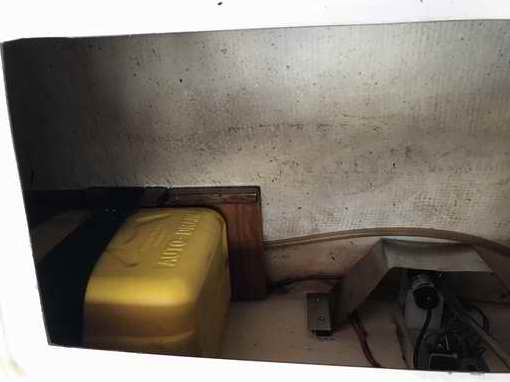
PORTABLE GREY WATER TANK (2022-04-30) - I sail Panache on a large lake that is fed by snow melt, rain and a few tiny creeks. Typical of a prairie lake. Once the water exceeds the height of the weir, the excess flows over to be blocked by the beaver dams downstream. This results in little flushing action so extra precaution must be taken to preserve the health of the lake. When boating on such ecologically sensitive water it is prudent to contain grey water. Besides, the fish and other critters don't like it if you dump stuff in their "living room" any more than them dumping stuff in your living room. If you are in doubt, consider the following statement by the US Environmental Protection Agency; "Grey water is rife with microorganisms originating from food and the human body. The US Environmental Protection Agency has found that in some instances grey water has higher concentrations of fecal coliform than domestic sewage, which is associated with the pathogens that cause salmonella, typhoid, cholera and dysentery. Noroviruses, rotaviruses, and adenoviruses (pathogens responsible for fevers, coughs, sore throats, diarrhea, vomiting and pink eye) are also present in grey water. Exposure can occur through activities like swimming or consuming contaminated shellfish." US EPA.
Over the years I have dumped very little grey water in the lake since Panache's fresh water tank holds only 10 Imp gallons. For example, in 2000 I moved the rigid drinking water tank to the V-berth to offset my weight in the cockpit. That was a lot of work just to sail faster. Ever since I've been reluctant to loose any of that portable, go fast "ballast." For this reason I carry my day's supply of drinking water in a reusable water bottle. But if Panache's effluent is added to that of other boaters anchored near by, the combined volume obviously exacerbates the pollution, especially when accumulated over time. A harmful component of the effluent is
DECISIONS, DECISIONS (Design Criteria) - I found a grey water tank installation to be ridiculously complex due to the many variables involved: the size & shape of the container that must fit, that the container must be water & gas tight, the plumbing fittings must be mechanically secure & align to the tubes, the grey water must flow on a continuous downward slope, the container must be secure, and above all, it has to be convenient to remove without spilling the content. Just a few simple things really! Hence the following research information.
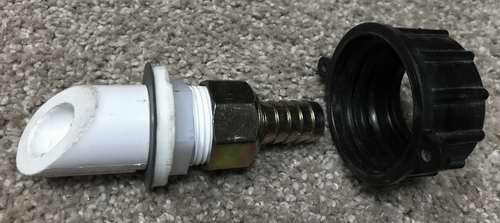
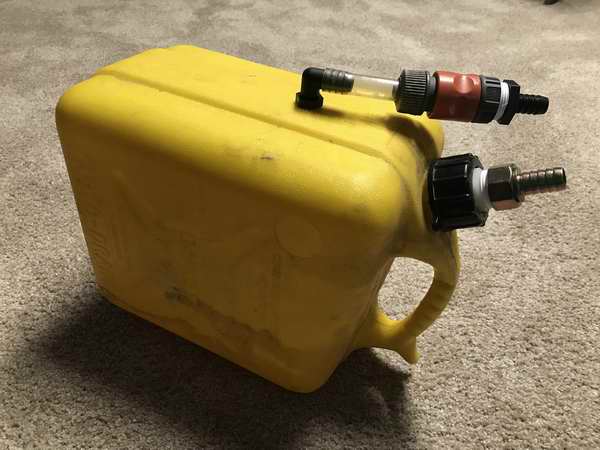
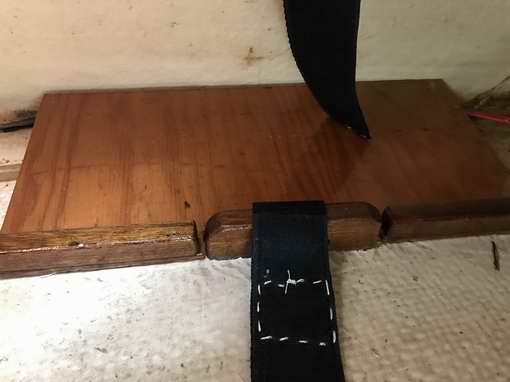
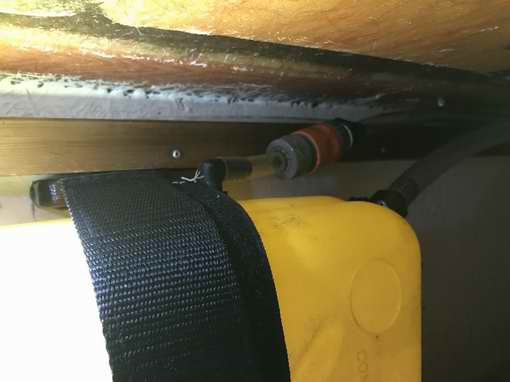
INSTALLATION on PANACHE - The installation on Panache uses a 10L gas jug resting on a (16 x 8)" wood shelf under the port settee. The shelf is equipped with a full length foot at the low side to raise it to horizontal over the sloped hull. It has a fiddle on the outboard side to keep the jug on the shelf. And finally it is saturated in epoxy to protect the wood. The gas jug rests on its narrow side for minimal fluid slosh and is secured with a 2" wide Velcro strap to ensure it stays put during a 600 heel. With the top mounted fittings released from the hoses the full jug can be slid aft and lifted out the settee hole without spilling a drop. Any spillage after first use will determine if a catch tray is required.
HOW FULL IS THE JUG? - The fluid level would be easy to see if this were translucent. Problem is, many translucent jugs are designed for drinking water and will pass sewage odour. This is disgusting for this application, not to mention a waste of time to install the wrong type. A person could keep track of how much water goes down the drain but that is easier said than done. What does work is to shine a bright flashlight to the side of the jug and look at the fluid level on an opposite or side wall. This works well even with clear water. The prospect of having a full tank with standing water in the drain tube is not to be taken lightly. Consider that it will be impossible to release the fill fitting without spilling the content. So draw a fill line on the jug with a permanent marker and empty accordingly. PS - It's probably wise to label this jug and the spare one so you don't take them
to the gas pump! Damn that would be embarrassing. |
|||||||||||||||||||
|
|||||||||||||||||||
|
What's cooking? Egg in a nest and dish water. Lightly butter a slice of bread that has a hole in it or use a bagel. Place it on a hot frying pan. Let the bread heat for about 30 seconds then crack an egg into the hole. Let it fry as you normally would with an egg. Flip it once and eat. This is toast and egg all once that doesn't get cold when served on a plate or eaten as finger food. STOVE SAFETY - The safest way to
light a gas stove on a boat is to use a flame from a BBQ lighter, not a spark. A flame held next to a burner is the only sure way to prevent
unburned gas or vapour in the cabin. This is especially important if you
use heavier than air propane. The fire extinguisher on
Panache is mounted low on the starboard side of the companionway, opposite the galley and
convenient for the cook. There is a second extinguisher in the forward
cabin, just in case the cook is trapped inside by a burning stove.
I have never been able to understand the extinguisher requirements on a
pocket cruiser so opted to go the safe route and install two, one on
either end of the cabin.
TOP |
|||||||||||||||||||
 DROP-LEAF TABLE (2002) - I
added oak fiddles to the original table leafs after the wake from a
passing powerboat rocked us so much it spilled hot soup over our laps,
staining the cushions at the same time. There has to be a special place for
yahoos like this! While fiddles are usually left open at a
corner so it is easy to wipe things up, I built mine closed
all around to contain liquids thereby protecting my lap and the cushions. Closed corners hasn't been a problem. DROP-LEAF TABLE (2002) - I
added oak fiddles to the original table leafs after the wake from a
passing powerboat rocked us so much it spilled hot soup over our laps,
staining the cushions at the same time. There has to be a special place for
yahoos like this! While fiddles are usually left open at a
corner so it is easy to wipe things up, I built mine closed
all around to contain liquids thereby protecting my lap and the cushions. Closed corners hasn't been a problem.
- I also constructed a new bridge (strong back) between the leafs from a piece of 3.5" wide red oak. This way I can use the slightly wider surface as a narrow table when the leafs are folded down. The cabin is small enough as is without blocking traffic by lifting a table leaf. The bridge is wide enough to hold a cup of coffee, provided the cup is equipped with a non-skid bottom. If your cups are not equipped with non-skid bottoms, then lay a mat of none skid material on top of the bridge. Be very careful with the various wood cuts you make on this bridge. Eventually someone will be laying on a settee, staring at your handiwork. Expect a comment or two! I once considered double folding the port leaf so half of it could be folded out but rejected it due to complications and a possible leak through the hinge when it was fully folded out. An alternate solution would be to clamp or set a short narrow shelf to the forward end of the bridge in a similar fashion as the stove shelf shown above. It could be useful for mugs-n-stuff. - To match the colour of the red oak to the 20 year old teak, I blended Minwax cherry and fruitwood stains. The final colour is pretty close as some people have asked where I bought such a large piece of teak. Some people can't judge wood by its grain. All wood is finished with Sikkens Cetol Marine because it is food grade and tough. - The forward end of the port leaf is cut out to create space for the heater. This is when I had to get fancy with forming the fiddle around the corners. - Notice that I have a blue Velcro strap around the leafs. This prevents banging noises at night and keeps the aisle clear when the Panache is heeled. You can find long straps like this around the bulk rolls in a rug store. - I mounted a combination magazine rack, chart holder and navigation tool holder (compass, divider and pencils) against the port bulkhead to the left of the heater, just in case I get lost! - A two-speed fan is hung from the ceiling, slightly to the left of chimney. It drives the warm air down to the floor and keeps people cool on a hot day. Living at 550N I need both features.
This is the sketch I used to rebuild my drop-leaf table with a wider bridge. The measurements will be close to your boat, but please verify them for your installation. The oak fiddles were glued and screwed with the screw heads plugged along the perimeter of each leaf. At one time I intended to add fiddles to the bridge but their absence has not been a problem. Note the small wood plug screwed to the bottom of the bridge and resting inside the top of the pedestal. It helps to anchor the table to the top of the pedestal. In future I may mount a 1" deep shelf under the port leaf to store folded charts. This place is well protected from the weather and is relatively convenient to access. TOP |
|||||||||||||||||||
|
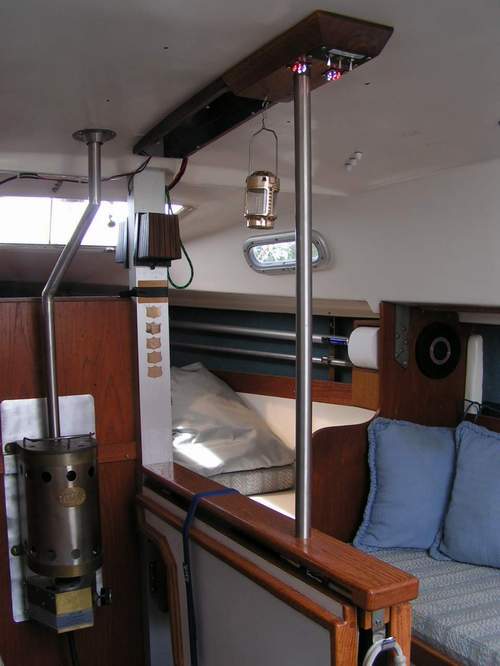
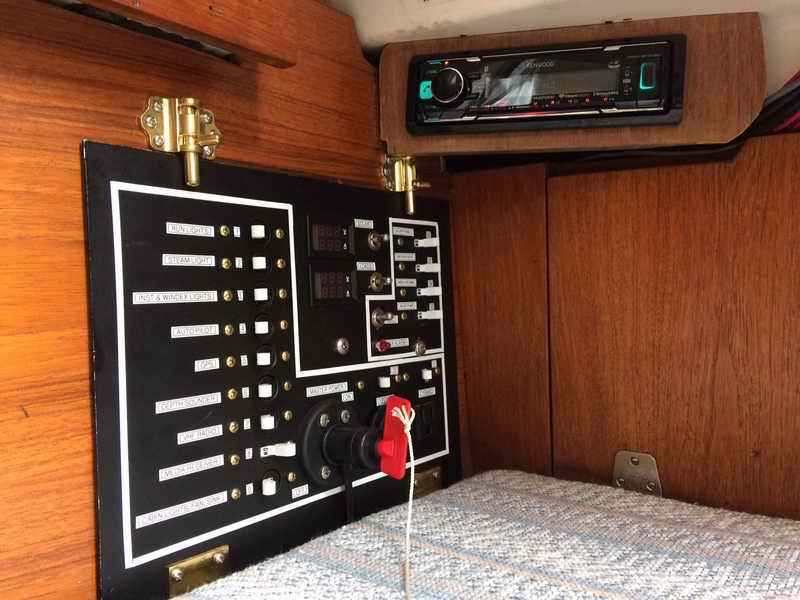
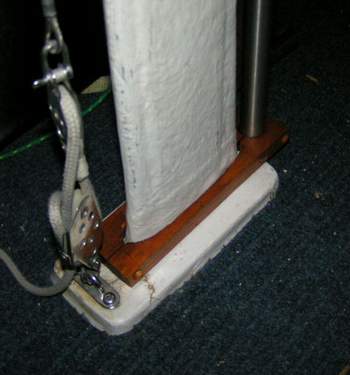
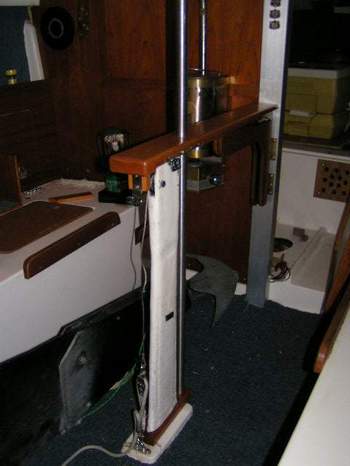
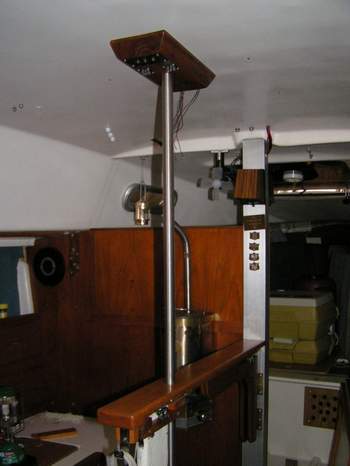
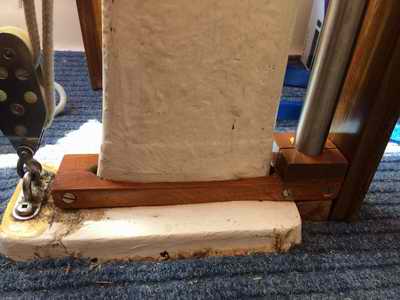
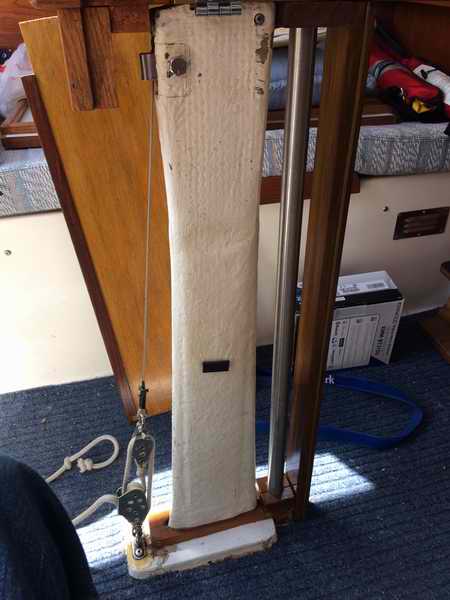
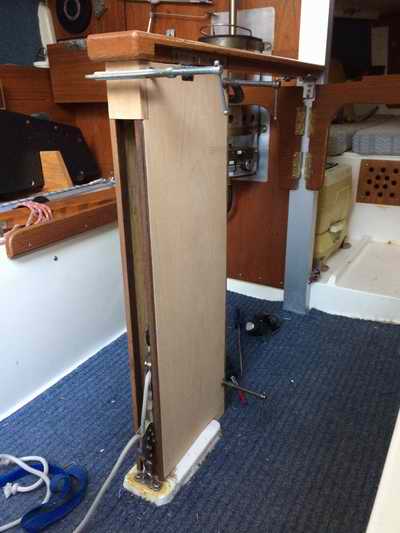
ENCLOSED TABLE PEDESTAL (2015) - I've always been concerned about the strength of the fibreglass table pedestal when sailing in rough weather with someone walking (more like stumbling) through the cabin. It is so natural for a person to lean against the table bridge for support when the boat dives into a deep trough, there being no other hand holds inside the cabin. My fear is that body weight might crack or snap the pedestal if the motion is violent enough. NOT a good situation as the cabin sole is ~1 foot below the water line. Don't believe me? Remove the table and look down the pedestal. The Clarks would never have sold an SJ23 if the pedestal was transparent. It's probably a good idea to have something handy to plug the hole as the boat will sink in less than 5 minutes. Oh darn it all! If water occasionally slops out the top, its a good sign to reduce the heel or slow down! I'm not alone in this judgment as other people have emailed me with similar concerns. By the way, I have no intention of testing the strength of the pedestal to put my concerns to rest as I have a pretty good understanding of physics and my imagination has served me well over the years! "The hull liner is a one-piece component that is bonded into the hull using a bedding of chopped strand mat and a polyester resin thickened with Q-cell, microspheres made of fibreglass. Visualize a thick frosted cake. With the resin catalyzed and the "cake frosted", the interior pan is lowered over the table post, aligned with a fore/aft, port/starboard jig. A hose is then attached to a hole next to the table post and a vacuum applied. The hull liner is instantly pulled tight down to the hull and the vacuum maintained until the resin sets. You'll see remnants of the microsphere putty inside the settees and all points of hull/interior contact. Think frosting again. You will note a void beneath the head floor. Don't fill that with foam. It's fine. If you spill water in the v-berth by cleaning, you can dry it by sponge or towel. If you continue to see water down there, there is a leak somewhere, and the usual suspects need to be checked." So my solution is a 1" OD stainless steel support post, floor to ceiling, installed just forward of the table pedestal. Think of it as a grab post similar to one on a city bus. The ceiling height of an SJ23 is just low enough to make it hard on my back while cooking, working in the cabin or getting off a settee. With this post it is easy to manoeuvre around the cabin by swinging from it. This project is not too difficult as it requires mostly carpentry skills. With planning you can incorporate other creature comforts that are so appreciated on a small cruiser. Shown above is the finished post with electrical switches and LED lights added to the ceiling support. The red LEDs provide adequate night vision and the white LEDs are wonderful for general illumination. They are too far away for reading a book but provide enough light for all movement in the cabin.
CONCLUSION - The
post is strong enough to support a line backer and should therefore dispel all fears of the pedestal ever breaking. Cutting and fitting the panels was a very complex bit of carpentry work,
there being no reference to measure from. While I had a mental
image of the final product, this was mostly a "design and build it as you go"
project.
The number of times I climbed the ladder in and out of the boat is
ridiculous. I can't believe I stepped on exactly the same
place every time, evident from my foot prints in the dust.
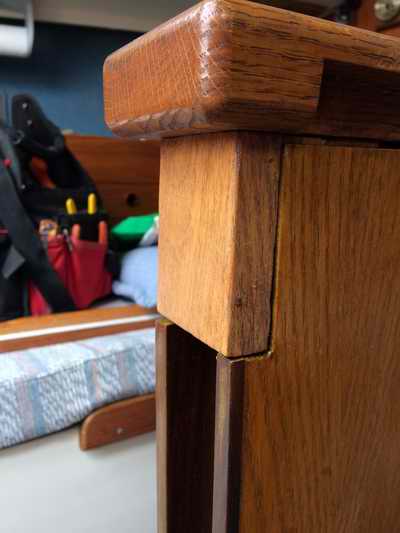
Enclosing the pedestal really does make the "joint" classier. By
the way, a real handy place to install a cabin handhold would be just
under the windows, especially if
the genoa track is installed against the cabin wall. See Tech
Tip F06.
TOP |
|||||||||||||||||||
|
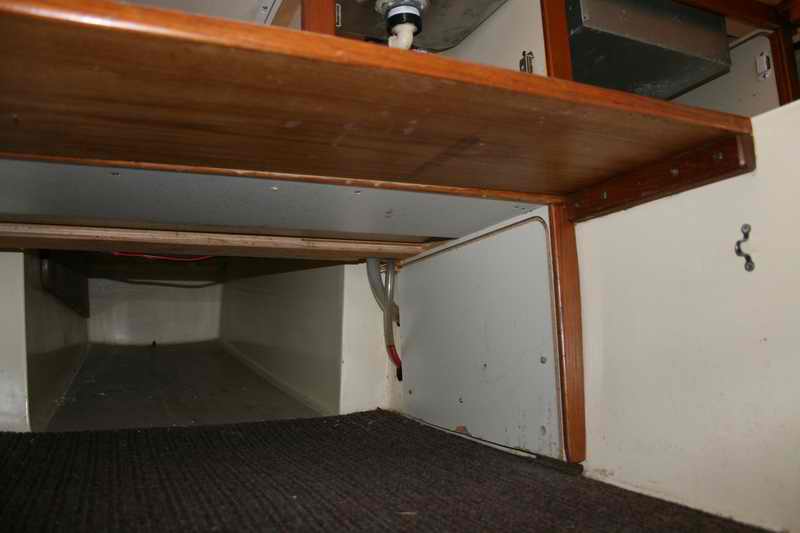
SETTEE DRAWER - Several members have installed a drawer under their settees to create convenient storage. It sure beats lifting a cushion and digging through the top access holes or asking someone to move off the bunk. While I have found a drawer to be very convenient on larger boats, on an SJ23 I would recommend installing a flip down hinged door. There just isn't enough room to pull out a square drawer. Whether you install a drawer or a door, you must restore the wall strength to retain the rigidity of the hull. However, if you sail in an area with high winds and rough water, I would think twice about this installation. I am not going to install drawers on Panache! Some issues to note are:
NOTE - An
argument can be made for retaining the strength and integrity of the
settee wall just in case you puncture the hull in this area. The
idea being that a solid wall may give you some extra time to get to land. A settee with drawer holes will equalize the
water level quicker than if the settee were sealed on the side. While a solid settee wall
CANNOT stop the water from filling the boat, it can contain the
water a bit longer thereby slowing the flow. The ends of the settees
are not totally sealed and water will eventually drain from the bow and stern
cavities, albeit slower. Regardless of drawers, once the settees
are filled, the water will continue to flow over the top access holes
and fill the cabin. Eventually the hull will fill and well, you
don't want to hear the rest! I am not going to install drawers on Panache! |
|||||||||||||||||||
|
Return to Tech Tip Index. . . . . . . . . . . . . . . Have a Question? |
|||||||||||||||||||

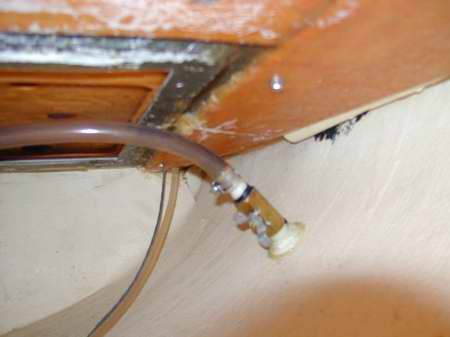
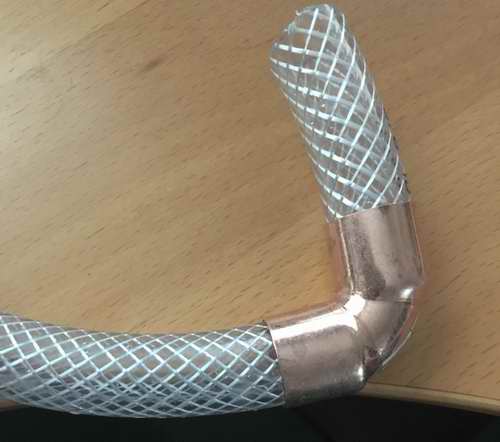
 This will go a long way to protect the elbow and thru-hull fitting. To ensure a hose drains drip dry
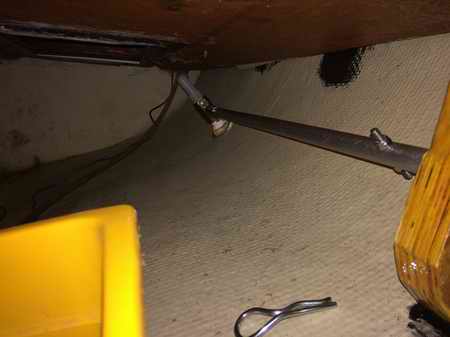 of the
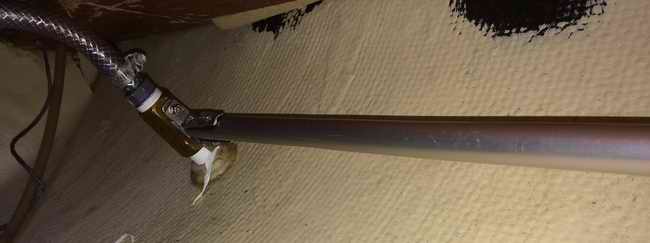


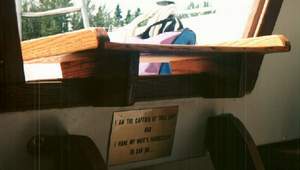 room and the only place I
can get that is in the companionway with the hatch open. So I built a small
removable "stove shelf" to hold my portable stove, a 2 burner
Optimus
22B. I
also didn't want cooking fumes, moisture or heat in the cabin during
summer and I needed a secure, convenient spot. The companionway fit
the bill quite nicely. It has the least motion, which is great for boiling water in a kettle or making coffee. It is
mostly out of the wind when I'm
swinging from an anchor. If the shelf is in the way or it's real windy
it can be moved to the cockpit
floor or other convenient place. STEPPING OVER the stove is not
allowed, as it is too dangerous. Besides you'll probably drop something
nasty in the soup. Sure would like to get some silent burners for
this stove. Anybody know where?
room and the only place I
can get that is in the companionway with the hatch open. So I built a small
removable "stove shelf" to hold my portable stove, a 2 burner
Optimus
22B. I
also didn't want cooking fumes, moisture or heat in the cabin during
summer and I needed a secure, convenient spot. The companionway fit
the bill quite nicely. It has the least motion, which is great for boiling water in a kettle or making coffee. It is
mostly out of the wind when I'm
swinging from an anchor. If the shelf is in the way or it's real windy
it can be moved to the cockpit
floor or other convenient place. STEPPING OVER the stove is not
allowed, as it is too dangerous. Besides you'll probably drop something
nasty in the soup. Sure would like to get some silent burners for
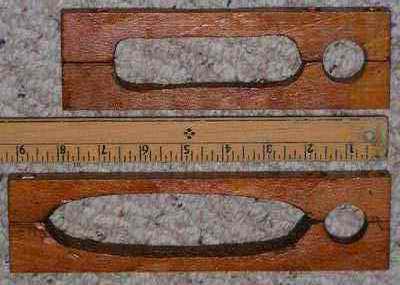
this stove. Anybody know where? 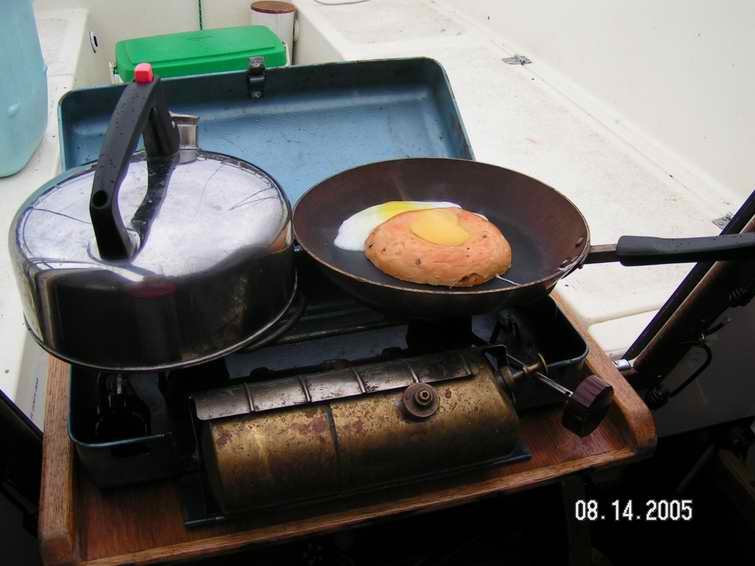 Above you can see the legs on the bottom of the shelf that fit over the
companionway bridge. It's a bit difficult to see in the shadow
but there is a slot cut in each leg, that is just a smidgen wider
than the thickness of the threshold. The legs slip over the
threshold and the shelf sits very secure with no wobble. Very
important. When I am finished cooking, I can pick up the shelf with the
stove to move it out of the way without burning
my hands. At times, the shelf is used to hold our
"happy hour" food and whatever maintenance project I'm doing. I've also been told it would make an
excellent fish cleaning station if only the fiddles would direct the
guts into the cockpit! If you decide to make a shelf like
this, bring the legs and table top to your boat. Slip both legs
over the companionway and then rest the shelf on them for alignment. Finally screw the
shelf to
the mounted legs to guarantee a perfect fit. The only improvement I could
suggest is to make folding legs for more compact storage but this hasn't
been a problem for me. The legs should fold inwards for storage and
outwards about 200 for use, (think aircraft landing gear).
With the legs spread outwards the shelf is stable when
resting on a flat surface. I store the shelf behind the port settee
wall where it fits very well on top of some none slip urethane cloth.
Above you can see the legs on the bottom of the shelf that fit over the
companionway bridge. It's a bit difficult to see in the shadow
but there is a slot cut in each leg, that is just a smidgen wider
than the thickness of the threshold. The legs slip over the
threshold and the shelf sits very secure with no wobble. Very
important. When I am finished cooking, I can pick up the shelf with the
stove to move it out of the way without burning
my hands. At times, the shelf is used to hold our
"happy hour" food and whatever maintenance project I'm doing. I've also been told it would make an
excellent fish cleaning station if only the fiddles would direct the
guts into the cockpit! If you decide to make a shelf like
this, bring the legs and table top to your boat. Slip both legs
over the companionway and then rest the shelf on them for alignment. Finally screw the
shelf to
the mounted legs to guarantee a perfect fit. The only improvement I could
suggest is to make folding legs for more compact storage but this hasn't
been a problem for me. The legs should fold inwards for storage and
outwards about 200 for use, (think aircraft landing gear).
With the legs spread outwards the shelf is stable when
resting on a flat surface. I store the shelf behind the port settee
wall where it fits very well on top of some none slip urethane cloth.

