|
WIRING a BILGE PUMP - The primary
job of a small electric bilge pump is to remove nuisance water or light flooding. It is not an emergency pump designed to
empty a half submerged hull. Few
SJ23s have enough electrical power to operate an emergency pump but any
pump can buy you
extra time to don a life jacket, find the leak and hopefully keep the
boat afloat till you get to shallow water. Beach it if you have to! A SJ23 does not have a central bilge where all water can be conveniently pumped out of. Instead it has 2 settees and a cockpit locker where water collects. The water under the forward berth flows into one of the settees. For this reason 3 pumps are required; one in each settee and another in the port cockpit locker. Panache's portable deck wash pump could be considered as the fourth pump for the cabin. The following points have
important overlapping
criteria to protect you and your SJ23 from a catastrophe.
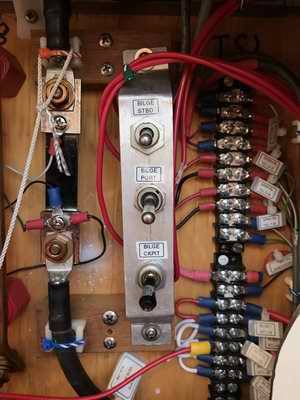
- FAIL SAFE POWER - Panache's 3 pumps are connected to an alarmed circuit breaker (Tech Tip E02, Bkr 15) wired directly to
the constant
battery buss BB2.
Wired as such, each bilge pump
can operate automatically by it's float switch or manually by a toggle switch, all with the main power switch off.
CAUTION - NEVER connect a switch in this circuit, unless it is alarmed to indicate power is
off.
- PUMP & CONNECTOR - Each bilge pump
is connected to the boat wire harness through a
robust
sealed connector with greased pins to protect against corrosion while immersed. The connectors can be handled safely with wet hands. All pumps are
installed, using the same type of connector and pin out so they can be
interchanged for redundancy,
removed for service
or dried for winter storage.
- To this end each settee
pump, float switch and relay combination is installed on an aluminum base plate
and is treated as a "unit". Each unit has a SS fence to protect it from gear stored under the
settee. See
Tech Tip C12
for this criteria.
-
A centrifugal pump is automatically primed to move water when it is immersed.
-
A centrifugal pump can move water faster than a
displacement pump.
- A centrifugal pump MUST be capable of pumping with
a minimum 4'
of head. This one exceeds 10'.
-
A centrifugal pump can move more water with the correct polarity applied than the opposite polarity. Perform this test prior to connecting. One of Panache's pumps was wired backward from the manufacturer.
- A check valve in the discharge hose can prevent water from draining
back into the bilge after the pump is shut off, but it can also prevent
the pump from self priming, restrict water flow or freeze during winter. This is why they are NOT installed on Panache.
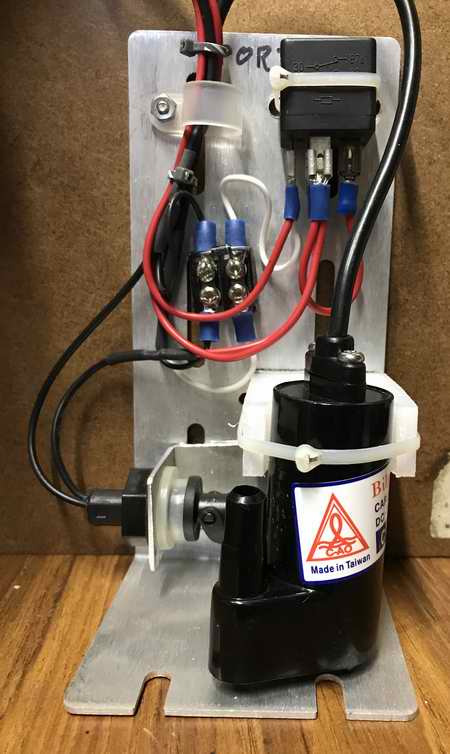
- PROTECTION DIODE - An electric bilge pump is an inductive load that sends a large voltage pulse back into the boat wiring harness when the power is shut off. This is from the magnetic field collapsing. For that reason each pump requires a diode (1N4007) across its coil leads to short circuit the pulse, thereby protecting sensitive electronic devices (LEDs) connected to the wiring harness. You may never experience this problem if the cabin lights are switched off when the pump shuts down but one day you will wonder what the hell happened to the lights? See Tech Tip E11.
- I installed this diode next to (electrically close) each pump on a Jones terminal strip as it is the most effective place. Don't install the diode buried somewhere in the wiring harness as you will forget where it is.
- UPDATED CONTACT ARC SUPPRESSION & ELECTRICAL NOISE - When a current carrying relay contact opens it generates an arc. The size of the arc is proportional to the current flowing when contacts were closed. Eventually the arc will pit the contacts and weld them shut. Each arc radiates as a voltage spike over the power lines that could interfere with sensitive electronics. Its doubtful it can do damage but you never can tell. Each arc can also radiate as an RF burst that interferes with VHF operation, just when you are trying to use it. The solution is to install an RC circuit across the pump motor contacts to absorb the arc faster than the contacts open. This is determined by the time constant of the components shown as R & C in schematic below. Install this RC combination electrically close to the relay.
Easier ---> |
R=E0/[10I91+50/E0))] (typically 1 Ohm/V) |
C=I2/10 (1 mfd/amp) |
Panache Bilge Pumps |
R = 14 Ohms, >1/2W |
C = 1 mfd, >50V |
In addition to quieting the high current relay contacts, it will likely be necessary to suppress voltage spikes (noise) originated by the commutator in the electric motor. I have yet to see an electrically quiet commutator. This is one of the reasons why brushless motors are used with sensitive electronics.
- Motor noise can generally be suppressed with a .1 Ufd (>100V) disk capacitor wired directly across the motor contacts. As electrically close to the motor as possible.
- If the noise still gets through, twist the power wires together. The inductance that twisting creates cancels the capacitance of parallel wires to stop the noise spikes from radiating.
- Finally, keep the power wires away from all other boat wires to prevent the noise from coupling to adjacent wiring. These steps are generally good practices to follow for a quiet electrical wiring system so other electronics can operate. In Panache's case the bilge pump now operates quieter (electrically). I'm considering a remote monitoring system that requires clean power with no false signals to skew measurement. Hence all this quieting. SETTEE FLOAT SWITCHES - For the shallow settee bilges I
repurposed an external float switch that operates in
only 1/2" deep water. The reed relay contacts in a float switch will fail quickly
due to contact arcing caused by surge
current when a bilge pump (DC motor) shuts off. But if
the reed relay of the float switch operates a sealed automotive relay
which in turn operates the bilge pump, there is no arcing on the float
switch contacts due to the
low coil current (~80MA). The automotive relay contacts are designed to handle high current (30A+) and
can easily control a bilge pump. Problem solved for the reed relay with no standby
power drain. This is the relay circuit configuration below that works for Panache's settee
pumps.
This configuration should last a million cycles. See Tech Tip E02 for
pin assignment on Term Strip #1.
NOTE - Don't operate a
reed relay with only
micro-amps of current as it will eventually go intermittent. The current should be in the
milliamp range to keep the contacts clean.

Possible Trouble - Float switch failure may also be due to a hull pounding hard on waves damaging the delicate reed relay as it bounces in a dry bilge. Each bounce may cycle the pump power, pitting the contacts. While this problem is more prevalent on a power boat skipping across the waves than on a sailboat sliding over the waves, you should be mindful of this. It could be an issue in the shallow settee "bilge" of an SJ23. So far it hasn't been a problem on Panache.
STILLING WELL - Consider installing the float switch in a "stilling well" to dampen
the surface so it measures water depth more accurately, minimizing
start/stop cycles due to water sloshing. Water in a "stilling
well" is
almost like installing an electronic timer (start delay of ~5 sec and a drop out delay of ~15 sec) to prevent false starts. This timer might be useful on its own merit though. With either or both of these timers the pump will cycle less, which
is a more satisfactory long lasting operation.
- An alternative to using a timer is to us a dry bilge pump. Do a search for 'dry bilge systems" reveals a useful bilge pump that can suck all the water from a shallow bilge: Seaflo with a YouTube video.
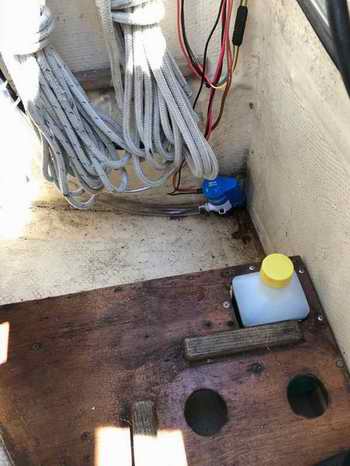
COCKPIT BILGE PUMP - Each bilge pump should be
wired to operate automatically through a float switch
with a manual override switch just in case the float switch doesn't
work. Most mechanical float switches start a pump when the water
is about 2" deep and stops when it is 3/4" deep. The way I see
it, this style float switch provides automatic pumping for lots of
water in the bilge and the manual switch can pump the remainder of the
water. Console yourself
with the fact that the bilge is basically empty and the boat can
easily handle the remaining bit of nuisance water. The remainder can be wicked up with a sponge. This is the simplest configuration and works well for the SJ23 port cockpit locker. The float switch in the drawing below is internal to the cockpit pump so the wiring harness is connected directly to the power distribution. See Tech Tip E02 for
pin assignment on
Term Strip #1.

-
 MANUAL OPERATION SWITCHES - A manual override switch
can be used to remove nuisance water below what a float switch can
detect or to bypass a failed float switch to
empty a bilge
RIGHT NOW! Install the
toggle switch in a
logical dry place above high water and label it. If the switch is
installed in
the open, protect it
with guards against accidental operation! MANUAL OPERATION SWITCHES - A manual override switch
can be used to remove nuisance water below what a float switch can
detect or to bypass a failed float switch to
empty a bilge
RIGHT NOW! Install the
toggle switch in a
logical dry place above high water and label it. If the switch is
installed in
the open, protect it
with guards against accidental operation!
- The 3 manual switches on Panache are installed on the breaker back panel where they are convenient to use and dry to prevent corrosion.
See Tech Tip E02.
Pin
assignment is on Term Strip #1.
-
WIRE GAUGE - Use at least #12 stranded wire
(tinned if you like) so the pump receives the highest possible
voltage. All splices are crimped, soldered, sealed and connector
pins are greased to prevent corrosion.
-
I tested Panache's
new settee pumps (1.5 A) with 20' of #12 wiring and it moved a gallon of water
in the same time as when connected via the thin manufacturer leads.
With that I fabricated a longer wire harness for each
pump (cockpit pump shown below), added a connector at the pump end, then labelled
and tested each to confirm they operate prior to
installation.
-
WIRE HARNESS INSTALL -
"This explanation gets kind of convoluted but bear with me". Where a wire harness goes through
a bulkhead the wood core was sealed with epoxy, a thru hull is fitted to provide chafe protection and is sealed with butyl rubber to
stop water flow. Butyl is used in case a fitting has to be
opened later.
 - The wire harness
for the cockpit locker goes up from the pump to the top of the
locker through a bulkhead hole into the cabin. The thinner upper
portion of the bulkhead is solid 1/8" fibreglass. - The wire harness
for the cockpit locker goes up from the pump to the top of the
locker through a bulkhead hole into the cabin. The thinner upper
portion of the bulkhead is solid 1/8" fibreglass.
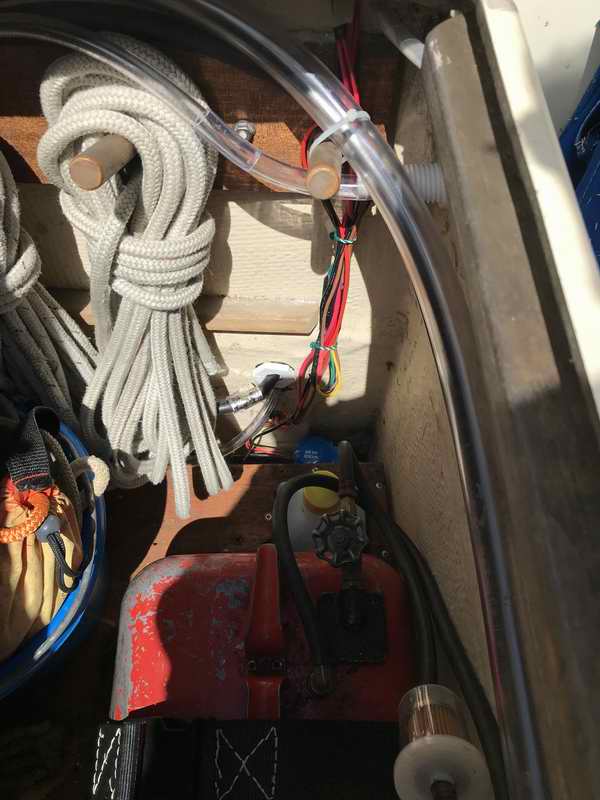
- The wire harness for
the port settee pump goes aft in a wood
cable tray mounted inside the top of the settee.
The tray lines up with a hole drilled through the bulkhead
into the cockpit locker. Once inside the locker
the harness goes up to the top of the locker (with the cockpit pump
harness), then both go back through the
bulkhead into the cabin.
NOTE - The thicker bottom half of the bulkhead at the front of the
cockpit locker
consists of 1/4" plywood covered with fibreglass. A hole is
drilled to accept a vinyl cable guide for chafe
protection. The exposed wood
in the cable hole is sealed with epoxy to protect the wood.
- From there both harnesses go under the companionway across to the starboard side
behind the breaker panel.
- The wire harness for the starboard settee
goes aft from the pump in a wood cable tray at the top,
then up to the starboard gunwale to end behind the breaker panel.
- All 3 harnesses go forward, through a hole I drilled in the 3" wide bulkhead, to
end behind the breaker panel for electrical connection.
Always install cable from the load to the power source
where the last connection is to be made. Leave some slack at
both ends for servicing. Make resistance measurements to confirm
all is OK then switch the power on to do an operational test. Now that a pump is at the bottom I'll have to drain this bone dry for winter.
- DISCHARGE HOSE - For clarity the discharge tube is not shown on
the settee pump below. This tube goes up from the pump to a
wood cable tray at the top of the settee, aft through a bulkhead (sealed
fitting), then up to the top of the cockpit where it drains into the
foot well. From there it flows through the cockpit drains back into the drink.
-
 BACKUP POWER - A boat connected to shore power
can usually draw
more power than it can use. Unfortunately dock power has a notorious way of
being switched or tripped off when you need it most.
Then there is the inevitable curse of forgetting to plug the boat
in before you leave! For this reason,
your boat
should also have a solar panel to charge the battery. Given a short run time of the pump and sufficient sun, the
solar panel should be able to maintain pump operation. Hopefully
long enough
for you to plug the leak. BACKUP POWER - A boat connected to shore power
can usually draw
more power than it can use. Unfortunately dock power has a notorious way of
being switched or tripped off when you need it most.
Then there is the inevitable curse of forgetting to plug the boat
in before you leave! For this reason,
your boat
should also have a solar panel to charge the battery. Given a short run time of the pump and sufficient sun, the
solar panel should be able to maintain pump operation. Hopefully
long enough
for you to plug the leak.
- OPERATIONAL TEST - It's wise to operate the each pump manually every now and then to verify
operation. The advantage of a mechanical float sensor versus a
solid state sensor is that you can lift the automatic float switch with your finger and the pump
should run. But mechanical is not perfect either!
Operate the manual override switch and the pump should run. I know
many sailors who test their pump each time they leave their
boat. On the other hand, there are lots who don't! Go
figure.
A centrifugal pump can be run dry for a few seconds without
damaging the motor. At right is my prototype settee bilge pump that has run for 2 seasons without failure. The flow rate is more than adequate for the tiny amount of water that settles in the settee.
- While a numerical counter for pump operating cycles is useful to understand the extent of a problem when you aren't aboard, I don't plan to install
one.
If you leave the bilge bone dry, it should still be bone dry when you
return. Think this logic through! Just say'n.
- On the other hand, a visual alarm to show which pump is operating is a useful thing to save time when s__t hits the fan. It only requires an LED connected to the power lead of each pump. Wired as such it will show operation in automatic or manual mode. The hassle is in running the DC wiring from each pump back to the power distribution panel.
- PARTS (or equivalent)
- Submersible Bilge Pump;
CK-181DC, rated at 200 GPH, 1/37 HP, 12V, carbon brush motor, polypropylene impeller.
Tested to empty a 23L bucket in 1 min. & measured head of 10'.
- Connector;
3-way flat trailer connector, (water proof if greased).
- Diode;
1N4007.
-
Float Switch;
Water level sensor, 400MM, N.O. contacts.
- Relay;
Bosch Automotive Relay, (water proof).
- Jones Terminal Strip;
Ebay.
- Insulated terminal fittings. (crimped, soldered & greased).
- 3/8" & 3/4" vinyl tubing.
- Two 1/2" hose thru-hull fittings,
24067 Binnacle.com
- One 3/4" hose thru-hull fitting,
24069 Binnacle.com
- All the consumable parts I grabbed from my stash at home.
- 4" wide SS fence to protect pump from items stored in settee.
|
COCKPIT
PUMP INSTALLATION |
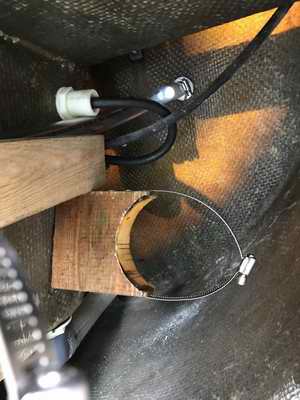
| Fig 1 - Here I
slid the false floor aft ~6" to reveal the blue bilge pump on the
bottom of the cockpit locker. While it isn't secured to the
floor, the stiff discharge hose and being wedged by the false floor support it
upright to prevent the float switch from false operation. |
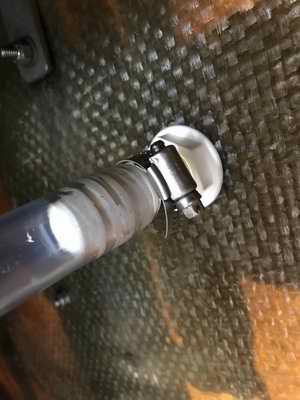
Fig 2 - I
temporarily removed the Tiller Pilot storage tube to install the transom
thru-hull. The vinyl drain hose is fully supported in the wood tray on the left. |
|
 |
 |
|
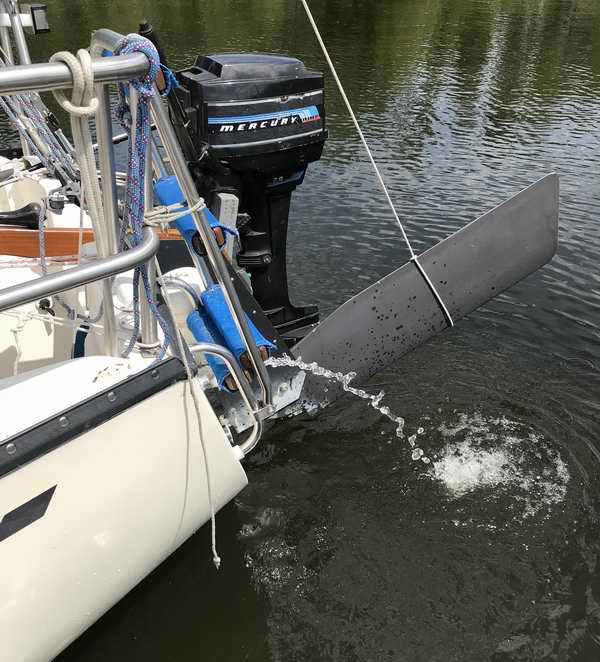 |
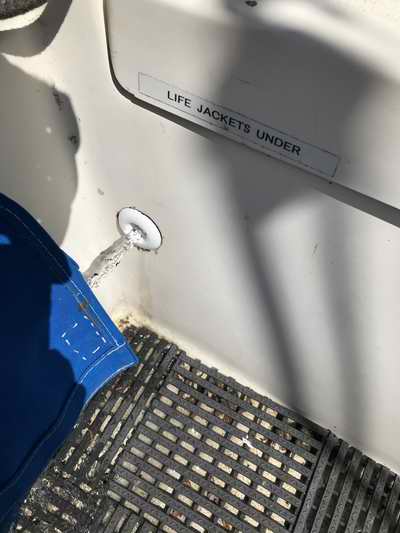
Fig 3 - This stream of water is leaving the cockpit locker almost at full flow. The flow starts slower than this but soon
becomes a full stream. I purposely placed the thru hull
fitting where the stream would flow between 2 rungs of the boarding ladder.
Hmmm, this could be embarrassing for a person climbing up the ladder. Oh well, they're wet anyway. |
SETTEE PUMP INSTALLATION
|
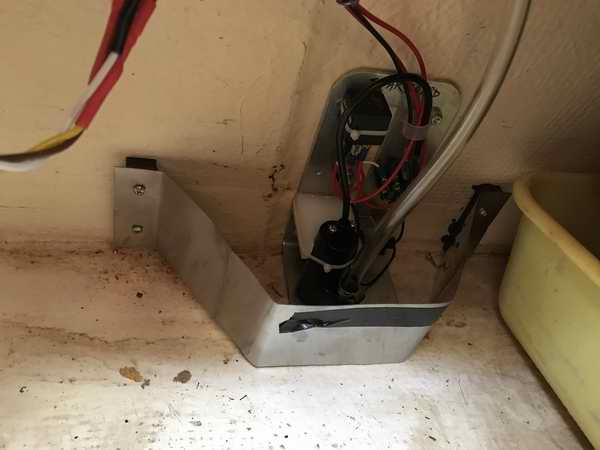
| Fig 1 - The SS fence below is temporary to determine suitable
protection. The pump assembly is bolted to the settee wall so it
can't tip over to prevent the float switch from activating the pump. The wire and hose above are supported in a wood cable tray at the top
of the
settee.
|
Fig 2 - Drilling through a water tight compartment always makes me nervous. Fortunately I could see and touch both sides so alignment was not a problem. The port side of the cockpit foot well is single
skin 1/8" fibreglass and the starboard side is dual skin 1/8" fibreglass.
A hole saw makes a very clean cut. 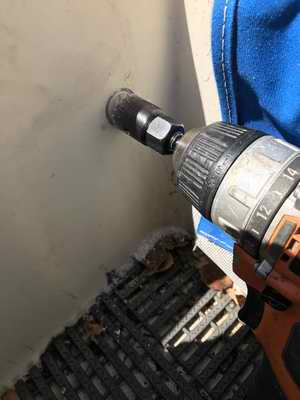
|
|
Fig 4 - Pumping from the starboard settee into cockpit.
|
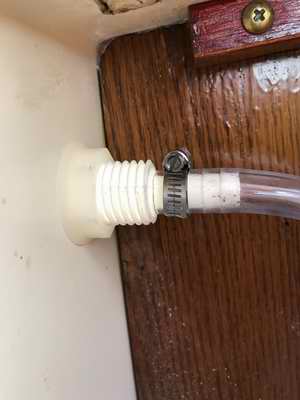
Fig 3 - Completed thru hull fitting installation on starboard side of the cockpit.
- The inside of the barbed end was bevelled to reduce debris obstruction and maximize flow.
- The hose clamp will be replaced with a spring style so it stays snug. This screw style has a nasty habit of getting loose with time.
|
It's interesting that if there is water in a settee, the pump can start when I step on board
as the hull heels ever so slightly. I never thought this design would be this sensitive. I'm
pleasantly surprised with how quickly it can empty the settee bilge though, especially when I sit on a gun whale to induce a heel.
A lot
quicker than any scoop or sponge I can shove down there and not messy. Both are benefits I never thought of. CAUTION - You should occasionally verify the performance to your pumps to confirm functionality. My bilge has been dry since I sealed the toe rail but I was surprised to discover debris plugging the barbed end of the thru-hull fitting at the cockpit. This was construction debris that went through the pump and hoses only to be stopped at the square back side of the barbed end. A good reason to vacuum the bilge clean after installation work.
|