 There
is nothing more annoying than water running down the cabin wall or dripping
from the ceiling when it's raining outside. The stale smell of a musty
boat cabin is not something to look forward to for an overnight outing. Soaked cushions make life
aboard miserable. In the long run the cushions will be ruined by the mildew and the cabin wood will rot. It is amazing how
much water can collect in an unattended
boat. If your boat freezes during winter storage this water spells big problems
as it expand while freezing. There
is nothing more annoying than water running down the cabin wall or dripping
from the ceiling when it's raining outside. The stale smell of a musty
boat cabin is not something to look forward to for an overnight outing. Soaked cushions make life
aboard miserable. In the long run the cushions will be ruined by the mildew and the cabin wood will rot. It is amazing how
much water can collect in an unattended
boat. If your boat freezes during winter storage this water spells big problems
as it expand while freezing. TOE
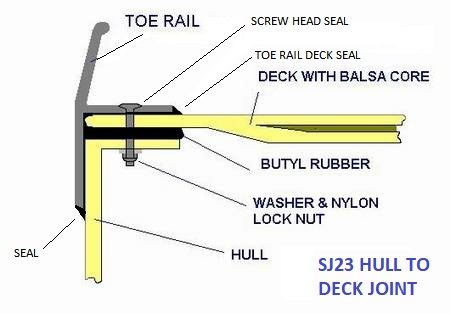
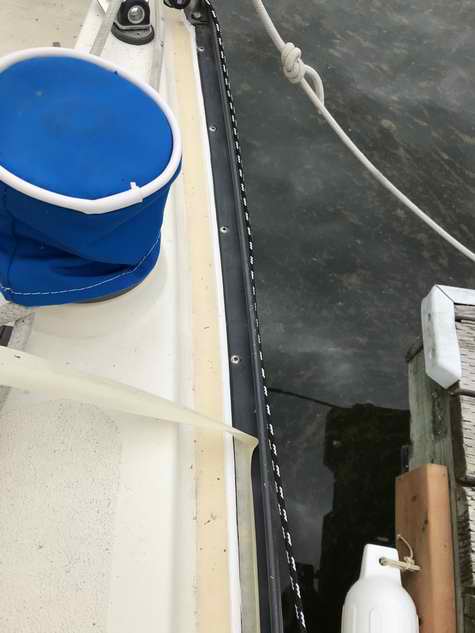
RAIL MAINTENANCE - "First, determine where it leaks; toe rail screw, deck seal, or hull to deck
seal. Look inside while someone
runs water on the suspect area. If a toe rail screw
leaks (drop of water hanging from it), remove it (one at a time) and seal the back of the head with black
butyl rubber. Plan to replace the toe rail screws because
the ends of most long ones were broken off during the factory installation.
I guess it was cheaper and faster than installing the correct length! Afterwards run a bead of Sikaflex 230 around the
deck edge of the toe rail to
restore the deck seal. If the hull to deck joint leaks you can either
live with a slow leak or remove the entire toe rail and seal under it with
fresh butyl rubber." Gene Adams.
- Sometimes a leak is really obvious after a bucket of water is dumped on
the deck; like a toe rail screw that drips almost instantly and can easily be spotted with
a bright flashlight. Other times you will have to run a steady stream on water to reveal a slow leak. The screws most affected are close to the shrouds where the hull undergoes the most strain. These screws are generally easy
to seal because the hole is so clean.
- With a leak that is difficult to find, draw a horizontal chalk line on the
cabin or settee wall below the suspected area. Any water running down will pull the chalk away, marking the location of the leak. This technique should identify a leaky toe rail screw or a leaky toe
rail quite quickly.
- It can require diligent sleuth work to find the tell tale streak of a leak. The streak of an old leak doesn't always show if the water is clean or the hull is clean.
- Another technique is to attach a paper towel or sheet
of printed paper to the cabin
wall. Make sure the top is stretched tight against the
inside of the fibreglass hull to wick up dripping water. The paper towel will show a
wrinkle where the water ran down and the printed text will run down the
sheet.
- If you have water in the settee bilge, place a paper towel at each
end of the bilge and run water on the deck. The towel with the tell tale wrinkle marks reveal where the leak is. At least you will know from which end the
water is leaking. You
could also draw a chalk line above the towel to save time. Don't have running water? Wait for the next rain.
- Remember that the windows,
stanchions, chain plates,
scuppers,
anchor
locker, gudgeons, cockpit
through hull fittings, backstay chain plate or the
transom
moulding could also be the source of your leak. Sorry about
complicating the issue, but this is reality!
- More toe rail info is available in Tech
Tip B26 under "strengthening the toe
rail."
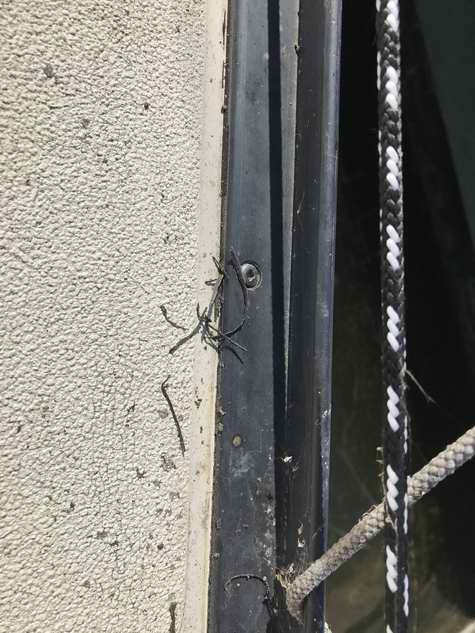
Below is Buddy Wright's boat during a 2021 overhaul. He decided to reseal both toe rails by removing them and sealing with butyl tape. Its a job for two people; one inside and one outside. He never did apply the bead of sealant along the deck as the butyl tape did the job. What oozed out was trimmed off as the screws were tightened. The hardest part was accessing the nuts at the aft end of the starboard toe rail. In the end he cut a 6" access hole through the aft end of the berth to reach those nuts. 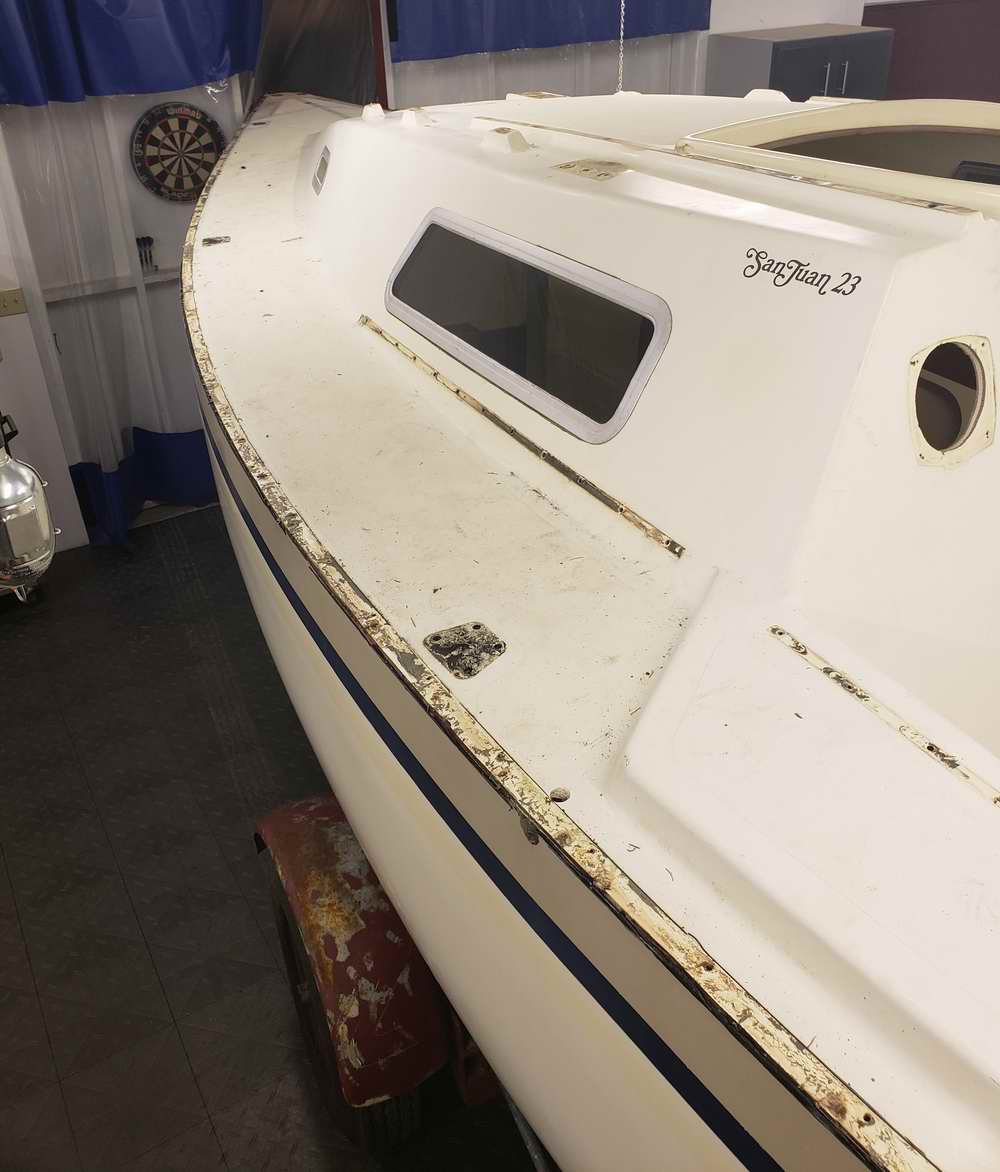
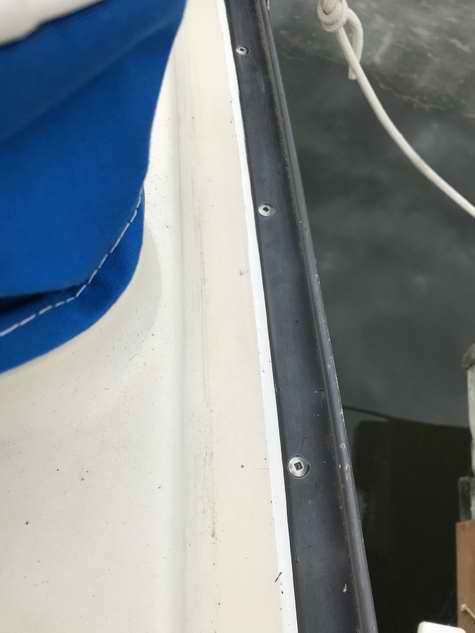
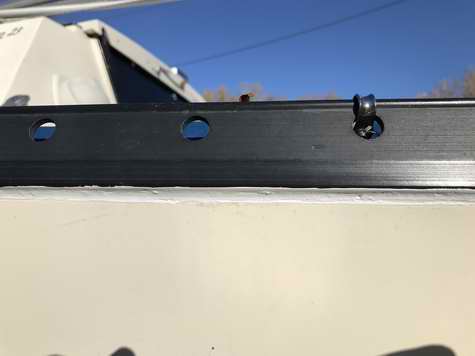
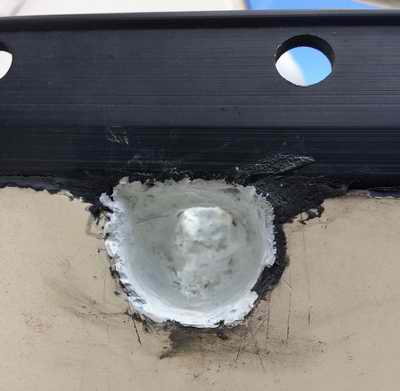
TOE RAIL SCREWS & NUTS (1995) - The factory toe rail screws & nuts loosen
with time. This is a natural function of the daily heat/cool cycling
and flexing of the hull. Don't be
surprised to find a few missing nuts. My experience is that the screws at
the maximum beam of the hull loosen the most. I think this is
because the keel mass is located here. With the hull heeled over, the weight of the keel
opposes the wind force from the
mast, twisting the hull between the two opposing forces. This has
to stress the toe rail screws/nuts and sealant around the maximum beam. "I'm
sticking to this theory
until someone finds a better idea!" If a screw is loose it will leak. "No
theory here, just plain fact!" If you allow the screws to
stay loose you also stand a good chance of breaking the butyl rubber seal under
the toe rail. So if you like work, don't tighten the nuts! If you don't like work then
tighten the nuts every 2 years.
 I was surprised to
find that mine
had loosened almost a full turn in 6 years, despite the fact that I installed nylock
nuts. I thought nylock nuts would be the final solution to this
problem. Answer is; NOPE, but they definitely slowed the process. This is a boat
after all that flexes all the time and therefore requires constant maintenance. To reseal the screws/nuts
follow these steps: I was surprised to
find that mine
had loosened almost a full turn in 6 years, despite the fact that I installed nylock
nuts. I thought nylock nuts would be the final solution to this
problem. Answer is; NOPE, but they definitely slowed the process. This is a boat
after all that flexes all the time and therefore requires constant maintenance. To reseal the screws/nuts
follow these steps:
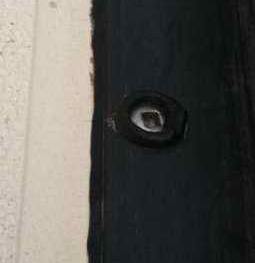
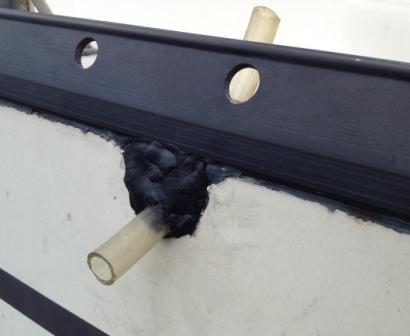
- Remove the screw and sanitize the shank and bottom of the head with acetone. Don't
touch it afterwards.
- Apply a cone of black butyl rubber under the head. Make the cone
about 600 so it works itself deep into the hole.
- Sink the screw into the hole using a screw driver and don't twist the screw. This retains as much sealant in the hole
as possible.
- Have another
person tighten the nut on the bottom, again to keep sealant in
the hole.
- Tighten the nut till the head is pulled flush with the toe rail at which time
butyl rubber will have oozed out all around the head which ensures a good seal.
See photo at right.
- At this point the washer should be pressed against the bottom of the fibreglass, otherwise the screw
will work itself loose very quickly. While gaps are not allowed you
should also not over tighten the nuts. All you need is a very snug
nut. Over tightening it will create bowing between the
screws which is hard on the toe rail seal and the fibreglass hull.
- Tighten it once and DON'T touch it afterwards.
- Two days later I rubbed the excess butyl off with my thumb. No
gooey mess on my finger and a water tight seal.
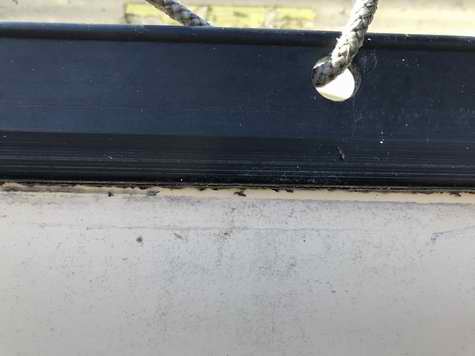
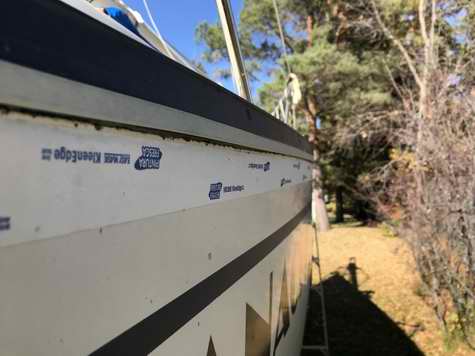
TOE RAIL DECK & HULL SEALS
(2020) - The toe rail deck seal deserves annual scrutiny to keep the cabin dry. This is the fillet of sealant on the deck adjacent to the toe rail. It wears out from thermal flexing, foot traffic, water and the sun beating on the deck. In 2020
Panache still had the factory application so it was time to do something about the leaks.
- Wash the toe rail and deck to remove crud. Its surprising how much collects here.
- To cut through the fillet push a sharp wood chisel along the edge of
the toe rail, with the straight side of the chisel to the toe rail. Hold the handle almost horizontal so the
corner just skims over the gel
coat. Then cut through the bottom of the fillet by pushing the chisel
flat alongside the toe rail, tipping it up ever so slightly so as not to
gouge the gel coat. Alternatively
you could use a 90 degree wood carving knife to push it off in one stroke.
In either case you should
end up with a clean deck/toe rail corner as in fig 1 below. Sweep
or vacuum the debris from the deck. It would be real annoying if the
wind blew this on the sticky sealant.
- Sanitize the deck and inside corner with acetone. Don't contaminate
it with your "greasy" fingers.
- Apply masking tape along the deck, 1/4" from the toe rail, and along
the top of the rail flush with the inside edge.
PS: It is possible to apply one continuous bead without using masking tape, but you would have to
remove all deck obstructions. There aren't enough 4 letter words in the English language for me to try
this, keeping in mind that the deck seal is in direct line of sight from
the cockpit.
- Cut the sealant nozzle to the desired bead size and apply a bead of Sikaflex
or 3M5200 sealant along the edge of the toe rail,
completely covering the area between the 2 runs of tape.
- Cut the end off a popsicle stick, making a razor sharp cut, and run it
over the bead at 450, flattening the sealant to the
deck. Or you could use a soapy finger. The end result should
be a fillet that tapers smoothly down to the
deck. See fig 2 below.
- Remove the masking tape while the sealant is still wet.
This creates a smooth edge. If you leave the tape on the deck, it will become part of the fillet!
Now that looks sloppy.
- Don't step on it till the sealant has cured for 48 hrs. As
the fillet cures it will become a bit concave.
PS: I discovered that 3M5200 shrinks
(pulls back) quite a bit so don't be afraid to apply a generous coat.
I may apply another bead over it next Spring.
- Don't worry if it rains. The sealant actually cures a bit
quicker with water on it.
- PS: After a month of monitoring for
leaks I
can declare that the hull is bone dry again with a new deck seal. Who would have thought
the seal leaked that much since it still looked good. We had some
pretty good rain here that would have easily filled the settee bilge to 2" deep.
I never saw a trace of water running down the cabin wall.
- Similarly reseal the hull side of the of the toe rail.
PS: It would
be very difficult to apply a straight bead with the boat floating.
For this reason I pulled Panache from the water a week early this Fall.
It is a tiring to scrape the joint clean, mask both sides
then caulk the joint ever so carefully. This is the reason it
took all day. See photos below.
REPLACE DECK SEAL (Deck side of toe rail).
|
|
Fig 1, BEFORE - Removing the old seal. There was dust under it in places.
|
Fig 2, AFTER -
Remove the tape immediately for a clean
edge.
|
|
Fig 3, AFTER - Don't touch. The sealant is self levelling.
|
Fig 4, AFTER -
Port side is done. Time to turn Panache around.
|
Replacing the deck seal solved the leaks for Panache.
All locker and bilge bottoms are bone dry now.
|
REPLACE HULL SEAL (Hull side of toe rail).
|
|
Fig 5 -
Remove old sealant with a sharp chisel. Perfect tool.
|
Fig 6 -
This
is as far as you need to go to remove the sealant.
|
|
Fig 7 -
Masking
off the toe rail and hull required 92' of tape.
|
Fig 8 -
Its
incredible how many gaps this sealant plugged.
|
Fig 9 - The
undulations between the hull and toe rail made it very difficult to draw an even bead. I
could never have achieved a smooth bead with the boat floating. I'm
happy its finally sealed again. Time to do some rail down
sailing?
|
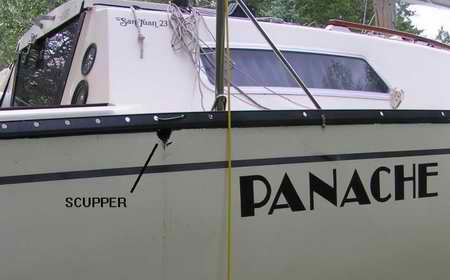 SCUPPERS
(2014-2016)
- The scuppers are located mid ship at the lowest part of the deck to pass water under the toe rails and over the side when the boat is floating on her lines. (Drilling drain holes
through the bottom of the toe rails
was not an option at the factory since the flat portion is 3/16" above deck height).
To
those of you with scuppers lined with gel coat, consider yourself lucky not
to have to deal with a leak into the cabin here. I bought Panache in
1986 and have always known her
to have sealant in the scuppers so I assumed
other early hulls had sealant as well. In Panache's case the water from the port scupper flowed into the cockpit locker and the port settee with a little bit flowing over the side. Nothing that a sponge can't take
care of but annoying none the less. The water from the starboard scupper drained into
the starboard berth and locker. That was annoying because the cushion
soaked up the water. So if your scuppers are lined with marine caulking the rest of this narrative applies to you. SCUPPERS
(2014-2016)
- The scuppers are located mid ship at the lowest part of the deck to pass water under the toe rails and over the side when the boat is floating on her lines. (Drilling drain holes
through the bottom of the toe rails
was not an option at the factory since the flat portion is 3/16" above deck height).
To
those of you with scuppers lined with gel coat, consider yourself lucky not
to have to deal with a leak into the cabin here. I bought Panache in
1986 and have always known her
to have sealant in the scuppers so I assumed
other early hulls had sealant as well. In Panache's case the water from the port scupper flowed into the cockpit locker and the port settee with a little bit flowing over the side. Nothing that a sponge can't take
care of but annoying none the less. The water from the starboard scupper drained into
the starboard berth and locker. That was annoying because the cushion
soaked up the water. So if your scuppers are lined with marine caulking the rest of this narrative applies to you.
NOTE -
This explanation is a bit of long winded so read on if you want to learn from it. I see no reason why somebody
else should go through the same frustrations I did. However, if you
want to go directly to the solution, click here.
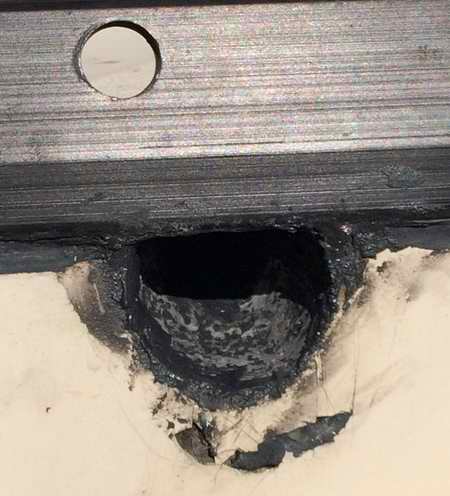
2014 - While searching for my elusive deck leak I finally pin
pointed it to the scuppers. It was difficult to believe they leaked
since the sealant inside looked and felt in excellent condition.
I checked it many times over the years and found it to be dry and absolutely smooth and tight.
But I still had water coming inside so
one day I
pointed my
brightest flashlight inside a scupper, holding the light at the critical angle,
 and spotted an edge of sealant
that was detached. Is it ever difficult to see inside a flat black
scupper. With more poking I discovered NONE of the sealant was
attached to the fibreglass. In fact, there was a perfect sphere of cured sealant
nestled
in there, holding water behind it. Much to my surprise I
discovered three 1/4" holes at the back of each scupper that are a direct path for water to flow
INTO the cabin. I think these holes were created while forming the
deck
seal during manufacture. With my upper galley cabinets covering the wall it was
impossible to detect the water trickling inside. My first sign of a
leak was a damp cabinet, cushion bottom and a bit of water inside the settee. and spotted an edge of sealant
that was detached. Is it ever difficult to see inside a flat black
scupper. With more poking I discovered NONE of the sealant was
attached to the fibreglass. In fact, there was a perfect sphere of cured sealant
nestled
in there, holding water behind it. Much to my surprise I
discovered three 1/4" holes at the back of each scupper that are a direct path for water to flow
INTO the cabin. I think these holes were created while forming the
deck
seal during manufacture. With my upper galley cabinets covering the wall it was
impossible to detect the water trickling inside. My first sign of a
leak was a damp cabinet, cushion bottom and a bit of water inside the settee.
Subsequent repairs with Sikaflex lasted only a few months despite the
fact that I
cleaned with an acetone soaked rag. Later I scrubbed it with a
toothbrush and what flowed out were bits of light brown, caked stuff. Looking back on it the
surface of the scupper must have had grunge on it, preventing the sealant
from sticking. I sealed it with Sikaflex.
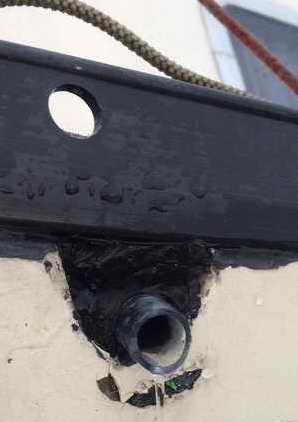
2015 Spring - Since each application of sealant eventually leaked, I decided
to try butyl rubber with a 1/2" vinyl tube through the cavity. The tube
worked and most of the butyl rubber stuck but after only 6 months it too leaked.
Butyl rubber is too soft in the hot sun for this application so out it
came.
2015 Fall - Next I tried a three step approach to sealing the scuppers.
I sanitized the cavity then jammed Marine Goop into the back
and allowed it to harden for 24 hours. It sealed the scupper.
I had to seal the holes from the outside since it
is impossible to access the scuppers from the inside. The hull liner
blocks access.
You would need some real skinny hands to reach in there.
Then I
applied a light coat of DOW Betaseal U-418 urethane (quick cure,
primer free adhesive for auto glass) to the surface and let it cure for 24 hours.
The gooey urethane showed real promise that it would stick.
The easiest way to coat the back of the scupper is with your finger.
Don't blame me if you walk around with a black finger for 3 days!
Thankfully acetone and soap will wash off the sealant while it is still wet.
 It rained that night which helped to cure
urethane. Then I inserted a
5/8" vinyl tube that made a tight fit through the deck hole and filled the
remainder of the scupper with urethane. The surface of the urethane
was smoothed with plastic
sandwich wrap. In the days after this application it rained
half a dozen times and the cabin stayed bone dry. You can see the finished results
at right.
Finally ..........dry! It rained that night which helped to cure
urethane. Then I inserted a
5/8" vinyl tube that made a tight fit through the deck hole and filled the
remainder of the scupper with urethane. The surface of the urethane
was smoothed with plastic
sandwich wrap. In the days after this application it rained
half a dozen times and the cabin stayed bone dry. You can see the finished results
at right.
Finally ..........dry!
- A tube through
the scupper reduces the size of the gap and creates a snug fit at the deck
to ensure
the sealant should stick at the perimeter. The water should flow
through the tube and not break the adhesion loose.
- After the sealant hardens use a razor blade holder to trim the
deck surface and the top of the tube flush. Bevel the inside of the vinyl tube so the water drains
quicker.
- Similarly trim the hull side of the sealant flush.
Trim the tube about 1/2" out from the hull so the water
pours into the air instead of running down the hull. This prevents
oxidized metal from creating a black stain.
The protruding tube should survive the beatings of daily boating.
After a winter and better part of a wet summer I was convinced that a
snug fitting vinyl tube through the scupper is key to solving my problem.
The finished installation is at right. Water pouring from the protruding tube is from a
light rain. The top inside of the tube was bevelled to speed flow.
 2016
Fall (Solution at last) - So is it still water tight? Well......not quit. The scuppers leaked again
in mid year, albeit slower
than ever before.
I've now come to the conclusion that you cannot fill a round void like this with a sealant
unless the sealant is designed to be gap filling, and few are. Even the excellent ones shrink
as they cure, albeit a teeny amount. 2016
Fall (Solution at last) - So is it still water tight? Well......not quit. The scuppers leaked again
in mid year, albeit slower
than ever before.
I've now come to the conclusion that you cannot fill a round void like this with a sealant
unless the sealant is designed to be gap filling, and few are. Even the excellent ones shrink
as they cure, albeit a teeny amount. Consider this:
- If a sealant is wrapped around something it tightens and seals
as it cures. The tighter it gets the better the seal.
- If a sealant adheres against or
between two surfaces, it shrinks towards them and stays sealed.
- If a sealant coats the inside of a sphere or a tube it pulls away
from the wall and looses the seal as it shrinks while curing. This is the reason why
a sealant is the wrong material
to solve this
problem.
The weather gods and my free time finally aligned late in the season to put
Panache
into dry dock to tackle this and some other problems. The urethane "plugs" came out in one piece.
They were damp on the outside, confirming the source of the leak. This time I
decided to seal the holes inside the scuppers with PC-7 epoxy, which doesn't shrink. A
Dremel Tool with a ball grinder smoothed the bumps in the back and roughened the surface so
the epoxy could key to it. I blew the dust out and sanitized the inside
with acetone.
Now I know what a dentist feels like!
Then I plugged the back of the scupper with PC-7 epoxy putty, pushing small amounts of it in every nook and
cranny till it filled the "factory" holes back there to a reasonably smooth surface. This I let it cure overnight under the heat of a trouble light.
 Over the next two
days I applied two subsequent coats of PC-7, keying them to the previous
green epoxy to ensure a uniform bond.
Finally I used the ball grinder to remove some "pointy" things and applied a
last fill to make the inside smooth.
The cabin has stayed dry for two weeks, enduring several days of
drizzle and
a week of 4" deep sloppy snow on the deck. For some reason wet snow is
a tough test. No new water entered the hull since the winter tarp
went on. But the real test will happen next summer. Over the next two
days I applied two subsequent coats of PC-7, keying them to the previous
green epoxy to ensure a uniform bond.
Finally I used the ball grinder to remove some "pointy" things and applied a
last fill to make the inside smooth.
The cabin has stayed dry for two weeks, enduring several days of
drizzle and
a week of 4" deep sloppy snow on the deck. For some reason wet snow is
a tough test. No new water entered the hull since the winter tarp
went on. But the real test will happen next summer.
Summer 2017 -
The port cockpit locker and settee stayed dry over winter so I coated the inside
of the scuppers with TUFF epoxy paint. Shown at right is the first coat. Its a bit
flexible when cured so it should stick to create the required UV protection for the PC-7
epoxy. I never did install another vinyl drain tube in the scuppers. While I liked the way they prevented stains down the side of
the hull, they were also a bit of a nuisance.
"Inside every rain droplet is a dust particle just begging to stick to something."
One thought that always bothered me was the possibility of water flowing
from the port locker to the settee. This could spell a lot of trouble
in the structural integrity of the hull.
Well since the scuppers were sealed I can confirm that the port locker water
stays there and the settees stay dry.
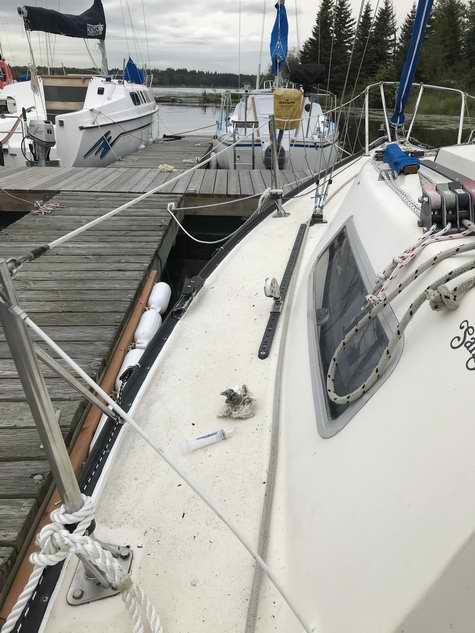
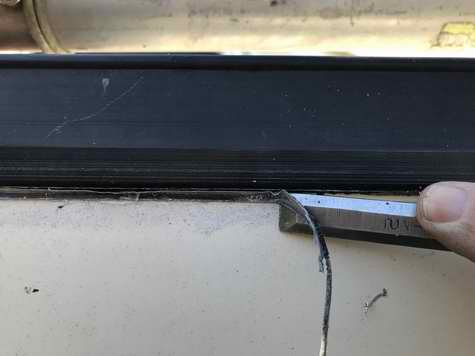
TRANSOM
MOULDING
(2010)
- After you've sealed the toe rail and dried up the water below the cockpit you will
likely be so full of confidence that you
may as well repair the transom moulding. It's the only portion of the deck
seal left to do and the moulding is likely scratched or has gouges
from foot traffic. This moulding
is a one piece section of fibreglass that creates a cosmetic finish
trim across the top of the transom, joining the port and starboard toe rails. Its primary
function is to provide impact protection to the corner with a semi-tough
trim.
 While the moulding is glued
and sealed in place with butyl rubber, it can be removed in one piece if you
cut it with a razor knife or a sharpened putty knife.
Look at the tools laying in the transom notch to see how many different
ones I used. Use extreme care because the moulding is rigid and prone
to break. It is no longer available as a
factory part, so DON'T BREAK IT! This is definitely a job where patience is a virtue.
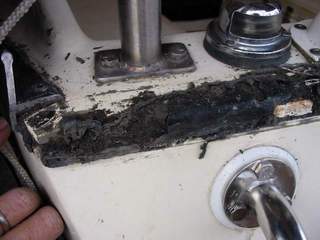
There was very little sealant holding Panache's moulding and it
had marine
growth in the voids. I'm still convinced that new life
forms start in places like this! The minimal sealant made for easy removal but the poor
support allowed the moulding to move under foot, causing some flex damage
that I repaired with WEST epoxy.
Shown
above
and below is the transom with the moulding removed. That old butyl
rubber is pretty ugly
looking. Remove it with a razor blade holder
and acetone. While the moulding is glued
and sealed in place with butyl rubber, it can be removed in one piece if you
cut it with a razor knife or a sharpened putty knife.
Look at the tools laying in the transom notch to see how many different
ones I used. Use extreme care because the moulding is rigid and prone
to break. It is no longer available as a
factory part, so DON'T BREAK IT! This is definitely a job where patience is a virtue.
There was very little sealant holding Panache's moulding and it
had marine
growth in the voids. I'm still convinced that new life
forms start in places like this! The minimal sealant made for easy removal but the poor
support allowed the moulding to move under foot, causing some flex damage
that I repaired with WEST epoxy.
Shown
above
and below is the transom with the moulding removed. That old butyl
rubber is pretty ugly
looking. Remove it with a razor blade holder
and acetone.
 Once
the moulding is removed fill any gouges with epoxy and coat the surface with epoxy blackened with
a liberal amount of carbon graphite powder. This powder does an excellent job of restoring the black finish and adds a considerable amount of scuff resistance.
A moulding coated with this stuff will
likely last forever regardless of how much foot traffic it experiences,
it's that hard and slippery. You should be able to buy carbon graphite powder from a
chandler or a boat fibreglass repair shop. Once
the moulding is removed fill any gouges with epoxy and coat the surface with epoxy blackened with
a liberal amount of carbon graphite powder. This powder does an excellent job of restoring the black finish and adds a considerable amount of scuff resistance.
A moulding coated with this stuff will
likely last forever regardless of how much foot traffic it experiences,
it's that hard and slippery. You should be able to buy carbon graphite powder from a
chandler or a boat fibreglass repair shop.
If you break the factory moulding or it is badly damaged there are a few
alternatives. Keep in mind that this moulding is mostly cosmetic, offers
little
structural support but does keep the water out of the joint.
- Replace the moulding with a commercially available vinyl
outside corner moulding. New vinyl is usually
thinner and therefore catches less dirt along the edge. This may be a good quick fix
if the moulding can stand up to ultraviolet light and the impact of foot
traffic.
- If you really want the dirt to slide off the transom then you can
fill the butt joint with epoxy and cover it with gel coat. I've seen this
finish on other San
Juan boats and it
creates a very pleasing smooth effect on the transom. However, the corner
has no crush protection against foot traffic and it wouldn't hurt
to set some screws (same spacing as the toe rail) through the fibreglass
to fasten the deck to transom.
- Repair your broken moulding with epoxy blackened with carbon graphite powder to restore the
dark finish. This is not as difficult as it may seem as you can likely tape across the gaps of the broken sections and use the tape as a
form to join the pieces of moulding. I realize this cured epoxy may
create a rough finish but that is what grinders, files and sandpaper are for! The Gougeon Bros
magazine "Epoxy Works" cover this technique and others in
good detail.
When gluing the repaired moulding to the transom make sure you fully
coat
the inside of the moulding with
black Sikkens Sikaflex to eliminate voids for maximum
support. As usual, use masking tape along the edges to keep the rest of
the deck clean. Now don't step on it for 48 hours till the Sikaflex is
cured.
|